GM Service Manual Online
For 1990-2009 cars only

Tools Required

    • J 41798 Engine Lifting Brackets
    • J 21366 Converter Holding Strap

Removal Procedure


    Object Number: 310799  Size: SH
  1. Open the hood.
  2. Place fender covers over both fenders.
  3. Raise the hood to the service position, then perform the following:
  4. 3.1. Remove the hood hinge bolts (1).
    3.2. Raise the hood until vertical.
    3.3. Install the hood hinge bolts until snug in the service position (2).
  5. Remove the air conditioning (AC) compressor. Refer to Air Conditioning Compressor Replacement in HVAC Systems - Manual.
  6. Remove the radiator supports. Refer to Radiator Support Replacement in Body Front End.

  7. Object Number: 659418  Size: SH
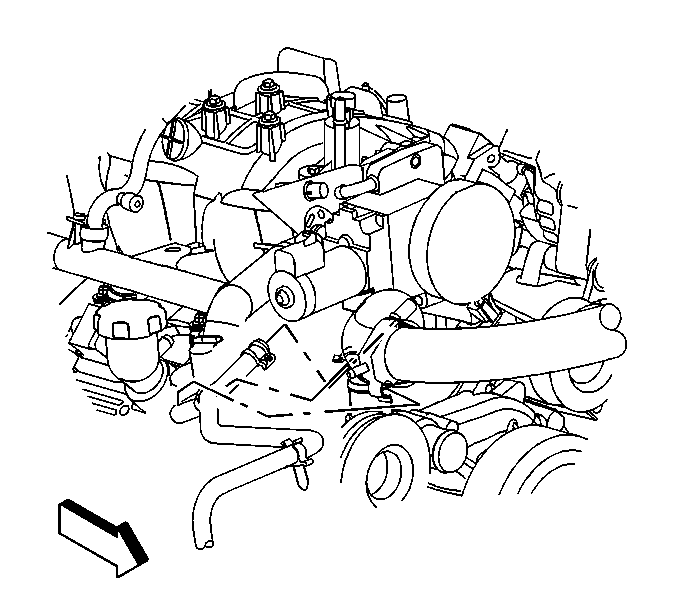
  8. Reposition the radiator inlet hose clamp at the water pump.
  9. Remove the radiator inlet hose from the water pump.

  10. Object Number: 308983  Size: SH
  11. Reposition the radiator outlet hose clamp at the water pump.
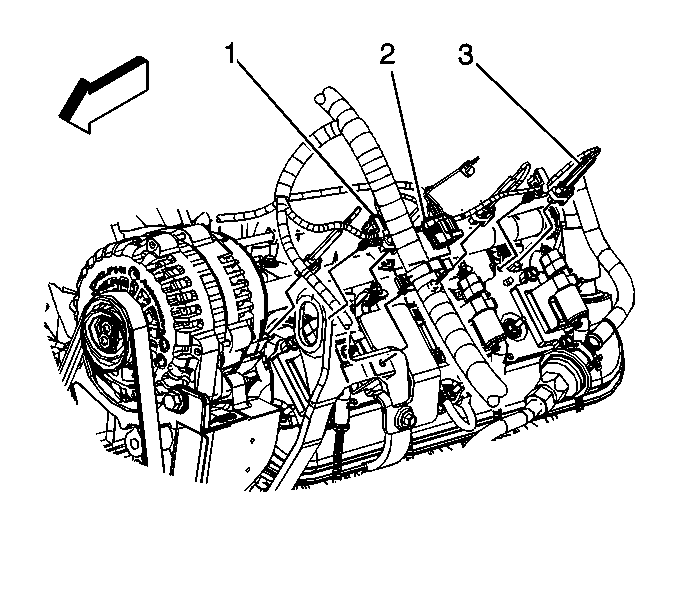
  12. Remove the radiator outlet hose from the water pump.
  13. Remove the heater hoses. Refer to Heater Inlet Hose Replacement and Heater Outlet Hose Replacement in Heating, Ventilation, and Air Conditioning.

  14. Object Number: 832094  Size: SH
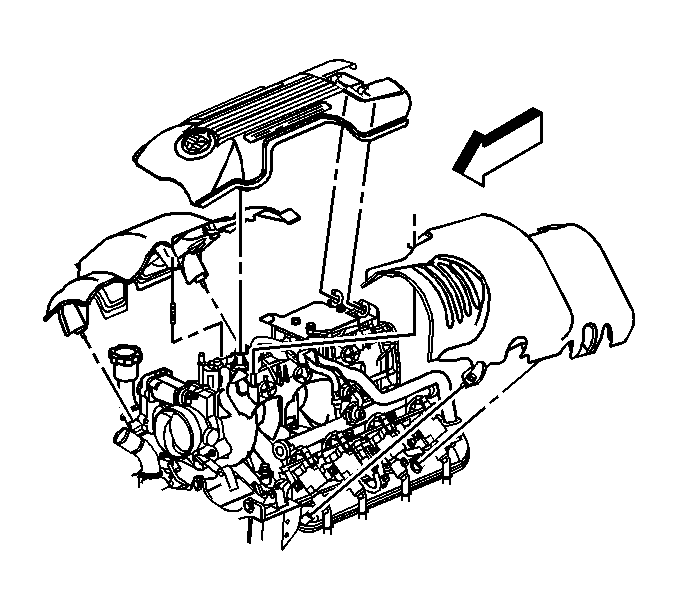
  15. If equipped with the 4.8L, 5.3L, or 6.0L regular production option (RPO) LQ4, loosen the intake manifold sight shield bolt.
  16. Remove the sight shield from the retainer.

  17. Object Number: 832097  Size: SH
  18. If equipped with the 6.0L with RPO LQ9, perform the following:
  19. 13.1. Loosen the intake manifold sight shield bolt.
    13.2. Loosen the left fuel rail cover bolts.
    13.3. Remove the left fuel rail cover.
    13.4. Loosen the right fuel rail cover bolts.
    13.5. Remove the right fuel rail cover.
    13.6. Remove the sight shield from the retainer.

    Object Number: 1235683  Size: SH
  20. Disconnect the following electrical connectors:
  21. • Evaporative emissions (EVAP) canister purge solenoid (1)
    • Generator (3)
  22. Remove the harness bracket nut (2) in order to remove the engine harness from the intake manifold.

  23. Object Number: 659465  Size: SH
  24. Reposition the vent inlet hose clamp at the throttle body.
  25. Remove the radiator vent inlet hose from the throttle body.

  26. Object Number: 395686  Size: SH
  27. Remove the generator cable from the generator, perform the following:
  28. 18.1. Slide the boot down revealing the terminal stud.
    18.2. Remove the generator cable nut from the terminal stud.
    18.3. Remove the generator cable.

    Object Number: 679597  Size: SH
  29. Disconnect the main coil harness (2) and fuel injector (3) electrical connectors on the left side.

  30. Object Number: 1235686  Size: SH
  31. Remove the connector position assurance (CPA) retainer (5).
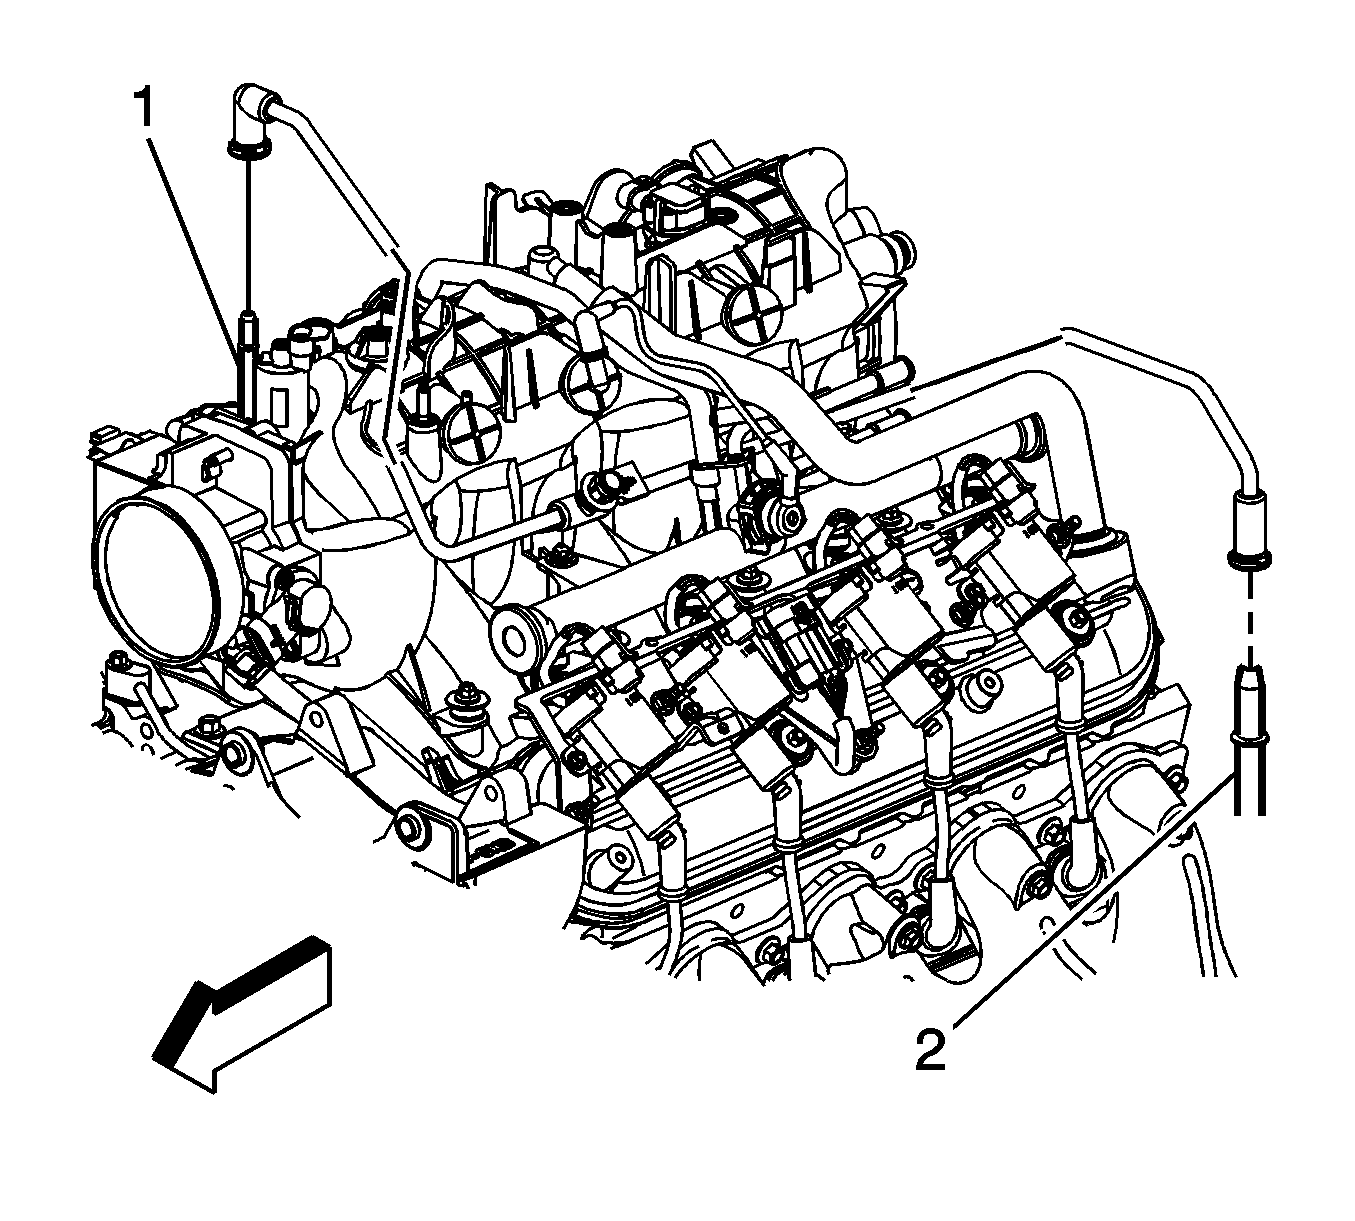
  32. Disconnect the following electrical connectors:
  33. • The main coil harness (4)
    • The fuel injectors (3)
    • The electronic throttle control (ETC) (2)

    Object Number: 679510  Size: SH
  34. Disconnect the manifold absolute pressure (MAP) sensor (1) and knock sensor (2) electrical connectors.

  35. Object Number: 1235684  Size: SH
  36. Remove the harness ground bolt.
  37. Reposition the harness ground and negative battery cable from the block.
  38. Disconnect the following electrical connectors:
  39. • The coolant temperature sensor (5)
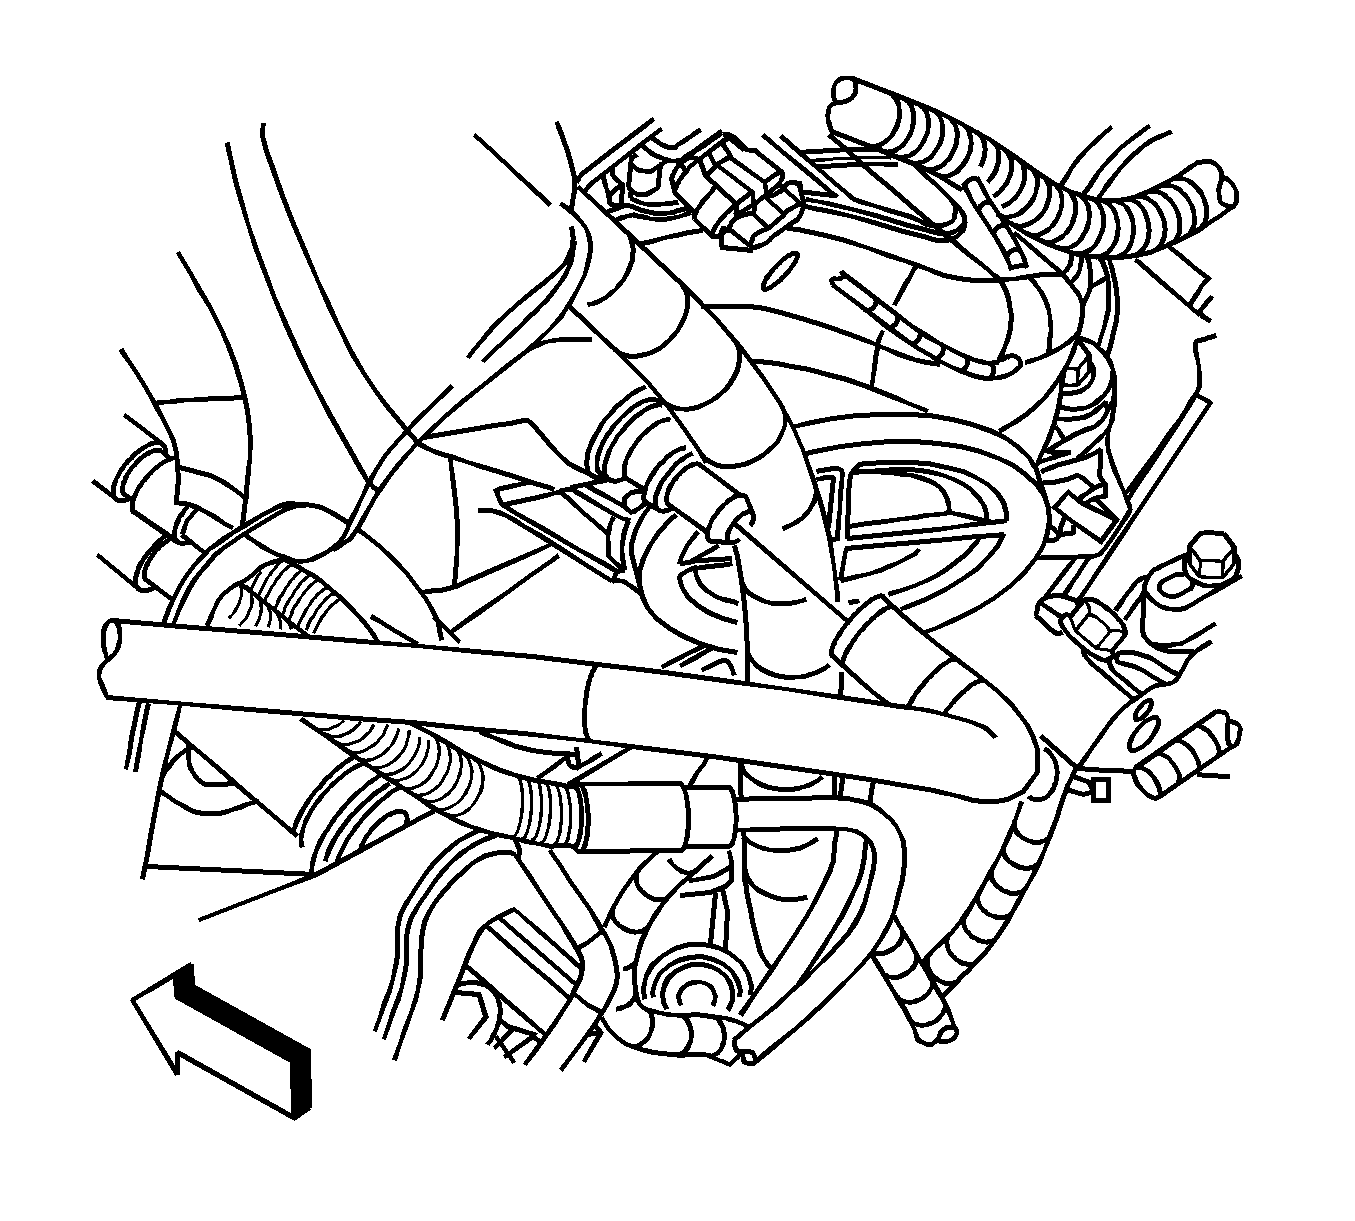
    • The electronic variable orifice switch

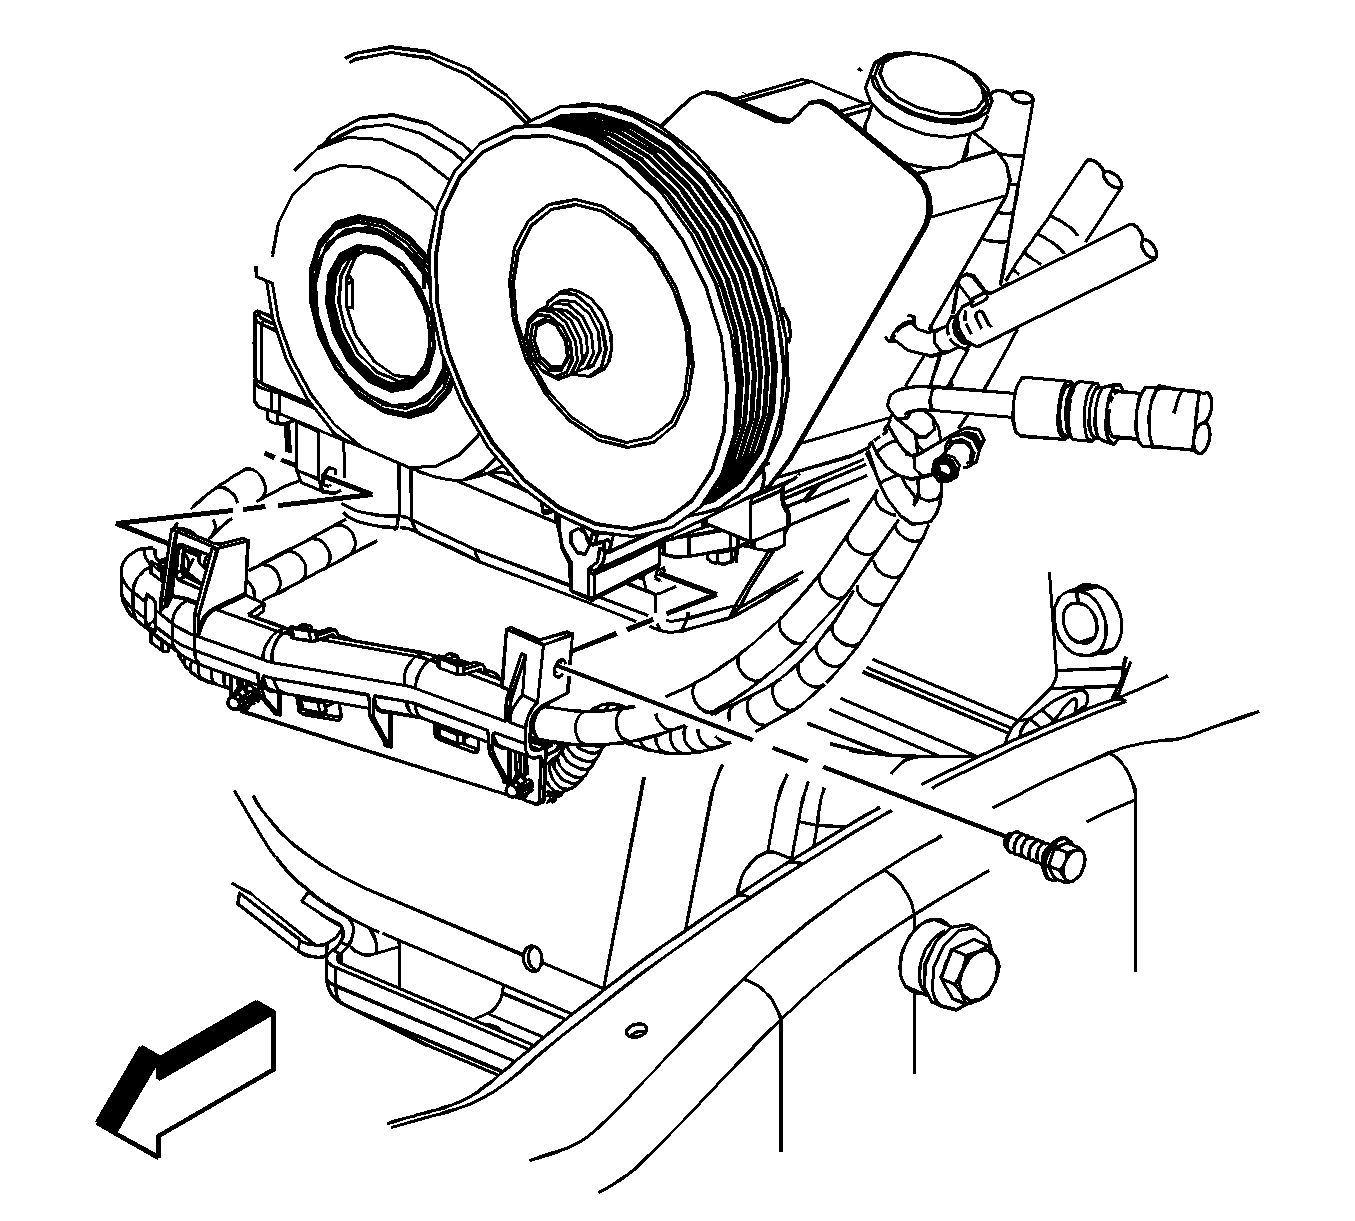
    Object Number: 1236366  Size: SH
  40. Remove the harness ground bolt at the right rear of the engine block.
  41. Reposition the harness ground, and auxiliary negative battery cable, if equipped from the block.
  42. Remove the harness ground bolt at the left rear of the engine block.
  43. Reposition the harness ground, and engine ground strap from the block.
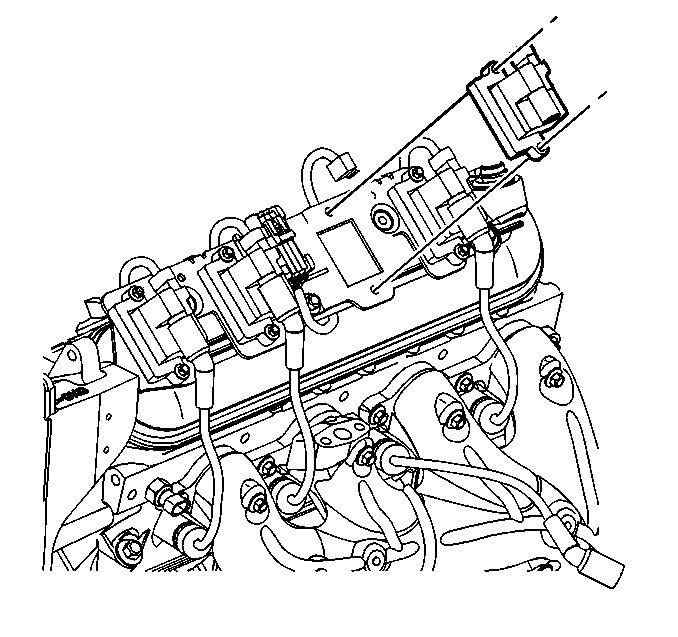
  44. Disconnect the following electrical connectors:
  45. • The oil pressure sensor (1)
    • The camshaft position (CMP) sensor (3)
  46. Unclip all of the engine harness clips from the engine.

  47. Object Number: 662505  Size: SH
  48. Remove the battery cable junction block from the junction block bracket.

  49. Object Number: 1285743  Size: SH
  50. Remove the EVAP purge solenoid vent tube, perform the following:
  51. 33.1. Remove the EVAP tube end from the solenoid (1).
    33.2. Remove the EVAP tube end from the vapor pipe (2).
  52. Disconnect the fuel pipes. Refer to Metal Collar Quick Connect Fitting Service in Engine Controls - 4.8L, 5.3L, and 6.0L.
  53. Raise the vehicle.

  54. Object Number: 1235682  Size: SH
  55. Disconnect the following electrical connectors:
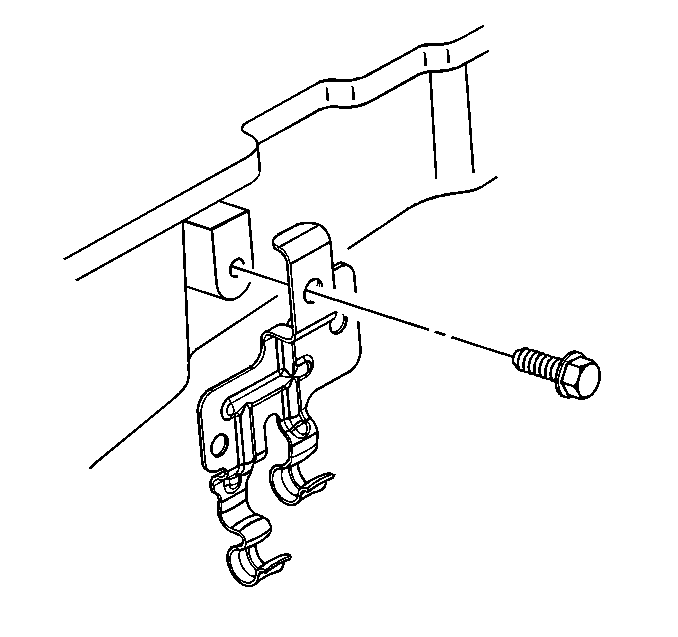
  56. • The crankshaft position (CKP) sensor (1)
    • The engine oil level sensor (3)
    • The coolant heater, if equipped

    Object Number: 1236368  Size: SH
  57. Remove the battery cable channel bolt.
  58. Slide the channel pin out of the oil pan tab.
  59. Gather all branches of the engine wiring harness and reposition off to the side.
  60. Lower the vehicle.

  61. Object Number: 310813  Size: SH
  62. Remove the rear power steering pump-to-engine block bolt.
  63. Remove the generator bracket mounting bolts.
  64. Position the bracket aside.

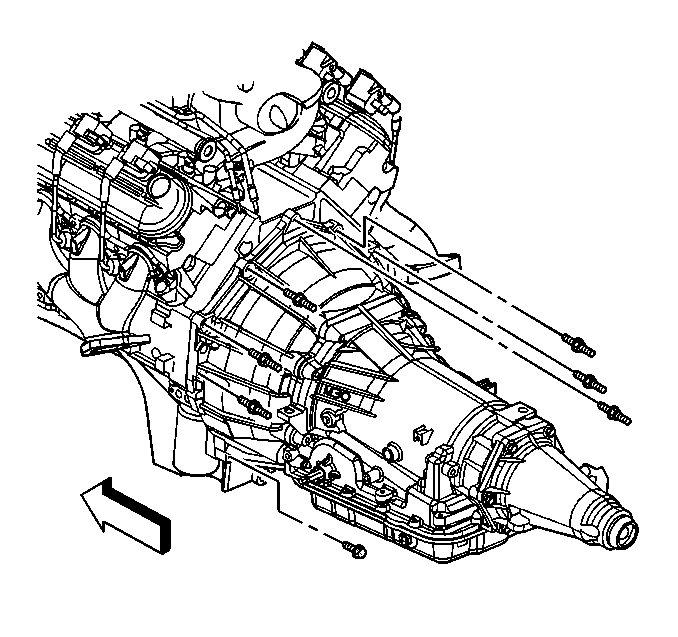
  65. Object Number: 1236362  Size: SH
  66. Remove the vacuum brake booster hose.
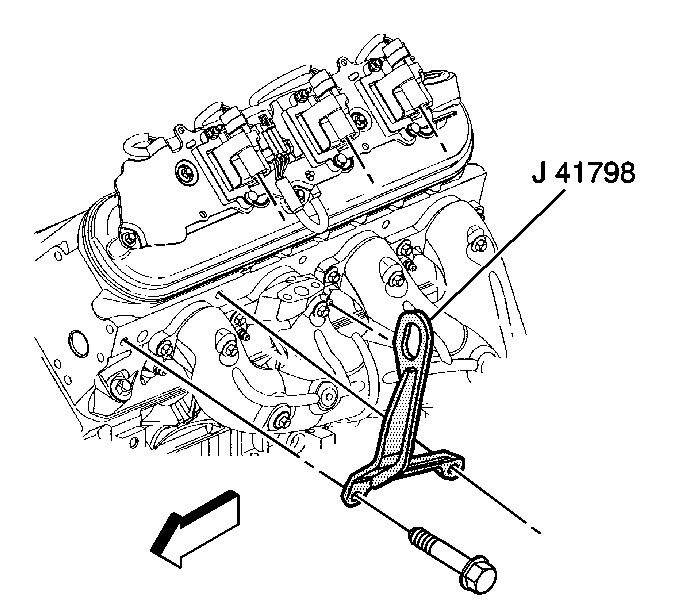
  67. Remove the ignition coil, as required for the proper fit of the J 41798 before lifting the engine. Refer to Ignition Coil Replacement in Engine Controls - 4.8L, 5.3L and 6.0L.

  68. Object Number: 309151  Size: SH

    Notice: Use the correct fastener in the correct location. Replacement fasteners must be the correct part number for that application. Fasteners requiring replacement or fasteners requiring the use of thread locking compound or sealant are identified in the service procedure. Do not use paints, lubricants, or corrosion inhibitors on fasteners or fastener joint surfaces unless specified. These coatings affect fastener torque and joint clamping force and may damage the fastener. Use the correct tightening sequence and specifications when installing fasteners in order to avoid damage to parts and systems.

  69. Install the J 41798 to the cylinder heads.
  70. Tighten

        • Tighten the M8 engine lift bracket bolts to 25 N·m (18 lb ft).
        • Tighten the M10 engine lift bracket bolts to 50 N·m (37 lb ft).

    Object Number: 307275  Size: SH
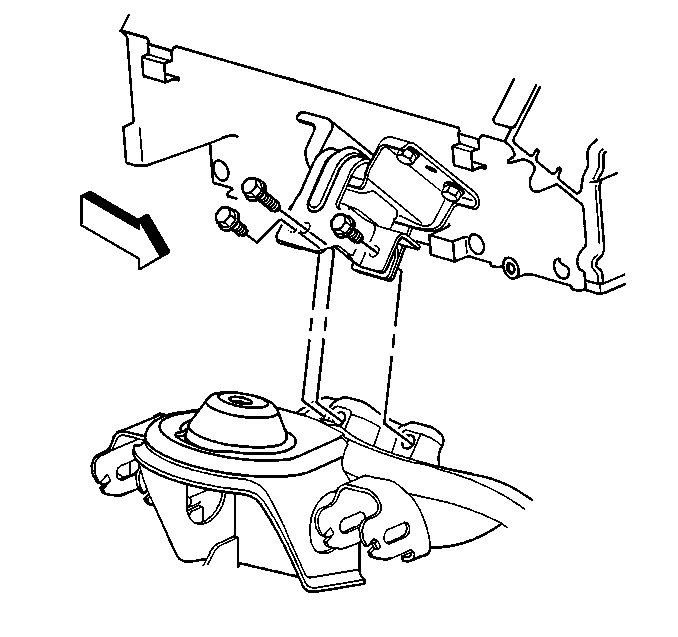
  71. Remove the left and right engine mount-to-engine mount bracket bolts.
  72. Raise and suitably support the vehicle. Refer to Lifting and Jacking the Vehicle in General Information.

  73. Object Number: 349061  Size: SH
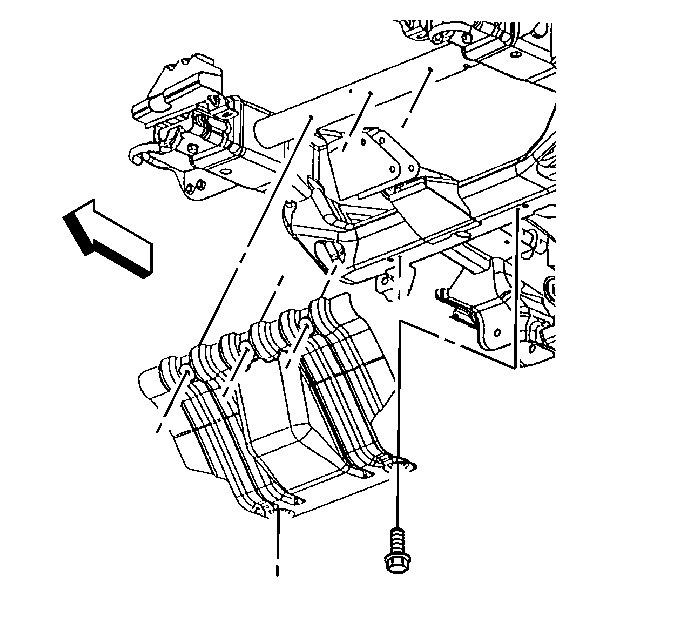
  74. Remove the engine shield bolts and shield.

  75. Object Number: 309158  Size: SH
  76. Remove the oil pan skid plate bolts and plate, if equipped.
  77. Drain the engine oil.
  78. Remove the starter motor. Refer to Starter Motor Replacement in Engine Electrical.
  79. Remove the catalytic converter. Refer to Catalytic Converter Replacement in Engine Exhaust.

  80. Object Number: 310672  Size: SH
  81. Remove the positive battery cable clip bolt and clip.

  82. Object Number: 9096  Size: SH
  83. Remove the flywheel to torque converter bolts.

  84. Object Number: 396797  Size: SH
  85. Remove the transmission oil level indicator tube nut , if equipped.

  86. Object Number: 396798  Size: SH
  87. Remove the transmission oil level indicator tube, if equipped.

  88. Object Number: 394448  Size: SH
  89. If equipped with the 4L60-E automatic transmission, remove the transmission bolt and stud on the right side.

  90. Object Number: 396795  Size: SH
  91. If equipped with the 4L80-E automatic transmission, remove the transmission converter cover bolts.

  92. Object Number: 394446  Size: SH
  93. Remove the automatic transmission bolt/studs, if equipped.
  94. Separate the engine from the automatic transmission.
  95. Install the J 21366 to the transmission in order to hold the torque converter.

  96. Lower the vehicle.
  97. Install an engine hoist to the J 41798 .
  98. Install a floor jack under the transmission for support.
  99. Notice: Use care while moving the engine assembly in order to avoid breaking the MAP sensor locating tabs. Broken MAP sensor tabs may result in decreased engine performance.

  100. Remove the engine.
  101. Install the engine to an engine stand.
  102. Remove the engine hoist.

  103. Object Number: 309151  Size: SH
  104. Remove the J 41798 from the engine.

Installation Procedure


    Object Number: 309151  Size: SH

    Notice: Use the correct fastener in the correct location. Replacement fasteners must be the correct part number for that application. Fasteners requiring replacement or fasteners requiring the use of thread locking compound or sealant are identified in the service procedure. Do not use paints, lubricants, or corrosion inhibitors on fasteners or fastener joint surfaces unless specified. These coatings affect fastener torque and joint clamping force and may damage the fastener. Use the correct tightening sequence and specifications when installing fasteners in order to avoid damage to parts and systems.

  1. Install the J 41798 to the engine.
  2. Tighten

        • Tighten the M8 engine lift bracket bolts to 25 N·m (18 lb ft).
        • Tighten the M10 engine lift bracket bolts to 50 N·m (37 lb ft).
  3. Install an engine hoist to the J 41798 .
  4. Remove the engine from the engine stand.
  5. Install the engine to the vehicle.
  6. Align the engine and transmission.

  7. Object Number: 307275  Size: SH
  8. Install the left and right engine mount-to-engine mount bracket bolts.
  9. Tighten
    Tighten the engine mount-to-engine mount bracket bolts to 65 N·m (48 lb ft).

  10. Install the upper transmission bolts until snug.
  11. Remove the floor jack from under the transmission.
  12. Remove the engine hoist.

  13. Object Number: 309151  Size: SH
  14. Remove the J 41798 from the engine.

  15. Object Number: 339300  Size: SH
  16. Install the ignition coils and the spark plug wires. Refer to Ignition Coil Replacement in Engine Controls - 4.8L, 5.3L and 6.0L.
  17. Raise the vehicle.

  18. Object Number: 394446  Size: SH
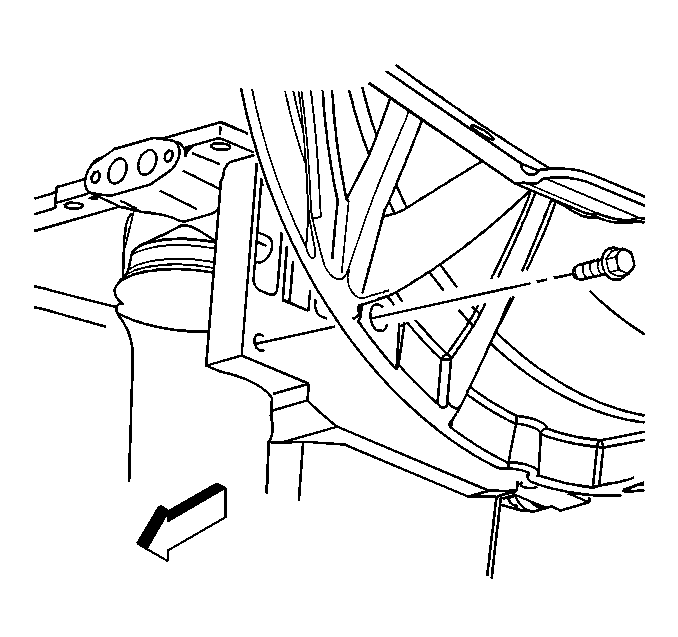
  19. Remove the J 21366 from the transmission.
  20. Install the automatic transmission bolt/studs.
  21. Object Number: 396795  Size: SH
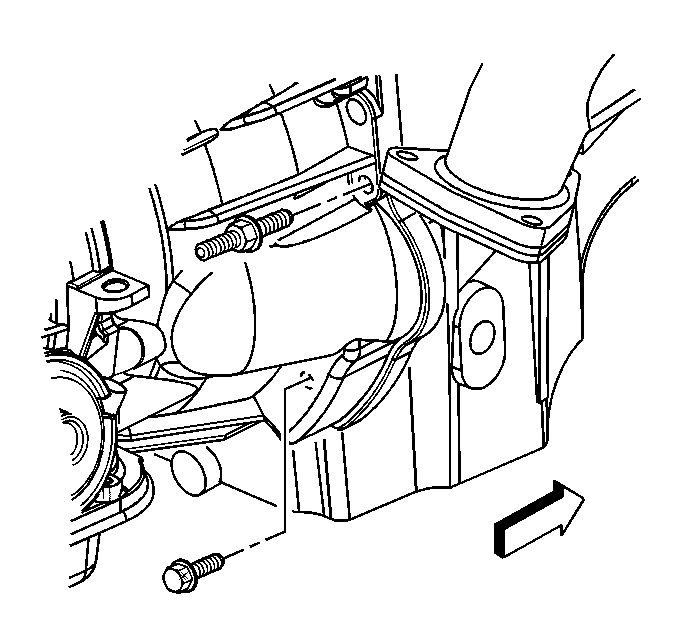
  22. If equipped with the 4L80-E automatic transmission, install the transmission converter cover bolts.
  23. Object Number: 394448  Size: SH
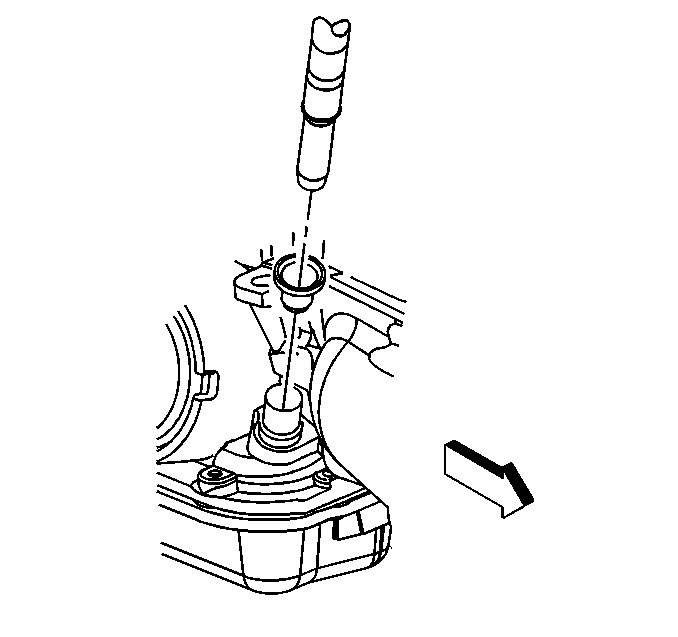
  24. If equipped with the 4L60-E automatic transmission, install the transmission bolt and stud on the right side.
  25. Tighten
    Tighten the automatic transmission bolts/studs to 50 N·m (37 lb ft).

    Object Number: 396798  Size: SH
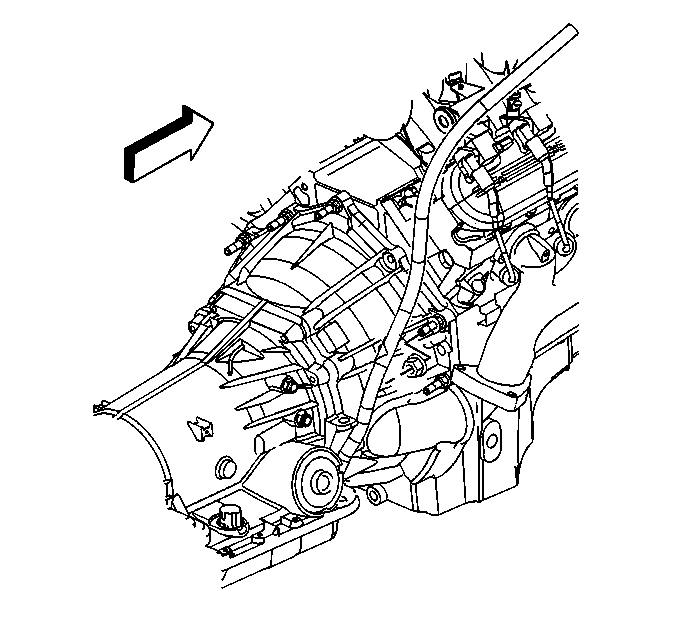
  26. Install the automatic transmission oil level indicator tube.
  27. Object Number: 396797  Size: SH
  28. Install the automatic transmission oil level indicator tube nut.
  29. Tighten
    Tighten the nut to 18 N·m (13 lb ft).
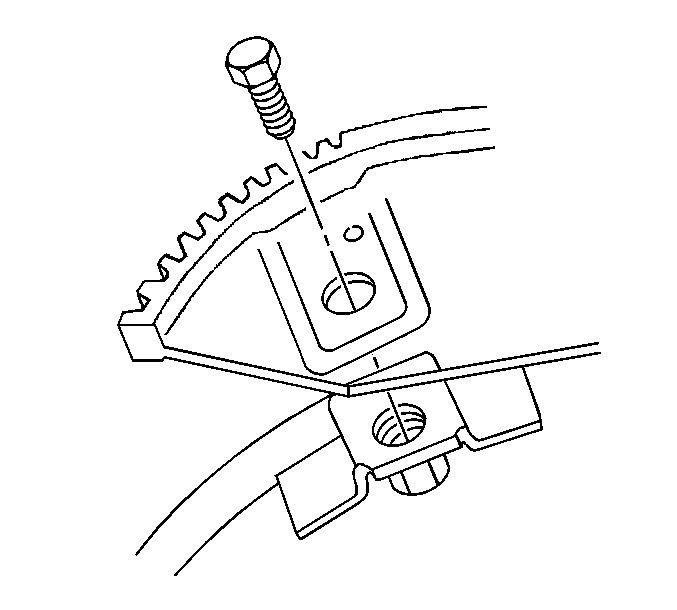

    Object Number: 9096  Size: SH
  30. Install the flywheel to torque converter bolts.
  31. Tighten

        • If equipped with a 4L60E transmission, tighten the bolts to 63 N·m (47 lb ft).
        • If equipped with a 4L80E transmission, tighten the bolts to 60 N·m (44 lb ft).

    Object Number: 310672  Size: SH
  32. Install the positive battery cable clip and bolt.
  33. Tighten
    Tighten the bolt to 9 N·m (80 lb in).

  34. Install the catalytic converter. Refer to Catalytic Converter Replacement in Engine Exhaust.
  35. Install the starter motor. Refer to Starter Motor Replacement in Engine Electrical.
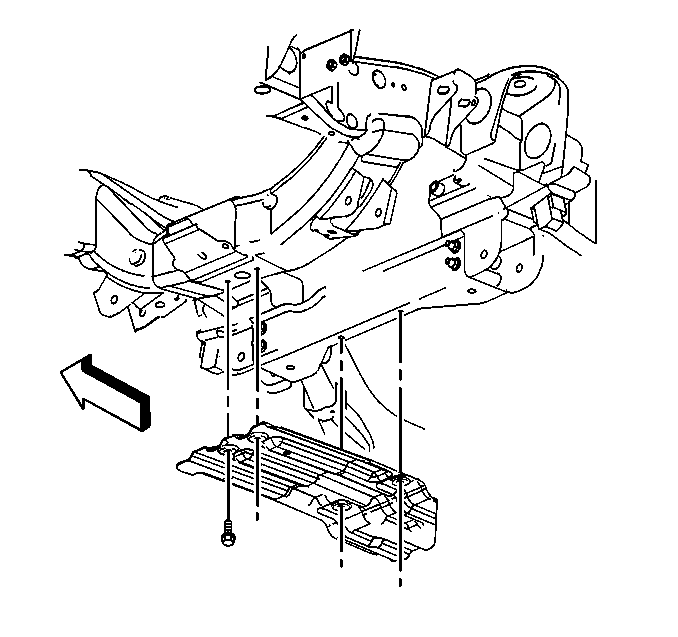
  36. Object Number: 309158  Size: SH
  37. Install the oil pan skid plate and bolts, if equipped.
  38. Tighten
    Tighten the bolts to 20 N·m (15 lb ft).
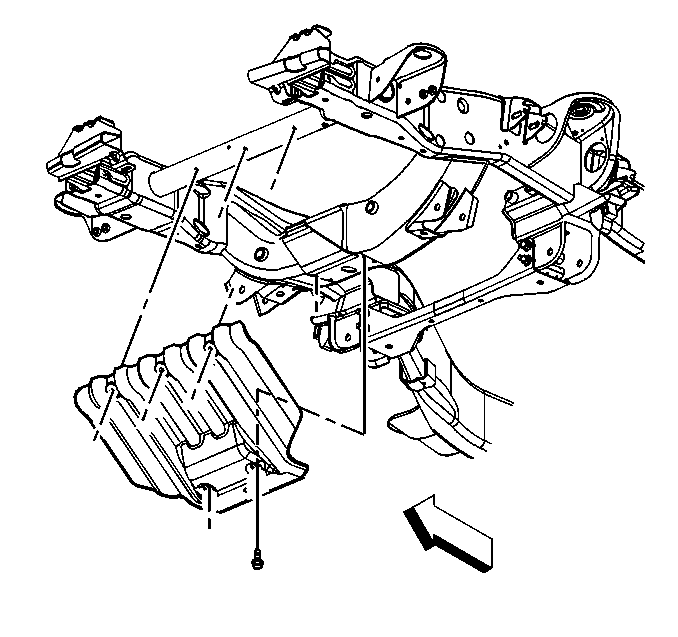

    Object Number: 310119  Size: SH
  39. Install the engine shield and bolts.
  40. Tighten
    Tighten the bolts to 20 N·m (15 lb ft).

  41. Lower the vehicle.

  42. Object Number: 1236362  Size: SH
  43. Install the vacuum brake booster hose.
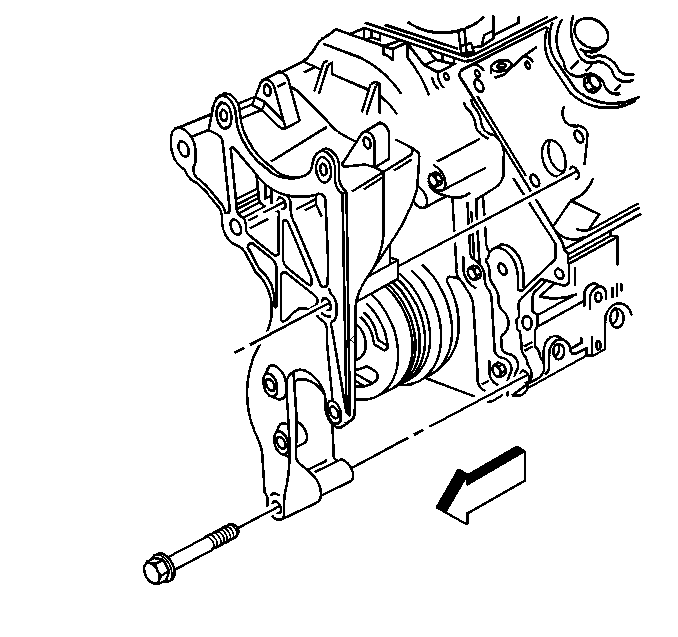
  44. Object Number: 310813  Size: SH
  45. Position the generator bracket to the front of the engine.
  46. Install the generator bracket bolts until snug.
  47. Install the rear power steering pump-to-engine block bolt until snug.
  48. Tighten

        • Tighten the rear power steering pump bolt to 50 N·m (37 lb ft).
        • Tighten the generator bracket bolts to 50 N·m (37 lb ft).
  49. Route the engine wiring harness to the lower engine area.
  50. Raise the vehicle.

  51. Object Number: 1236368  Size: SH
  52. Slide the channel pin into the oil pan tab.
  53. Install the battery cable channel bolt.
  54. Tighten
    Tighten the bolt to 12 N·m (106 lb in).
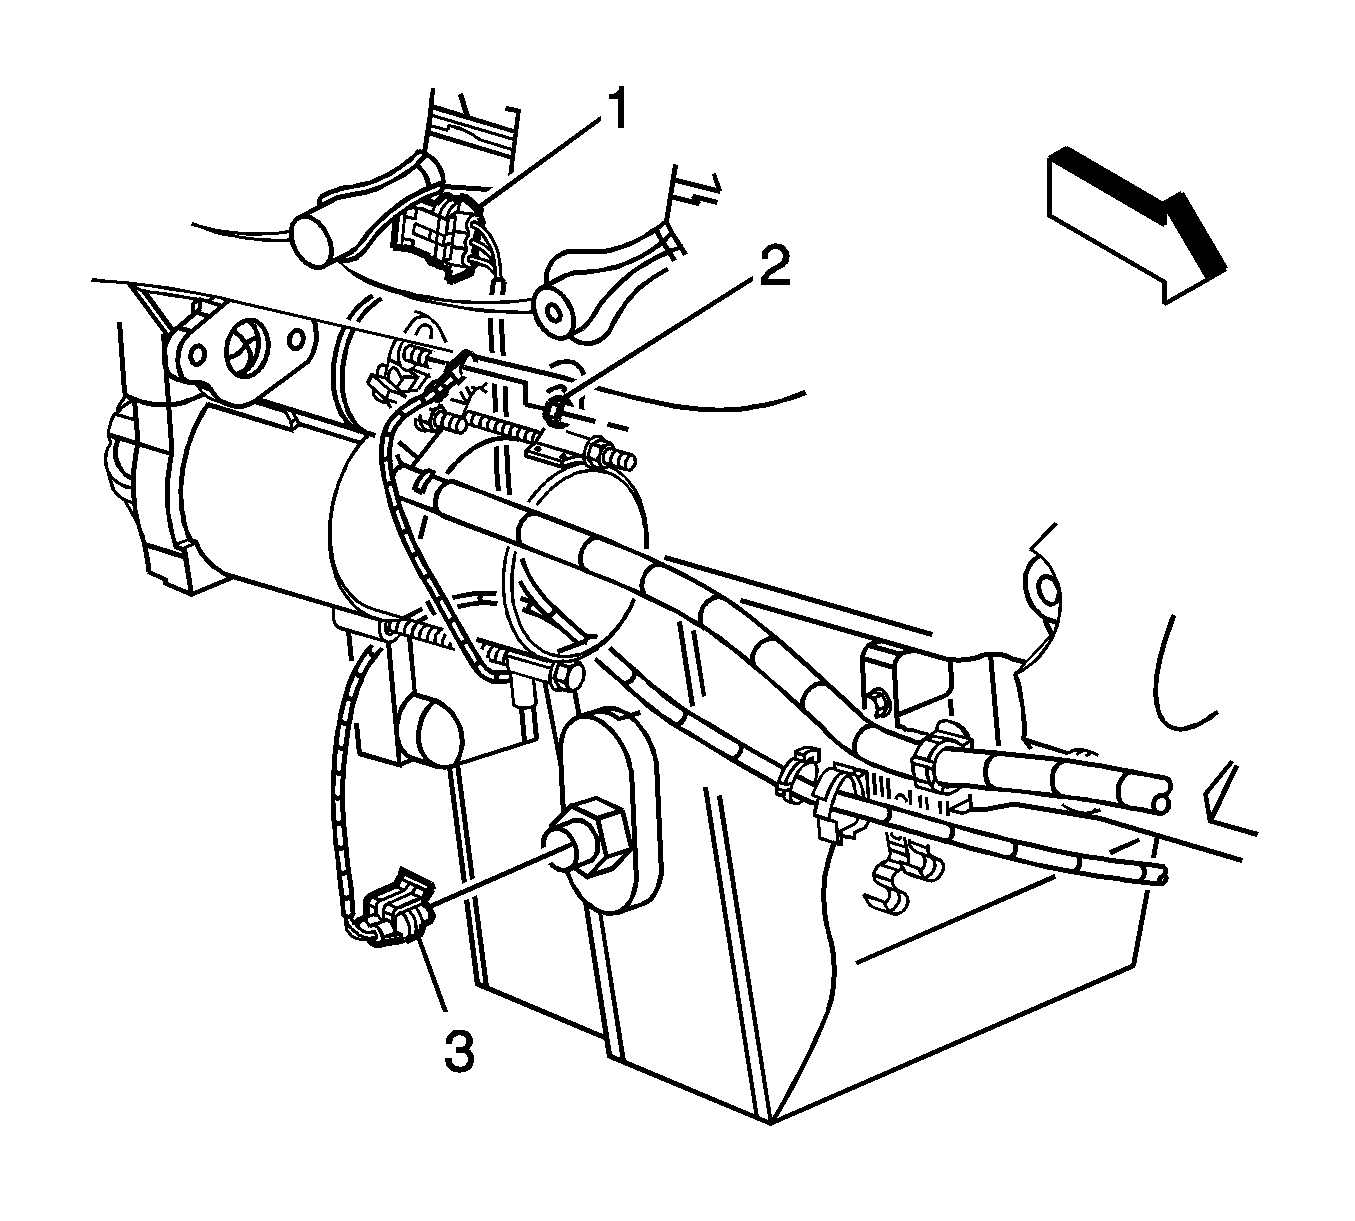

    Object Number: 1235682  Size: SH
  55. Connect the following electrical connectors:
  56. • The CKP sensor (1)
    • The engine oil level sensor (3)
    • The coolant heater, if equipped
  57. Lower the vehicle.
  58. Connect the fuel pipes.

  59. Object Number: 1285743  Size: SH
  60. Install the EVAP purge solenoid vent tube to the solenoid (1).
  61. Install the EVAP tube end to the vapor pipe (2).
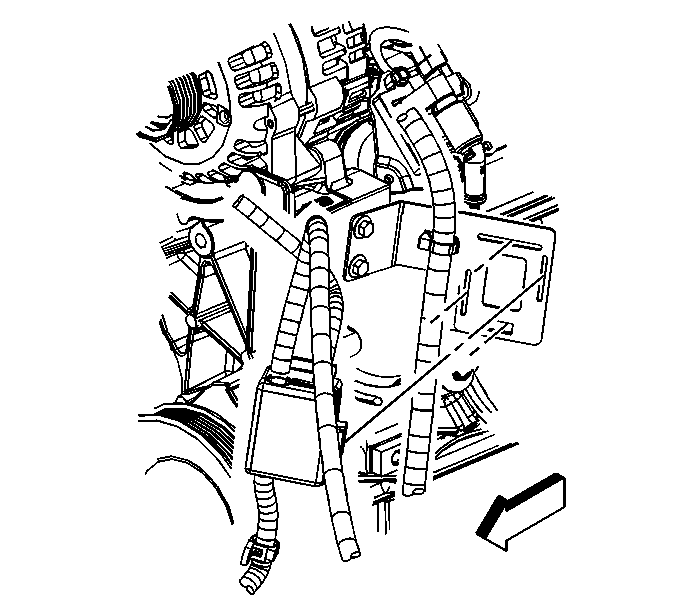
  62. Object Number: 662505  Size: SH
  63. Install the battery cable junction block to the junction block bracket.
  64. Clip all of the engine wiring harness clips to their correct location.
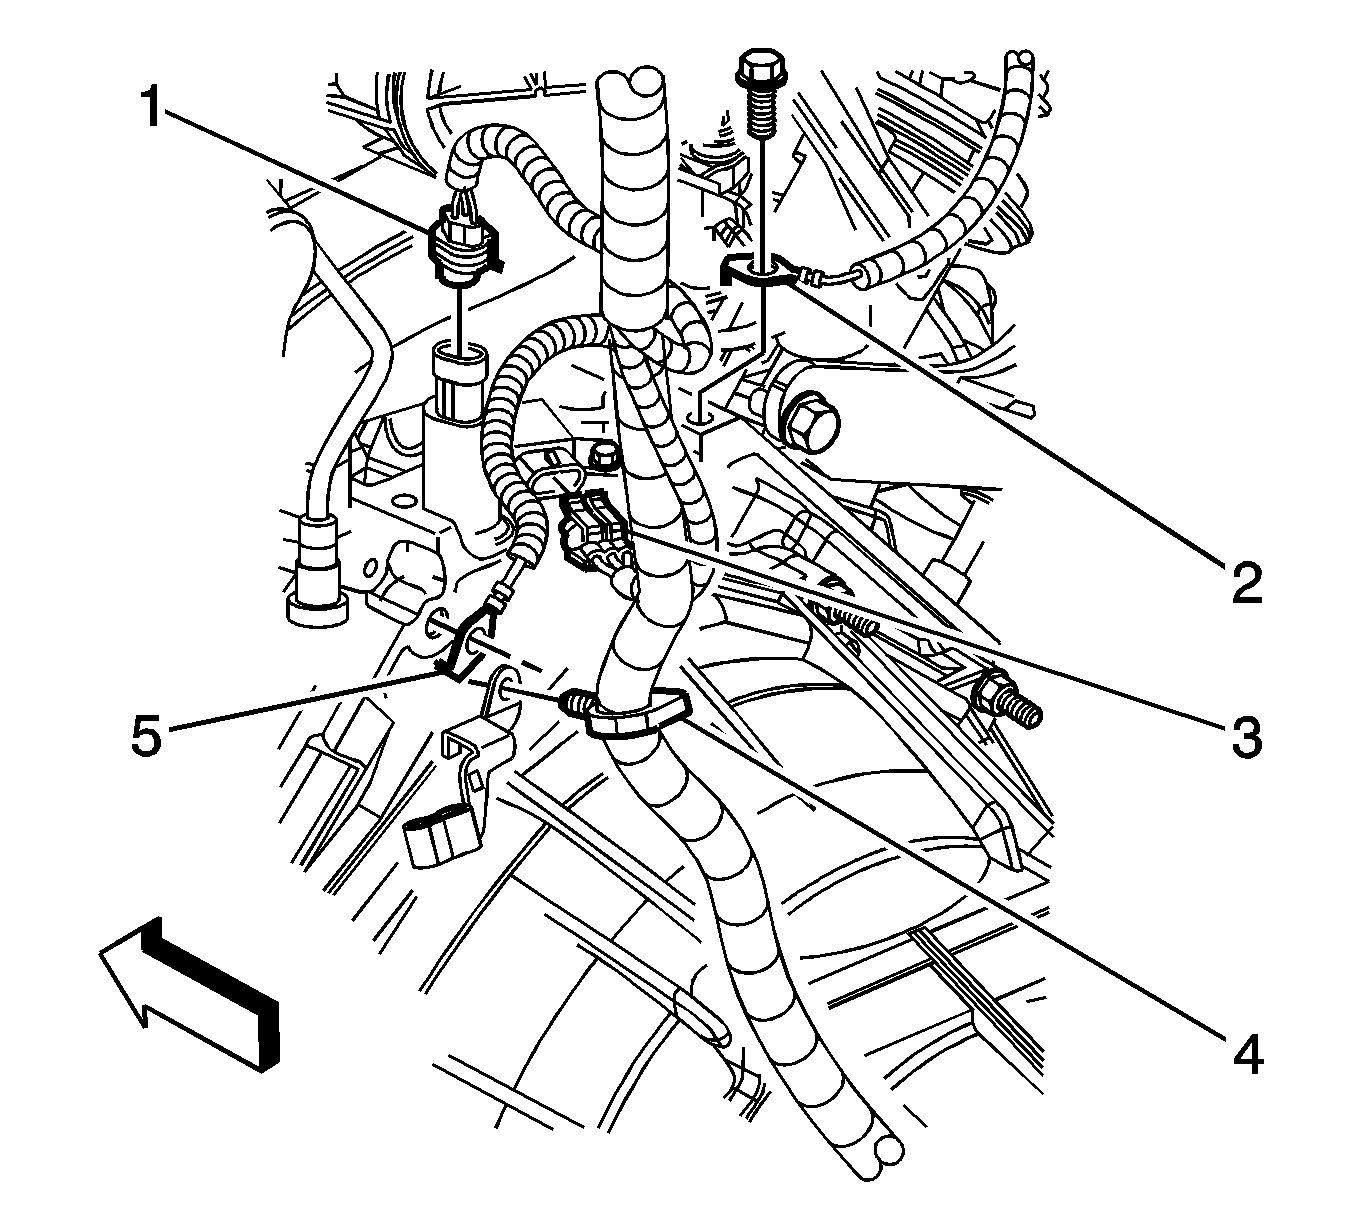
  65. Object Number: 1236366  Size: SH
  66. Connect the following electrical connectors:
  67. • The oil pressure sensor (1)
    • The CMP sensor (3)
  68. Position the harness ground and the engine ground strap to the block.
  69. Install the harness ground bolt at the left rear of the engine block.
  70. Position the harness ground, and auxiliary negative battery cable, if equipped to the block.
  71. Install the harness ground bolt at the right rear of the engine block.
  72. Tighten
    Tighten the bolts to 16 N·m (12 lb ft).
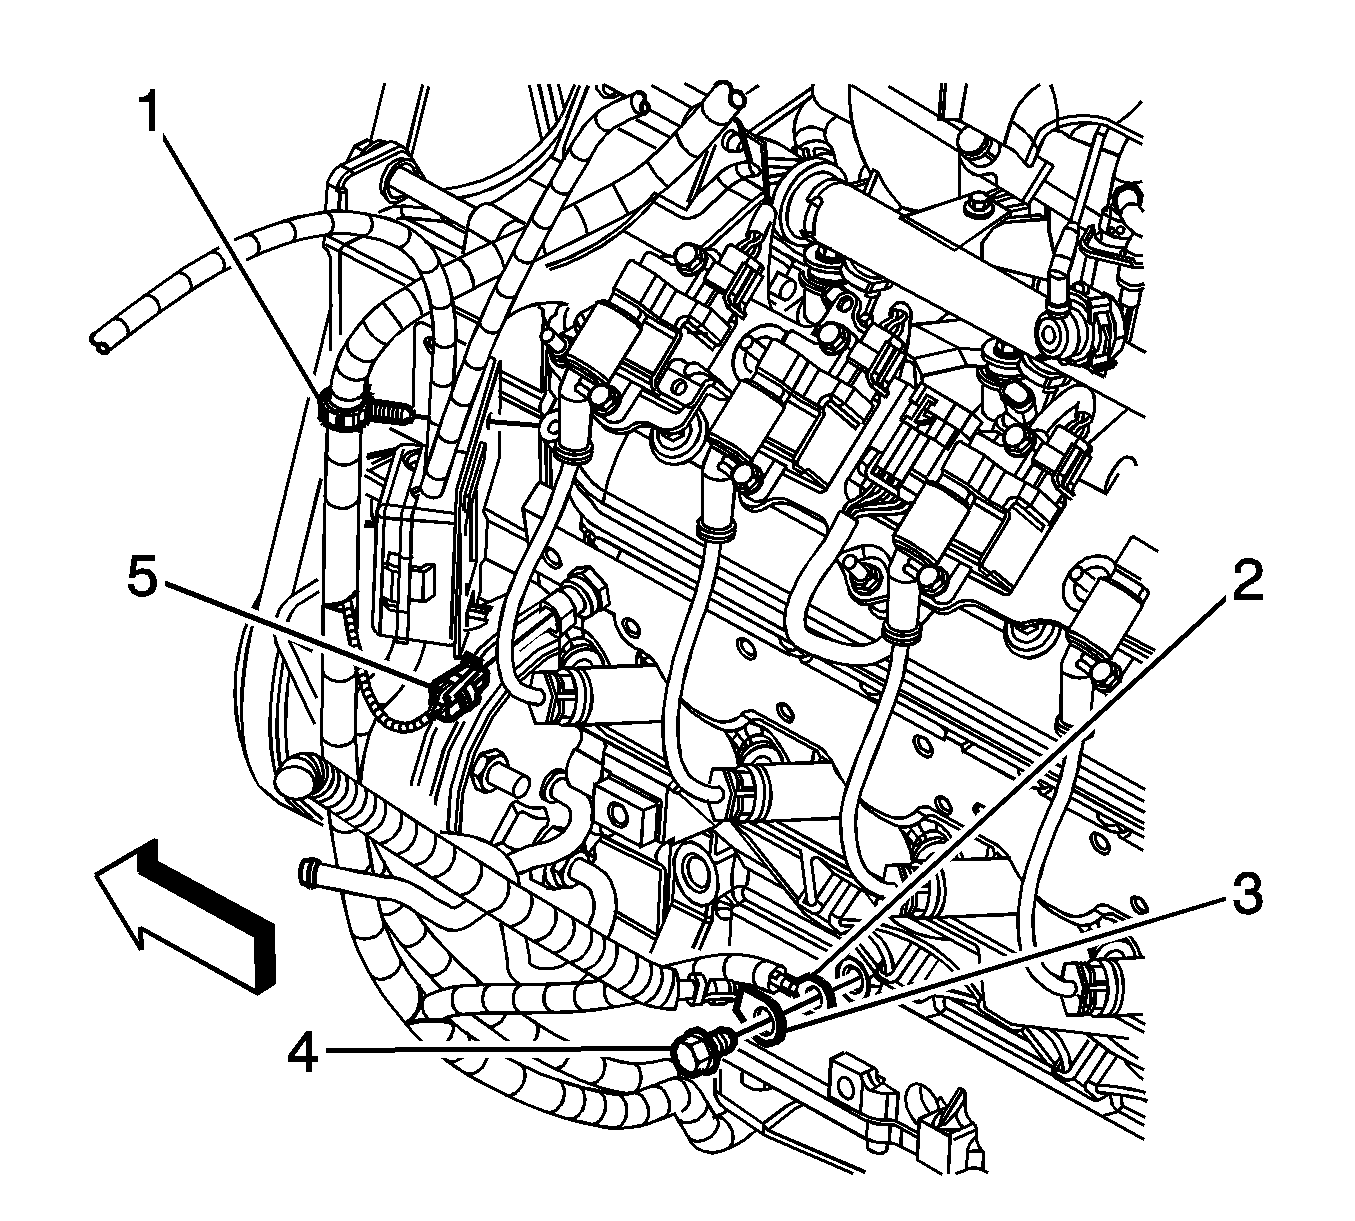

    Object Number: 1235684  Size: SH
  73. Connect the following electrical connectors:
  74. • The coolant temperature sensor (5)
    • The electronic variable orifice switch
  75. Position the harness ground and negative battery cable to the block.
  76. Install the harness ground bolt.
  77. Tighten
    Tighten the bolt to 25 N·m (18 lb ft).
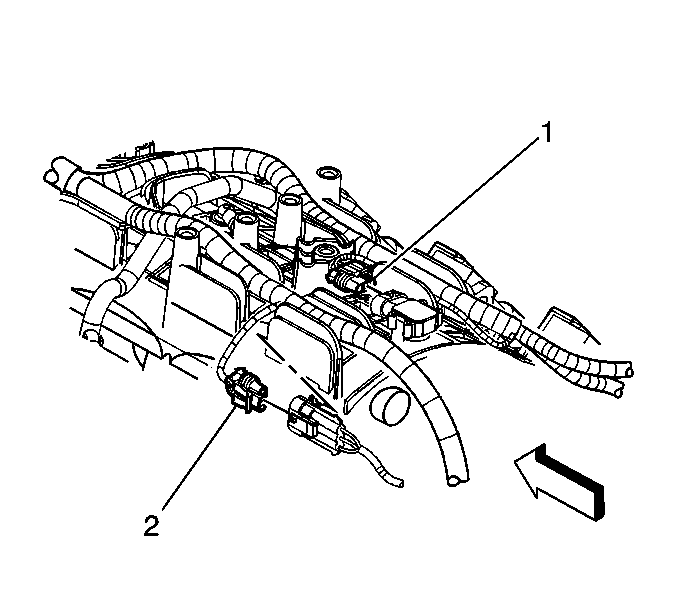

    Object Number: 679510  Size: SH
  78. Connect the MAP sensor (1) and knock sensor (2) electrical connectors.
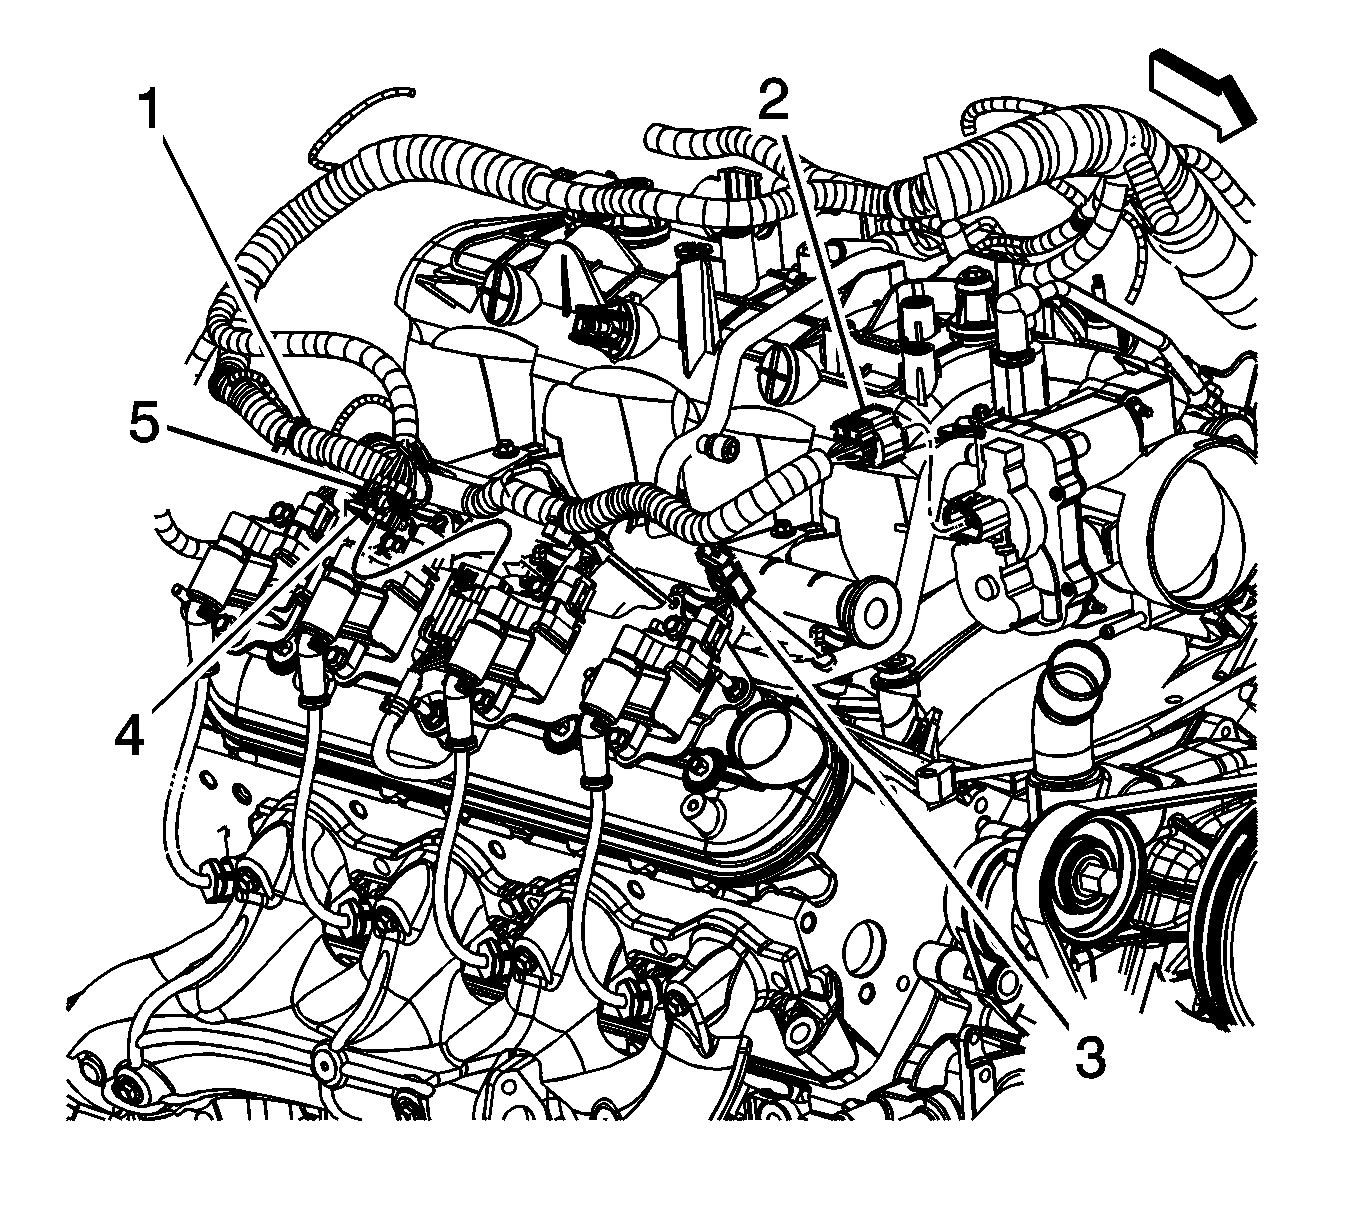
  79. Object Number: 1235686  Size: SH
  80. Connect the following electrical connectors:
  81. • The main coil harness (4)
    • The fuel injectors (3)
    • The ETC (2)
  82. Install the CPA retainer (5).

  83. Object Number: 679597  Size: SH
  84. Connect the main coil harness (2) and fuel injector (3) electrical connectors on the left side.
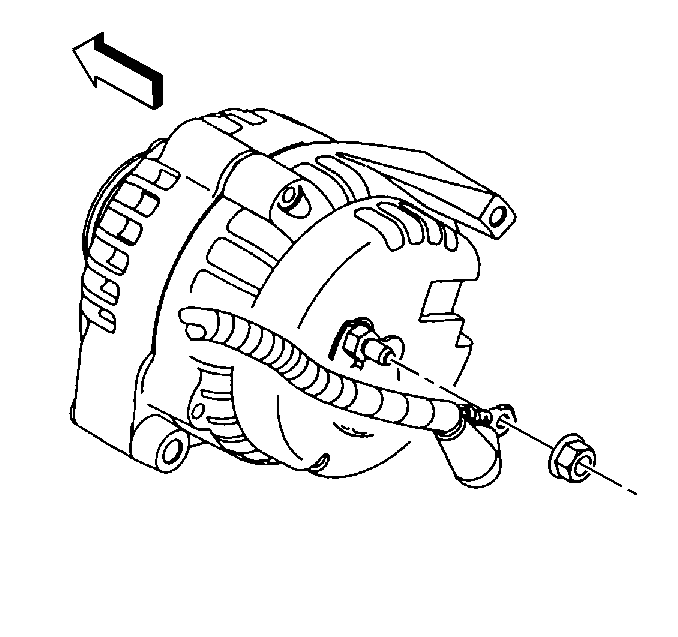
  85. Object Number: 395686  Size: SH
  86. Install the generator cable to the generator, perform the following:
  87. 53.1. Install the generator cable.
    53.2. Install the generator cable nut to the terminal stud.

    Tighten
    Tighten the nut to 9 N·m (80 lb in).

    53.3. Slide the boot over the terminal stud.

    Object Number: 659465  Size: SH
  88. Install the radiator vent inlet hose to the throttle body.
  89. Position the vent inlet hose clamp at the throttle body.
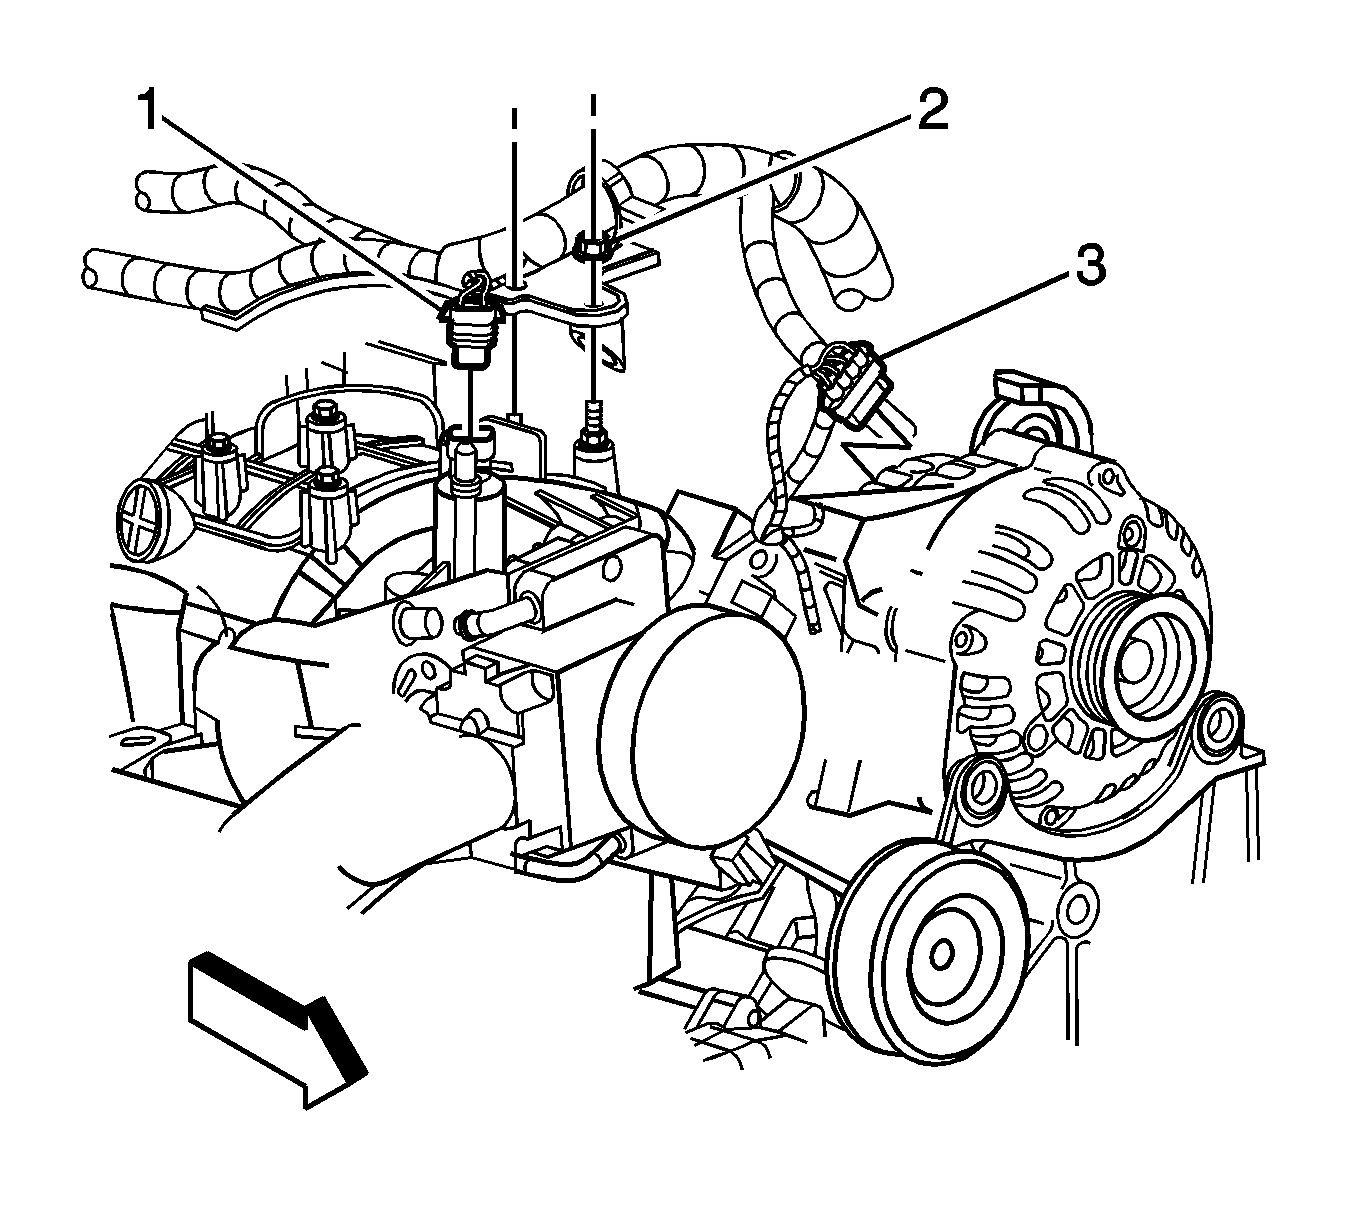
  90. Object Number: 1235683  Size: SH
  91. Install the engine wiring harness bracket and nut (2).
  92. Tighten
    Tighten the nut to 5 N·m (44 lb in).

  93. Connect the following electrical connectors:
  94. • The EVAP canister purge solenoid (1)
    • The Generator (3)

    Object Number: 832097  Size: SH
  95. If equipped with the 6.0L with RPO LQ9, perform the following:
  96. 58.1. Install the right fuel rail cover.
    58.2. Tighten the right fuel rail cover bolts.

    Tighten
    Tighten the bolts to 9 N·m (80 lb in).

    58.3. Install the left fuel rail cover.
    58.4. Tighten the left fuel rail cover bolts.

    Tighten
    Tighten the bolts to 9 N·m (80 lb in).

    58.5. Install the sight shield to the retainer.
    58.6. Tighten the intake manifold sight shield bolt.

    Tighten
    Tighten the bolt to 10 N·m (89 lb in).
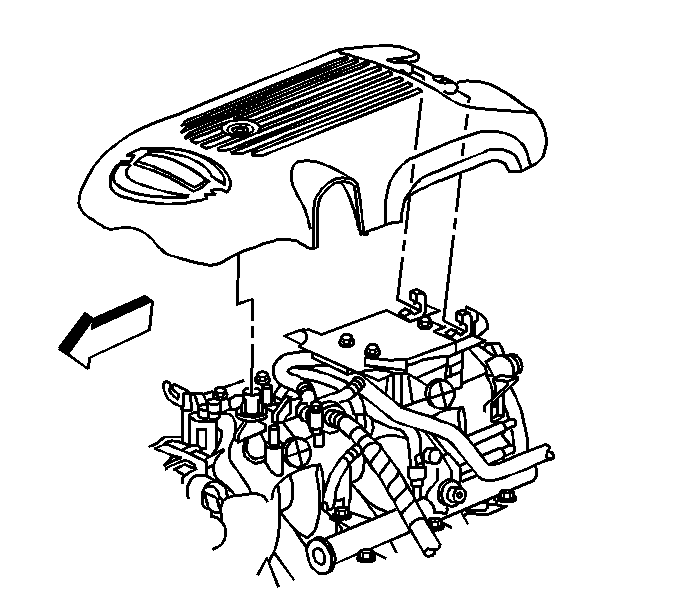

    Object Number: 832094  Size: SH
  97. If equipped with the 4.8L, 5.3L, or 6.0L with RPO LQ4, install the engine sight shield to the retainer.
  98. Tighten the engine sight shield bolt.
  99. Tighten
    Tighten the bolt to 10 N·m (89 lb in).

  100. Install the heater hoses. Refer to Heater Inlet Hose Replacement and Heater Outlet Hose Replacement in Heating, Ventilation and Air Conditioning.
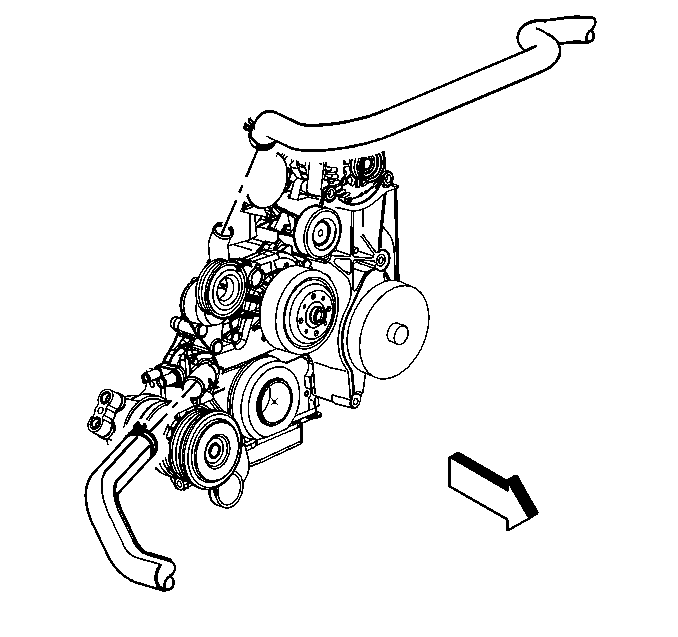
  101. Object Number: 308983  Size: SH
  102. Install the radiator outlet hose to the water pump.
  103. Position the radiator outlet hose clamp at the water pump.
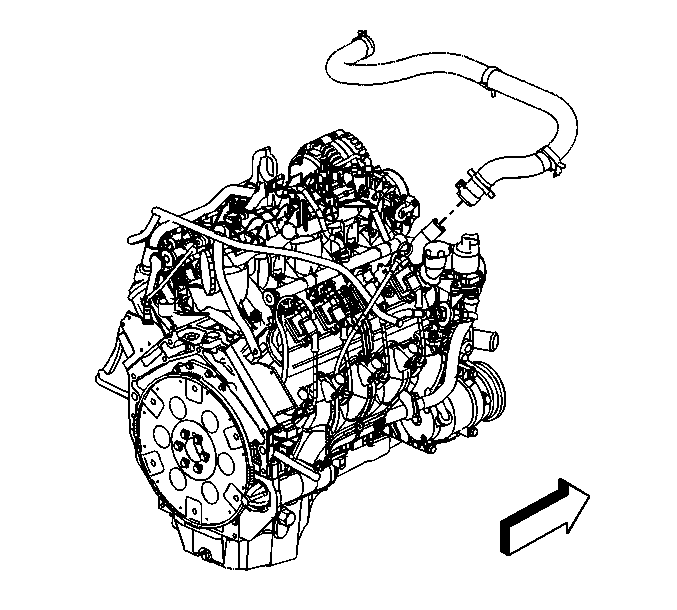
  104. Object Number: 659418  Size: SH
  105. Install the radiator inlet hose to the water pump.
  106. Position the radiator inlet hose clamp at the water pump.
  107. Install the radiator supports. Refer to Radiator Support Replacement in Body Front End.
  108. Install the A/C compressor. Refer to Air Conditioning Compressor Replacement in HVAC System - Manual.
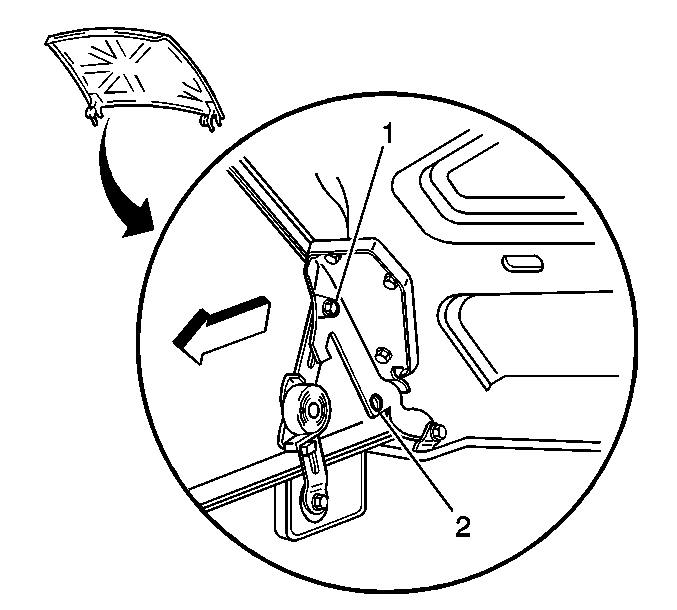
  109. Object Number: 310799  Size: SH
  110. Remove the hood hinge bolts from the service position (2).
  111. Lower the hood to the normal position.
  112. Install the hood hinge bolts.
  113. Tighten
    Tighten the bolts to 25 N·m (18 lb ft).

  114. Remove the fender covers.
  115. Perform the engine prelubing procedure. Refer to Engine Prelubing .
  116. Perform the CKP system variation learn procedure. Refer to Crankshaft Position System Variation Learn in Engine Controls - 4.8L, 5.3L, and 6.0L.
  117. Important: After an overhaul, the engine should be tested. Use the following procedure after the engine is installed in the vehicle.

    73.1. Disable the ignition system.
    73.2. Crank the engine several times. Listen for any unusual noises or evidence that parts are binding.
    73.3. Enable the ignition system.
    73.4. Start the engine and listen for unusual noises.
    73.5. Check the vehicle oil pressure gauge or light and confirm that the engine has acceptable oil pressure.
    73.6. Run the engine speed at about 1,000 RPM until the engine has reached normal operating temperature.
    73.7. Listen for sticking lifter and other unusual noises.
    73.8. Inspect for fuel, oil and/or coolant leaks while the engine is running.
    73.9. Perform a final inspection for the proper engine oil and coolant levels.
  118. Close the hood.