Assist Step Replacement Denali/Escalade
Removal Procedure
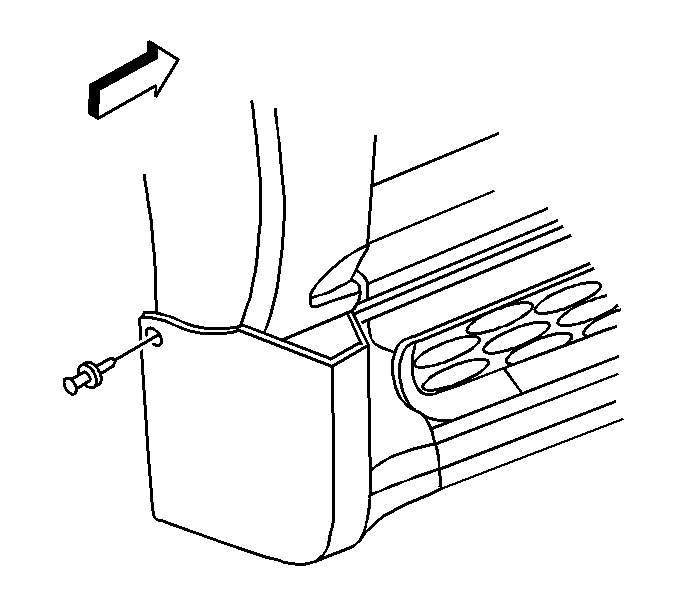
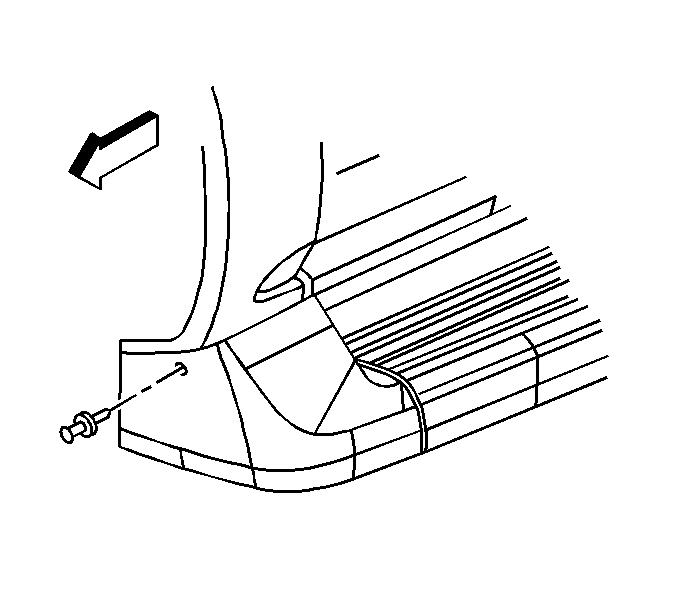
- Remove the push-in retainer from the assist step front cover.
- Remove the cover from the vehicle.
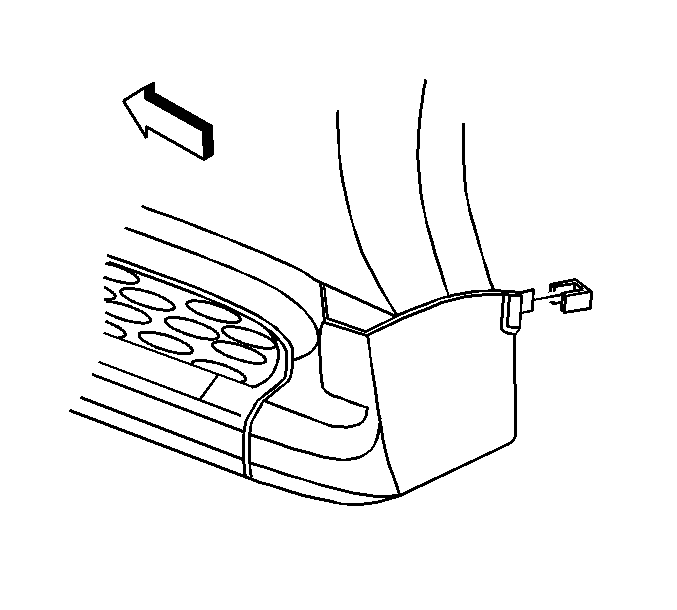
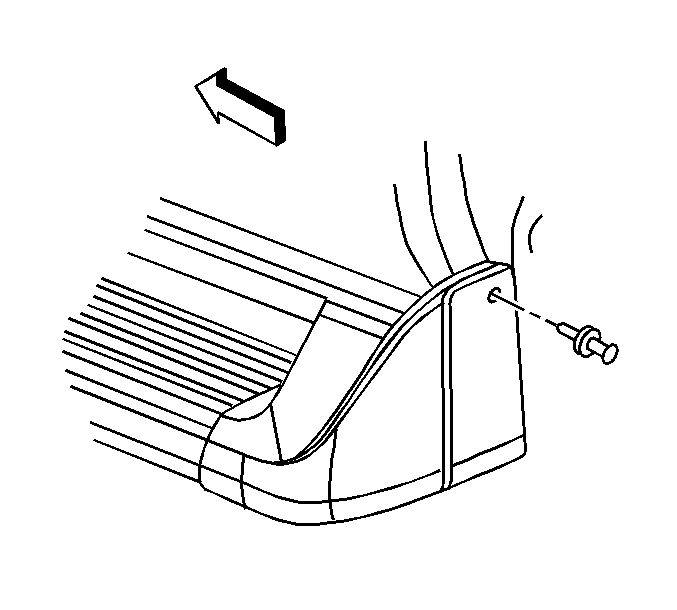
- Remove the retainer clip from the assist step rear cover.
- Remover the cover from the vehicle.
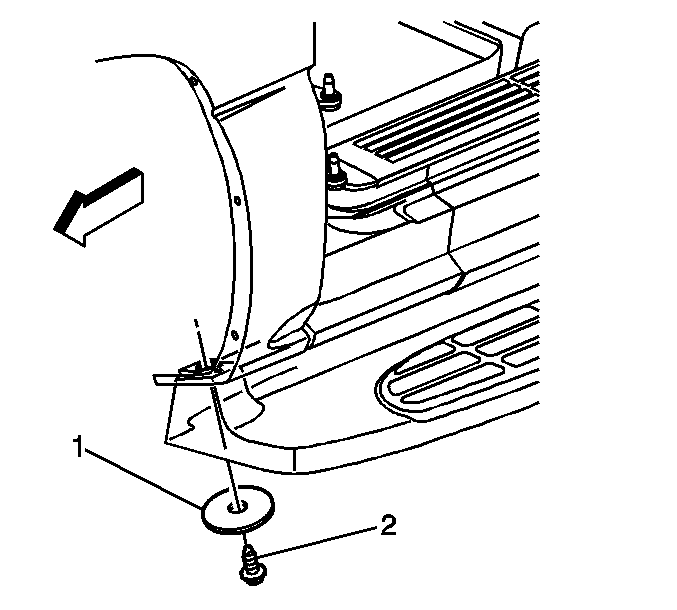
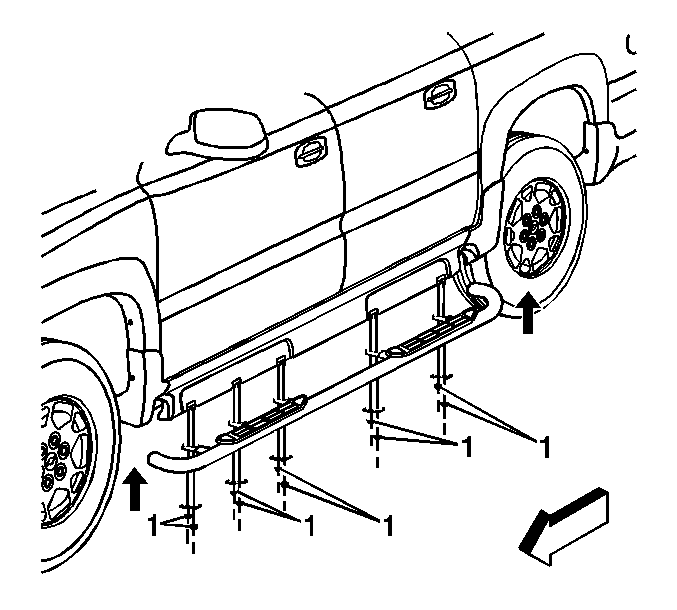
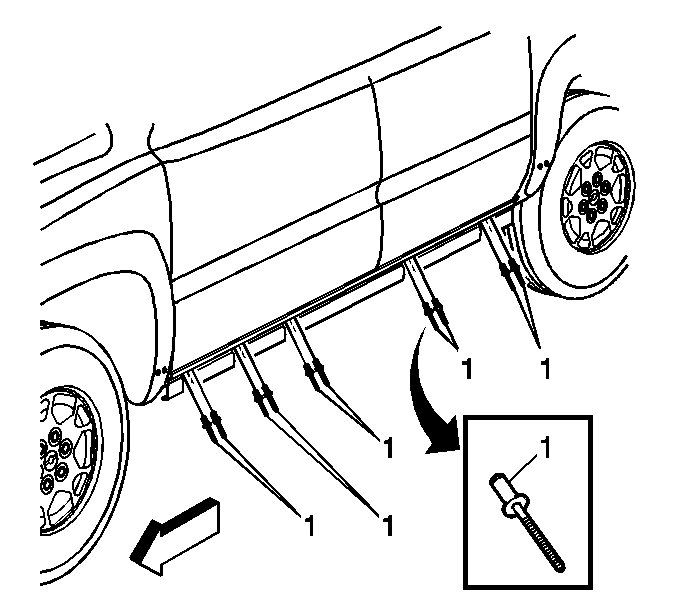
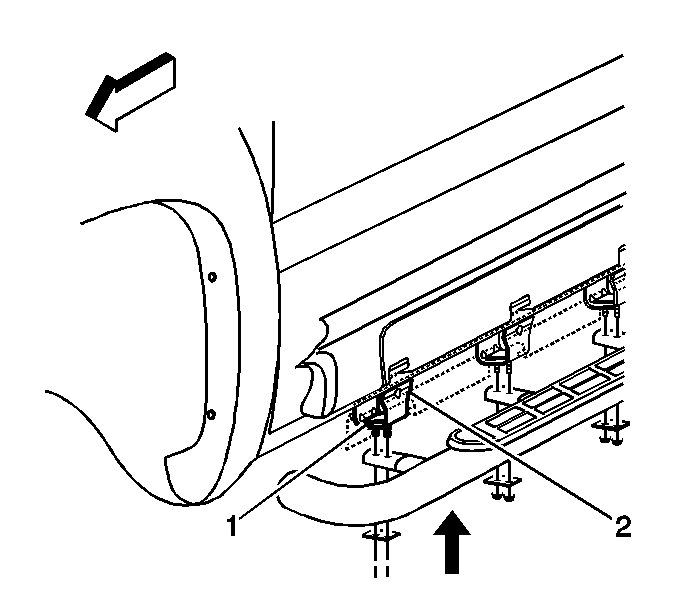
- Remove the bottom fender bolt (2) and the washer (1) from the vehicle.
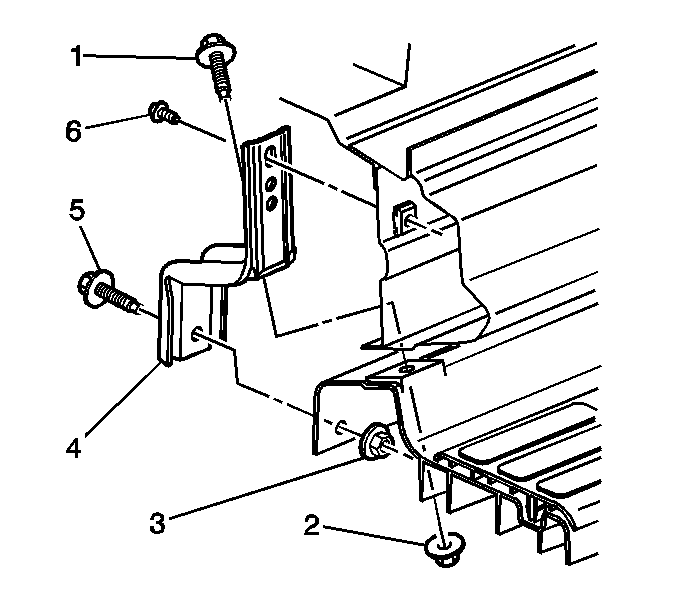
- With the aid of an assistant, remove the bolts (1, 5) and the nuts (2, 3) from the assist step brackets.
- Remove the assist step from the vehicle.
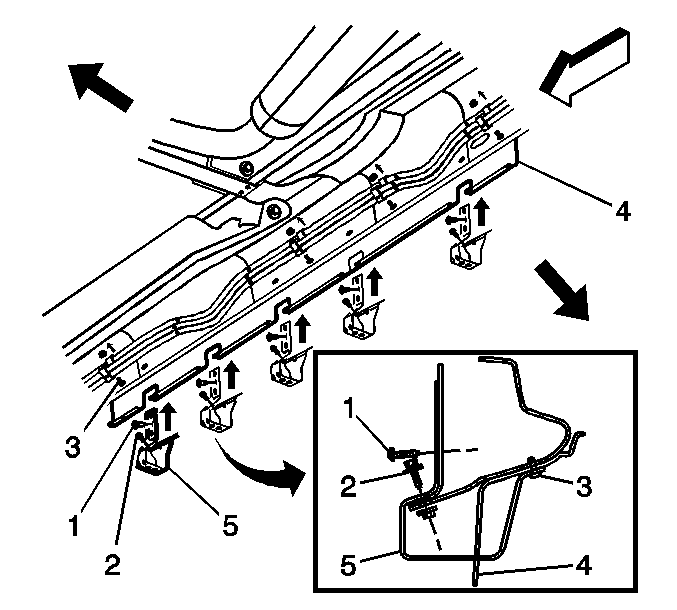
- Remove the heater and A/C tubes retaining nuts from the studs, if equipped. Refer to Auxiliary Heater Pipe Replacement in Heating, Ventilation, and Air Conditioning.
- Remove the assist step bolts (6) from the brackets.
- Remove the brackets (4) from the vehicle.
Installation Procedure
- Install the assist step brackets to the vehicle (4).
- Install the bolts (6) to the brackets and ensure that the brackets are seated securely to the inner rocker panel.
- Install the heater and A/C tubes retaining nuts to the studs, if equipped. Refer to Auxiliary Heater Pipe Replacement in Heating, Ventilation, and Air Conditioning.
- With the aid of an assistant, install the assist step to the vehicle.
- Install the bolts (1, 5) and the nuts (2, 3) to the assist step bracket, and leave the nuts loose.
- Install the bottom fender bolt (2) and the washer (1) to the vehicle.
- Tighten the assist step fasteners in the following sequence:
- Tighten the bracket bolt (6) to 25 N·m (18 lb ft).
- Tighten the assist step bracket nut (2) to 9 N·m (80 lb in).
- Tighten the assist step to the bracket nut (3) to 9 N·m (80 lb in).
- Install the assist step rear cover to the vehicle.
- Install the clip retainer.
- Install the assist step front cover to the vehicle.
- Install the push-in retainer.
Important: Use the Threadlocker, GM P/N 12345382 (Canadian P/N 10953489), to all bolt threads prior to assembly.
Notice: Use the correct fastener in the correct location. Replacement fasteners must be the correct part number for that application. Fasteners requiring replacement or fasteners requiring the use of thread locking compound or sealant are identified in the service procedure. Do not use paints, lubricants, or corrosion inhibitors on fasteners or fastener joint surfaces unless specified. These coatings affect fastener torque and joint clamping force and may damage the fastener. Use the correct tightening sequence and specifications when installing fasteners in order to avoid damage to parts and systems.
Tighten
Tighten the bottom fender bolt (2) to 25 N·m
(18 lb ft).
Tighten
Assist Step Replacement Escalade
Removal Procedure
- Remove the push-in retainer from the assist step front cover.
- Remove the cover from the vehicle.
- Remove the push-in retainer from the assist step rear cover.
- Remover the cover from the vehicle.
- Remove the bottom fender bolt (2) from the vehicle.
- With an assistant, remover the bolts (3,1) from the assist step brackets.
- Remove the assist step from the vehicle.
- Remove the heater and A/C tubes retaining nuts from the studs, if equipped. Refer to Auxiliary Heater Pipe Replacement in Heating, Ventilation, and Air Conditioning.
- Remove the assist step bolts (6) from the brackets.
- Remove the brackets from the vehicle.
Installation Procedure
- Install the assist step brackets to the vehicle.
- Install the bolts (6) to the brackets and ensure that the brackets are seated securely to the inner rocker panel.
- Install the heater and A/C tubes retaining nuts to the studs, if equipped. Refer to Auxiliary Heater Pipe Replacement in Heating, Ventilation, and Air Conditioning.
- With an assistant, install the assist step to the vehicle.
- Install the bolts (3,1) to the assist step bracket, and leave the bolts loose.
- Install the bottom fender bolt (2) and the washer to the vehicle.
- Tighten the assist step fasteners in the following sequence:
- Tighten the front fender bolt to 25 N·m (18 lb ft).
- Tighten the bracket bolt to 25 N·m (18 lb ft).
- Tighten the assist step bracket bolt (2) to 9 N·m (80 lb in).
- Tighten the assist step to the bracket bolt to 9 N·m (80 lb in).
- Install the assist step rear cover to the vehicle.
- Install the push-in retainer.
- Install the assist step front cover to the vehicle.
- Install the push-in retainer.
Important: Use the thread locker GM P/N 12345382 to all bolt threads prior to assembly.
Notice: Use the correct fastener in the correct location. Replacement fasteners must be the correct part number for that application. Fasteners requiring replacement or fasteners requiring the use of thread locking compound or sealant are identified in the service procedure. Do not use paints, lubricants, or corrosion inhibitors on fasteners or fastener joint surfaces unless specified. These coatings affect fastener torque and joint clamping force and may damage the fastener. Use the correct tightening sequence and specifications when installing fasteners in order to avoid damage to parts and systems.
Tighten
Assist Step Replacement Z-71
Removal Procedure
- With the aid of a helper, remove the retaining nuts and the spacers (1) from the bottom side of the assist step, and remove the assist step from the vehicle.
- Remove the rocker panel molding. Refer to Rocker Panel Molding Replacement in Exterior Trim.
- Drill out the rivets (1) from the assist step brackets.
- Remove the 5 stud plates (1) from the 5 assist step brackets (2).
- Remove the 5 retaining bolts (1) from the inner side of the rocker panel.
- Remove the 5 retaining bolts (2) from the inner side of the rocker panel.
- Remove the assist step brackets (5) from the vehicle.
- Drill out the rivets (3) for the rocker panel molding bracket (4).
- Remove the bracket (4) from the vehicle.
Installation Procedure
- Install the rocker panel molding bracket (4) to the vehicle.
- Install the rivets (3) that secure the rocker panel molding bracket (4) to the vehicle.
- Install the assist step brackets (5) to the vehicle.
- Install the 5 retaining bolts (1) to the inner side of the rocker panel.
- Install the 5 retaining bolts (2) to the inner side of the rocker panel.
- Install the 5 stud plates (1) to the 5 assist step brackets (2).
- Install the rivets (1) that secure the assist step brackets to the rocker panel.
- Install the rocker panel molding. Refer to Rocker Panel Molding Replacement in Exterior Trim.
- With the aid of an assistant, install the assist step to the vehicle.
- Install the spacers and the nuts (1) .
Notice: Use the correct fastener in the correct location. Replacement fasteners must be the correct part number for that application. Fasteners requiring replacement or fasteners requiring the use of thread locking compound or sealant are identified in the service procedure. Do not use paints, lubricants, or corrosion inhibitors on fasteners or fastener joint surfaces unless specified. These coatings affect fastener torque and joint clamping force and may damage the fastener. Use the correct tightening sequence and specifications when installing fasteners in order to avoid damage to parts and systems.
Tighten
Tighten the bolts (1) to 29 N·m (21 lb ft).
Tighten
Tighten the bolts (1) to 10 N·m (89 lb in).
Tighten
Tighten the bolts (1) to 29 N·m (21 lb ft).
