Rear Spoiler Replacement Convertible and Chevrolet Coupe
Removal Procedure
Notice: When removing body panels, apply tape to corners of panel and adjacent
surfaces to help prevent paint damage.
- Open the rear liftgate.
- Remove the high-mounted stoplamp. Refer to [ADD LINK].
- Perform the following steps to remove
the wiring extension from the spoiler:
| 3.1. | Disconnect the electrical connector. |
| 3.3. | From the outside of the vehicle, pull the wiring extension from
the spoiler. |
| 3.4. | Remove the liftgate trim. Refer to [ADD LINK]. |
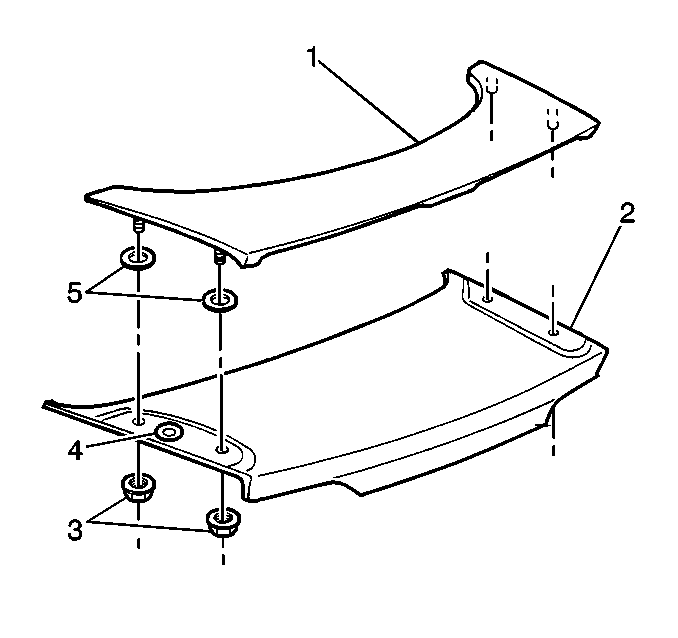
- Remove the fasteners (3) securing the spoiler to the rear
liftgate.
- Remove the spoiler (3) from the liftgate.
- Remove the washers (5) from the spoiler.
- Remove the seal (4) form the spoiler.
Installation Procedure
- Install the seal (4) to the spoiler.
- Install the washers (5) to the spoiler.
- Install the spoiler (1) to the rear liftgate (2).
Notice: Use the correct fastener in the correct location. Replacement fasteners
must be the correct part number for that application. Fasteners requiring
replacement or fasteners requiring the use of thread locking compound or sealant
are identified in the service procedure. Do not use paints, lubricants, or
corrosion inhibitors on fasteners or fastener joint surfaces unless specified.
These coatings affect fastener torque and joint clamping force and may damage
the fastener. Use the correct tightening sequence and specifications when
installing fasteners in order to avoid damage to parts and systems.
- Install the fasteners in order to secure the spoiler to the rear liftgate. (3).
Tighten
Tighten the fasteners to 6 N·m (53 lb in).
- Install the rear liftgate trim. Refer to [ADD LINK].
- Perform the following steps in order to install the harness into
the spoiler:
| 6.1. | Route the wiring extension through the spoiler. |
| 6.2. | Connect the electrical connector. |
| 6.3. | Secure the wiring extension to the lid panel. |
- Install the high-mounted stoplamp. Refer to [ADD LINK].
Rear Spoiler Replacement Pontiac Coupe
Removal Procedure
Notice: When removing body panels, apply tape to corners of panel and adjacent
surfaces to help prevent paint damage.
- Remove the rear compartment lift window inner panel cover. Refer to
[ADD LINK].
- Remove the rear compartment lift window side finish moldings.
Refer to [ADD LINK].
- Remove the high-mounted stoplamp. Refer to [ADD LINK].
- Perform the following steps to remove
the wiring extension from the spoiler:
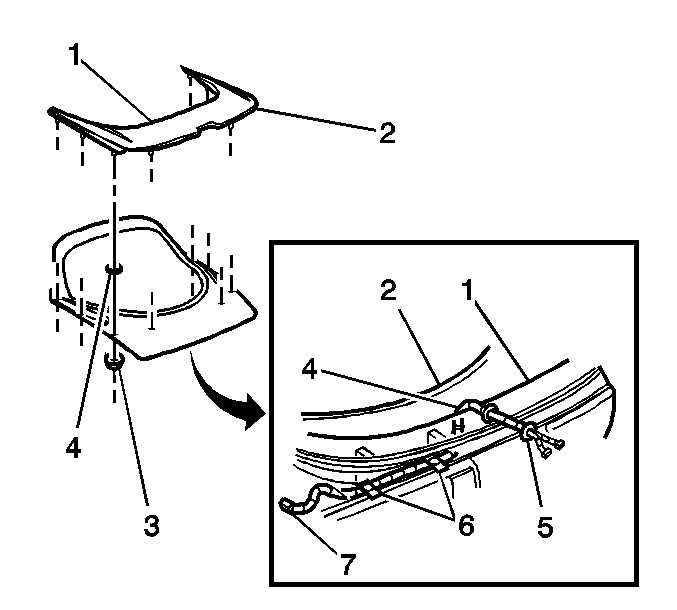
| 4.1. | Disconnect the electrical connector (4). |
| 4.2. | Remove the tape (7). |
| 4.3. | From outside of the vehicle, pull the wiring extension from the
spoiler (5). |
- Remove the fasteners securing the spoiler (1) to the rear liftgate
(2).
- Remove the spoiler (1) from the rear liftgate (2).
- Remove the washers (4) from the spoiler (1).
Installation Procedure
- Install the washers to the studs on the
spoiler (4).
- Install the spoiler (1) to the liftgate (2).
- Push the spoiler forward (1).
Notice: Use the correct fastener in the correct location. Replacement fasteners
must be the correct part number for that application. Fasteners requiring
replacement or fasteners requiring the use of thread locking compound or sealant
are identified in the service procedure. Do not use paints, lubricants, or
corrosion inhibitors on fasteners or fastener joint surfaces unless specified.
These coatings affect fastener torque and joint clamping force and may damage
the fastener. Use the correct tightening sequence and specifications when
installing fasteners in order to avoid damage to parts and systems.
- Install the fasteners in order to secure the spoiler to the rear lift
gate..
Tighten
Tighten the nuts in sequence to 6 N·m (53 lb in)
as shown.
- Perform the following steps in order to install the harness into
the spoiler:
| 5.1. | Route the wiring extension through the spoiler (7). |
| 5.2. | Pull on the wiring extension in order to seat the grommet. |
| 5.3. | Connect the electrical connector (4). |
| 5.4. | Secure the wiring extension to the window panel. |
- Install the high-mounted stoplamp. Refer to [ADD LINK].
- Install the rear compartment lift window side finish moldings.
Refer to [ADD LINK].
Rear Spoiler Replacement Chevy RS Coupe
Removal Procedure
Notice: When removing body panels, apply tape to corners of panel and adjacent
surfaces to help prevent paint damage.
- Remove the rear compartment lift window inner panel cover. Refer to
[ADD LINK].
- Remove the high mount stoplamp from the rear end spoiler. Refer
to [ADD LINK].
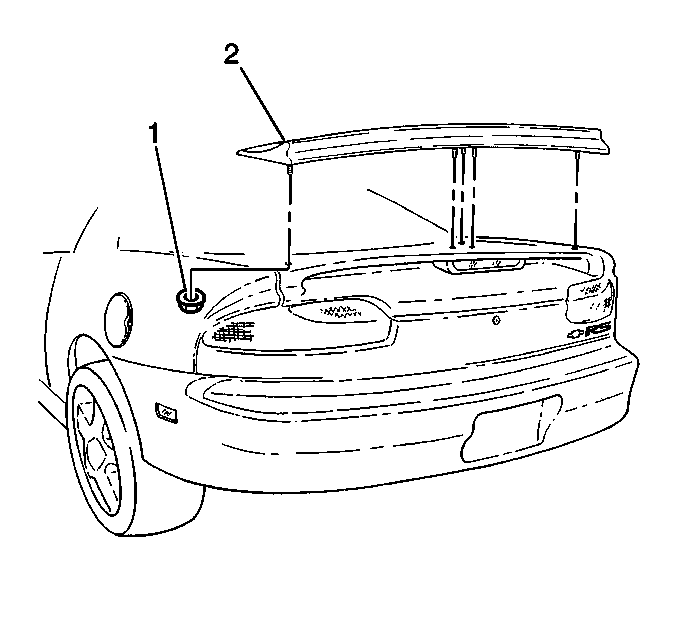
- Remove the rear end spoiler from the
rear compartment lift window panel.
- Place the rear end spoiler upside down on a clean, smooth, soft
surface.
- Remove the fasteners attaching the rear deck spoiler to the rear
end spoiler (1).
- Remove the rear deck spoiler (2).
Installation Procedure
- Install the rear deck spoiler.
Notice: Use the correct fastener in the correct location. Replacement fasteners
must be the correct part number for that application. Fasteners requiring
replacement or fasteners requiring the use of thread locking compound or sealant
are identified in the service procedure. Do not use paints, lubricants, or
corrosion inhibitors on fasteners or fastener joint surfaces unless specified.
These coatings affect fastener torque and joint clamping force and may damage
the fastener. Use the correct tightening sequence and specifications when
installing fasteners in order to avoid damage to parts and systems.
- Install the fasteners attaching the rear deck spoiler to the rear end
spoiler (1).
Tighten
Tighten the fasteners to 8.5 N·m (75 lb in).
- Install the rear end spoiler to the rear compartment lift window
panel.
- Place the rear end spoiler onto the rear compartment lift window
panel (2).
Do not scratch the paint surface.
- Install the high mount stoplamp to the rear compartment lift window
panel. Refer to [ADD LINK].
- Install the rear compartment lift window inner panel cover. Refer
to [ADD LINK].
