SERVICE MANUAL UPDATE - SEC. 6E2-C2 IDLE SPEED ADJUSTMENT

SUBJECT: SERVICE MANUAL UPDATE - SECTION 6E2-C2 - IDLE SPEED ADJUSTMENT
VEHICLES AFFECTED: 1992-93 GEO METRO
This bulletin replaces the "Idle Speed Check and Adjustment" procedure and the "Air Conditioner Idle Speed VSV Adjustment" procedure on pages 6E2-C2-9, respectively, in DRIVEABILITY AND EMISSIONS FUEL INJECTION (TBI) (SECTION 6E2-C2) of the 1992 Geo Metro Service Manual (ST370-92). This bulletin also replaces the "Idle Speed Adjustment" procedure on page 6E27C2-9 in DRIVEABILITY AND EMISSIONS 1.0L (VIN 6) (SECTION 6E2-C2) of the 1993 Geo Metro Service Manual ({ST371-93).
IMPORTANT: Before starting engine, place the manual selector lever in "P" (automatic transaxle) or place the gearshift control lever in neutral (manual transaxle), set the parking brake and block the front wheels.
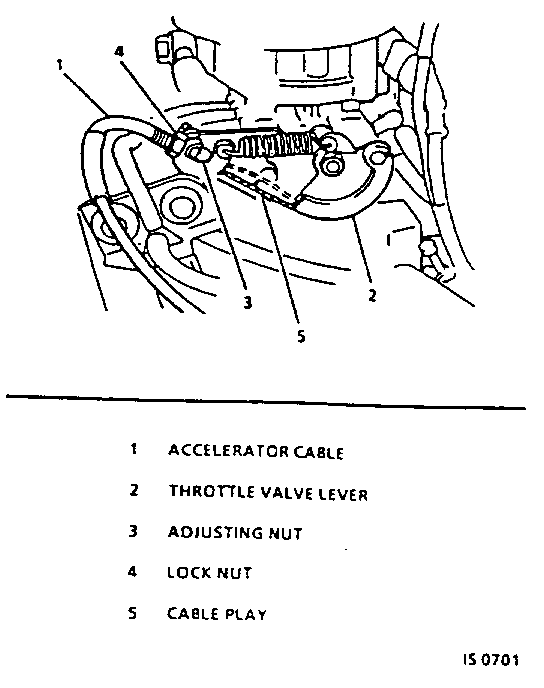
1. Check accelerator cable for free movement and excessive play; cable play should be within specification (Figure 1). If not within specification, adjust the accelerator cable:
A. Loosen the accelerator cable locknut.
B. Adjust the cable play to 3 to 5 mm (0.12 to 0.20 inch).
C. Tighten cable locknut.
See Figure 1 Accelerator Cable Adjustment
2. Inspect the lead wires and hoses of the throttle body fuel injection (TBI) unit and evaporative emission (EVAP) control systems for proper connection.
3. Check ignition timing and adjust if necessary. Refer to SECTION 6D4.
4. Turn off all accessories (A/C, wipers, heater, headlamps, etc.).
5. Make sure that the air cleaner (ACL) is installed correctly.
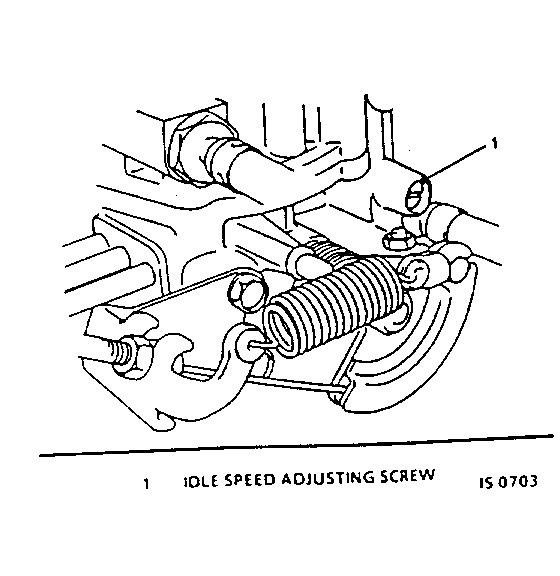
6. Remove the cover from the idle speed adjusting screw (Figure 2).
See Figure 2 Idle Speed Adjusting Screw
7. Start the engine and allow it to reach normal operating temperature and idle speed (accessories off).
8. Connect a TECH 1 to the data link connector (DLC).
MODEL IDLE SPEED/IAC DUTY w/A/C OFF IDLE SPEED/IAC DUTY w/A/C ON| ----- ----------------------------- ----------------------------- XFi 700 +/- 50 RPM/30 +/- 5% 1) 700 +/- 50 RPM/15 +/- 5%| 2) 900 +/- 50 RPM/20 +/- 5%|
BASE/LSi 800 +/- 50 RPM/30 +/- 5% 1) 800 +/- 50 RPM/15 +/- 5%| (M/T) 2) 900 +/- 50 RPM/20 +/- 5%|
BASE/LSi 850 +/- 50 RPM/30 +/- 5% 1) 850 +/- 50 RPM/15 +/- 5%| (A/T) 2) 900 +/- 50 RPM/20 +/- 5%|
CONVERT- 850 +/- 50 RPM/30 +/- 5% 1) 850 +/- 50 RPM/15 +/- 5%| IBLE 2) 900 +/- 50 RPM/20 +/- 5%|
1) EARLY PRODUCTION 1992 MODEL SPECIFICATION
2) LATE PRODUCTION 1992 MODEL / 1993 MODEL SPECIFICATION
See Figure 3 Idle Speed and Idle Air Control (IAC) Duty Settings
9. Check the idle speed and idle air control (IAC) (idle speed control (ISC)} duty on the TECH 1 (Figure 3).
10. Adjust the idle speed and IAC duty as necessary by turning the idle speed adjusting screw.
11. Press the A/C switch in and set the blower speed selector switch to low (A/C equipped vehicles). Make sure that the A/C compressor clutch engages.
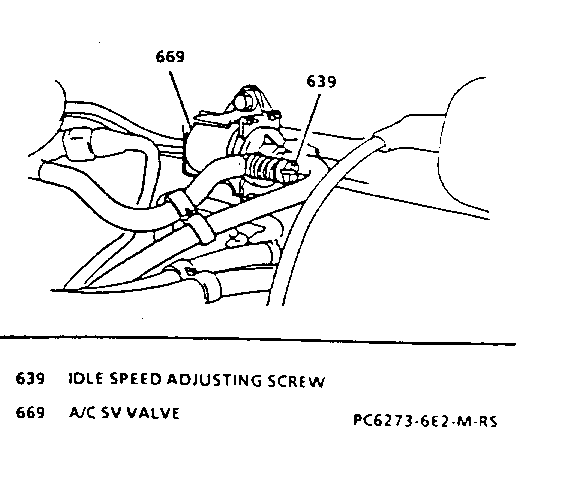
12. Check A/C idle speed and IAC duty on the TECH 1 (Figure 3) (A/C equipped vehicles). Adjust as necessary by adjusting the A/C solenoid vacuum (SV) valve (Figure 4).
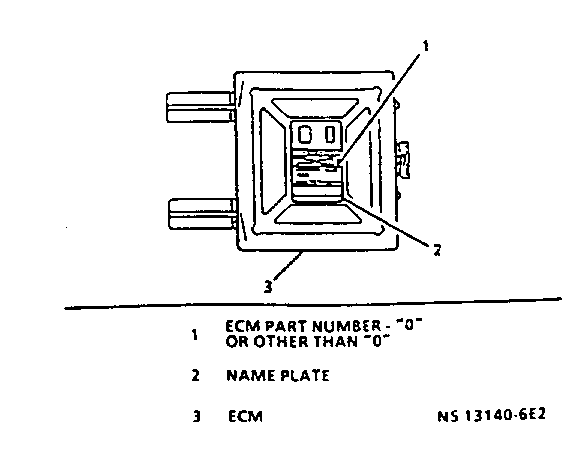
NOTICE: Specified values for the 1992 Geo Metro A/C idle speed adjustment vary depending upon the part number of the engine control module (ECM). Types of ECMs can be identified by the last number of the ECM part number. If the ECM's part number ends with a 0 (zero), use the "Early Production A/C Idle Speed Specification Chart." If the ECM's part number ends with any other number besides 0, use the "Late Production A/C Idle Speed Specification Chart" (Figure 5).
See Figure 4 A/C Solenoid Vacuum (SV) Valve Idle Speed Adjusting Screw
See Figure 5 Engine Control Module (ECM) Part Number
13. Disconnect the TECH 1.
14. Install the idle speed adjusting screw cover.


General Motors bulletins are intended for use by professional technicians, not a "do-it-yourselfer". They are written to inform those technicians of conditions that may occur on some vehicles, or to provide information that could assist in the proper service of a vehicle. Properly trained technicians have the equipment, tools, safety instructions and know-how to do a job properly and safely. If a condition is described, do not assume that the bulletin applies to your vehicle, or that your vehicle will have that condition. See a General Motors dealer servicing your brand of General Motors vehicle for information on whether your vehicle may benefit from the information.
