CAMPAIGN: CENTER CONSOLE LIQUID SPILL SHIELD

Subject: PRODUCT CAMPAIGN 95-C-71 - CENTER CONSOLE LIQUID SPILL SHIELD -------------------------------------------------------------
Model and Year: 1993-95 CHEVROLET GEO PRIZM (EXCLUDING LSi MODEL) -------------------------------------------------
To: All Chevrolet Geo Dealers
-------------------------
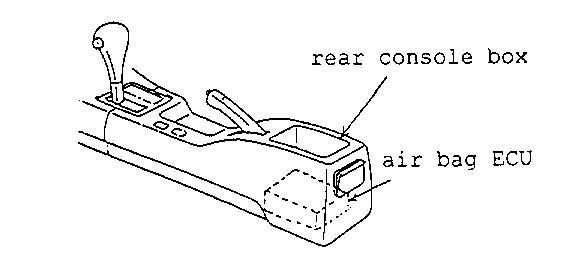
General Motors has determined that certain 1993-95 Chevrolet Geo Prizm model vehicles may have been assembled in such a way as to allow any liquid spilled in the rear center console to leak through to the Supplemental Inflatable Restraint System (SIR) center sensor. Any liquid spilled in this area may leak onto the circuit board and damage the sensor. This could cause the airbag warning light to illuminate and stay "ON" during normal driving conditions. There is also a remote possibility that this condition could cause the airbag to inadvertently deploy.
To prevent the possibility of these conditions occurring, dealers are to inspect for evidence of liquids spilled into/onto the center sensor and connector. Center sensors found to have experienced a previous liquid spill will be replaced and the connector cleaned. Vehicles that have not experienced liquid intrusion will have a vinyl sheet affixed to the top of the center sensor. This sheet will deflect any future liquid spills that may leak through the rear center console and onto the center sensor.
VEHICLES INVOLVED
Involved are certain 1993-95 Chevrolet Geo Prizm model vehicles (Excluding LSi Model), built within the following VIN breakpoints:
PLANT YEAR MODEL PLANT CODE FROM THROUGH ---- ---- ----- ---- ---- -------
1993 Prizm Fremont "Z" PZ000003 PZ075500 1994 Prizm Fremont "Z" RZ000001 RZ108000 1995 Prizm Fremont "Z" SZ000001 SZ050051
Involved vehicles have been identified by Vehicle Identification Number Computer Listings. Computer listings contain the complete Vehicle Identification Number, owner name and address data, and are furnished to involved dealers with the campaign bulletin. Owner name and address data furnished will enable dealers to follow-up with owners involved in this campaign.
These listings may contain owner names and addresses obtained from State Motor Vehicle Registration Records. The use of such motor vehicle registration data for any other purpose is a violation of law in several states. Accordingly, you are urged to limit the use of this listing to the follow-up necessary to complete this campaign. Any dealer not receiving a computer listing with the campaign bulletin has no involved vehicles currently assigned.
PARTS INFORMATION
NOTICE:
A pre-shipment of part number (vinyl sheet) 94856382 will be sent to involved dealers the week of May 1, 1996. Preshipment will equal parts for 50% of the number of vehicles to be repaired. Pre-shipment parts will be charged to the dealers, open parts account.
Additional parts required to complete this campaign are to be obtained from General Motors Service Parts Operations (GMSPO) . Normal orders should be placed on a DRO = Daily Replenishment Order. An emergency requirement should be ordered on a CSO Customer Special Order.
Quantity/ Part Number Description Vehicle ---------- ----------- ----------
94856382 Sheet, Protective Vinyl 1 94853086 Sensor(1993) As Required 94854796 Sensor(1994-95) As Required
OWNER NOTIFICATION
Owners will be notified of this campaign on their vehicles by Chevrolet Motor Division (see copy of owner letter included with this bulletin).
DEALER CAMPAIGN RESPONSIBILITY
All unsold new vehicles in dealers, possession and subject to this campaign must be held and inspected/repaired per the service procedure of this campaign bulletin before owners take possession of these vehicles.
Dealers are to service all vehicles subject to this campaign at no charge to owners, regardless of mileage, age of vehicle, or ownership, from this time forward.
Owners of vehicles recently sold from your new vehicle inventory with no owner information indicated on the dealer listing, are to be contacted by the dealer, and arrangements made to make the required correction according to the instructions contained in this bulletin. This could be done by mailing to such owners a copy of the owners letter accompanying this bulletin. Campaign follow-up cards should not be used for this purpose, since the owner may not as yet have received the notification letter.
In summary, whenever a vehicle subject to this campaign enters your vehicle inventory, or is in your dealership for service in the future, please take the steps necessary to be sure the campaign correction has been made before selling or releasing the vehicle.
SERVICE PROCEDURE
CAUTION:
WORK ON THE SUPPLEMENTAL INFLATABLE RESTRAINT SYSTEM (SIR) MUST NOT START FOR 90 SECONDS FOLLOWING THE NEGATIVE BATTERY CABLE DISCONNECTION. THE SIR SYSTEM RAS A BACK-UP POWER SOURCE WHICH MAY CAUSE INADVERTENT DEPLOYMENT IF WORK IS STARTED WITHIN THE FIRST 90 SECONDS.
INSPECTION
1. Note electronic settings before disconnecting negative battery cable from battery and wait a minimum of 90 seconds before proceeding.
2. Remove 2 screws securing center console to rear center console.
3. Remove tray liner and 3 screws underneath tray liner.
4. Raise parking brake lever and remove console.
5. Remove 3 bolts securing console mounting bracket to floor. Remove bracket.
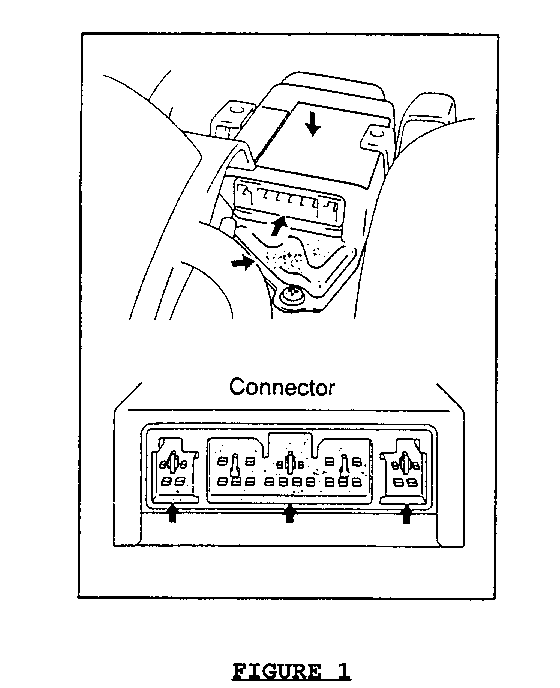
6. Remove connectors and check for ANY evidence of liquids, dried liquid residue or corrosion (See Figure 1);
A) On top of sensor
B) On sensor connector terminals
C) Oon connector terminals
D) On sensor mounting bracket.
7. If there is NO evidence of liquids, dried liquid residue or corrosion, reconnect the connectors and proceed to Vinyl Sheet Installation procedure on page 6. If there is ANY evidence of spilled liquids, proceed to Sensor Replacement and Connector Cleaning procedure on page 7.
VINYL SHEET INSTALLATION
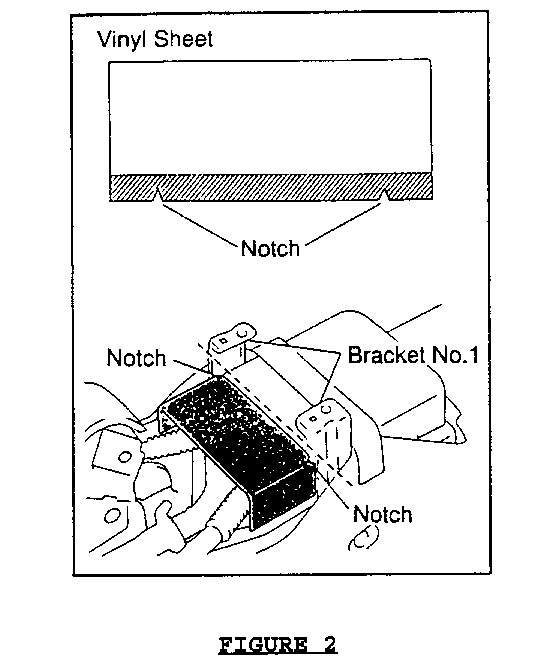
1. Install vinyl sheet on sensor as shown in Figure 2 below.
* Be sure edge of sheet is along edge of bracket.
* Be sure sheet is centered on sensor.
2. Install rear center console mounting bracket and torque bolts to 10 Nm (89 lb. in.).
3. Install rear center console and fasten with 3 screws in the tray, and two screws at the front.
4. Install tray liner.
5. Connect negative battery cable to battery and reset all electronic devices.
6. Perform system check for Diagnostic Trouble Codes (DTC).
7. Install Campaign Identification Label.
SENSOR REPLACEMENT AND CONNECTOR CLEANING
1. Move both front seats completely forward and recline seatback forward.
2. Remove rear seat cushion.
3. Remove center (B) pillar lower garnish.
4. Unclip rear door sill plates securing carpet (do not remove).
5. Remove rear floor mats.
6. Pull up floor carpet to allow access to 3 center sensor attachment bolts.
7. Disconnect connectors and remove center sensor.
NOTICE: Center sensor connectors must be cleaned prior to installation of a new center sensor. DO NOT brush or use anything abrasive on gold terminals.
8. Fill shallow container with a small amount of Ethanol or Acetone.
9. Dip connector in fluid to completely cover contacts and REMOVE ALL TRACES OF LIQUID RESIDUE.
10. Blow dry connector with air.
11. Install NEW center sensor (with protective vinyl sheet factory installed) and torque attachment bolts to 21 Nm (16 lb. ft.).
12. Reconnect center sensor connector.
13. Install floor carpet.
14. Secure rear door sil plate.
15. Install rear seat cushion.
16. Install rear floor mats.
17. Install center pillar lower garnish.
18. Return front seats back to upright position.
19. Install rear center console mounting bracket and torque bolts to 10 Nm (89 lb. in.).
20. Connect negative battery cable to battery.
21. Perform warning light check.
22. Perform system check for Diagnostic Trouble Codes (DTC).
23. Install rear center console and fasten with 3 screws in the tray, and two screws at the front.
24. Install tray liner.
25. Reset all Electronic devises as noted in Step 1 page 3.
26. Install Campaign Identification Label.
CAMPAIGN IDENTIFICATION LABEL
Each vehicle corrected in accordance with the instructions outlined in this Product Campaign Bulletin will require a "Campaign Identification Label". Each label provides a space to include the campaign number and the five (5) digit dealer code of the dealer performing the campaign service. This information may be inserted with a typewriter or a ball point pen.
Each "Campaign Identification Label" is to be located on the radiator core support in an area which will be visible when the vehicle is brought in for periodic servicing by the owner. When using the new campaign identification label, be sure to install the clear protective covering.
Additional "Campaign Identification Labels" can be obtained from VISPAC Incorporated by calling 1-800-269-5100 (Monday through Friday 8:00 a.m. to 4:30 p.m. EST). Ask for Item Number S-1015 when ordering.
Apply "Campaign Identification Label", only on a clean, dry surface.
CLAIM INFORMATION
Submit a Product Campaign Claim with the information indicated below:
** FAILED PARTS LABOR LABOR REPAIR PERFORMED PC PART NO. ALLOW CC-FC OP HOURS ---------------- -- -------- ----- ----- ------ ------
Inspect - Install Vinyl Sheet 94856382 MA-96 V9916 0.5 Inspect - Replace Center Sensor 1 94854796 MA-96 V9917 0.8
* For Campaign Administrative Allowance, add 0.1 hours to the "Labor Hours".
** The "Parts Allowance" should be the sum total of the current GMSPO Dealer Net price plus 30% (for 1993 vehicles) or 40% (for 1994-95 vehicles) of all parts required for the repair.
Refer to the General Motors Claims Processing Manual for details on Product Campaign Claim Submission.
May, 1996
Dear Chevrolet Geo Prizm Owner:
This notice is sent to inform you that Chevrolet Motor Division is conducting a recall campaign that includes your vehicle.
REASON FOR THIS RECALL
General Motors has determined that certain 1993-95 Chevrolet Geo Prizm model vehicles may have been assembled in such a way as to allow liquid spilled in the rear console box to leak through to the Supplemental Inflatable Restraint. System (SIR) center sensor and damage the circuit board. Any liquid spilled in this area may leak onto the circuit board. This could cause the airbag warning light to illuminate and stay "ON" during normal driving conditions. There is also a remote possibility that this condition could cause the airbag to inadvertently deploy.
WHAT WE WILL DO
To prevent the possibility of these conditions occurring, your dealer will inspect for evidence of liquids spilled into/onto the center sensor and connector. Center sensors found to have experienced a previous liquid spill will be replaced and the connector cleaned. Vehicles that have not experienced liquid intrusion will have a vinyl sheet affixed to the top of the center sensor. This sheet will deflect any future liquid spills that may leak through the rear console box.
WHAT YOU SHOULD DO
Please contact your Chevrolet Geo dealer as soon as possible to arrange a service date and so the dealer may order the necessary parts for the repair.
Instructions for making this correction have been sent to your dealer and parts are available. You may ask your dealer if you wish to know how much time will be needed to schedule and process your vehicle.
To avoid future problems, please do not set liquid/drink containers in the rear console box. Liquids spilled in this area may damage the function of the air bag. Please use the cup holder located near the radio for your beverage.
The enclosed owner reply card identifies your vehicle. Presentation of this card to your dealer will assist in making the necessary correction in the shortest possible time. If you have sold or traded your vehicle, please let us know by completing the postage paid reply card and returning it to us.
We are sorry to cause you this inconvenience; however, we have taken this action in the interest of your continued satisfaction with our products.
Chevrolet Motor Division GENERAL MOTORS CORPORATION


General Motors bulletins are intended for use by professional technicians, not a "do-it-yourselfer". They are written to inform those technicians of conditions that may occur on some vehicles, or to provide information that could assist in the proper service of a vehicle. Properly trained technicians have the equipment, tools, safety instructions and know-how to do a job properly and safely. If a condition is described, do not assume that the bulletin applies to your vehicle, or that your vehicle will have that condition. See a General Motors dealer servicing your brand of General Motors vehicle for information on whether your vehicle may benefit from the information.
