CAMPAIGN:REAR AXLE HOUSING FRACTURE

SUBJECT: REAR AXLE HOUSING FRACTURE
RE-ISSUE
Models: Certain 1993-94 Geo Trackers and 1994 Pontiac Sunrunners
TO: ALL GENERAL MOTORS DEALERS
THIS BULLETIN CANCELS AND SUPERSEDES SAFETY CAMPAIGN BULLETIN 4D15 ISSUED MAY, 1994. - THE VEHICLES INVOLVED, OWNER NOTIFICATION, SERVICE PROCEDURE AND PARTS AND LABOUR CLAIM INFORMATION SECTIONS HAVE BEEN REVISED. SPECIFICALLY, CHANGES HAVE BEEN MADE TO REFLECT ADDITIONAL VEHICLES INVOLVED. REVISED INFORMATION IS SHOWN IN BOLD TYPE.
General Motors of Canada Limited has determined that a defect which relates to motor vehicle safety exists in certain 1993-94 Geo Tracker and 1994 Pontiac Sunrunner model vehicles. Some of these vehicles have a rear axle shaft housing tube that was incorrectly welded and could fracture. Fracture of the rear axle shaft housing tube could result in a loss of rear braking and affect vehicle control.
To prevent the possibility of this condition occurring, dealers are to inspect the rear axle assemblies on involved vehicles and, if necessary, replace the complete rear axle assembly.
VEHICLES INVOLVED: (REVISED 1994 ENDING VIN BREAKPOINT): ------------------------------------------------------- Involved are certain 1993-94 Geo Tracker and 1994 Pontiac Sunrunner model vehicles built within the following VIN breakpoints:
Year Model Plant Plant Code From Through
1993 E10 & J10 Ingersoll "6" P6900179 P6938624 1994 EIO & J10 Ingersoll "6" R6900001 R6947897
NOTE: PLEASE CHECK DCS SCREEN 45 OR YOUR V.I.N. LISTING BEFORE PERFORMING CAMPAIGN TO ENSURE THAT THE VEHICLE IS AFFECTED. ONLY AFFECTED VIN'S WILL BE PAID.
All affected vehicles have been identified by the VIN listing provided to involved dealers with this bulletin. Any dealer not receiving a listing was not shipped any of the affected vehicles.
DEALER CAMPAIGN RESPONSIBILITY:
All unsold new vehicles in dealer's possession and subject to this campaign Must be held and inspected/repaired per the Service Procedure of this Campaign Bulletin before owners take possession of these vehicles.
Dealers are to perform this campaign on all involved vehicles at no charge to owners, regardless of kilometers traveled, age of vehicle, or ownership, from this time forward.
Owners of vehicles recently sold from your new vehicle inventory with no owner information indicated on the dealer listing, are to be contacted by the dealer, and arrangements made to make the required correction according to instructions contained in this bulletin. This could be done by mailing to such owners a copy of the owner letter accompanying this bulletin. Campaign follow- up cards should not be used for this purpose, since the owner may not as yet have received the notification letter
In summary, whenever a vehicle subject to this campaign is taken into your new or used vehicle inventory, or is in your dealership for service in the future, please take the steps necessary to be sure the campaign correction has been made before selling or releasing the vehicle.
CAMPAIGN PROCEDURE:
Refer to Section 4 of the Service Policies and Procedures Manual for the detailed procedure on handling Product Campaigns. Dealers are requested to complete the campaign on all transfers as soon as possible.
OWNER NOTIFICATION:
All owners of record at the time of campaign release are shown on the attached computer listing and have been notified by first class mail from General Motors (see copy of owner letter included with this bulletin). The listings provided are for campaign activity only and should not be used for any other purpose.
PARTS INFORMATION:
SPECIAL INSPECTION GAUGE
Affected dealers were shipped, along with the initial bulletin, an inspection gauge.
While the rear axle shaft housing tube is the cause of this condition, dealers are to replace the complete rear axle assembly.
Parts required to complete this campaign should be ordered through regular channels, as follows:
Part Number Description Quantity/Vehicle ----------------------------------------------------------------------------- 91171637 Rear Axle Assembly - Manual Transmission 1
91171638 Rear Axle Assembly - Automatic Transmission 1 - 8 Valve Engine
10951848 Synthetic Gear Lubricant (or Equivalent) 2.2 Liters
992669 Brake Fluid 1 Liter
NOTICE: REAR AXLE ASSEMBLY PART NUMBERS 91171637 AND 91171638 WILL NOT BE RETURNABLE TO GMSPO UNDER THE RETURN PARTS PROGRAM.
PARTS AND LABOUR CLAIM INFORMATION:
Credit for the campaign work performed will be paid upon receipt of a properly completed campaign claim card or DCS transmission in accordance with the following:
Repair Code Description Time Allowance
1A Inspect, Axle Welded Correctly .3 or No Manufacturing Codes On Axle Housing
2A Inspect, Axle Requires Replacement - Manual Trans. 2.5 1993 Tracker & Sunrunner
3A Inspect, Axle Requires Replacement - Auto. Trans. 2.5 1993 Tracker & Sunrunner
4A Inspect, Axle Requires Replacement Manual Trans 2.5 1994 Tracker & Sunrunner
5A Inspect, Axle Requires Replacement Auto. Trans 2.5 1994 Tracker & Sunrunner
Time allowance includes 0.1 hour for dealer administrative detail associated with this campaign. An allowance of .2 hours credit for packaging of the axle assembly for retum is also included in repair code 2A to 5A. Replacement of the complete axle assembly is due to the incorrect rear axle shaft housing tube weld, therefore, the 30% (1993, 2A & 3A) or 40% (1994, 4A & 5A) dealer net will be applied only to the cost of the rear axle shaft housing, part number 30004983.
SERVICE PROCEDURE
SERVICE PROCEDURE: (FIGURES REFERENCED ARE LOCATED ON PAGES 6 AND 7)
AXLE INSPECTION PROCEDURE
NOTICE:
(PERFORM THIS OPERATION PRIOR TO STEP 2 OF SERVICE PROCEDURE):
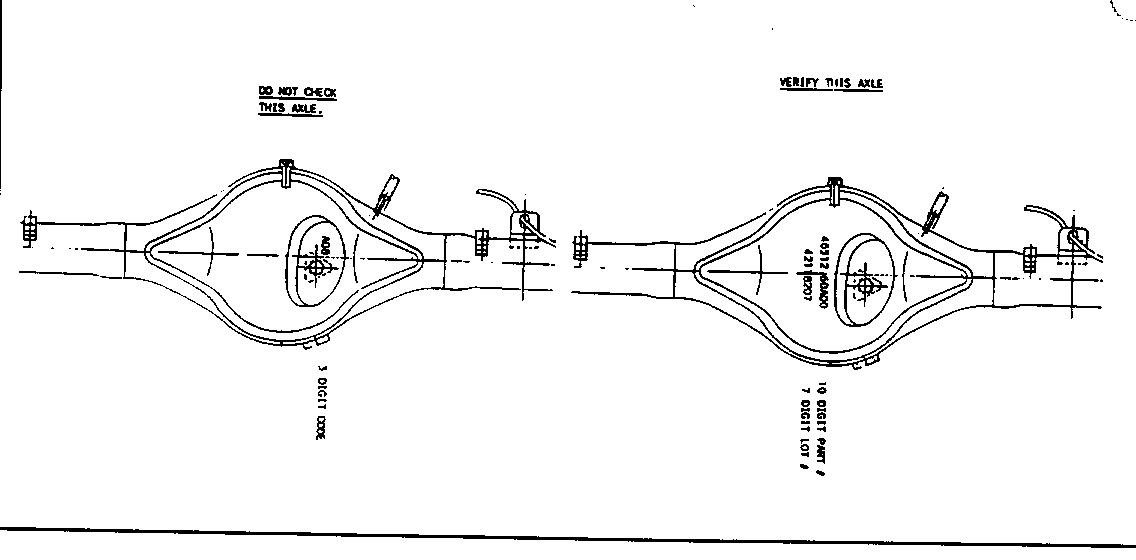
FOR VEHICLES PRODUCED BETWEEN VIN'S R6908149 & R6947897 A HOUSING PREINSPECTION PRIOR TO WELD INSPECTION IS NECESSARY ONCE VEHICLE HAS BEEN RAISED ON HOIST. CLEAN REAR FACE OF AXLE HOUSING AND INSPECT FOR MANUFACTURE'S IDENTIFICATION CODES.
0 IF AXLE HOUSING DOES NOT HAVE ANY MANUFACTURER'S IDENTIFICATION CODES ON THE BACK OF THE HOUSING (AS INDICATED ON THE LEFT BELOW), IT IS NOT NECESSARY TO INSPECT FOR PROPER WELD LOCATION. DO NOT REPLACE EITHER AXLE. INSTALL CAMPAIGN IDENTIFICATION LABEL AND RETURN VEHICLE TO CUSTOMER.
0 IF AXLE HOUSING DOES HAVE MANUFACTURE'S CODES (AS INDICATED ON THE RIGHT BELOW), CONTINUE TO SERVICE PROCEDURE STEP 2 AND FOLLOWING PROCEDURE REVISIONS WHICH FOLLOW.
SERVICE PROCEDURE: (FIGURES REFERENCED ARE LOCATED ON PAGES 6 AND 7)
AXLE INSPECTION PROCEDURE
1. Raise vehicle on hoist.
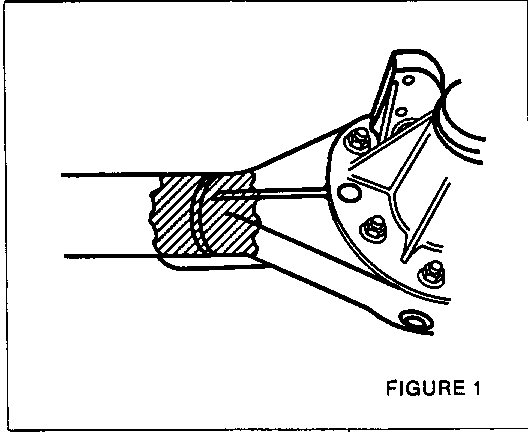
2. Clean dirt/undercoat from front of axle tube near bottom of weld area (see Figure 1, shaded area).
3. Visually inspect welds for any oil leaks. If leaks are, found, the axle assembly will require replacement (skip to "AXLE REPLACEMENT PROCEDURE").
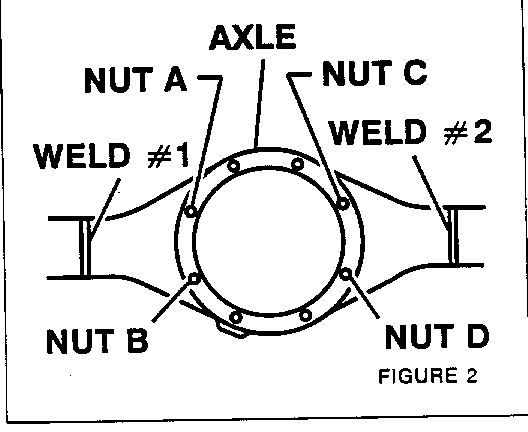
4. Place gauge tool over nuts "A" and "B" (Figure 2) ensuring that the gauge tool is resting on the axle (also see label on tool for proper positioning).
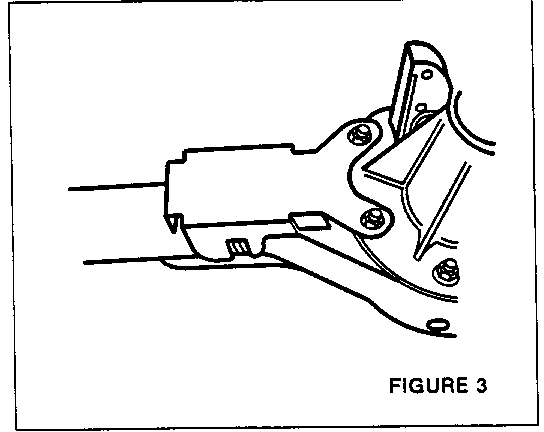
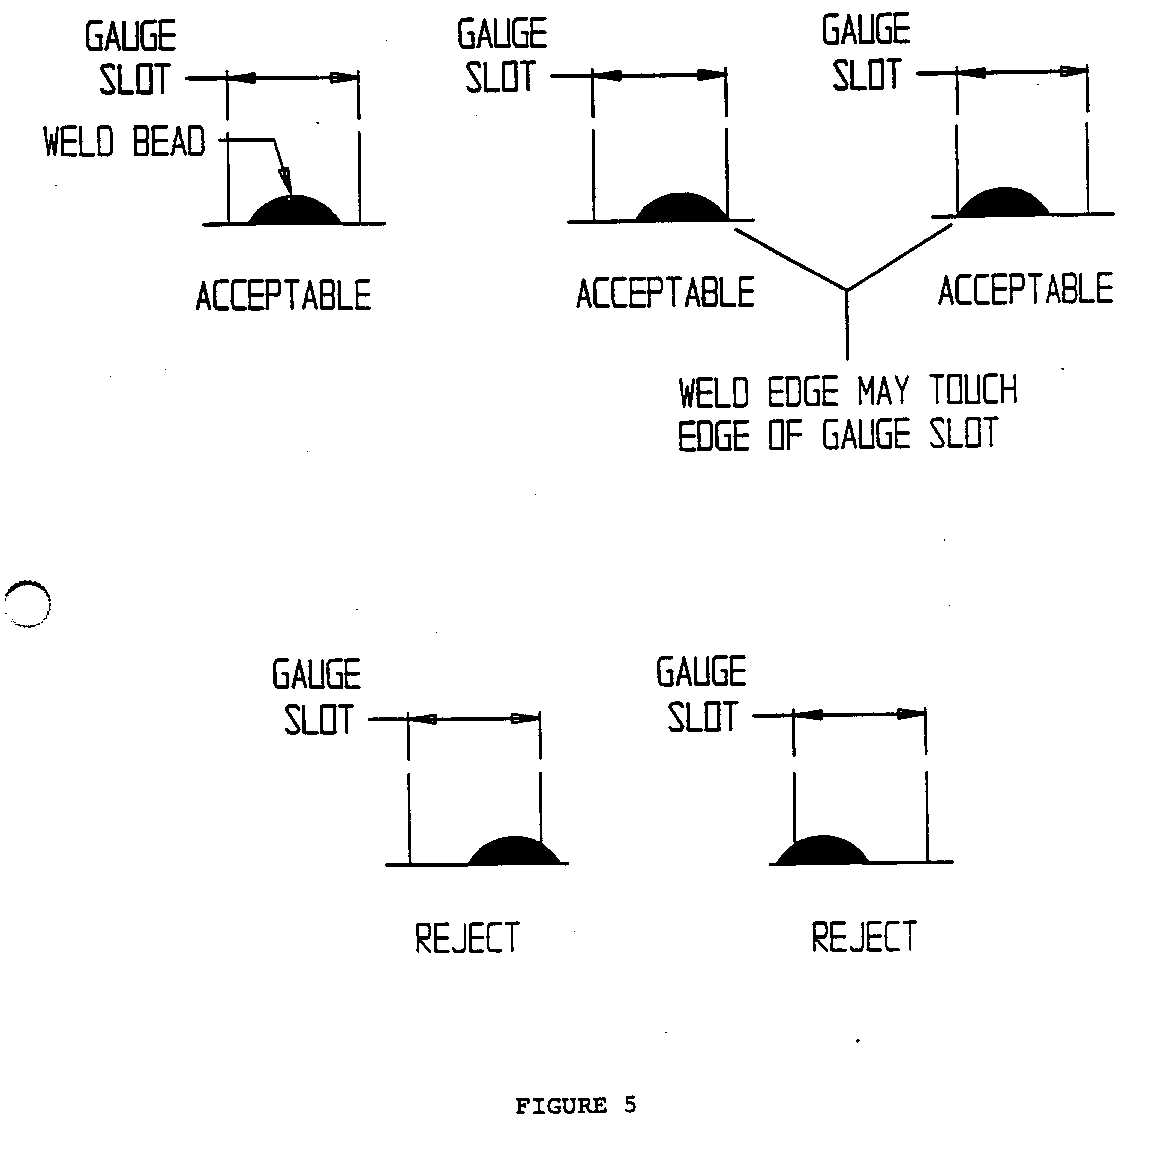
5. Position your line of sight with gauge slot (Figure 3) and inspect location of weld #1 (Figure 2). The part is acceptable if the weld is located within the slot. See Figure 5 for acceptable criteria of weld location.
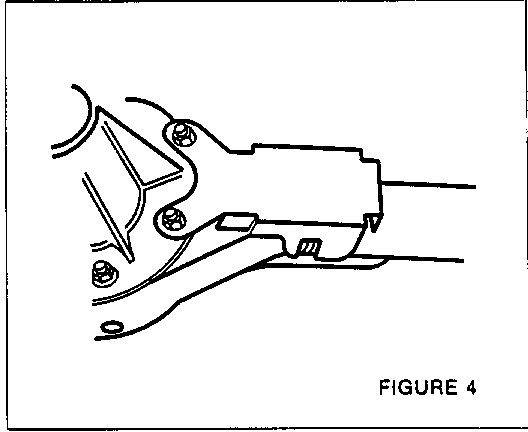
6. Place gauge tool over nuts "C" and "D" and inspect weld #2 (Figure 2 & 4). The part is acceptable if weld bead is located within the slot. See Figure 5 for acceptable criteria of weld location.
7. If weld areas do not pass inspection procedure, it will be necessary to replace the rear axle following the repair procedure which follows. If the weld area does pass in do not make any further repair but install Campaign Identification Label.
AXLE REPLACEMENT PROCEDURE
1. Remove two (2) screws, two (2) clips and parking brake lever cover from vehicle.
2. Remove park brake cable locknut and spacer.
3. Remove park brake cable from equalizer.
4. Raise and suitably support vehicle. Refer to Section OA of Service Manual.
5. Remove both rear wheels.
6. Remove bolts (8 total) from left and right park brake cable protectors on trailing rod, frame and crossmember.
7. Remove park brake cables from openings in floor.
8. Remove rear axle drain plug and drain fluid from rear axle into drain pan or other suitable container.
9. Disconnect propeller shaft from rear axle. SECURE SHAFT UNDER VEHICLE.
10. Loosen rear axle trailing rod through bolts.
11. Position hydraulic jack under the vehicle and support rear axle housing.
12. Remove four (4) bolts at rear control arm ball joint boss and separate ball joint boss from differential carrier.
13. Remove wheel speed sensor cover bolts.
14. Disconnect wheel speed sensor connector.
15. Disconnect brake fluid hose and remove E clip from brake hose bracket.
16. Disconnect rear axle breather hose.
17. Remove both lower shock mounting bolts and nuts.
18. Remove trailing rod through bolts.
19. Remove wheel speed sensor harness connector at axle.
20. Slowly lower rear axle and coil springs from vehicle.
NOTICE: Rear coil springs are under pressure. Lower hydraulic jack under rear axle slowly until coil springs become relieved. If rear coil springs become unseated while under pressure, serious bodily injury may result.
21. Remove old axle and hydraulic jack from under vehicle.
22. Install new axle on hydraulic jack and position axle under vehicle.
23. Raise axle assembly and install coil springs in their proper position.
NOTICE: When installing rear coil springs in their spring seats, make sure that the spring end with the stepped portion is aligned with the stepped portion of the rear axle housing.
24. Install speed sensor wiring harness to rear axle.
25. Install trailing rod through bolts and torque to 90 N.m (66 lb. ft.).
26. Install both lower shock through bolts and nuts. Torque nuts to 90 N.m (66 lb. ft.).
27. Connect rear axle breather hose to rear axle housing; secure with one clamp.
28. Connect brake fluid hose and install E clip to brake hose bracket.
29. Connect wheel speed sensor connector.
30. Install wheel speed sensor cover; secure with two bolts. Torque bolts 15 N.m (11 lb. ft.).
(Through hole bolt must have GM 992545 or equivalent sealant)
31. Install ball joint boss to differential carrier; secure with four bolts. Torque bolts to 50 N.m (37 lb. ft.).
32. Remove hydraulic jack from under the rear axle.
33. Install propeller shaft; secure with four (4) bolts and nuts. Torque to 50 N.m (36 lb. ft.).
34. Refill rear axle with approximately 2.2 liters (4.6 pints) of synthetic gear lubricant Oil level should be level with the bottom of the rear axle housing oil level/filler plug.
35. Install axle housing oil level/filler plug and torque to 50 N.m (36 lb. ft.).
36. Install park brake cables through floor openings.
37. Install left and right park brake cable protectors on trailing rod, frame and crossmember. Secure with four (4) bolts per side.
38. Bleed rear brakes. Refer to Section 5 of Service Manual.
39. Install both rear wheels.
40. Lower vehicle.
41. Install park brake cables to equalizer and connect equalizer to connecting rod. Secure with spacer and locknut.
42. Adjust park brake lever by loosening or tightening the locknut until parking brake is applied with between 7 and 9 clicks on parking brake lever with about 20 Kg (44 lb.) force.
43. Install park brake lever cover to vehicle; secure with two (2) screws and two (2) clips.
44. Install Campaign Identification Label.
45. Return removed rear axle assembly as follows:
ALL AXLE ASSEMBLIES REMOVED FROM VEHICLES IN CONJUNCTION WITH PERFORMING THIS CAMPAIGN SHOULD BE PROMPTLY RETURNED WITHIN 24 HOURS OF COMPLETING THE REPLACEMENT SERVICE ROCEDURE.
A. Drain all fluid from removed axle assembly.
B. Secure removed axle assembly on original shipping container.
C. Fill in information on shipping tag.
D. RETURN REMOVED REAR AXLE ASSEMBLY (VIA GROUND TRANSPORTATION) BY SHIPPING COLLECT TO:
Dominion General Mfg. Ltd. Packaging and Assemblies Division Attn: James O'Lugos 1770 Britannia Road E. Mississauga, ON L4W 1J3
INSTALLATION OF CAMPAIGN IDENTIFICATION LABEL
Clean surface of radiator upper mounting panel and apply a Campaign Identification Label. Make sure the correct campaign number is inserted on the label. This will indicate that the campaign has been completed.
Dear General Motors Customer
General Motors of Canada Limited has determined that a defect which relates to motor vehicle safety exists in certain 1993-94 Geo Tracker and 1994 Pontiac Sunrunner model vehicles. Some of these vehicles have a rear axle shaft housing tube that was incorrectly welded and could fracture. Fracture of the rear axle shaft housing tube could result in a loss of rear braking and affect vehicle control.
To prevent the possibility of this condition occurring, your dealer will inspect the rear axle assembly on your vehicle and, if necessary, replace the complete rear axle assembly.
This service will be provided for you at no charge.
Please contact your GM dealer as soon as possible to arrange a service date.
If parts are required, ask your dealer for details regarding their availability. If parts are not in stock, they can be ordered before scheduling your service date.
This letter identifies your vehicle. Presentation of this letter to your dealer will assist their Service personnel in completing the necessary correction to your vehicle in the shortest possible time.
We are sorry to cause you this inconvenience; however, we have taken this action in the interest of your continued satisfaction with our products.
Customer Support Department General Motors of Canada Limited
General Motors bulletins are intended for use by professional technicians, not a "do-it-yourselfer". They are written to inform those technicians of conditions that may occur on some vehicles, or to provide information that could assist in the proper service of a vehicle. Properly trained technicians have the equipment, tools, safety instructions and know-how to do a job properly and safely. If a condition is described, do not assume that the bulletin applies to your vehicle, or that your vehicle will have that condition. See a General Motors dealer servicing your brand of General Motors vehicle for information on whether your vehicle may benefit from the information.
