Important: The Throttle Position (TP) sensor, the fast idle air valve or any other components containing rubber should not be placed in a solvent or cleaner bath. A chemical reaction will cause these parts to swell, harden or distort. Do not soak the throttle body with the above parts attached. If the throttle body requires cleaning, soaking time in the cleaner should be kept to a minimum. Some models have hidden throttle shaft dust seals that could lose their effectiveness by extended soaking. These components should be cleaned in a cold immersion cleaner such as Carbon X (X-55) or equivalent.
Removal Procedure
- Disconnect the negative battery cable.
- Relieve the fuel system pressure. Refer to Fuel Pressure Relief .
- Drain the cooling system. Refer to Engine Cooling and Radiator.
- Remove the three bolts from the throttle cover.
- Remove the throttle cover to gain access to accelerator and throttle cables.
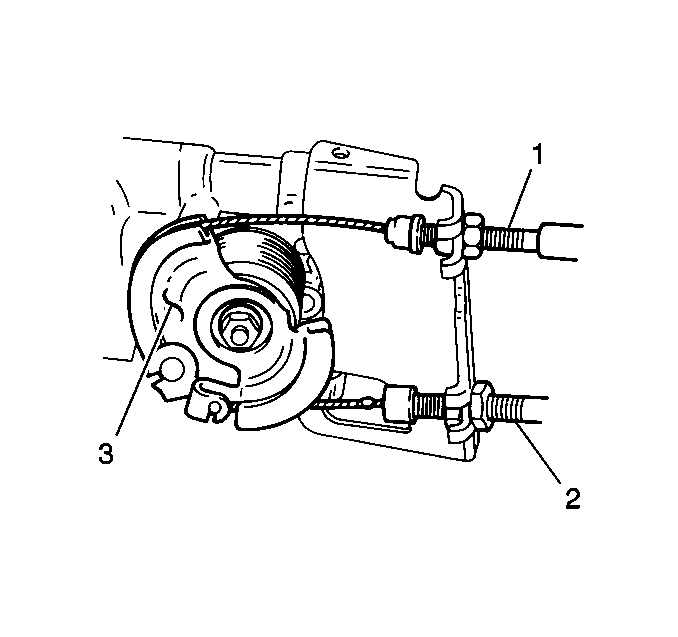
- Disconnect the accelerator cable (1) from the throttle lever.
- Disconnect the throttle cable (2) (automatic transmission) from the throttle lever.
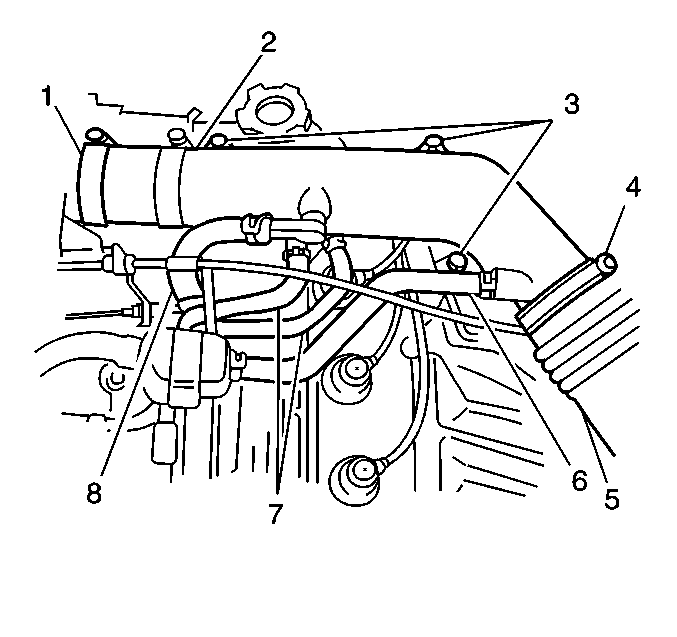
- Loosen the clamp (4) to the air intake hose (5).
- Remove the air intake hose (5) from the air intake pipe (2).
- Disconnect the two coolant hoses (7) from the air intake pipe.
- Remove the Positive Crankcase Ventilation (PCV) hose (8) from the air intake pipe.
- Disconnect the Idle Air Control (IAC) valve air intake/hose (6) from air intake pipe.
- Remove the three bolts (3) securing the intake air pipe.
- Loosen the clamp (1) at the throttle body.
- Remove the air intake pipe (2) from the throttle body.
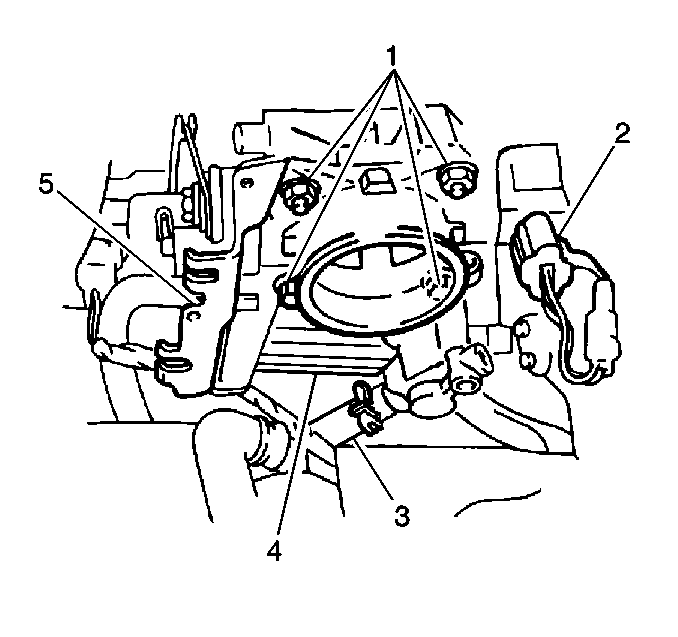
- Disconnect the throttle Position (TP) sensor electrical connector (2).
- Remove the nut from the accelerator cable bracket (1).
- Remove the bolt from the accelerator cable bracket (1).
- Remove the screw from the accelerator cable bracket.
- Remove the accelerator cable bracket (5) from the throttle body.
- Disconnect the Exhaust Gas Recirculation (EGR) solenoid vacuum valve vacuum hose from the throttle body.
- Disconnect the two coolant hoses (3) from the throttle body.
- Remove the nut from the throttle body to the intake manifold (1).
- Remove the bolt from the throttle body to the intake manifold (1).
- Remove the throttle body and gasket from intake manifold (4).
Caution: Unless directed otherwise, the ignition and start switch must be in the OFF or LOCK position, and all electrical loads must be OFF before servicing any electrical component. Disconnect the negative battery cable to prevent an electrical spark should a tool or equipment come in contact with an exposed electrical terminal. Failure to follow these precautions may result in personal injury and/or damage to the vehicle or its components.


Disassembly Procedure
Important: Do not remove the fast idle air valve from the throttle body. The fast idle air valve is not serviceable. The fast idle air valve is calibrated at the factory and is not adjustable.
Important The TP sensor, fast idle air valve or other components containing rubber must not be cleaned in a solvent or parts bath. A chemical reaction will occur that can cause the parts to swell, harden or distort.
- Remove the two screws from the Throttle Position (TP) sensor to the throttle body.
- Remove the Throttle Position (TP) sensor from the throttle body.
- Clean the passages by blowing with compressed air. Do not use drills or wires, these may damage the passages.
- Clean all of the metal parts thoroughly and blow dry with shop air.
- Be sure that all fuel and air passages are free of dirt or burns.
Assembly Procedure
- Install the TP sensor to throttle body.
- Secure the TP sensor with two screws. Do not tighten fully.
Installation Procedure
- Install the new gasket and the throttle body to the intake manifold (4).
- Secure the throttle body with one nut (1) and one bolt (1).
- Connect the two coolant hoses to the throttle body (3).
- Secure the two coolant hoses with hose clamps.
- Connect the EGR solenoid vacuum valve vacuum hose to the throttle body.
- Install the accelerator cable bracket (5) to the throttle body.
- Secure the accelerator cable bracket with one nut (1), one bolt (1) and one screw.
- Connect the TP sensor electrical connector (2).
- Install the air intake pipe (2) to throttle body.
- Secure the intake air pipe to the throttle body with the one clamp (1).
- Secure the intake air pipe in place with three bolts (3).
- Connect the IAC valve air intake hose to the air intake (4) pipe.
- Connect the PCV valve hose to the intake air pipe (8).
- Connect the two coolant hoses (7) to the intake air pipe.
- Secure the two coolant hoses with hose clamps.
- Connect the air intake hose (6) to the air intake pipe.
- Secure the air intake hose with one clamp.
- Connect the throttle cable (2) (automatic transmission) to the throttle lever.
- Connect the accelerator cable (1) to the throttle lever.
- Install the throttle cover.
- Secure the throttle cover with three bolts.
- Adjust the accelerator cable. Refer to Accelerator Adjustment Procedure.
- Adjust the throttle valve cable. Refer to Automatic Transmission On-Vehicle Service.
- Adjust the TP sensor. Refer to Throttle Position (TP) Sensor Adjustment.
- Turn OFF the ignition.
- Check for any fuel leaks and repair as necessary.
- Refill the engine coolant to proper level. Refer to Engine Cooling and Radiator.
- Connect the negative battery cable.

Notice: Use the correct fastener in the correct location. Replacement fasteners must be the correct part number for that application. Fasteners requiring replacement or fasteners requiring the use of thread locking compound or sealant are identified in the service procedure. Do not use paints, lubricants, or corrosion inhibitors on fasteners or fastener joint surfaces unless specified. These coatings affect fastener torque and joint clamping force and may damage the fastener. Use the correct tightening sequence and specifications when installing fasteners in order to avoid damage to parts and systems.
Tighten
Tighten the throttle body bolt and the nut to 18-28 N·m (13.5-20
lb ft).
Tighten
Tighten the throttle body nut and the bolt to 18-28 N·m (13.5-20
lb. ft).

Tighten
Tighten the three air intake pipe bolts to 15 N·m (11 lb
ft).

Tighten
Tighten the throttle cover bolts to 15 N·m (11 lb ft).
