CAMPAIGN:SEAT BELT - BUCKLE ASSEMBLY

SUBJECT: SEAT BELT BUCKLE ASSEMBLY -------------------------
Models: 1989-1991 Chevrolet Sprint 1989-1991 Pontiac Firefly 1989-1991 Chevrolet/GMC Tracker -------------------------------
TO: ALL GENERAL MOTORS DEALERS
--------------------------
Transport Canada, in cooperation with General Motors of Canada Limited, has decided that a defect which relates to motor vehicle safety exists in CERTAIN 1989-1991 Chevrolet Sprint, 1989-1991 Pontiac Firefly and 1989-1991 Chevrolet/GMC Tracker model vehicles. Some of these vehicles may exhibit a condition in which the driver and/or passenger front seat belt buckle release button may be chipped or cracked. If this were to occur, it could interfere with the proper operation of latching mechanism. These buckle malfunctions could prevent a person from using the seat belt system, and risk of injury to an unbelted person in an accident would be increased.
To correct this condition, all involved vehicles will have the release button with spring replaced and have a new buckle housing cover installed. Also, any buckle assemblies which are found not to function correctly will be replaced.
Buckle assemblies which are found not to fucction correctly in the future, no matter when, will also be repaired.
VEHICLES INVOLVED:
Involved are CERTAIN 1989-1991 Chevrolet Sprint, 1989-1991 Pontiac Firefly and 1989-1991 Chevrolet/GMC Tracker model vehicles built within the following VIN breakpoints:
Year Model Plant Plant Code From Through
1989 Chevrolet Sprint Kosai K SOP EOP 1989 Chevrolet Tracker Iwata W SOP EOP 1989 Pontiac Firefly Kosai K SOP EOP 1989 GMC Tracker Iwata W SOP EOP 1990 Chevrolet Sprint Kosai K SOP EOP 1990 Chevrolet Tracker Iwata W SOP EOP 1990 Pontiac Firefly Kosai K SOP EOP 1990 GMC Tracker Iwata W SOP EOP 1991 Chevrolet Sprint Kosai K SOP EOP 1991 Chevrolet Sprint Ingersoll 6 SOP EOP 1991 Chevrolet Tracker Ingersoll 6 SOP EOP 1991 Pontiac Firefly Kosai K SOP EOP 1991 Pontiac Firefly Ingersoll 6 SOP EOP 1991 GMC Tracker Ingersoll 6 SOP EOP
NOTE: PLEASE CHECK DCS SCREEN 445 OR YOUR V.I.N. LISTING BEFORE PERFORMING CAMPAIGN TO ENSURE THAT THE VEHICLE IS AFFECTED. ONLY AFFECTED VIN'S WILL BE PAID.
All affected vehicles have been identified by the VIN listing provided to involved dealers with this bulletin. Any dealer not receiving a listing was not shipped any of the affected vehicles.
DEALER CAMPAIGN RESPONSIBILITY:
All unsold new vehicles in dealer's possession and subject to this campaign must be held and inspected/repaired per the Service Procedure of this Campaign Bulletin before owners take possession of these vehicles.
Dealers are to perform this campaign on all involved vehicles at no charge to owners, regardless of kilometres traveled, age of vehicle, or ownership, from this time forward.
Owners of vehicles recently sold from your new vehicle inventory with no owner information indicated on the dealer listing, are to be contacted by the dealer, and arrangements made to make the required correction according to instructions contained in this bulletin. This could be done by mailing to such owners a copy of the owner letter accompanying this bulletin. Campaign follow-up cards should not be used for this purpose, since the owner may not as yet have received the notification letter.
In summary, whenever a vehicle subject to this campaign is taken into your new or used vehicle inventory, or is in your dealership for service in the future, please take the steps necessary to be sure the campaign correction has been made before selling or releasing the vehicle.
CAMPAIGN PROCEDURE:
Refer to Section 4 of the Service Policies and Procedures Manual for the detailed procedure on handling Product Campaigns. Dealers are requested to complete the: campaign on all transfers as soon as possible.
OWNER NOTIFICATION:
All owners of record at the time of campaign release are shown on the attached computer listing and have been notified by first class mail from General Motors (see copy of owner letter included with this bulletin). The listings provided are for campaign activity only and should not be used for any other purpose.
SPECIAL INSTRUCTIONAL VIDEO
Each dealer is being shipped an instructional video with this campaign bulletin. Technicians should be certain to view this video tape before attempting to perfonn the following service procedure.
PARTS INFORMATION:
RELEASE-BUTTON REPAIR KITS
(ONE PER VEHICLE)
Release-button repair kits required to complete this campaign should be ordered through regular channels, as follows:
Part Number Description Quantity/Vehicle ----------- ----------- ----------------
SPRINT/FIREFLY --------------
91173032 Release-Button Kit - Black (19I) As Required 91173104 Release-Button Kit - Gray (13I) As Required 91173103 Release-Button Kit - Blue (23I) As Required
TRACKER
91173033 Release-Button Kit - Black Only As Required
ONE KIT IS REQUIRED PER VEHICLE. EACH KIT WILL REPAIR THE DRIVER'S BUCKLE ASSEMBLY AND THE FRONT PASSENGER'S BUCKLE ASSEMBLY.
Each Kit Includes:
2 - Release Buttons with Springs 2 - Buckle Housing Covers
REPLACEMENT BUCKLE ASSEMBLIES
Replacement buckle assemblies required to complete this campaign should be ordered through regular channels:
DUE TO THE SMALL PERCENTAGE OF VEHICLES THAT WILL REQUIRE THIS REPAIR (LESS THAN 10%) AND VERY LIMITED PARTS AVAILABILITY, DEALERS ARE NOT TO ORDER REPLACEMENT BUCKLE ASSEMBLIES FOR USE AS SHELF STOCK. ONLY ORDER REPLACEMENT BUCKLE ASSEMBLIES IF THEY ARE REQUIRED TO REPAIR A VEHICLE WITH AN INOPERATIVE BUCKLE ASSEMBLY.
For those vehicles which experience inoperative buckle assemblies, dealers will need to order buckle assemblies as listed below. TO ENSURE EXACT COLOUR MATCH, BOTH BUCKLE ASSEMBLIES (DRIVER & PASSENGER) MUST BE ORDERED WHEN EITHER BUCKLE ASSEMBLY REQUIRES REPLACEMENT.
Left-Hand Right-Hand Quantity/ Part Number Part Number Description Vehicle ----------- ----------- ----------- SPRINT/FIREFLY --------------
91173192 91173191 Buckle Assembly - Black (I 91) As Required 91173196 91173193 Buckle Assembly - Slate Gray (I 3 1) As Required 91173197 91173194 Buckle Assembly - Med. Smoke Gray (901) As Required 91173198 91173195 Buckle Assembly - Blue (231) As Required
TRACKER
96059626 96059621 Buckle Assembly - Black Only As Required
PARTS AND LABOUR CLAIM INFORMATION:
Credit for the campaign work perfoffned will be paid upon receipt of a properly completed campaign claim card or DCS transmission in accordance with the following: Repair Time
Repair Code Description Allowance
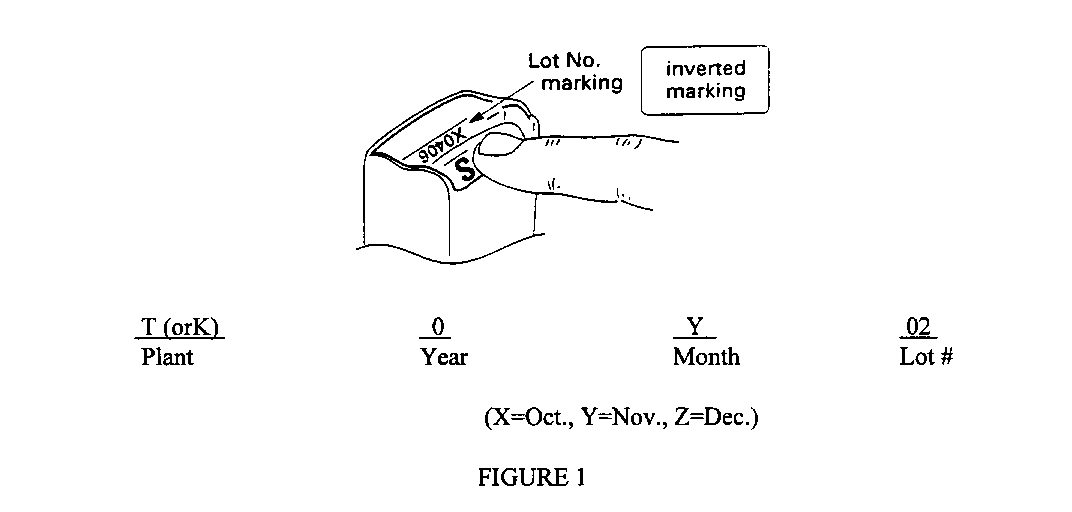
1A For 1991 Models Only - .3 Inspect Both Front Seat Belt Buttons for Lot Number Markings DO NOT REPLACE if Lot Number is later than T (orK) 0Y02
6A Replace Both Front Seat Belt Buttons - Tracker .5 Includes Time to Inspect 1991 Vehicles) Replace Both Front Seat Belt Buttons - Tracker .6 (Includes Time to Inspect 1991 Vehicles) Replace Both Front Buckle Assembly - ALL MODELS .4
Time allowance includes 0. I hour for dealer administrative detail associated with this campaign. Parts credit will be based on dealer net plus 30% to cover parts handling.
SERVICE PROCEDURE:
IMPORTANT: THIS PROCEDURE MUST BE PERFORMED ON BOTH FRONT SEAT BELT BUCKLE ASSEMBLIES TO COMPLETE THE CAMPAIGN.
INSPECTION PROCEDURE (L30TH FRONT SEATS)
IMPORTANT: IF CUSTOMER COMPLAINS OF LATCHING PROBLEMS WITH EITHER FRONT SEAT BELT BUCKLE, BOTH BUCKLE ASSEMBLIES WILL REQUIRE REPLACEMENT TO ENSURE EXACT COLOUR MATCH.
A LOT NUMBER INSPECTION WILL BE REQUIRED ON 1991 MODEL VEHICLES.
1. Slide front seat to the most rearward position and place clean shop cloth on seat and console. Ensure shop cloth allows access to seat belt buckle assemblies.
2. FOR 1991 VEHICLES ONLY: Inspect BOTH front seat belt buckle assemblies for the lot number markings (see Figure 1) to determine if involved in recall. Using a pen-light will help with this inspection.
REPLACE THOSE MARKED WITH LOT NUMBERS EARLIER THAN T (orK) OY02.
3. If lot number markings indicate that it IS NOT necessary to perform the recall procedure, proceed to Step 27. If lot number markings indicate it IS necessary to perform the recall procedure, proceed to Step 4.
4. Disconnect the negative battery cable.
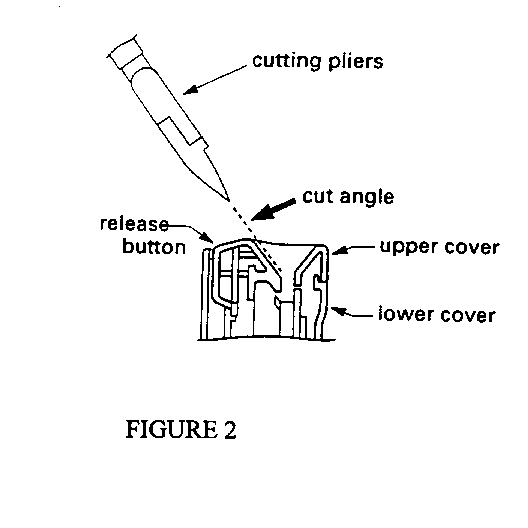
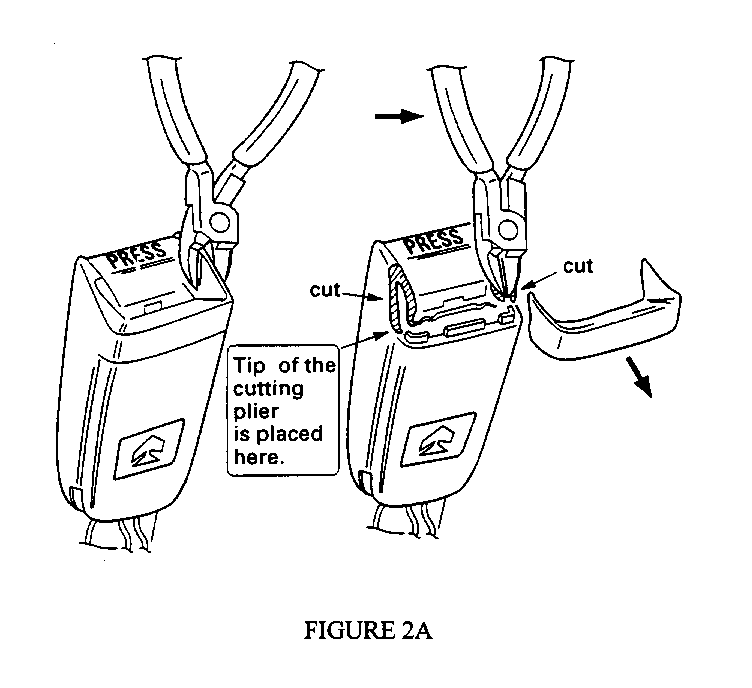
5. Using a small pair of wire cutters, carefully cut plastic outer cover along separation line between the two covers as shown in Figures 2 and 2A.
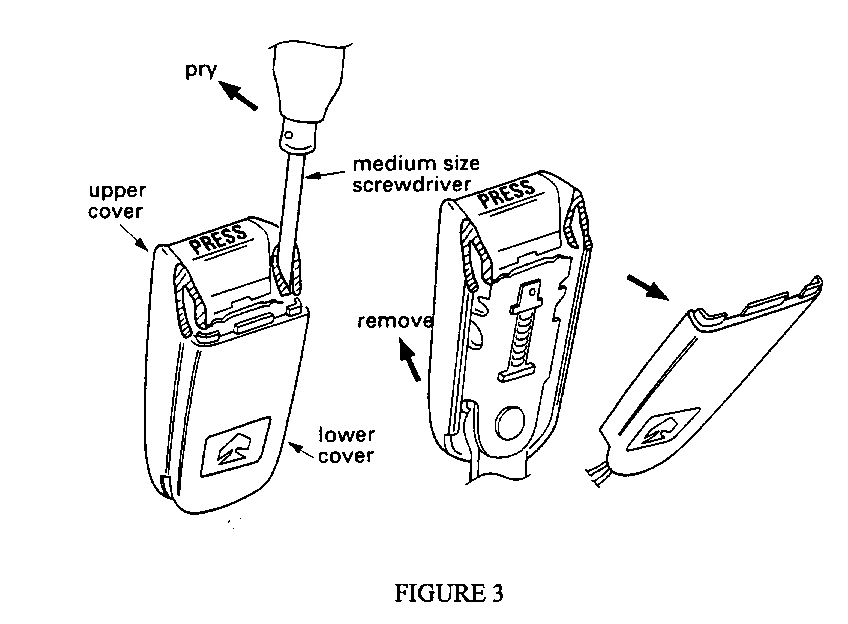
6. Using a medium screwdriver or other suitable tool, carefully separate the two halves of the outer cover by placing the screwdriver into the slot between the edges of the two covers as shown in Figure 3. Do not pry in the middle of the buckle, as this may damage the switch (e.g.: driver side).
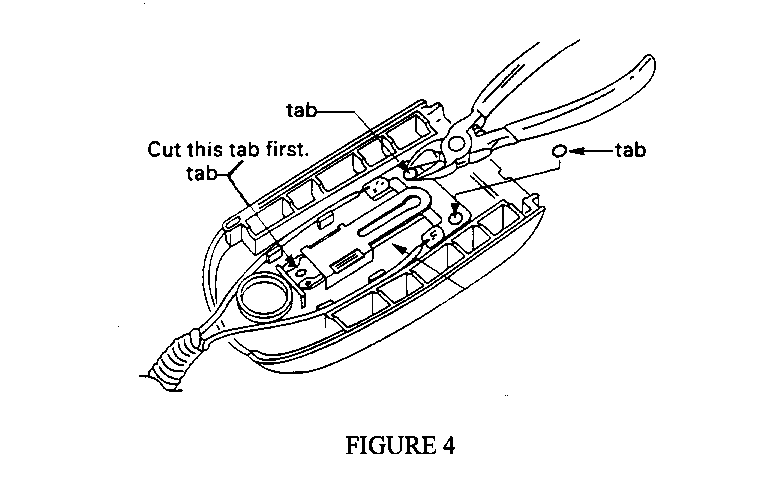
7. FOR DRIVER SIDE BUCKLES ONLY: Using the wire cutters, cut the three plastic tabs retaining the switch to the cover. Cut the bottom pin first, slide the switch down, then cut the top two retaining pins (see Figure 4).
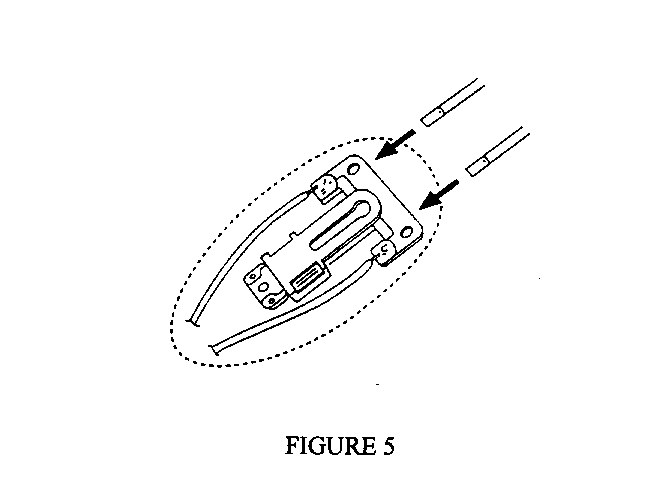
8. FOR DRIVER SIDE BUCKLES ONLY: Use a small blade flat screwdriver to separate the switch from the cover (see Figure 5).
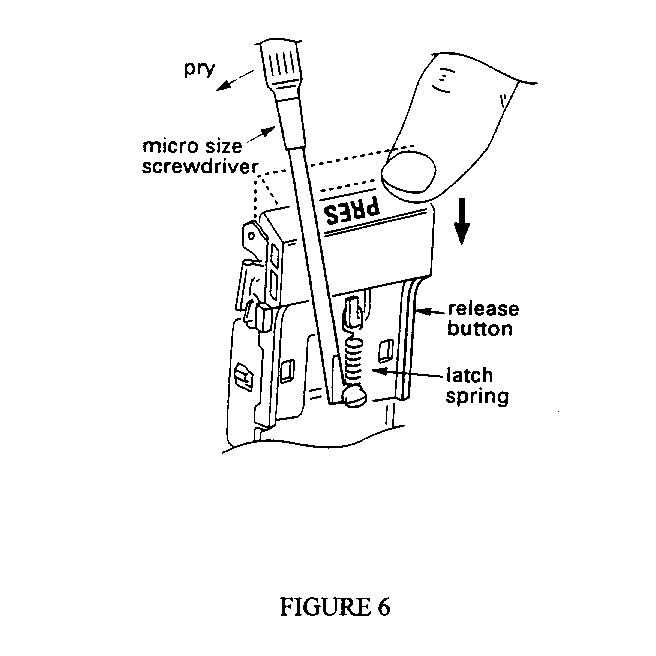
9. Depress seat belt push-button and release the bottom loop of the latch spring using a small screwdriver (see Figure 6).
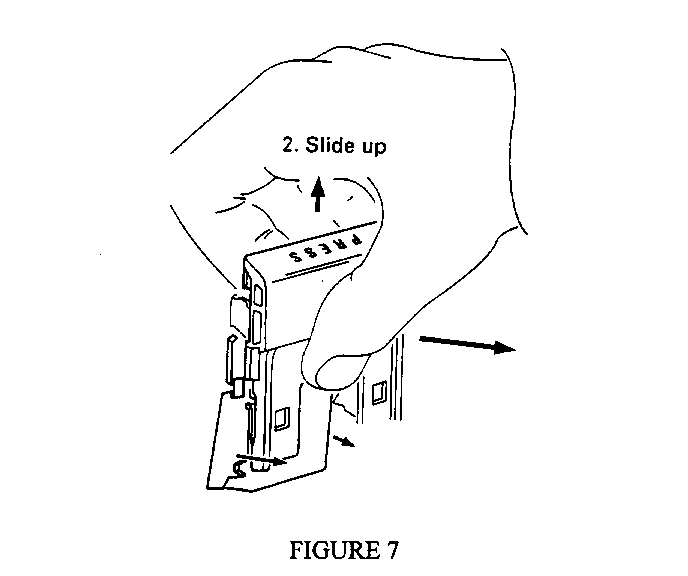
10. Remove button and spring by applying slight upward force while pulling button out of buckle assembly (see Figure 7). BUTTON AND SPRING WILL NOT BE REUSED.
11. Inspect buckle assembly for dirt, dust or foreign material. If buckle is contaminated with any form of sticky material, replace both buckle assemblies. DO NOT ATTEMPT TO CLEAN BUCKLE OF STICKY MATERIAL.
12. Remove any loose dirt, dust or foreign material using a dry compressed air (40 psi - 280 kPa maximum). BE CAREFUL NOT TO DAMAGE OR DISLODGE ANY PARTS DURING THIS PROCESS. SAFETY GOGGLES MUST BE WORN DURING THIS STEP.
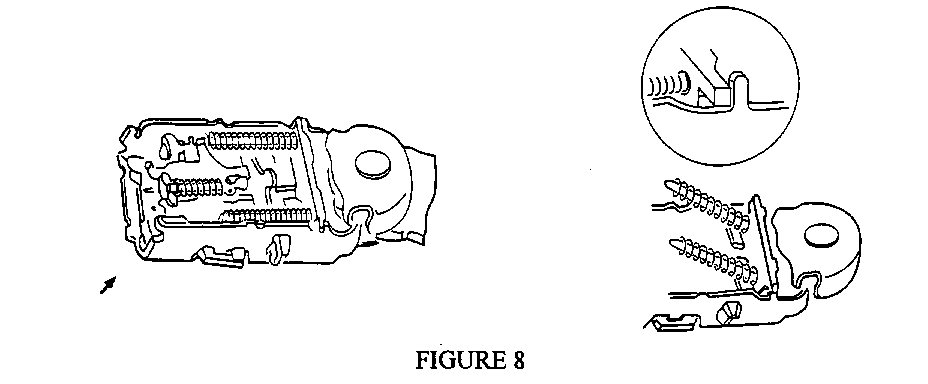
13. Check for proper position of the ejector mechanism, springs and rails (see Figure 8).
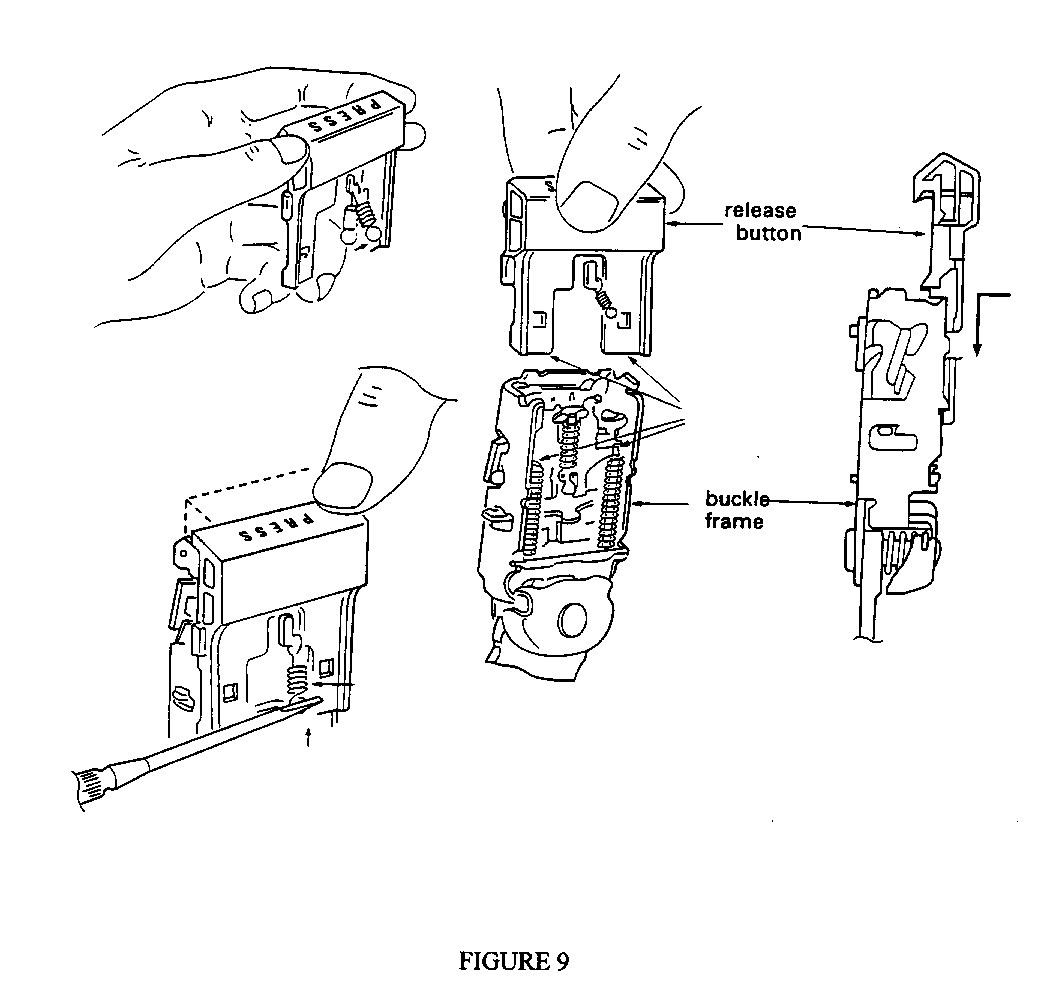
14. Install the NEW button onto the buckle assembly. Depress the release button and hold. Attach the end of the latch spring using a small screwdriver (see Figure 9).
15. Check operation of the button and that the spring is attached correctly by pressing the button several times to confirm free travel.
16. TEST the operation of the buckle. Insert seat belt latch plate into buckle and check to see that it latches properly by tugging on the seat belt latch plate while firmly holding the buckle. Repeat this step five (5) times. If it DOES NOT latch, the buckle assembly should be replaced.
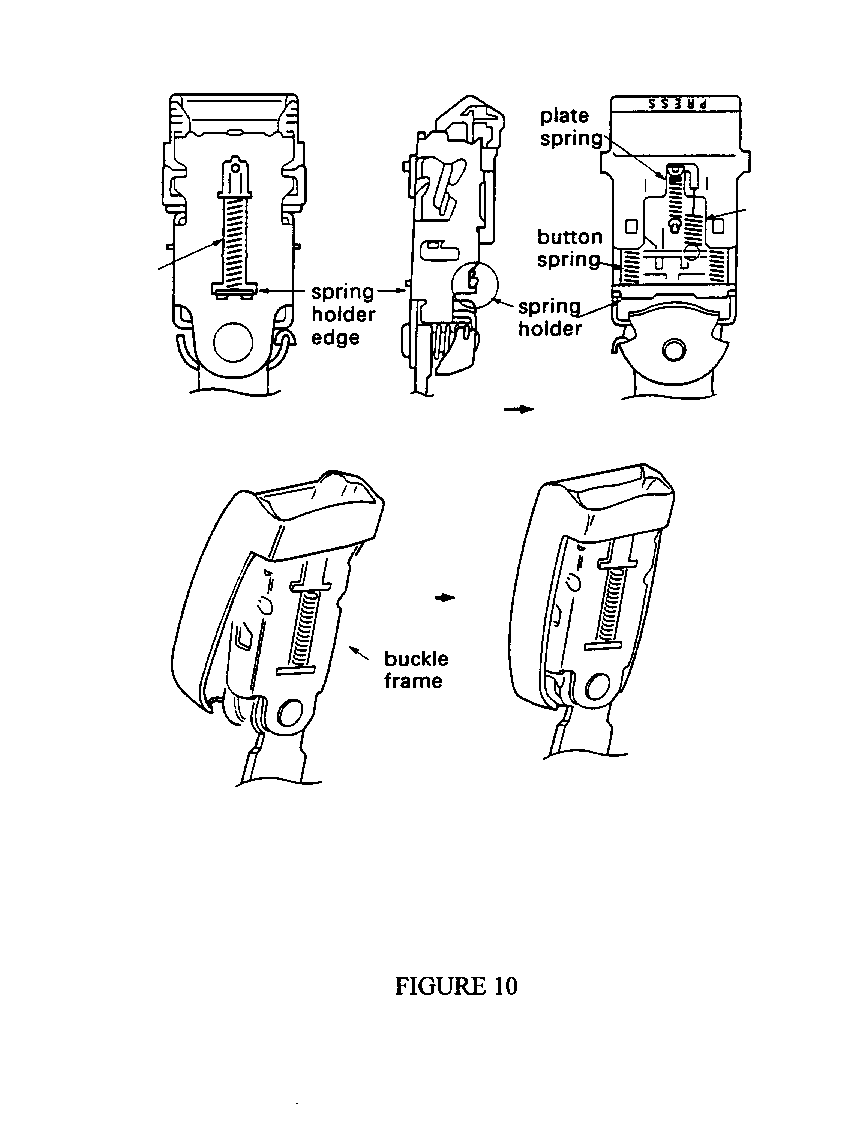
17. Install new upper cover to the base (see Figure 10).
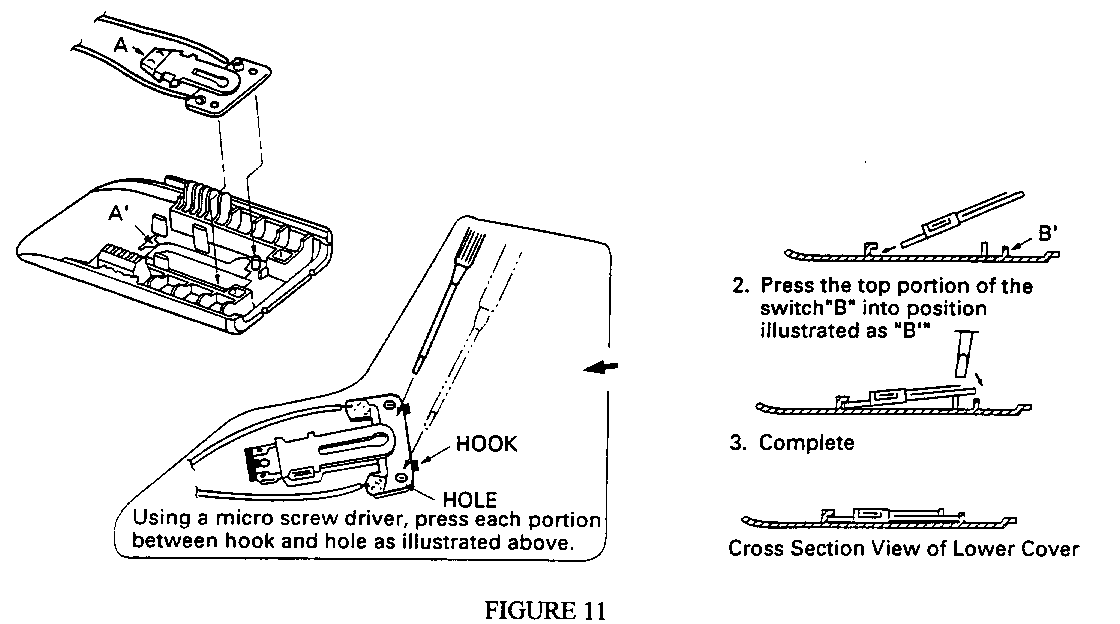
18. FOR DRIVER SIDE BUCKLES ONLY: Carefully install switch onto lower cover half by inserting the bottom portion first (A) and then by applying pressure to the top comers of (B) the switch (see Figure 11).
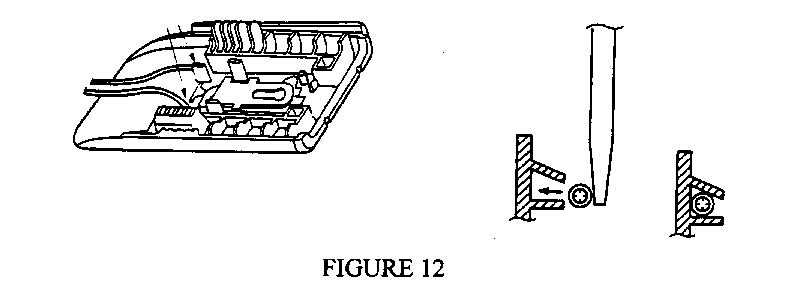
19. Press the switch wires into the clamps provided in the lower cover (see Figure 12).
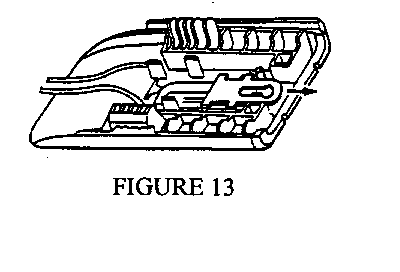
20. Slide the switch upwards (away from wires) to its original position (see Figure 13).
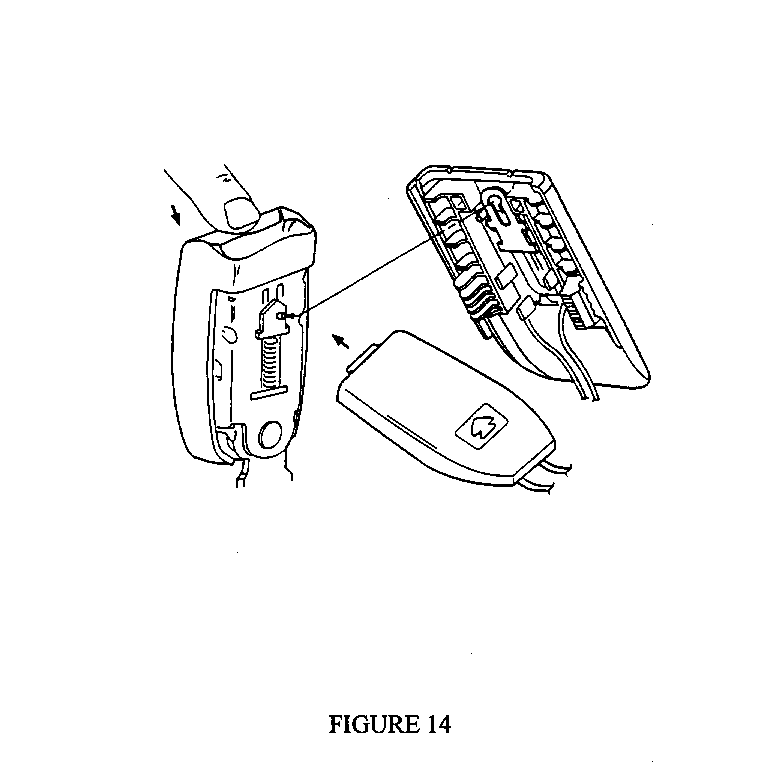
21. Push and hold down the buckle release button (this will ensure the correct engagement of the switch assembly) and carefully assemble the two halves together by first inserting the top tabs of the lower cover into the button half of the cover (see Figure 14).
22. Firmly push the two halves together until a snap is heard and/or felt.
23. Check the operation of the buckle. Insert the seat belt latch plate into the buckle. Be sure there is a positive locking sound and check to see that it latches properly by tugging on the seat belt latch plate while firmly holding the buckle. Repeat this step five (5) times. If it DOES NOT latch, both buckle assemblies should be replaced.
24. Reconnect the negative battery cable.
25. Check for proper operation of the seat belt warning light.
26. Return seat to its original starting position.
27. Remove shop cloth from seats and console.
28. Install Campaign Identification Label.
Clean surface of radiator upper mounting panel and apply a Campaign Identification Label. Make sure the correct campaign number is inserted on the label. This will indicate that the campaign has been completed.
June 1996
Dear General Motors Customer:
Our records indicate that you are the owner of a 1989-1991 Chevrolet Sprint, 1989-1991 Pontiac Firefly or 1989-1991 Chevrolet/GMC Tracker model vehicle. We at General Motors of Canada Limited, in cooperation with Transport Canada, want to notify you that some of these vehicles may exhibit a condition in which the driver and/or passenger front seat belt buckle release button may be chipped or cracked. If this were to occur, it could interfere with the proper operation of latching mechanism. These buckle malfunctions could prevent a person from using the seat belt system, and risk of injury to an unbelted person in an accident would be increased.
To correct this condition, all involved vehicles will have the front seat belt buckle release buttons and springs replaced and have a new buckle housing cover installed. Also, any front seat belt buckle assemblies which are found not to function correctly will be replaced. This service will be provided for you at no charge. The release buttons in the rear seat belt buckles are made of a different material, and they are not subject to this campaign.
In addition, if you ever have a problem with the front seat belt buckle assemblies in the future - no matter when - contact your GM dealer for buckle repair.
Please contact your GM dealer as soon as possible to arrange a service date.
Also, please tell them the interior colour of your vehicle so they may order the necessary parts for the repair.
This letter identifies your vehicle. Presentation of this letter to your dealer will assist their Service personnel in completing the necessary correction to your vehicle in the shortest possible time.
We are sorry to cause you this inconvenience; however, we have taken this action in the interest of your continued satisfaction with our products.
Customer Support Department General Motors of Canada Limited
General Motors bulletins are intended for use by professional technicians, not a "do-it-yourselfer". They are written to inform those technicians of conditions that may occur on some vehicles, or to provide information that could assist in the proper service of a vehicle. Properly trained technicians have the equipment, tools, safety instructions and know-how to do a job properly and safely. If a condition is described, do not assume that the bulletin applies to your vehicle, or that your vehicle will have that condition. See a General Motors dealer servicing your brand of General Motors vehicle for information on whether your vehicle may benefit from the information.
