Removal Procedure
- Remove the door trim panel. Refer to Front Side Door Trim Panel Replacement or Rear Side Door Trim Panel Replacement .
- Place the door trim panel, back-side up, on a clean prepared non-abrasive surface.
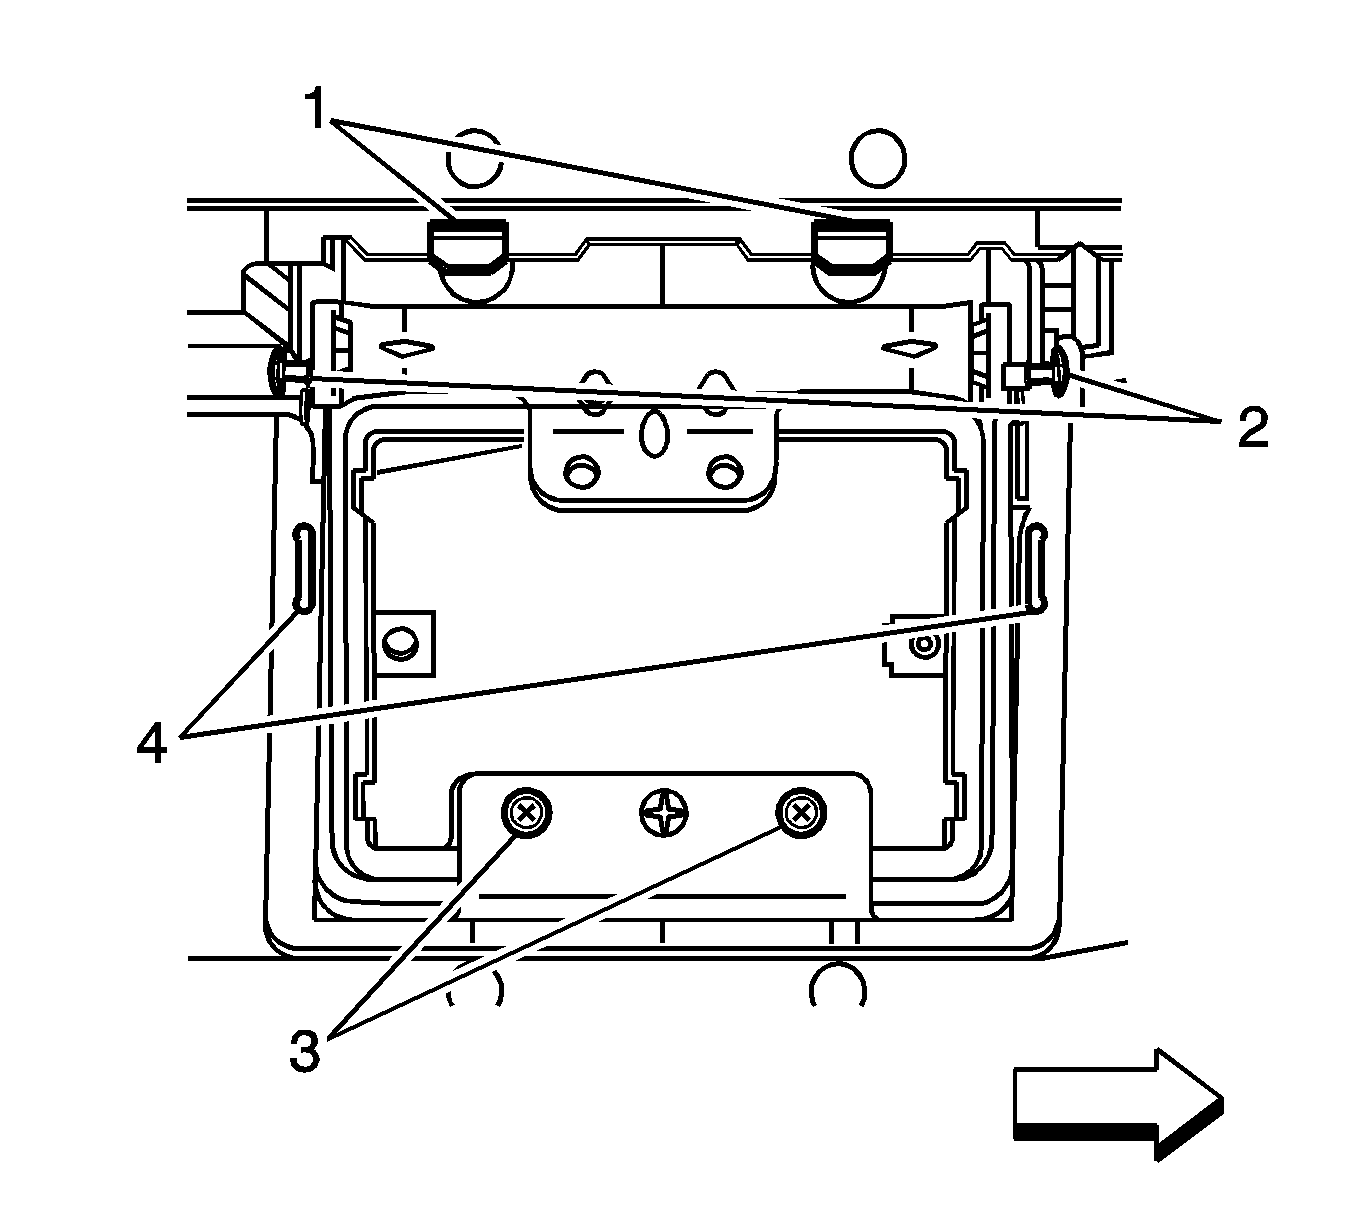
- Locate the 2 lower heat-stakes holding the pull handle bezel assembly to the door panel (3).
- Using a 8mm (5/16in) drill bit, drill through the round heat-staked studs (3).
- Using a Dremel tool or equivalent, remove any heat-stake material that may be left in the door panel holes or on the door panel.
- Grind off the heat-stake material (4).
- Remove the screws (2).
- Using pliers, straighten the pull handle bezel tabs (1). Grind any remaining material if necessary.
- Remove the pull handle bezel assembly from the door panel.

Important: If the heat-stake is beaded, grin off the bead. Do not remove any door trim material.
Drill into the heat-staked stud just enough to cause the stud material to separate from the door panel.
Installation Procedure
- Position the replacement pull handle bezel assembly to the door trim panel.
- Place the door trim panel, back-side up, on a clean prepared non-abrasive surface.
- Install the 2 screws (2).
- Use clamps to temporarily secure handle bezel to door trim panel.
- Using a Weller model 8200 soldering gun, or equivalent, equipped with a flat tip, heat and bend the tabs (1) securing the handle bezel to the door panel.
- Heat the tabs (4) securing the handle bezel to the door panel.
- Use a soldering gun equipped with a flat tip. Using a circular motion, apply firm steady pressure to spread the heat-stake (3) material into the door trim panel to achieve a proper weld.
- Allow for heat-stakes to cool and remove clamps.
- Verify that the pull handle bezel is securely heat-staked to the door trim panel.
- Install the door trim panel. Refer to Front Side Door Trim Panel Replacement or Rear Side Door Trim Panel Replacement .

Notice: Use the correct fastener in the correct location. Replacement fasteners must be the correct part number for that application. Fasteners requiring replacement or fasteners requiring the use of thread locking compound or sealant are identified in the service procedure. Do not use paints, lubricants, or corrosion inhibitors on fasteners or fastener joint surfaces unless specified. These coatings affect fastener torque and joint clamping force and may damage the fastener. Use the correct tightening sequence and specifications when installing fasteners in order to avoid damage to parts and systems.
Tighten
Tighten the screws to 2.8 N·m (25 lb in).
Important: A desirable round heat-stake weld should have an approximate diameter of 13mm (1/2in) and height 2mm (3/32in).
