Special Tools
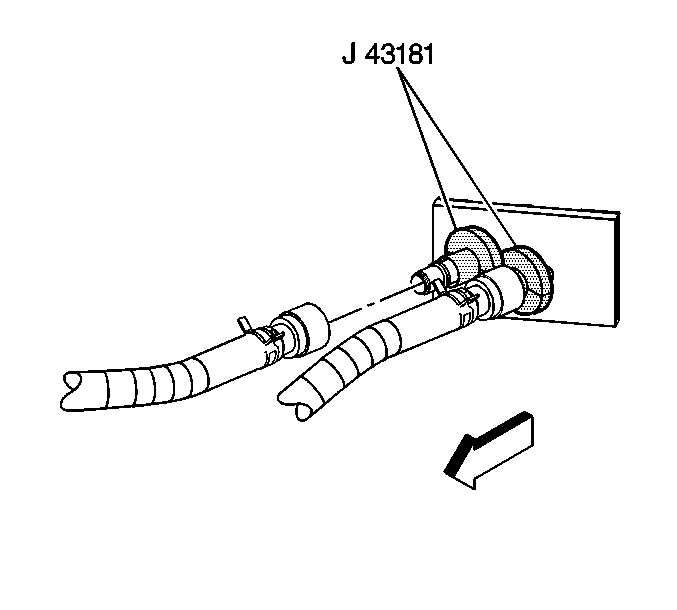
J 43181
Quick Connect Connector Removal Tool
Removal Procedure
- Drain the engine coolant. Refer to
Cooling System Draining and Filling.
- Remove the air cleaner assembly. Refer to
Air Cleaner Assembly Replacement.
- Remove the windshield solvent heater. Refer to
Windshield Washer Solvent Heater Replacement.
- Remove the windshield washer solvent container. Refer to
Windshield Washer Solvent Container Replacement.

- Using the
J 43181
disconnect the inlet heater hose from the heater core.
| 5.1. | Install the
J 43181
to the heater core pipe. |
| 5.2. | Close the tool around the heater core pipe. |
| 5.3. | Firmly pull the tool into the quick connect end of the heater hose. |
| 5.4. | Firmly grasp the heater hose. Pull the heater hose forward in order to disengage the inlet hose from the heater core. |
- Using the
J 43181
disconnect the surge tank outlet hose from the heater core.
| 6.1. | Install the
J 43181
to the heater core pipe. |
| 6.2. | Close the tool around the heater core pipe. |
| 6.3. | Firmly pull the tool into the quick connect end of the heater hose. |
| 6.4. | Firmly grasp the heater hose. Pull the heater hose forward in order to disengage the surge tank outlet hose from the heater core. |
- Remove the accumulator. Refer to
Air Conditioning Accumulator Replacement.
- Move the instrument panel into the service position. Refer to
Instrument Panel Service Positioning.
- Remove the Radio Front Floor Console Speaker. Refer to
Radio Front Floor Console Speaker Replacement
- Remove the HVAC module drain hose.
- Disconnect the electrical harnesses and the ground connections from the HVAC module assembly.

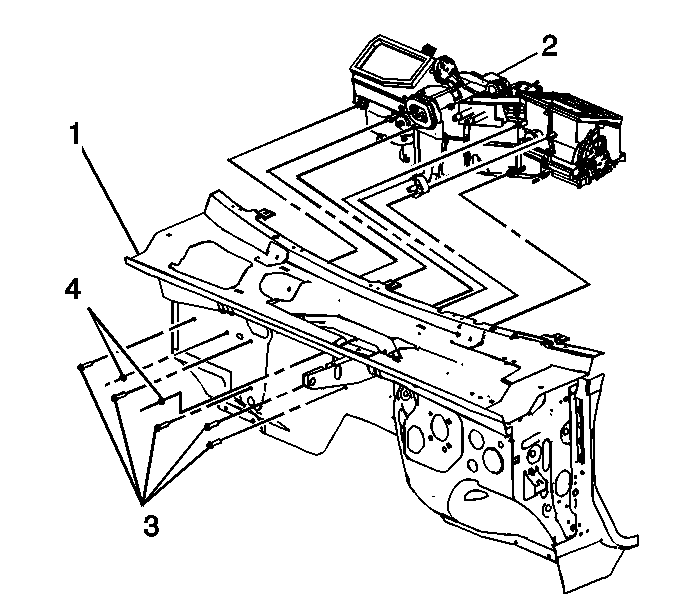
- Remove the nuts (4) from the HVAC module assembly (2).
- Remove the bolts (3) from the HVAC module assembly (2).
- Remove the HVAC module assembly (2) from the vehicle (1).
Installation Procedure

- If replacing the HVAC module, transfer the components from the old HVAC module as necessary.
- Install the HVAC module assembly (2) to the vehicle (1).
Notice: Refer to Fastener Notice in the Preface section.
- Install the nuts (4) to the HVAC module assembly (2).
Tighten
Tighten the nuts to 9 N·m (80 lb in).
- Install the bolts (4) to the HVAC module assembly (2).
Tighten
Tighten the bolts to 4 N·m (35 lb in).
- Connect the electrical harnesses and the ground connections.
- Install the HVAC module drain hose.
- Install the Radio Front Floor Console Speaker. Refer to
Radio Front Floor Console Speaker Replacement
- Install the instrument panel back into position. Refer to
Instrument Panel Service Positioning.
- Install the accumulator. Refer to
Air Conditioning Accumulator Replacement.

- Install the surge tank outlet hose to the heater core.
Important: Firmly push the quick connect onto the heater core pipe until you hear an audible click.
- Pull the surge tank outlet hose to ensure the connection.
- Install the inlet heater hose to the heater core.
Important: Firmly push the quick connect onto the heater core pipe until you hear an audible click.
- Pull the inlet heater hose to ensure the connection.
- Install the windshield solvent heater. Refer to
Windshield Washer Solvent Heater Replacement.
- Install the windshield washer solvent container. Refer to
Windshield Washer Solvent Container Replacement.
- Install the air cleaner assembly. Refer to
Air Cleaner Assembly Replacement.
- Fill the engine coolant. Refer to
Cooling System Draining and Filling.


