Floor Pan Creak Noise When Moving in Seat or When Seat is Loaded or Occupied While Traveling (Install Weld)

| Subject: | Floor Pan Creak Noise When Moving in Seat or When Seat is Loaded or Occupied While Traveling (Install Weld) |
| Models: | 2008-2009 HUMMER H3 |
| 2009 HUMMER H3T |
Condition
Some customers may comment on a seat frame creak when moving in the passenger's seat. This condition may also occur when the vehicle is traveling down the road and the seat is occupied or loaded.
Cause
This condition may be caused by the location of a weld on the passenger side of the floor pan tunnel at the trim edge or crease.
Correction
Caution: To avoid personal injury when exposed to welding flashes or to galvanized (Zinc Oxide) metal toxic fumes while grinding/cutting on any type of metal or sheet molded compound, you must work in a properly ventilated area, wearing an approved respirator, eye protection , earplugs, welding gloves, and protective clothing.
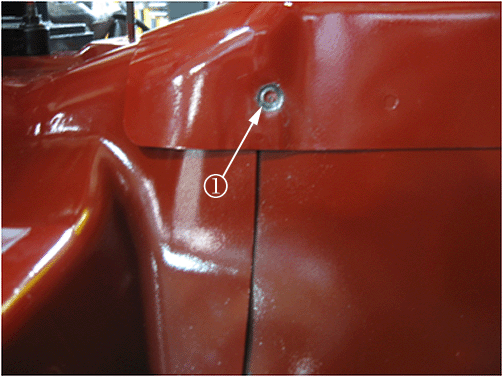
Drill out the incorrect weld on the passenger's side of the floor pan tunnel and install a new weld using the procedure below.
- Disable the SIR system. Refer to SIR Disabling and Enabling in SI.
- Remove the front seats. Refer to Front Seat Replacement in SI.
- Disconnect the negative battery cable. Refer to Battery Negative Cable Disconnection and Connection in SI.
- Remove the floor console. Refer to Console Replacement in SI.
- Remove the seat belt buckles. Refer to Front Seat Belt Buckle Replacement in SI.
- Remove the door sill plates. Refer to Front Side Door Sill Trim Plate Replacement in SI.
- Remove the cowl side trim panels. Refer to Cowl Side Trim Panel Replacement in SI.
- Pull the carpet assembly back away from the floor tunnel.
- Locate the incorrect weld on the passenger's side of the floor pan tunnel.
- Drill out the old weld (1) using a 5/16 in spot weld drill bit.
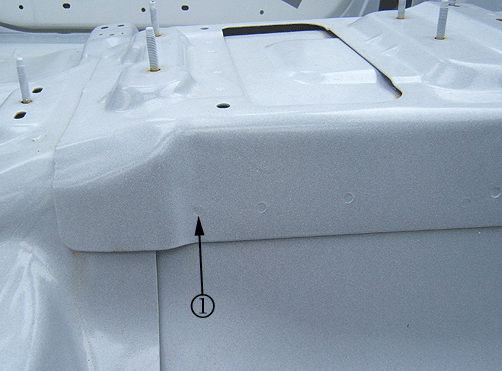
- Measure the new weld (1) location 10 mm (3/8 in) forward of the crease in the floor pan tunnel. Align the new weld (1) location in relation to the existing welds and mark the location.
- Drill an 8 mm (5/16 in) plug weld hole through the first layer of sheet metal in the floor pan tunnel.
- MIG WELD the floor pan tunnel to the floor pan using the appropriate welding technique.
- Apply force to front seat reinforcement bar and verify the creak has been corrected with the new weld.
- Sand, clean and prepare the welded surface.
- Paint the metal and welded surface with GM Touch-Up Paint using the appropriate body color. For the proper refinish materials to use, refer to the 2008 GMWI5406 GM Globally Approved Refinish Materials information. The refinish materials information is now online at the GMGOODWRENCH WEB SITE*. Printed books have been discontinued. To access the site, follow these steps:
- Hoist and raise the vehicle. Refer to Lifting and Jacking the Vehicle in SI.
- Sand, clean and prepare the bottom side of the floor pan tunnel at the repaired heated metal location.
- Using a brush, apply GM Touch-Up Paint to the bottom side of the floor pan tunnel repair.
- Apply Anti-Corrosion (Clear) Wax Based Compound, P/N 12378399 (in Canada, P/N 10952414) or equivalent, to the bottom side of the repair to prevent corrosion.
- Lower the vehicle.
- Install the carpet assembly back into position.
- Install the floor console. Refer to Console Replacement in SI.
- Install the seat belt buckles. Refer to Front Seat Belt Buckle Replacement in SI.
- Install the front seats. Refer to Front Seat Replacement in SI.
- Install the cowl side trim panels. Refer to Cowl Side Trim Panel Replacement in SI.
- Install the door sill plates. Refer to Front Side Door Sill Trim Plate Replacement in SI.
- Connect the negative battery cable. Refer to Battery Negative Cable Disconnection and Connection in SI.
- Enable the SIR system. Refer to SIR Disabling and Enabling in SI.

Important: Drill through the first layer of the sheet metal ONLY.
Correct Weld Location Example

Important: Protect the vehicles interior and glass prior to welding. Do Not use oxyacetylene welding equipment. MIG WELD ONLY .
Important: Apply GM Touch-Up Paint to the repaired floor pan tunnel area.
| • | Go to www.gmgoodwrench.com. |
| • | Click on For Body Shops & Services link at the bottom of the page. |
| • | Click on GM Technical Repair Information. |
| • | Click on Paint Shop tab. |
| *In Canada, the 2008 GM Approved Refinish Materials booklet is also available on the GM infoNET under the Service and Body tab. |
Parts Information
Part Number | Description |
|---|---|
12378399 (U.S.) | Compound, Anti-Corrosion (Clear) Wax Based |
10952414 (Canada) | Undercoat, Protective |
Warranty Information
For vehicles repaired under warranty, use:
Labor Operation | Description | Labor Time |
|---|---|---|
A9931* | Install Weld to Floor Pan Tunnel | 2.3 hrs |
Add | Material Allowance | $5.90 in U.S. ($6.30 in Canada) |
*This labor operation number is for bulletin use only. This number will not be published in the Labor Time Guide. | ||
