Radiator Air Lower Baffle and Deflector Replacement HSV Maloo
Removal Procedure - Type B
- Raise and support the vehicle. Refer to Lifting and Jacking the Vehicle .
- Remove the air deflector. Refer to Front Air Deflector Replacement .
- Remove the front bumper fascia. Refer to Front Bumper Fascia Replacement .
- Remove the front bumper impact bar. Refer to Front Bumper Impact Bar Replacement .
- Remove the washer solvent container. Refer to Windshield Washer Solvent Container Replacement .
- Detach the ambient air temperature sensor and ambient air temperature sensor wiring loom. Refer to Ambient Air Temperature Sensor Replacement .
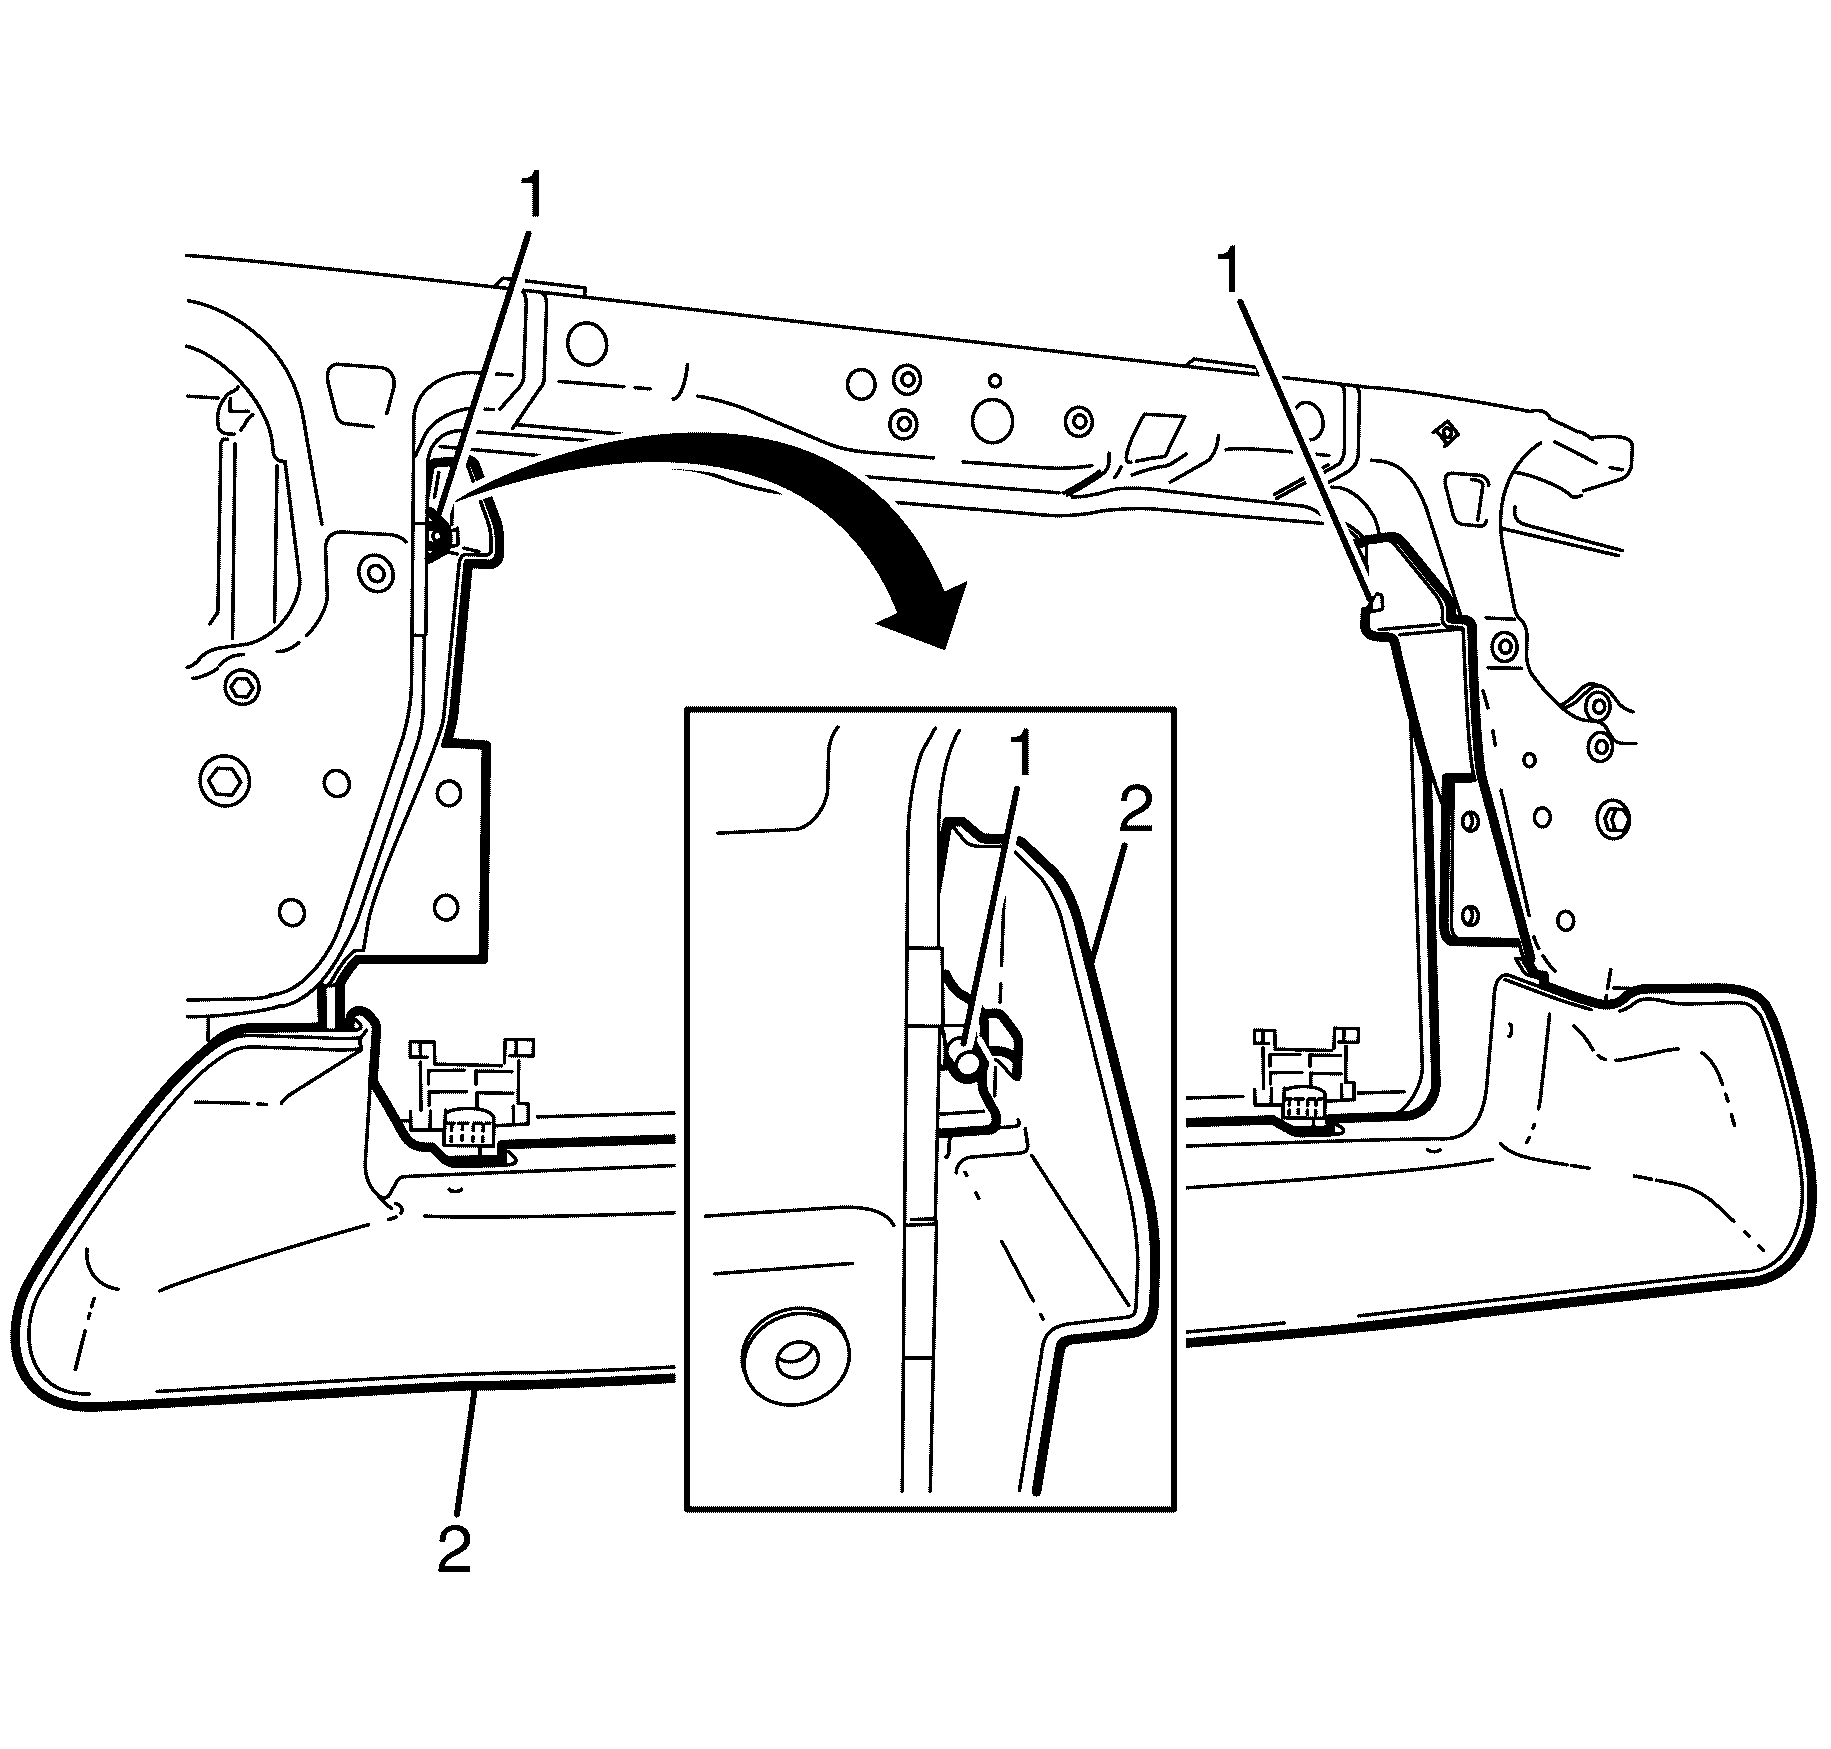
- Remove the retaining pins (1) located at either side of the lower air baffle (2).
- Remove the lower air baffle (2) from the front of vehicle.
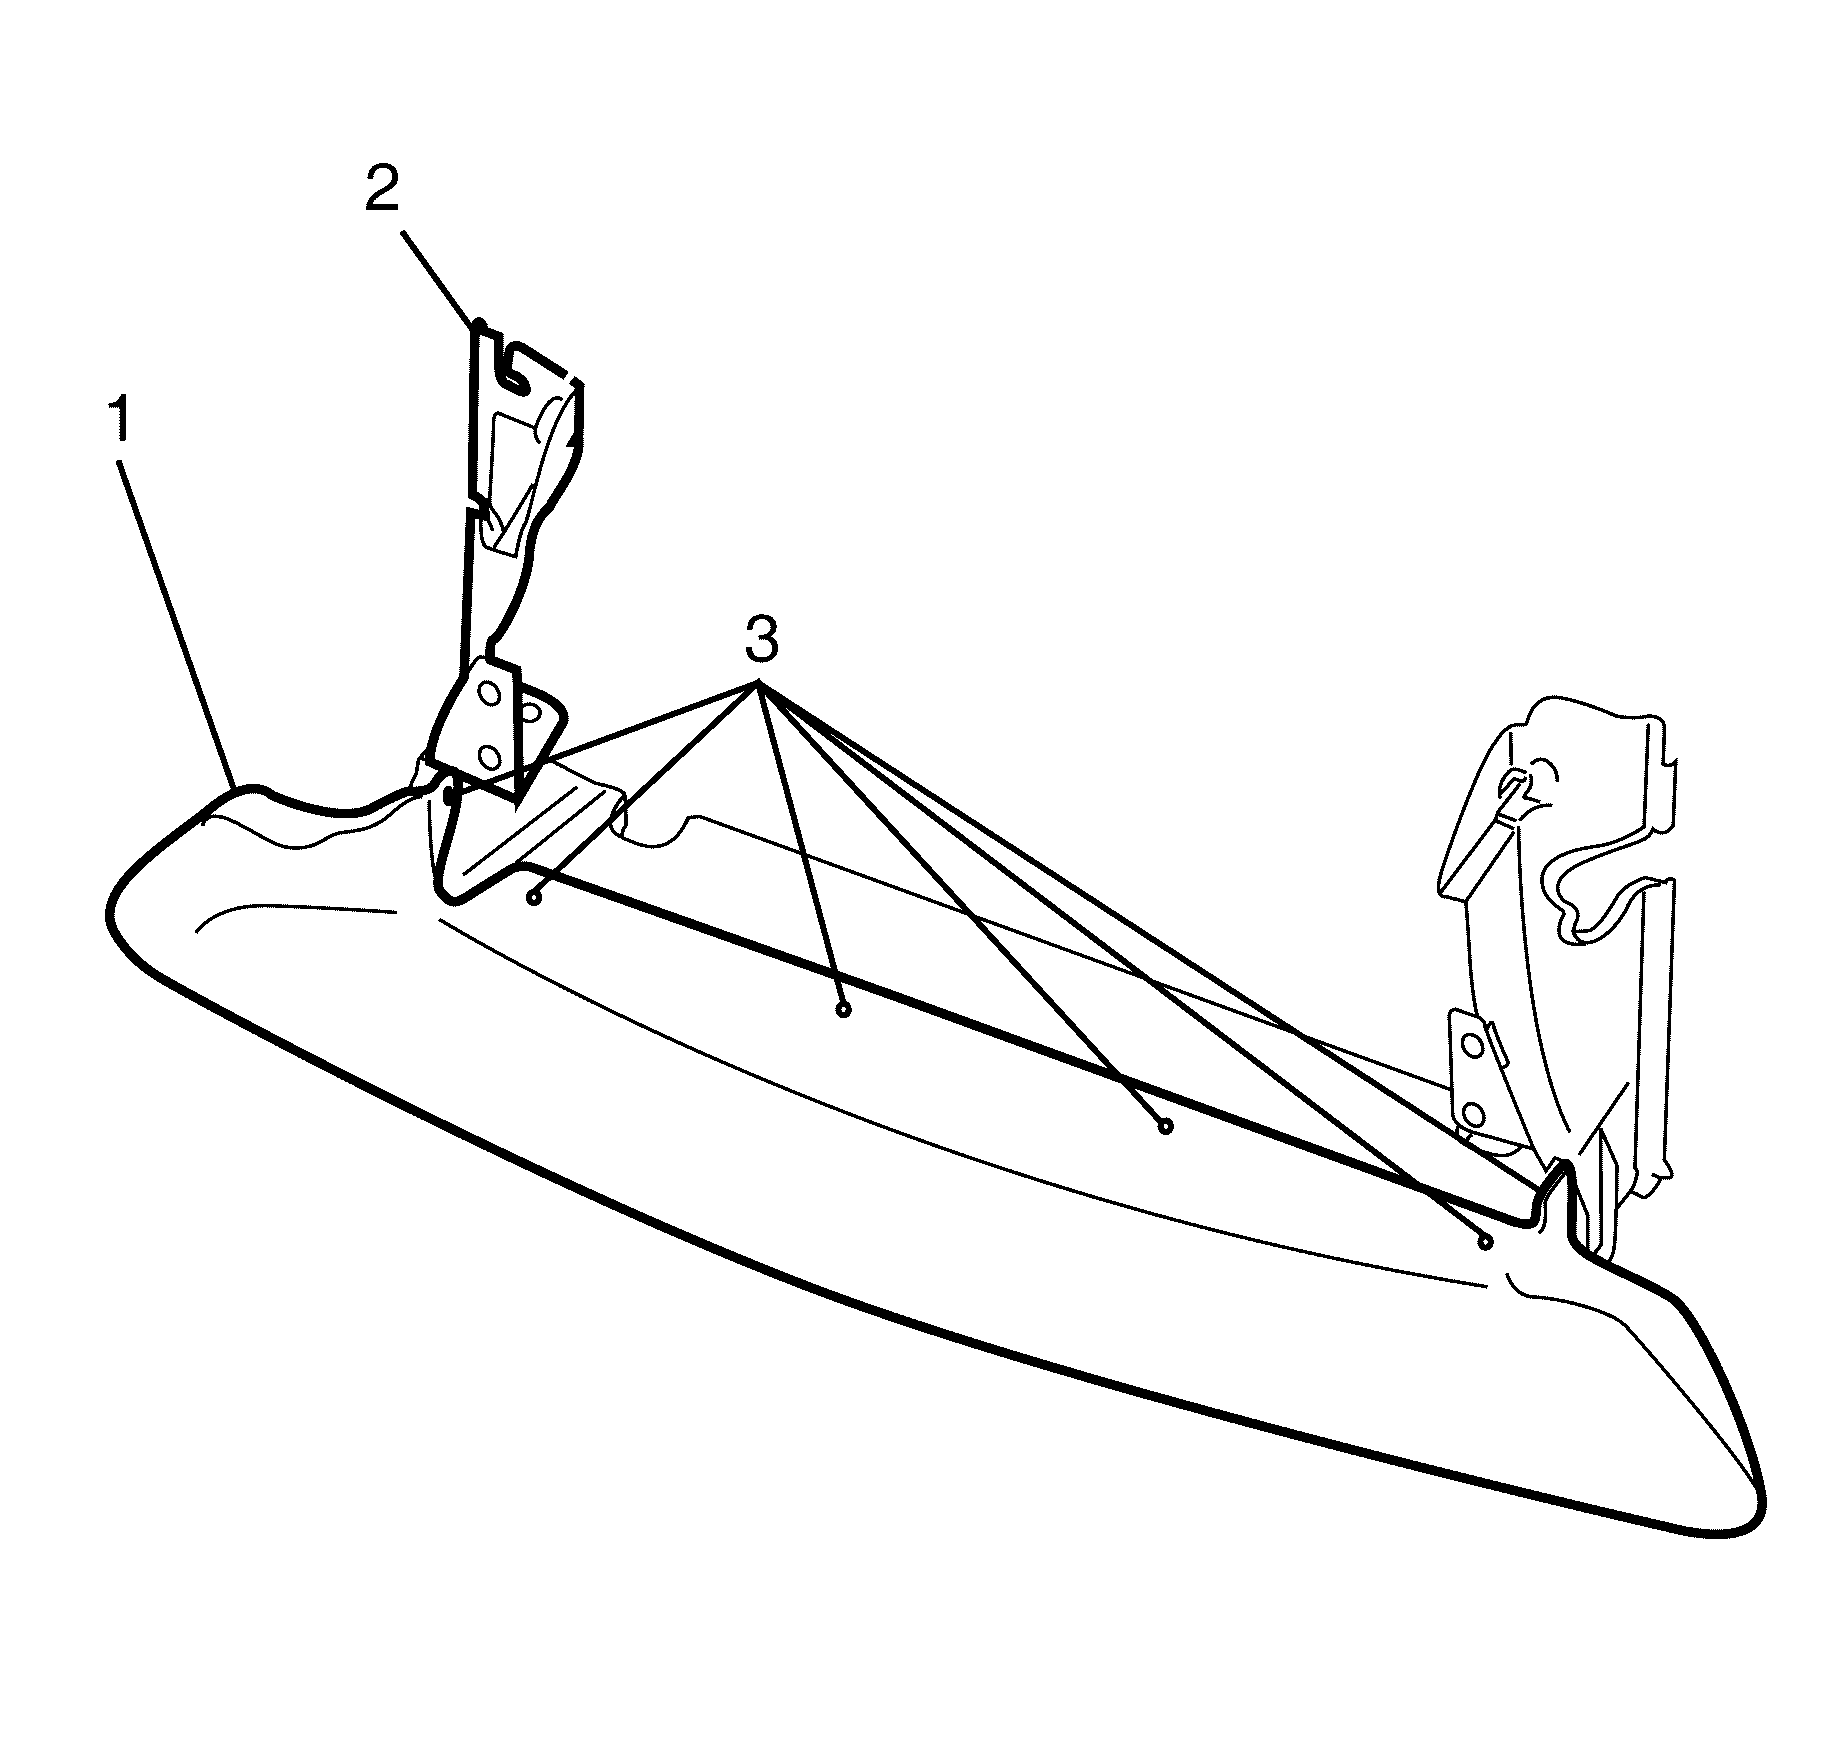
- Drill out the 6 rivets (3) and separate the Type B air baffle (1) from the Type A air baffle (2) .
- Inspect all parts for wear and damage. Replace as necessary.
Caution: Refer to Safety Glasses Caution in the Preface section.
Caution: Refer to Vehicle Lifting Caution in the Preface section.
Important: The Type B air baffle is a combination of two parts, a revised Type A air baffle and a Type B air baffle.
Important: Steps 3 through 8 are not required when Type B air baffle is being replaced. Steps 3 through 8 are only applicable when Type A and Type B are being replaced.


Installation Procedure - Type B
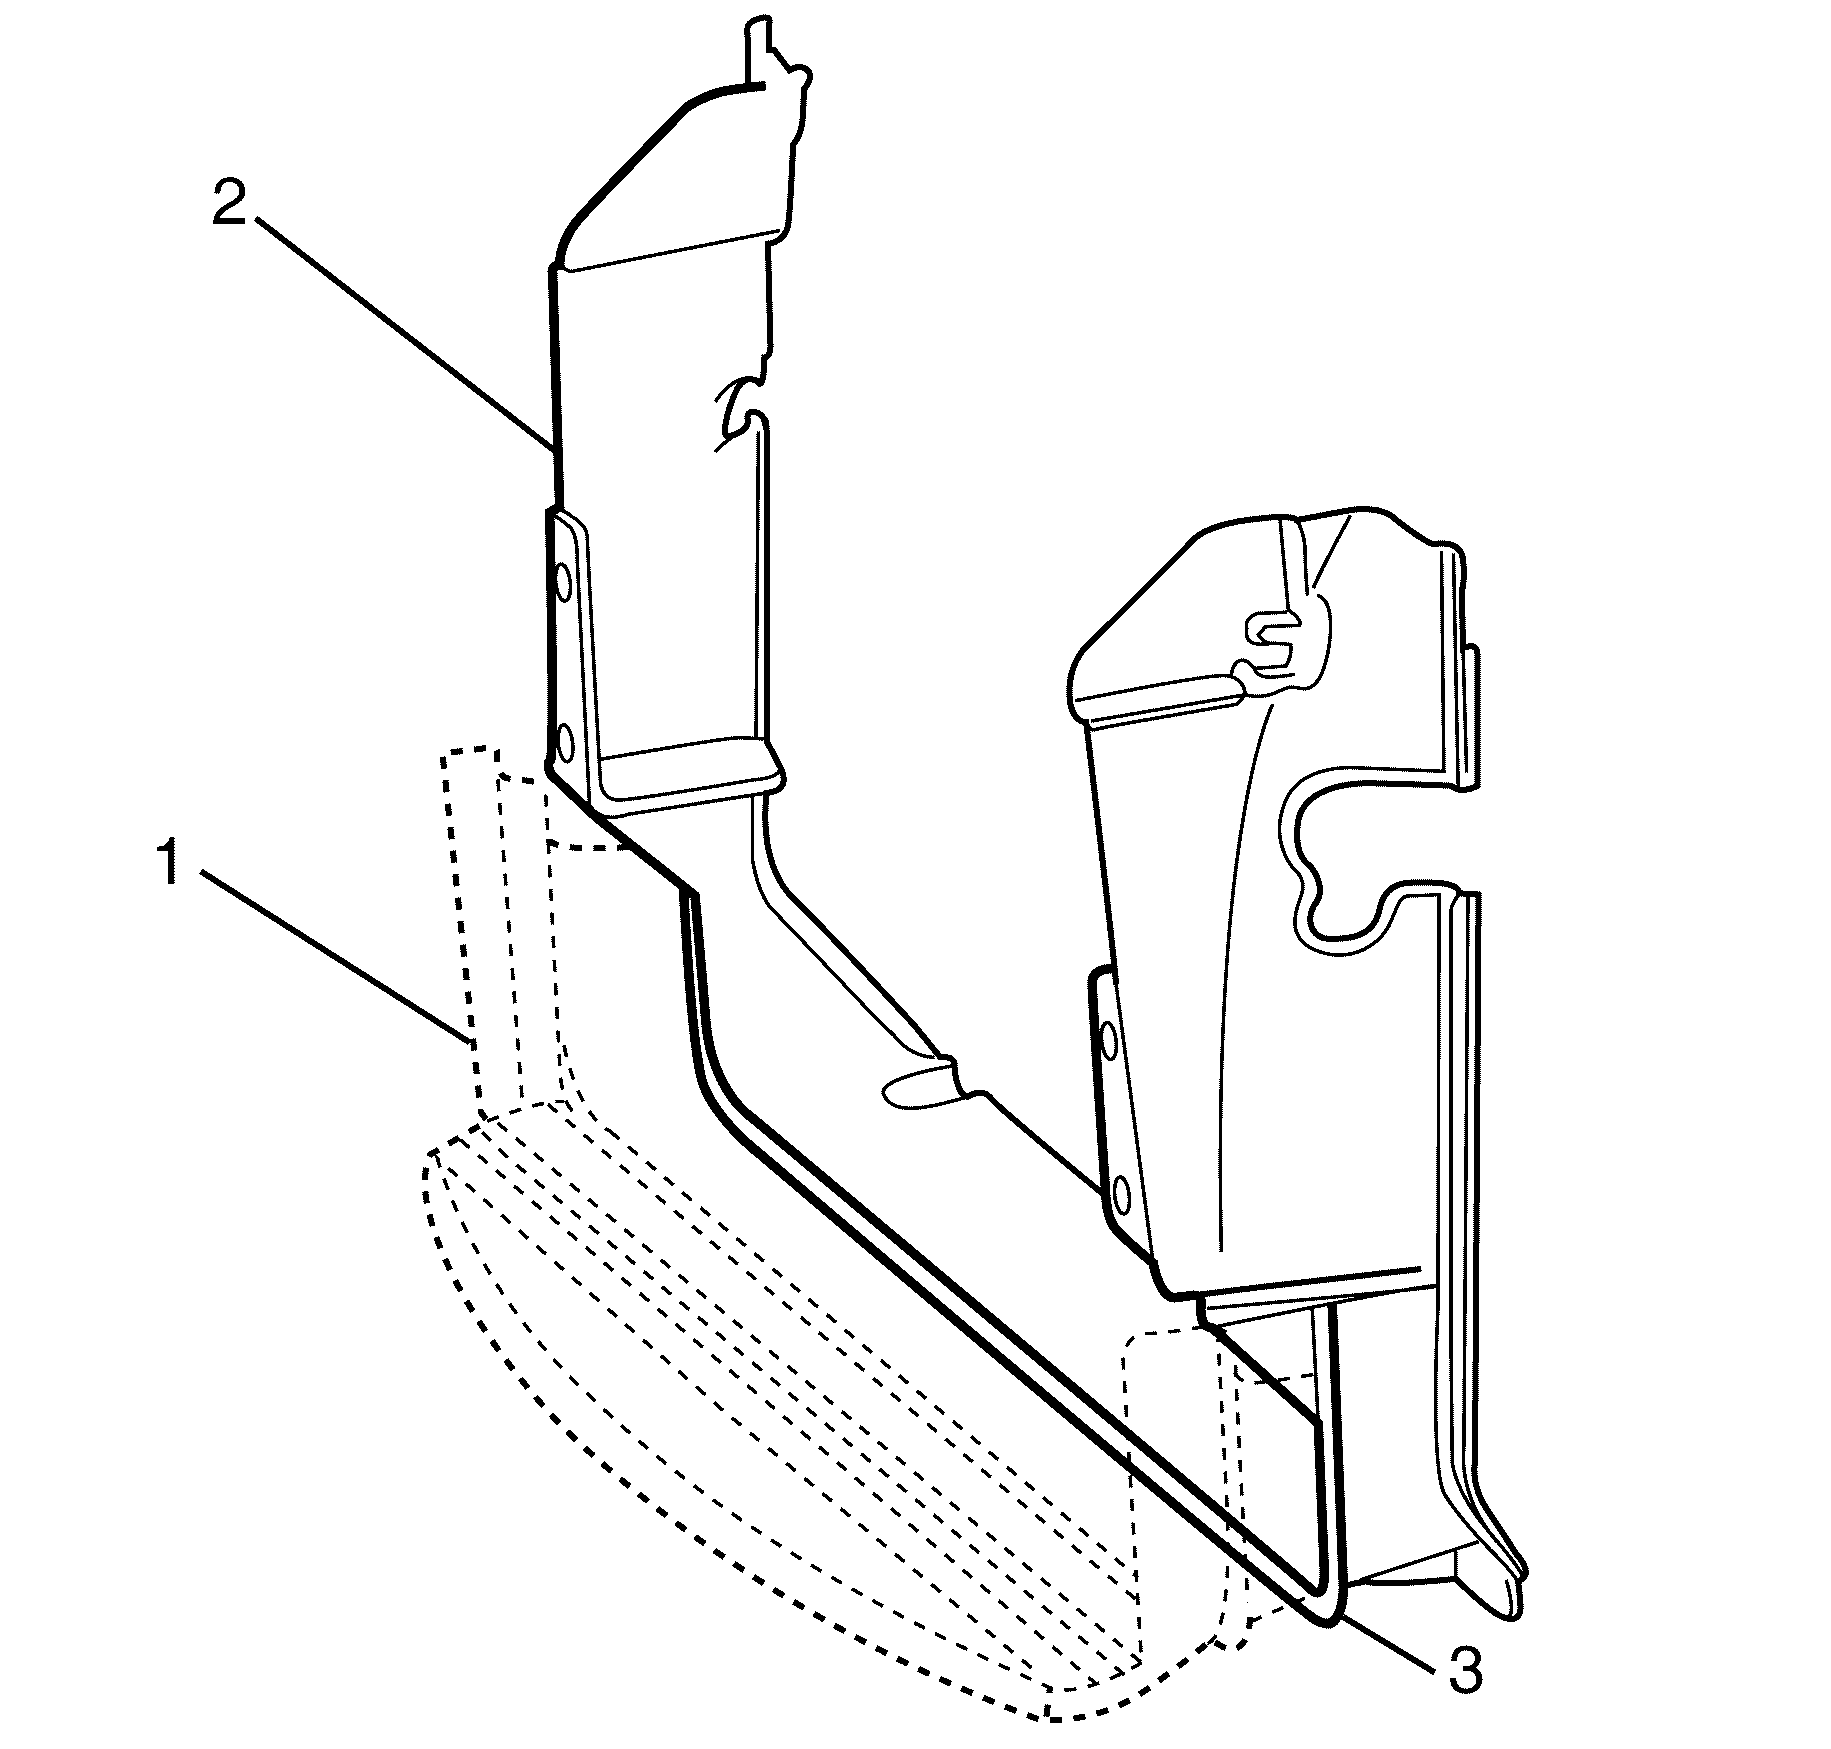
- Using a suitable tool, remove the indicated material (1) from the Type A lower air baffle (2). Indicated material for removal is to be cut from forward edge of the third strengthening rib (3) from the front.
- Align the Type B air baffle (1) against the revised Type A lower air baffle (2).
- Drill 6 x 4.5 mm diameter holes (3) through the modified Type A lower air baffle (2), using the Type B air baffle (1) as a template.
- Rivet the Type A lower air baffle (2) and Type B lower air baffle (1) together using 4.1 mm diameter "spreader type" rivets in the six places (3).
- Install the retaining pins (1) located at either side of the lower air baffle (2).
- Attach the ambient air temperature sensor and ambient air temperature sensor wiring loom. Refer to Ambient Air Temperature Sensor Replacement .
- Install the washer solvent container. Refer to Windshield Washer Solvent Container Replacement .
- Install the front bumper impact bar. Refer to Front Bumper Impact Bar Replacement .
- Install the front bumper fascia. Refer to Front Bumper Fascia Replacement .
- Install the air deflector. Refer to Front Air Deflector Replacement .
- Lower the vehicle.
- Inspect the vehicle for correct alignment of body panels. Refer to Dimensions - Body .
Caution: Refer to Safety Glasses Caution in the Preface section.
Important: For complete air baffle replacement, Type A and Type B air baffles are required.


Radiator Air Lower Baffle and Deflector Replacement Except HSV Maloo
Removal procedure
- Raise and support vehicle. Refer to Lifting and Jacking the Vehicle .
- Remove the air deflector. Refer to Front Air Deflector Replacement .
- Remove the front fascia. Refer to Front Bumper Fascia Replacement .
- Remove the front impact bar. Refer to Front Bumper Impact Bar Replacement .
- Lower the vehicle.
- Detach the ambient sensor. Refer to Ambient Air Temperature Sensor Replacement .
- Remove the washer solvent container. Refer to Windshield Washer Solvent Container Replacement .
- Detach the wiring loom from the duct.
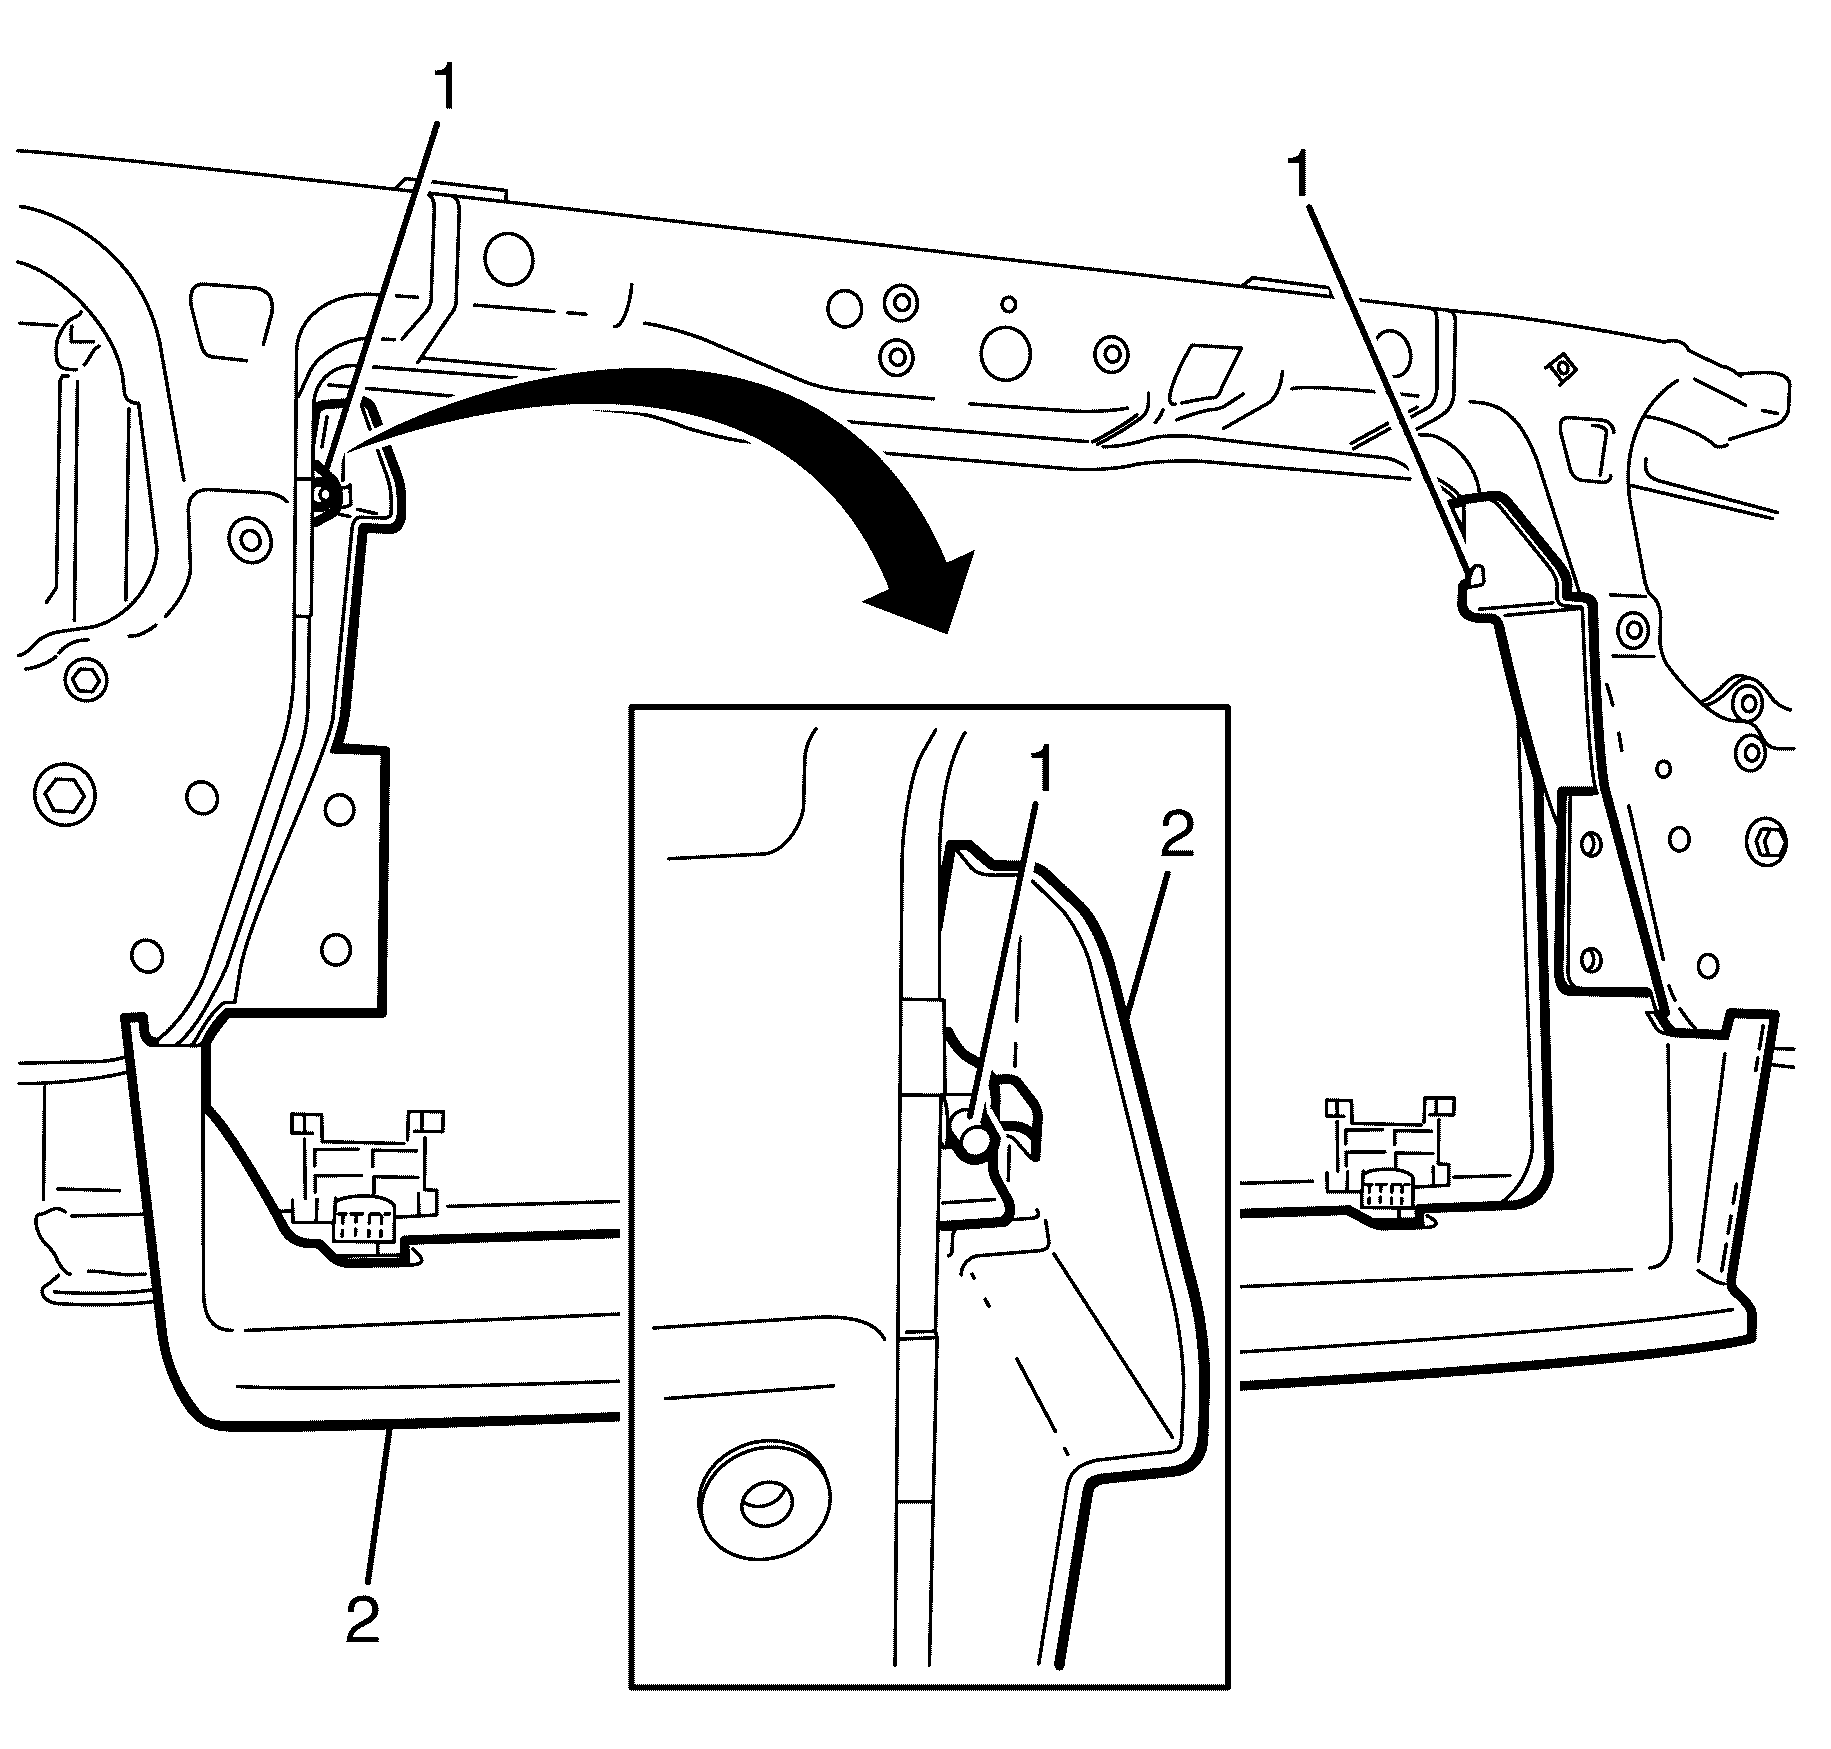
- Remove the retaining pins (1) on either side of the air baffle (2).
- Remove air baffle out of locating lugs and remove from front of vehicle.
Caution: Refer to Safety Glasses Caution in the Preface section.
Caution: Refer to Vehicle Lifting Caution in the Preface section.
Caution: Refer to Safety Glasses Caution in the Preface section.

Installation Procedure
- Install the air baffle into the locating lugs.
- Install the air baffle retaining pins (1) located at either side of the baffle (2).
- Attach the wiring loom to the duct.
- Attach the ambient sensor. Refer to Ambient Air Temperature Sensor Replacement .
- Install the washer solvent container. Refer to Windshield Washer Solvent Container Replacement .
- Raise and support vehicle. Refer to Lifting and Jacking the Vehicle .
- Install the front impact bar. Refer to Front Bumper Impact Bar Replacement .
- Install the front fascia. Refer to Front Bumper Fascia Replacement .
- Instal the air deflector. Refer to Front Air Deflector Replacement .
- Lower vehicle.
- Inspect vehicle for correct alignment of body panels. Refer to Dimensions - Body .

Caution: Refer to Safety Glasses Caution in the Preface section.
Caution: Refer to Vehicle Lifting Caution in the Preface section.
