Discharge Hose Replacement 3.6L Engine
Tools Required
J 39400 Halogen Leak Tester
Removal Procedure
- Recover the refrigerant Refer to Refrigerant Recovery and Recharging .
- Disconnect the battery negative cable. Refer to Battery Negative Cable Disconnection and Connection .
- Remove the air filter assembly. Refer to Air Cleaner Assembly Replacement .
- Remove the radiator air baffle and deflector. Refer to Radiator Air Upper Baffle and Deflector Replacement
- Remove the passenger side engine cover. Refer to Engine Cover Replacement .
- Raise and support the vehicle. Refer to Lifting and Jacking the Vehicle .
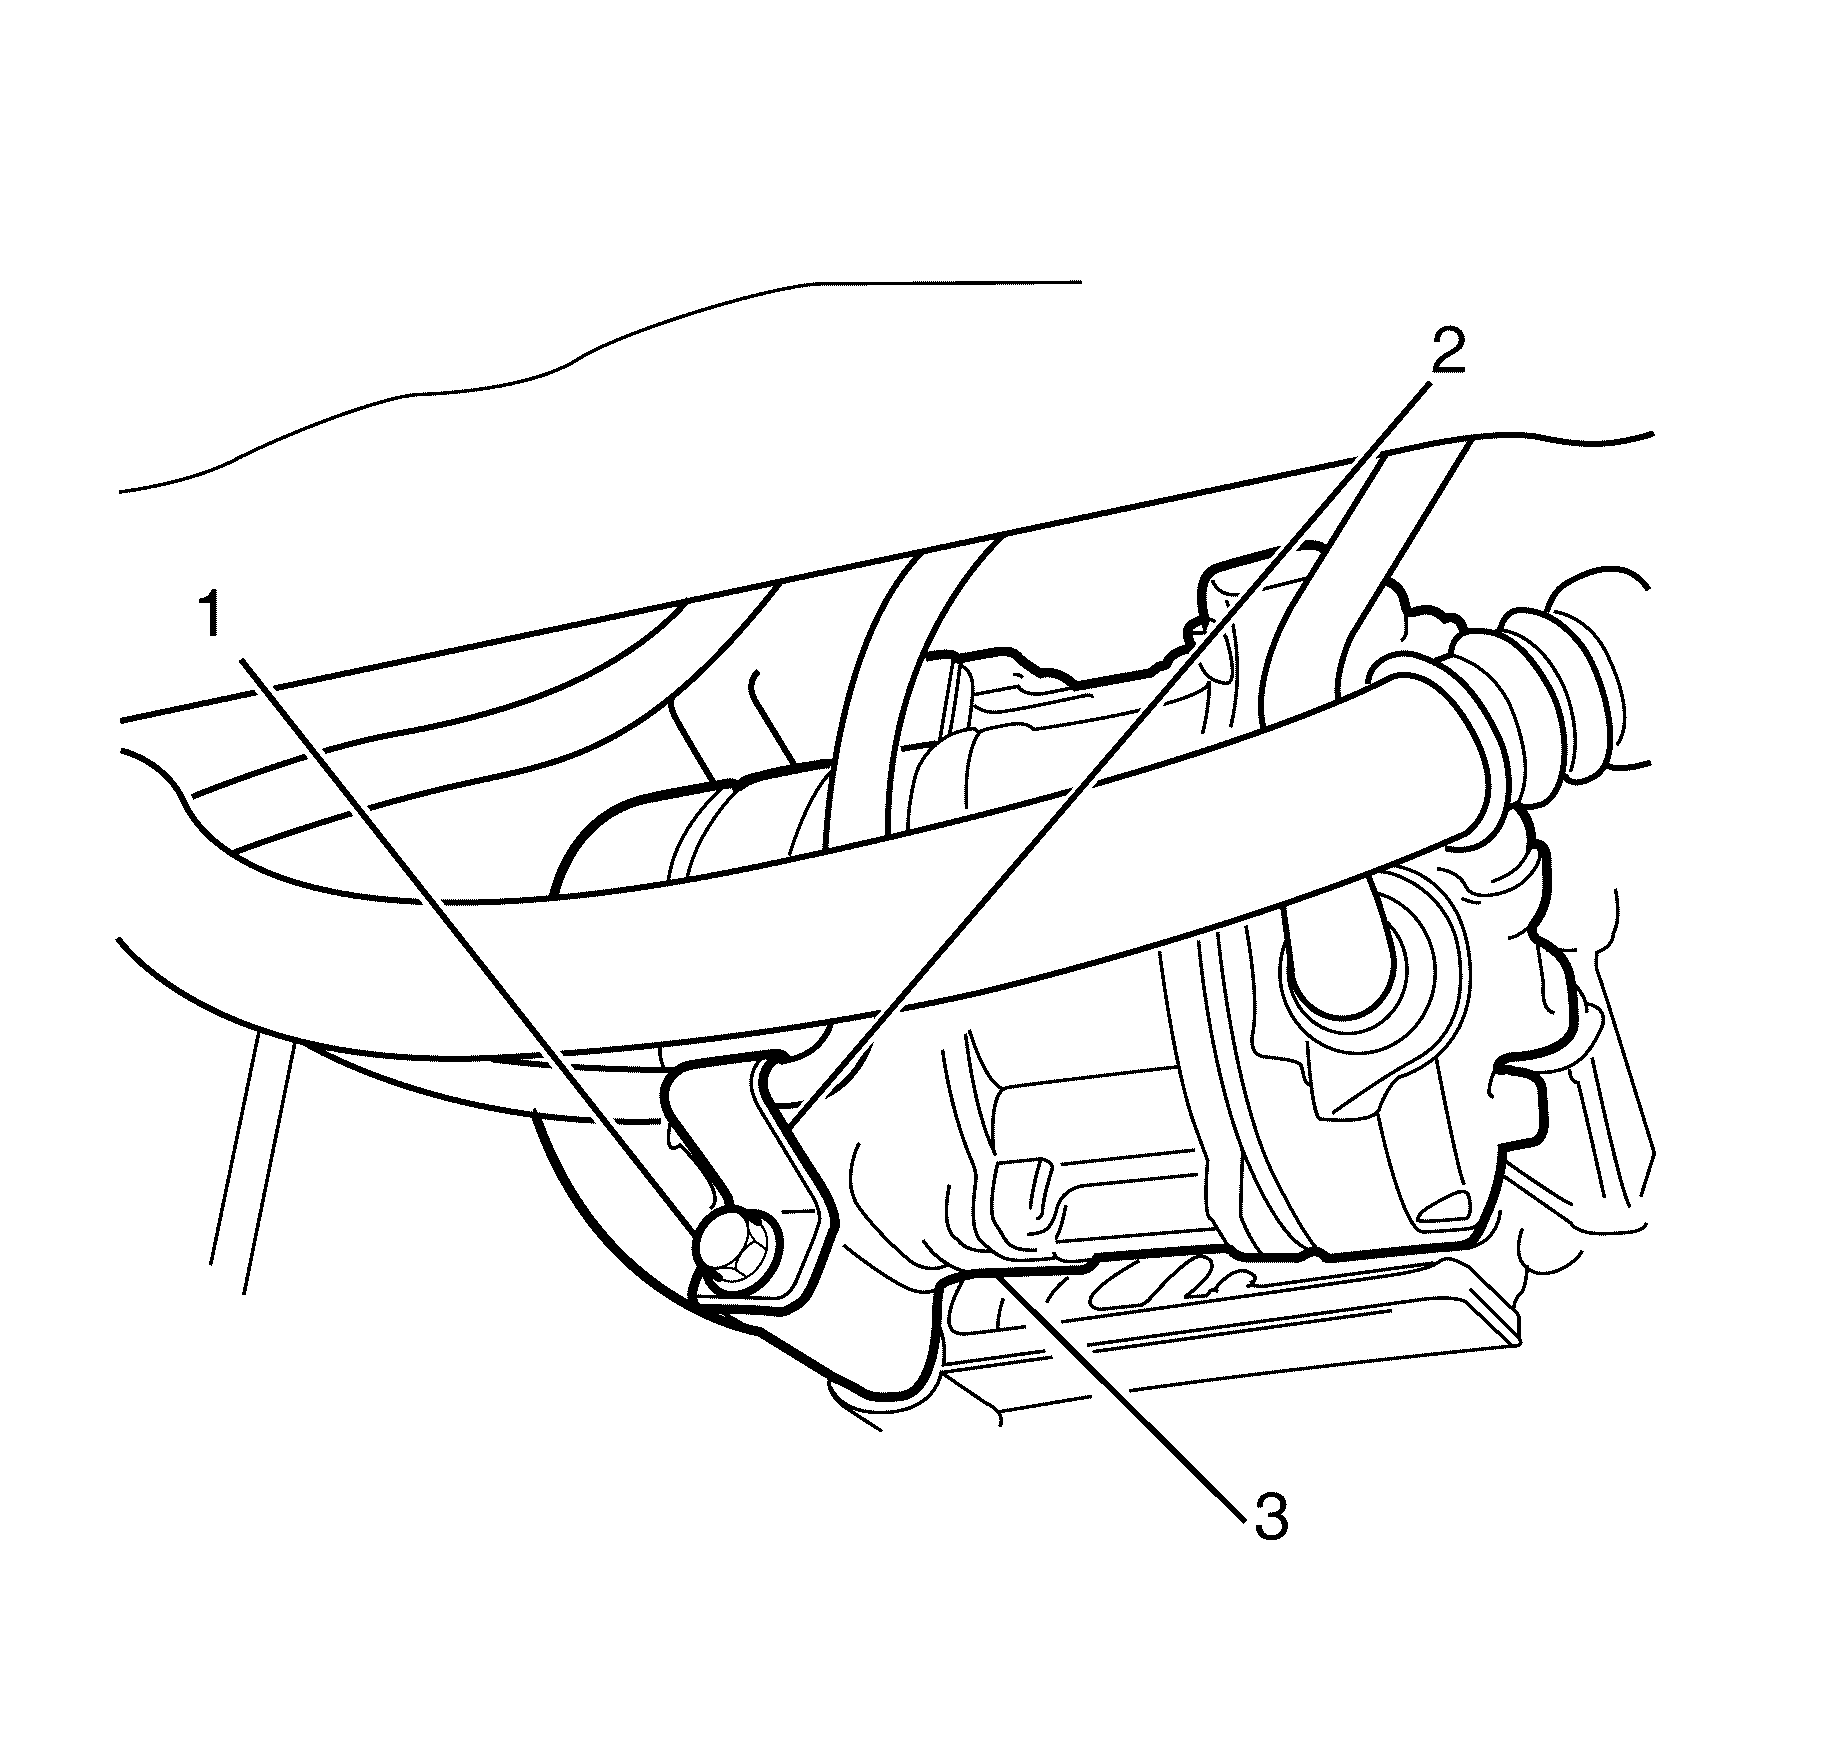
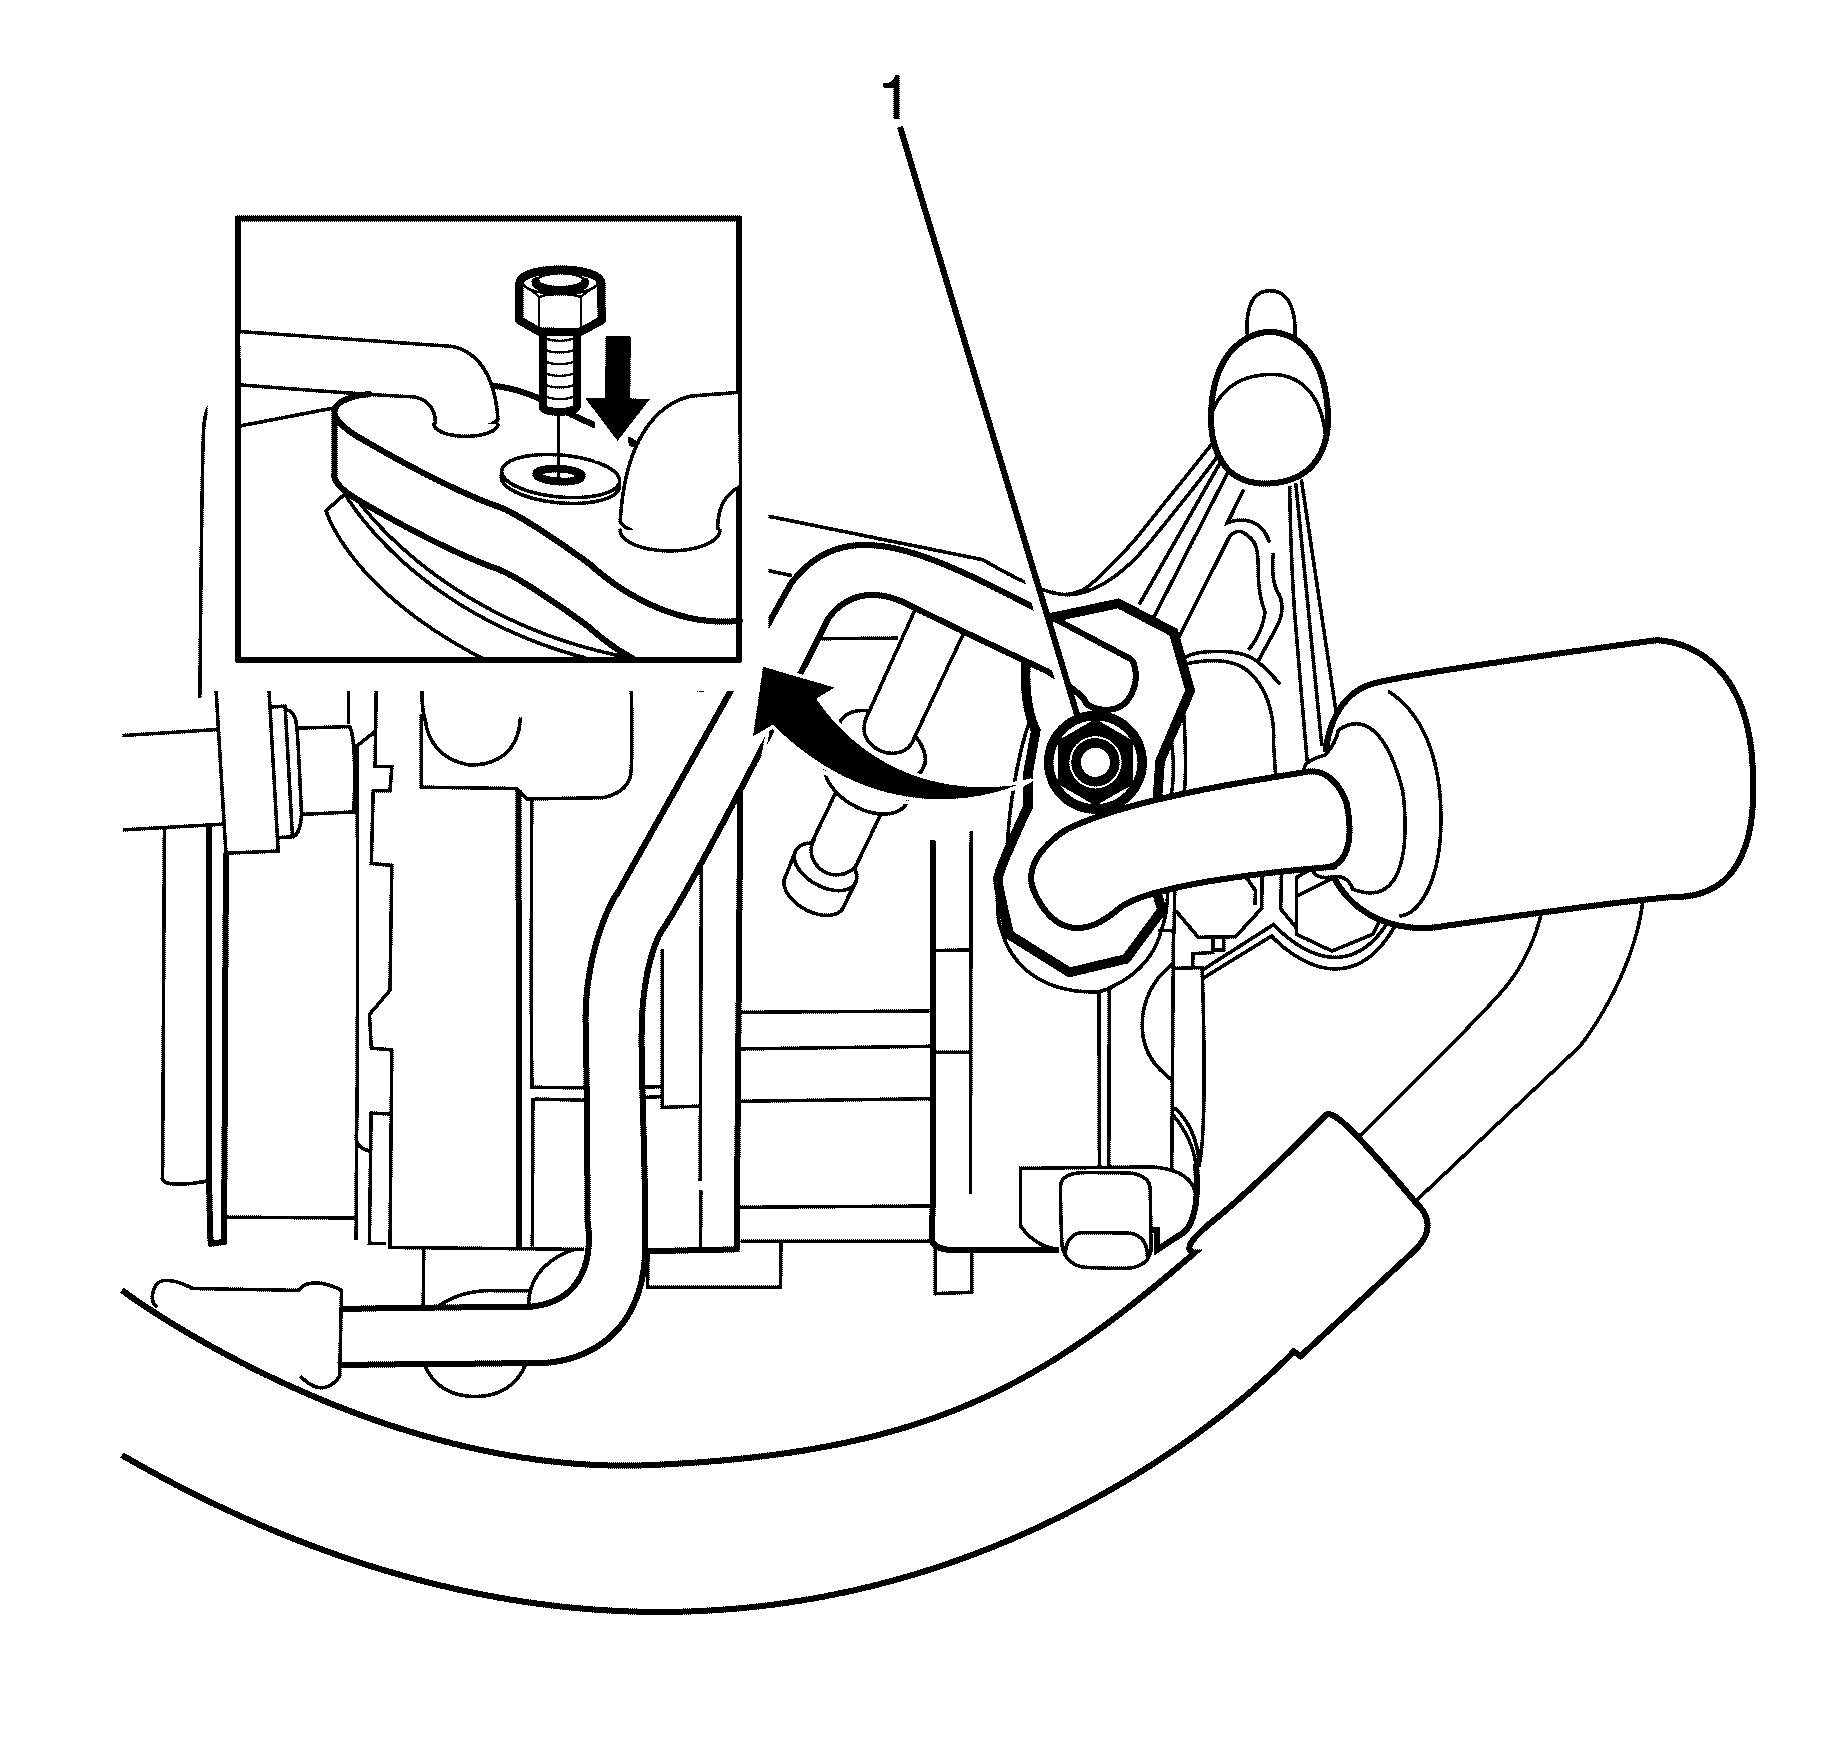
- Remove the compressor to compressor mounting bracket retaining bolt (1).
- Position the discharge hose retaining bracket (2) away from the compressor (3).
- Lower the vehicle
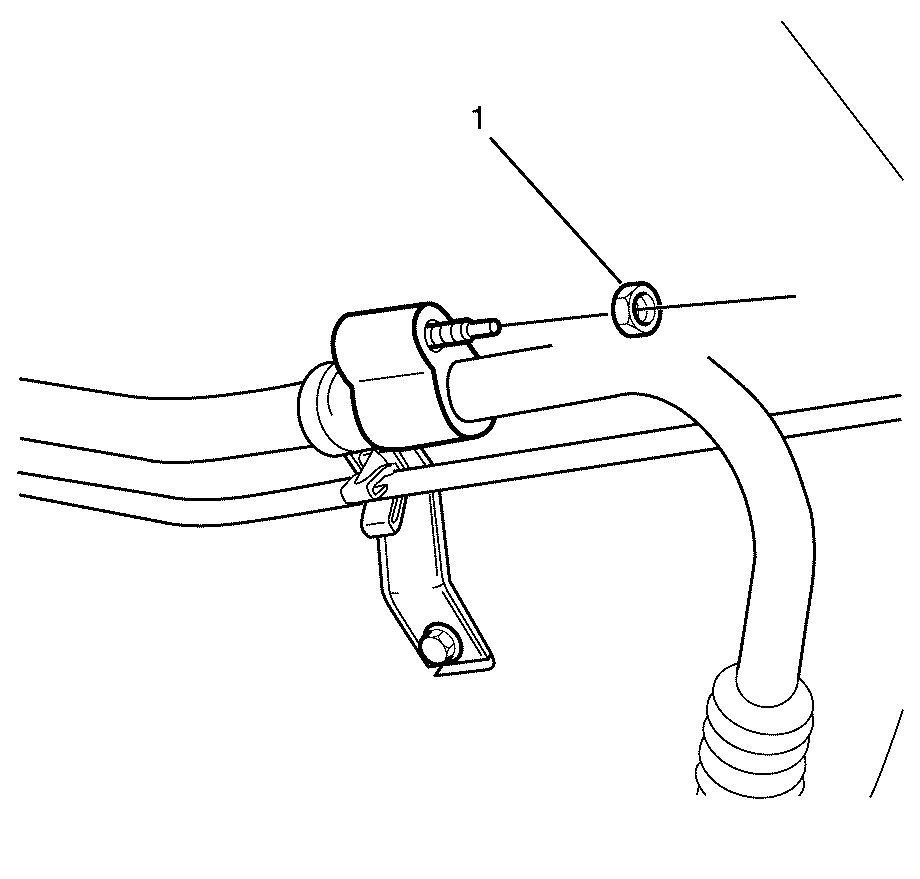
- Remove the suction pipe upper to suction pipe lower retaining nut (1).
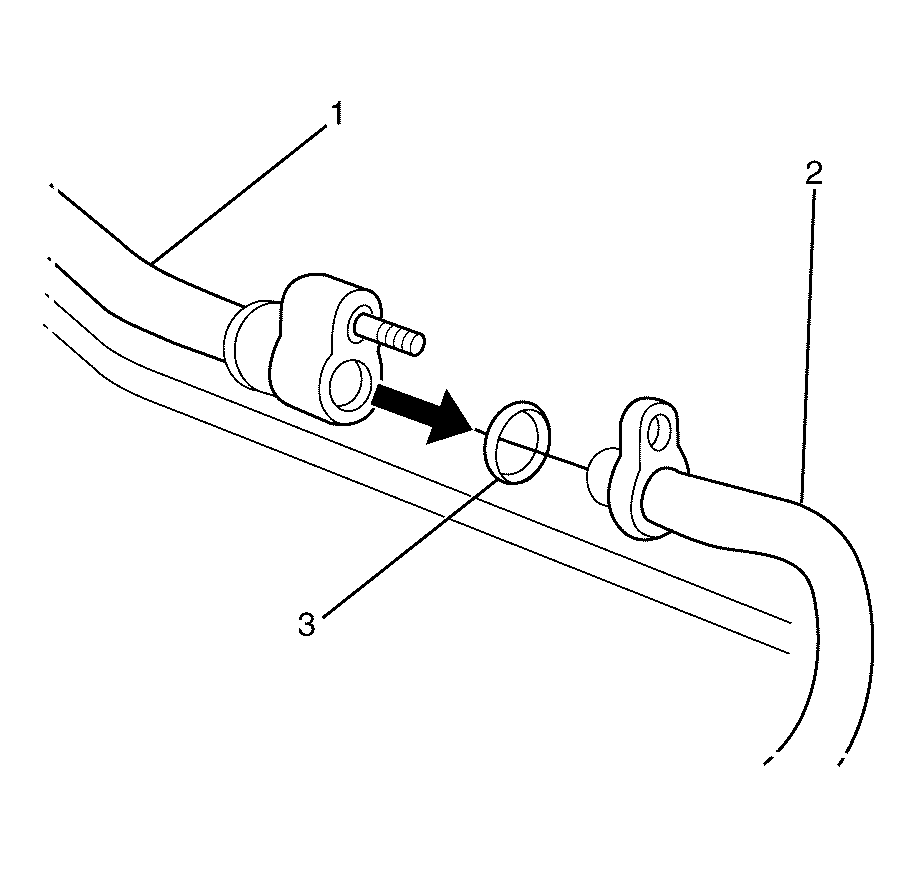
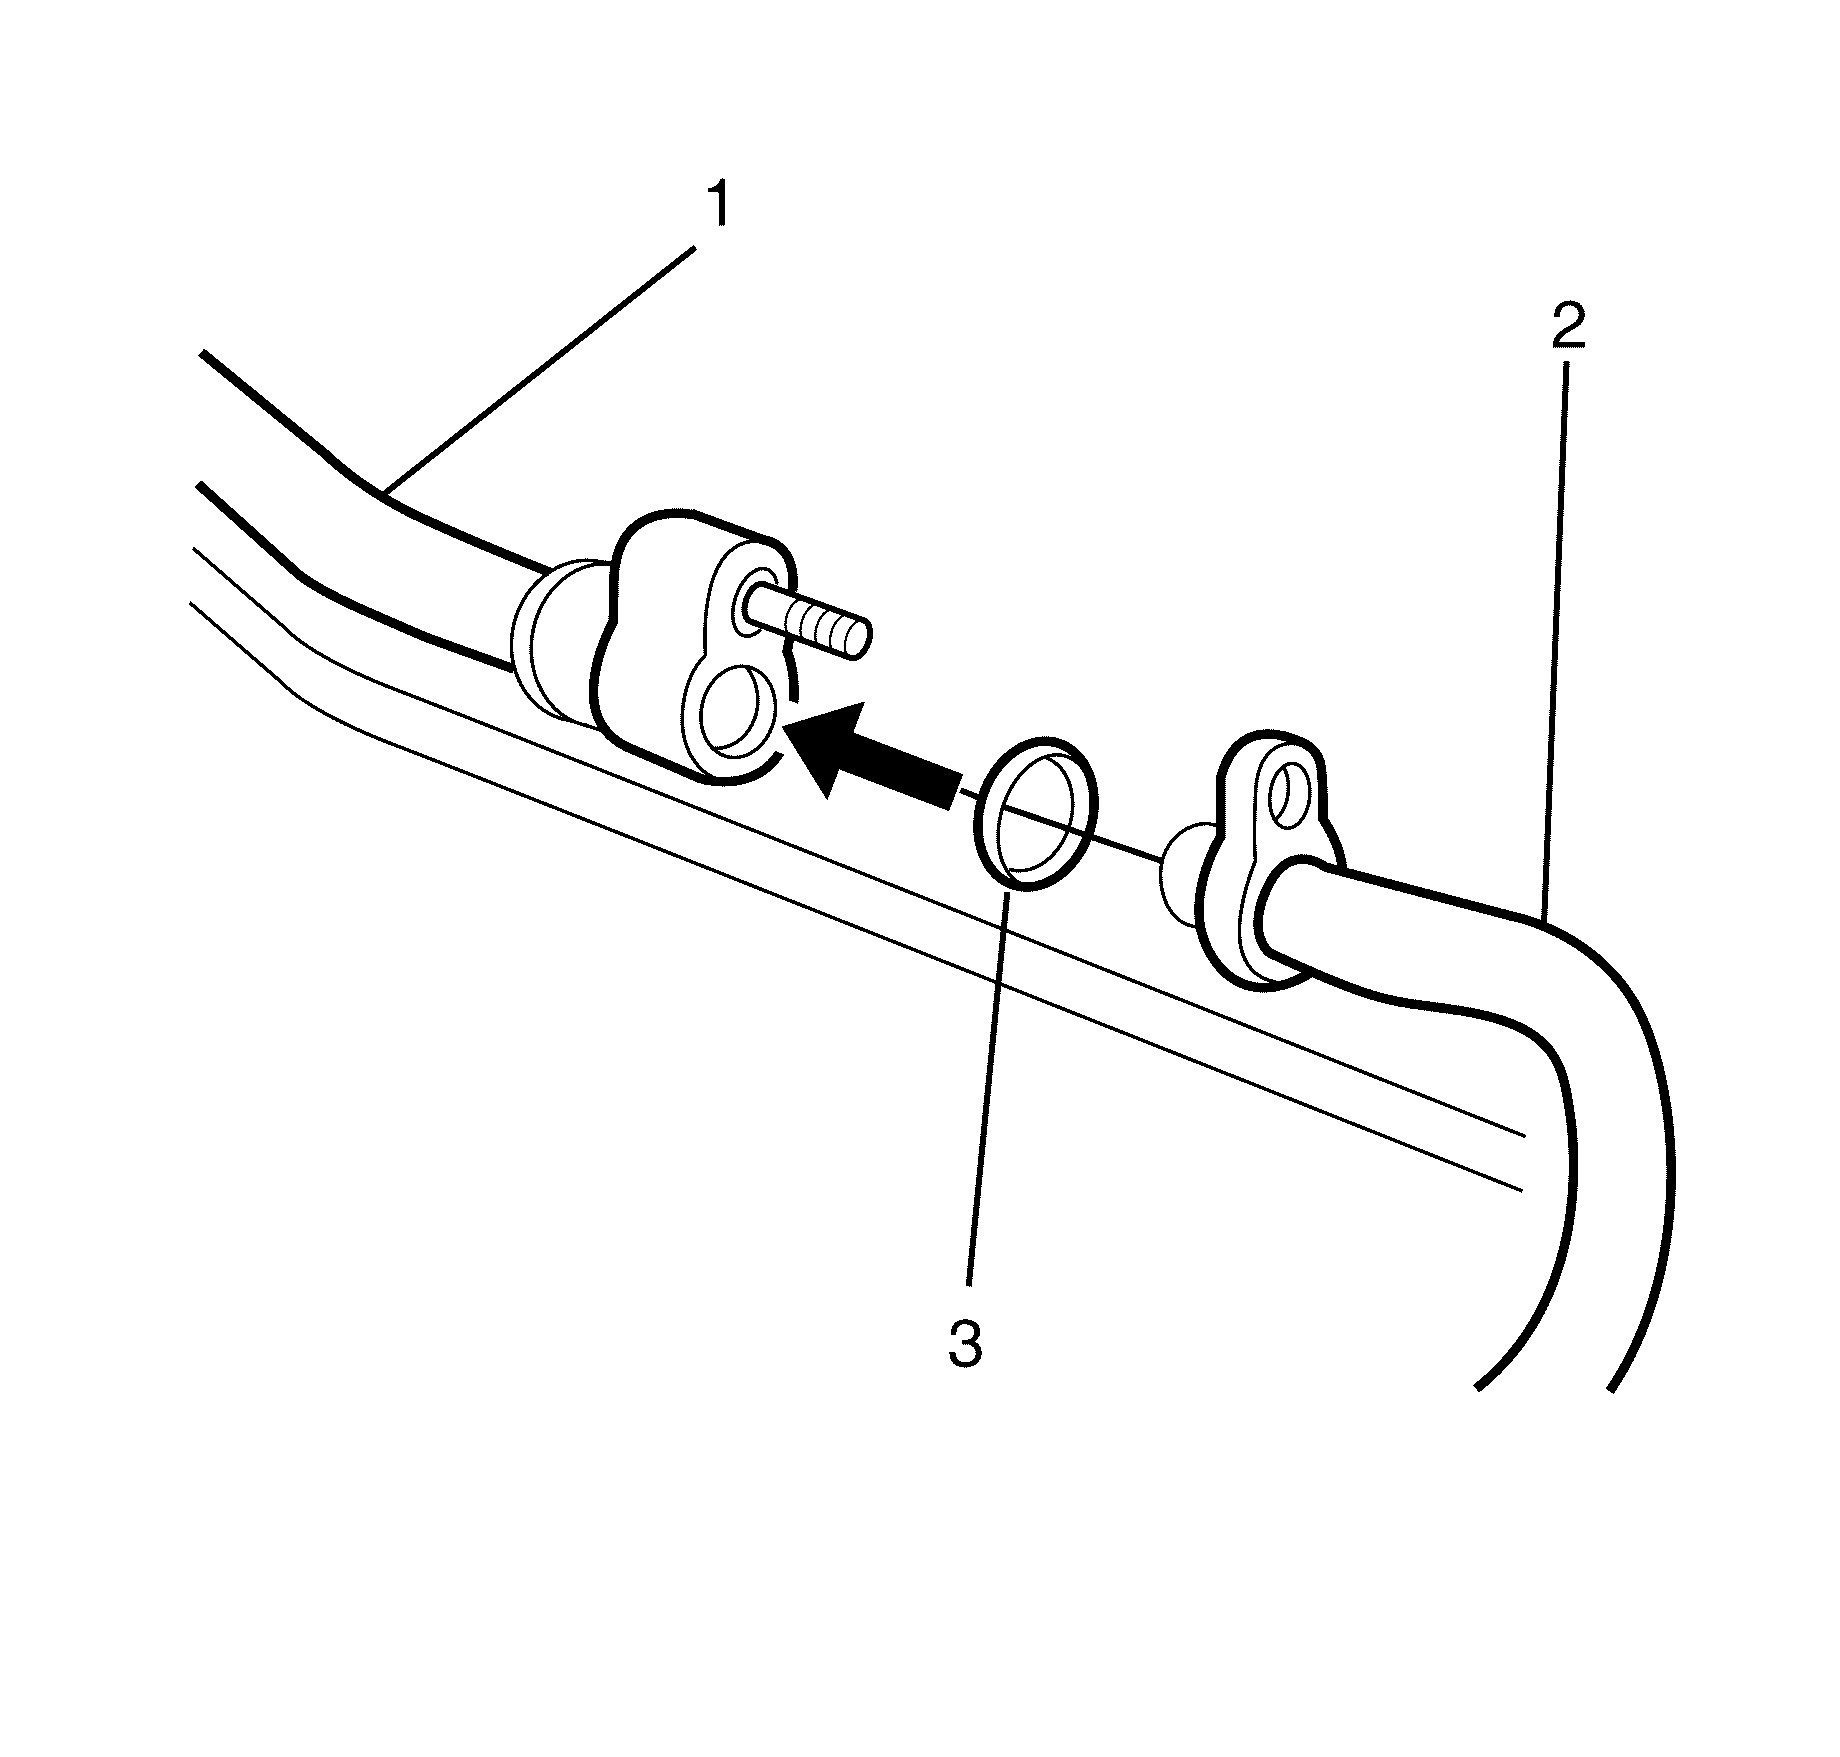
- Disconnect the suction pipe upper (1) from suction pipe lower (2).
- Remove the sealing washer (3). Refer to Sealing Washer Replacement .
- Cap or plug the suction pipe upper (1) and the suction pipe lower (2).
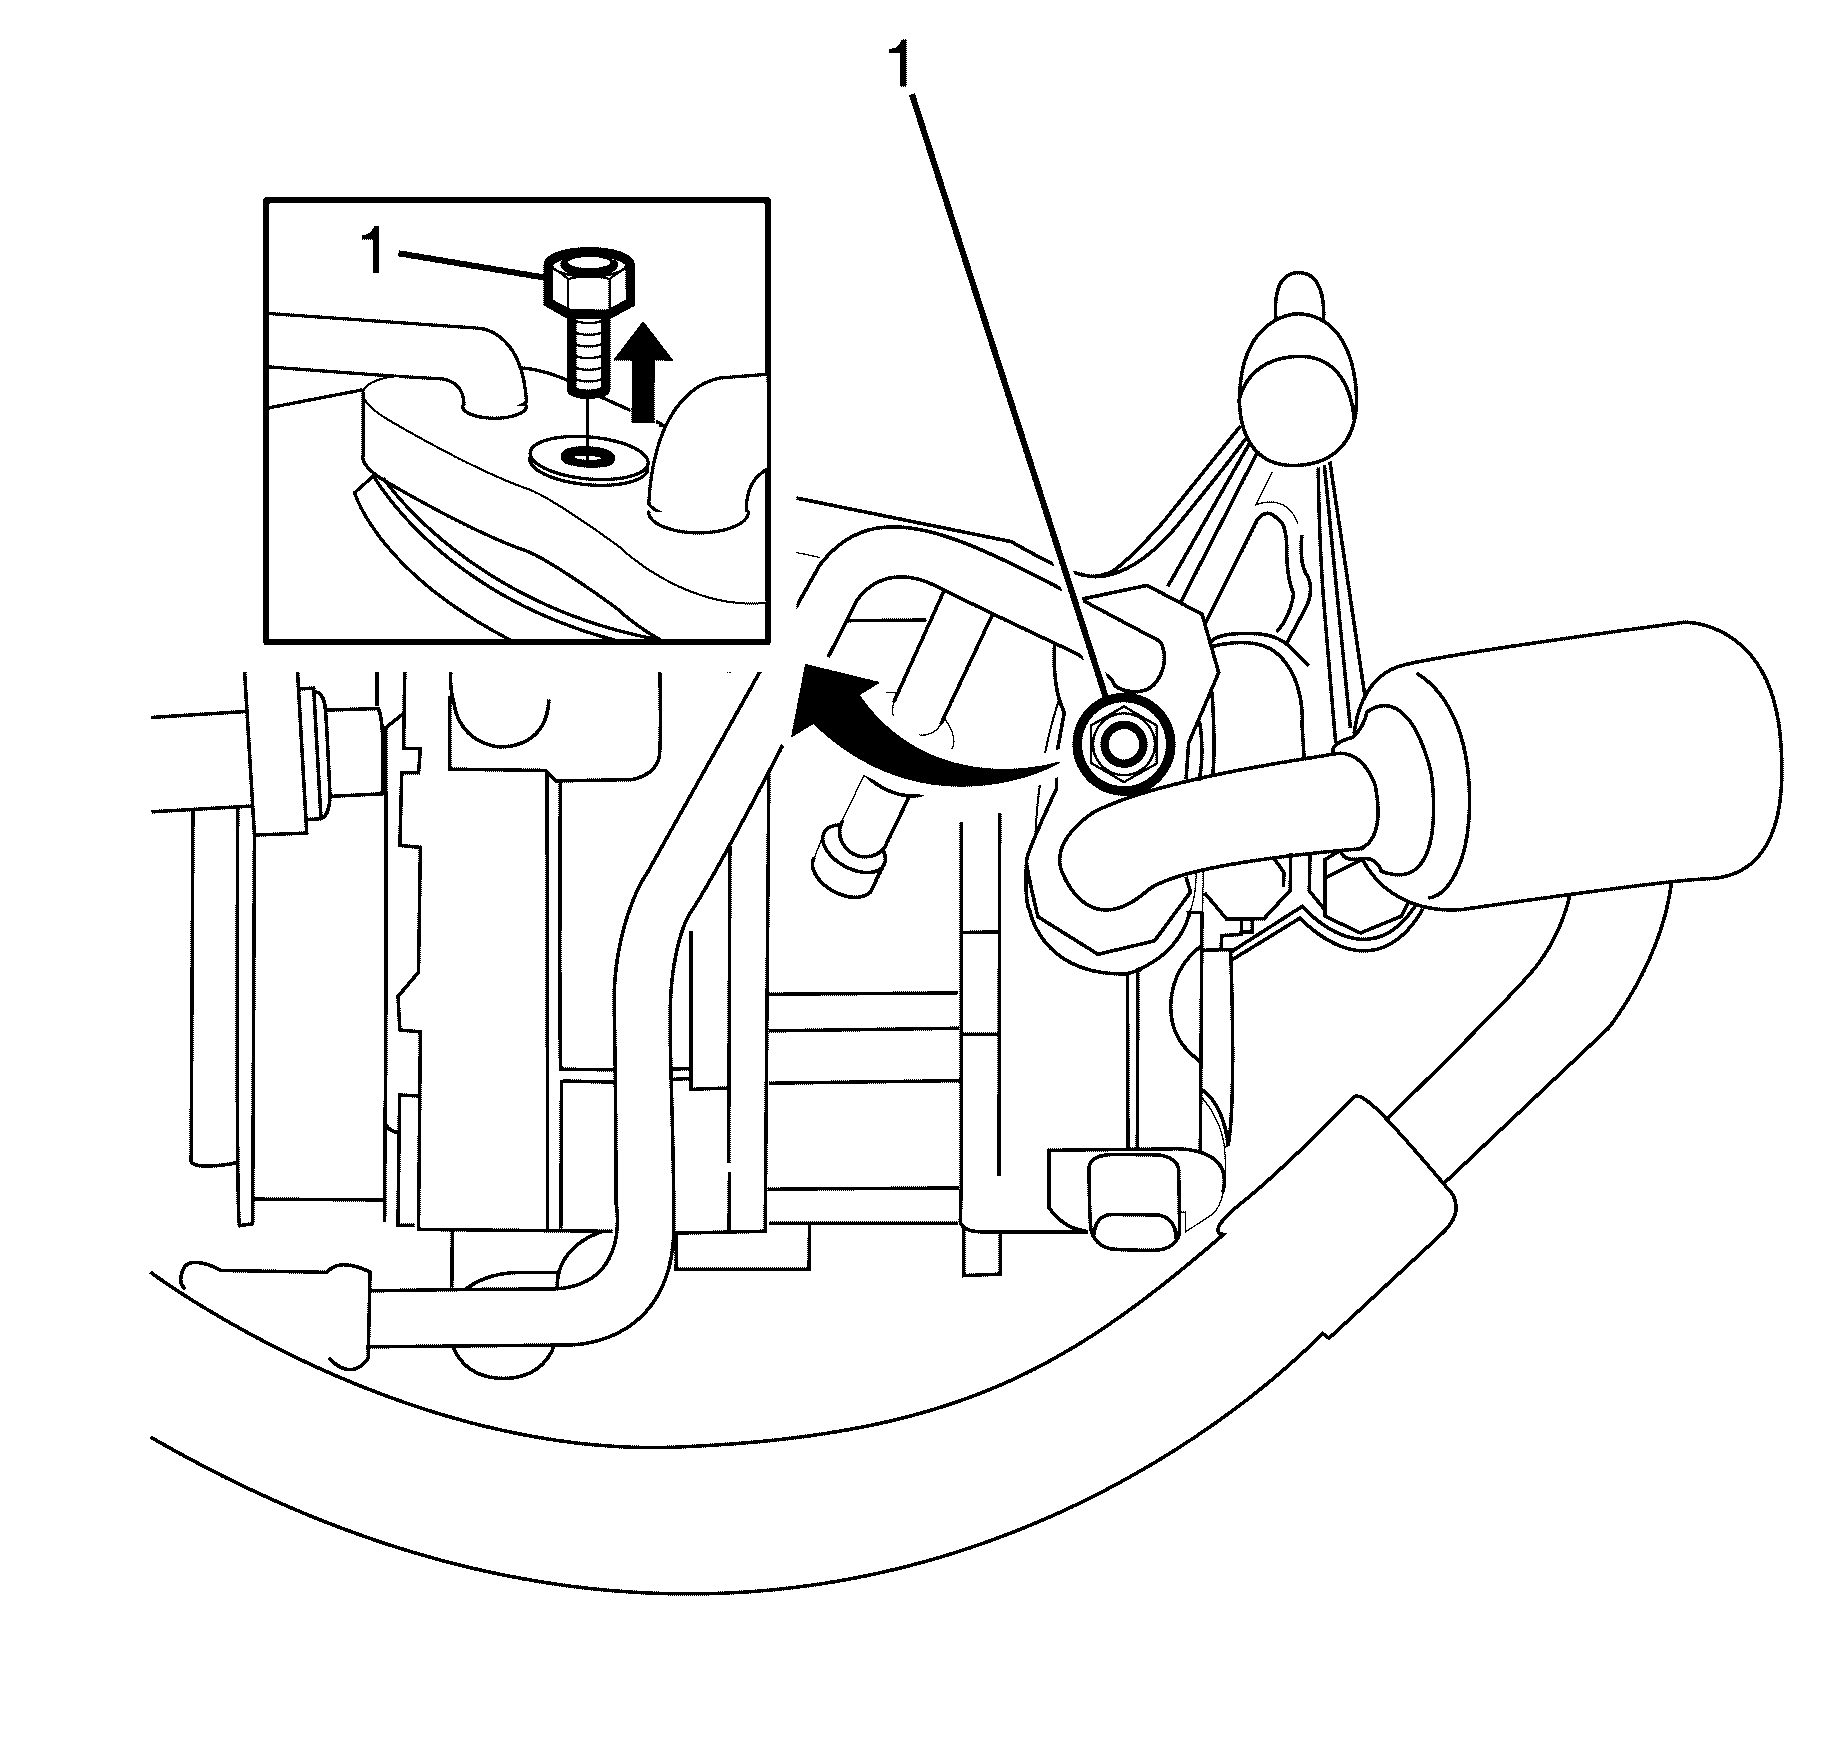
- Remove the suction/discharge pipes pad retaining bolt (1).
- Disconnect the suction/discharge pipes (1) from the compressor (3).
- Remove the sealing washers (2). Refer to Sealing Washer Replacement .
- Cap or plug the suction/discharge pipes (1) and the ports on the compressor (3).
- Remove the upper radiator support brackets (1).
- Remove the discharge pipe to condenser retaining nut (1).
- Disconnect the discharge pipe (1) from condenser (3).
- Remove the sealing washer (2). Refer to Sealing Washer Replacement .
- Cap or plug the discharge pipe (1) and the condenser (3).
Caution: Refer to Safety Glasses Caution in the Preface section.
Caution: Refer to Vehicle Lifting Caution in the Preface section.
Important: The sealing washer (3) is a single use item and must be discarded after use.
Discard the sealing washer
Important: Cover any opening of the A/C system with a suitable cap or tape immediately, to prevent absorption of moisture from the atmosphere.
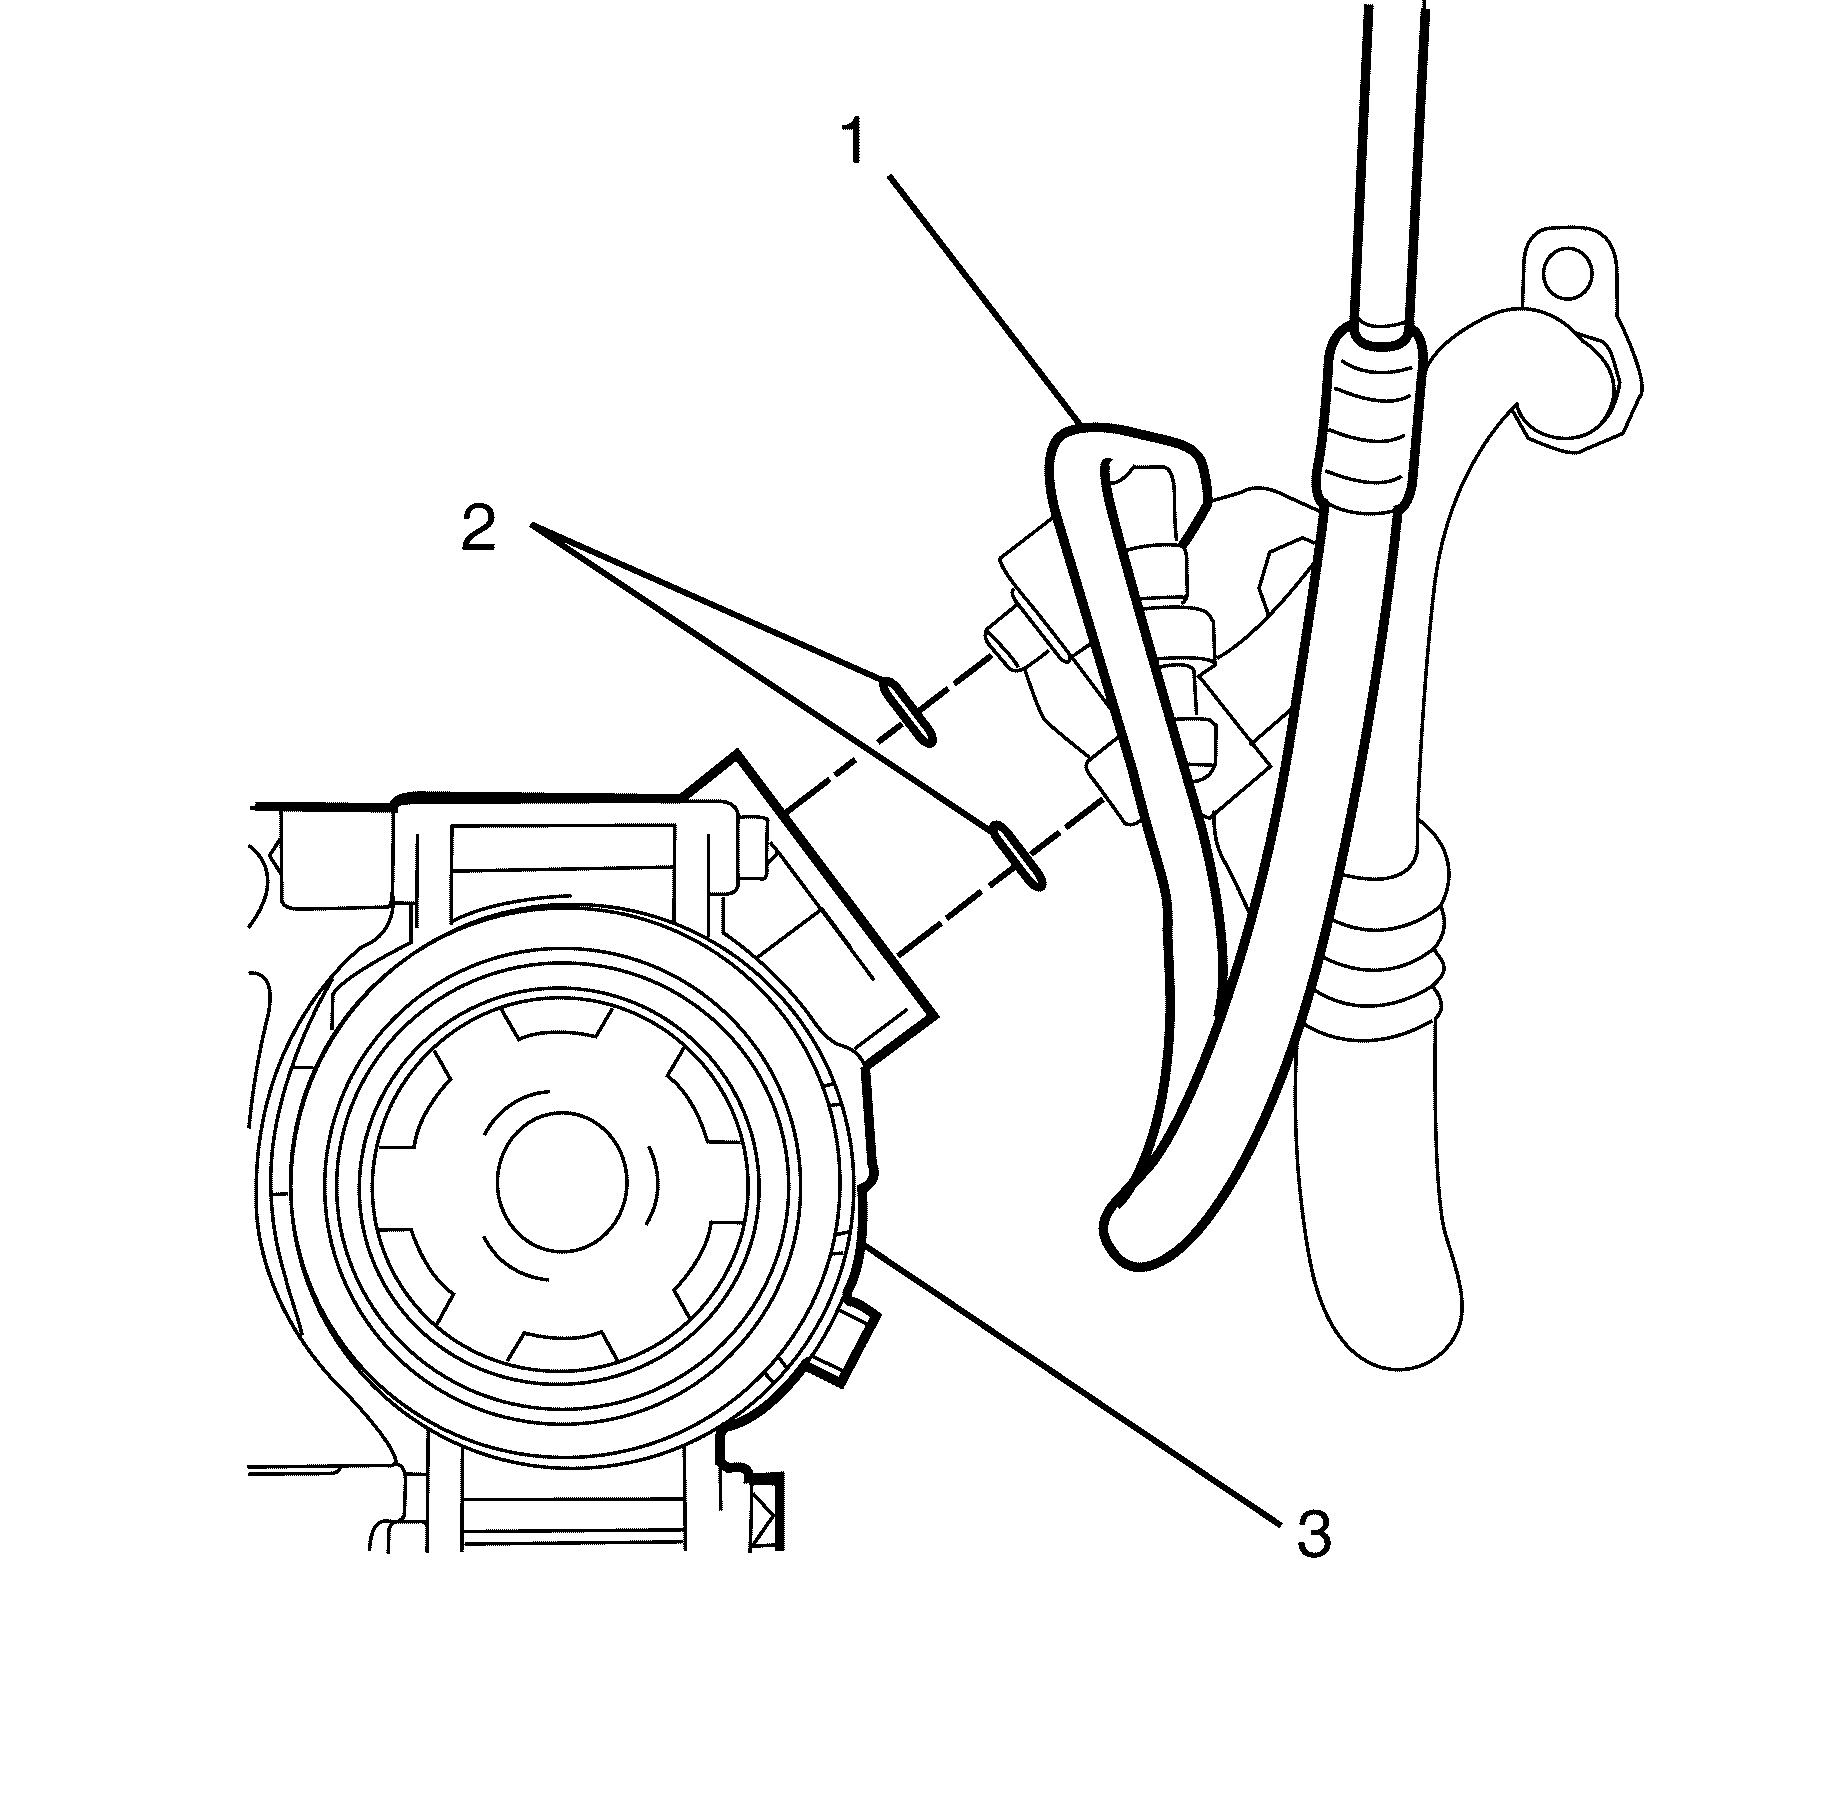
Important: The sealing washers (2) are a single use item and must be discarded after use.
Discard the sealing washers
Important: Cover any opening of the A/C system with a suitable cap or tape immediately, to prevent absorption of moisture from the atmosphere.
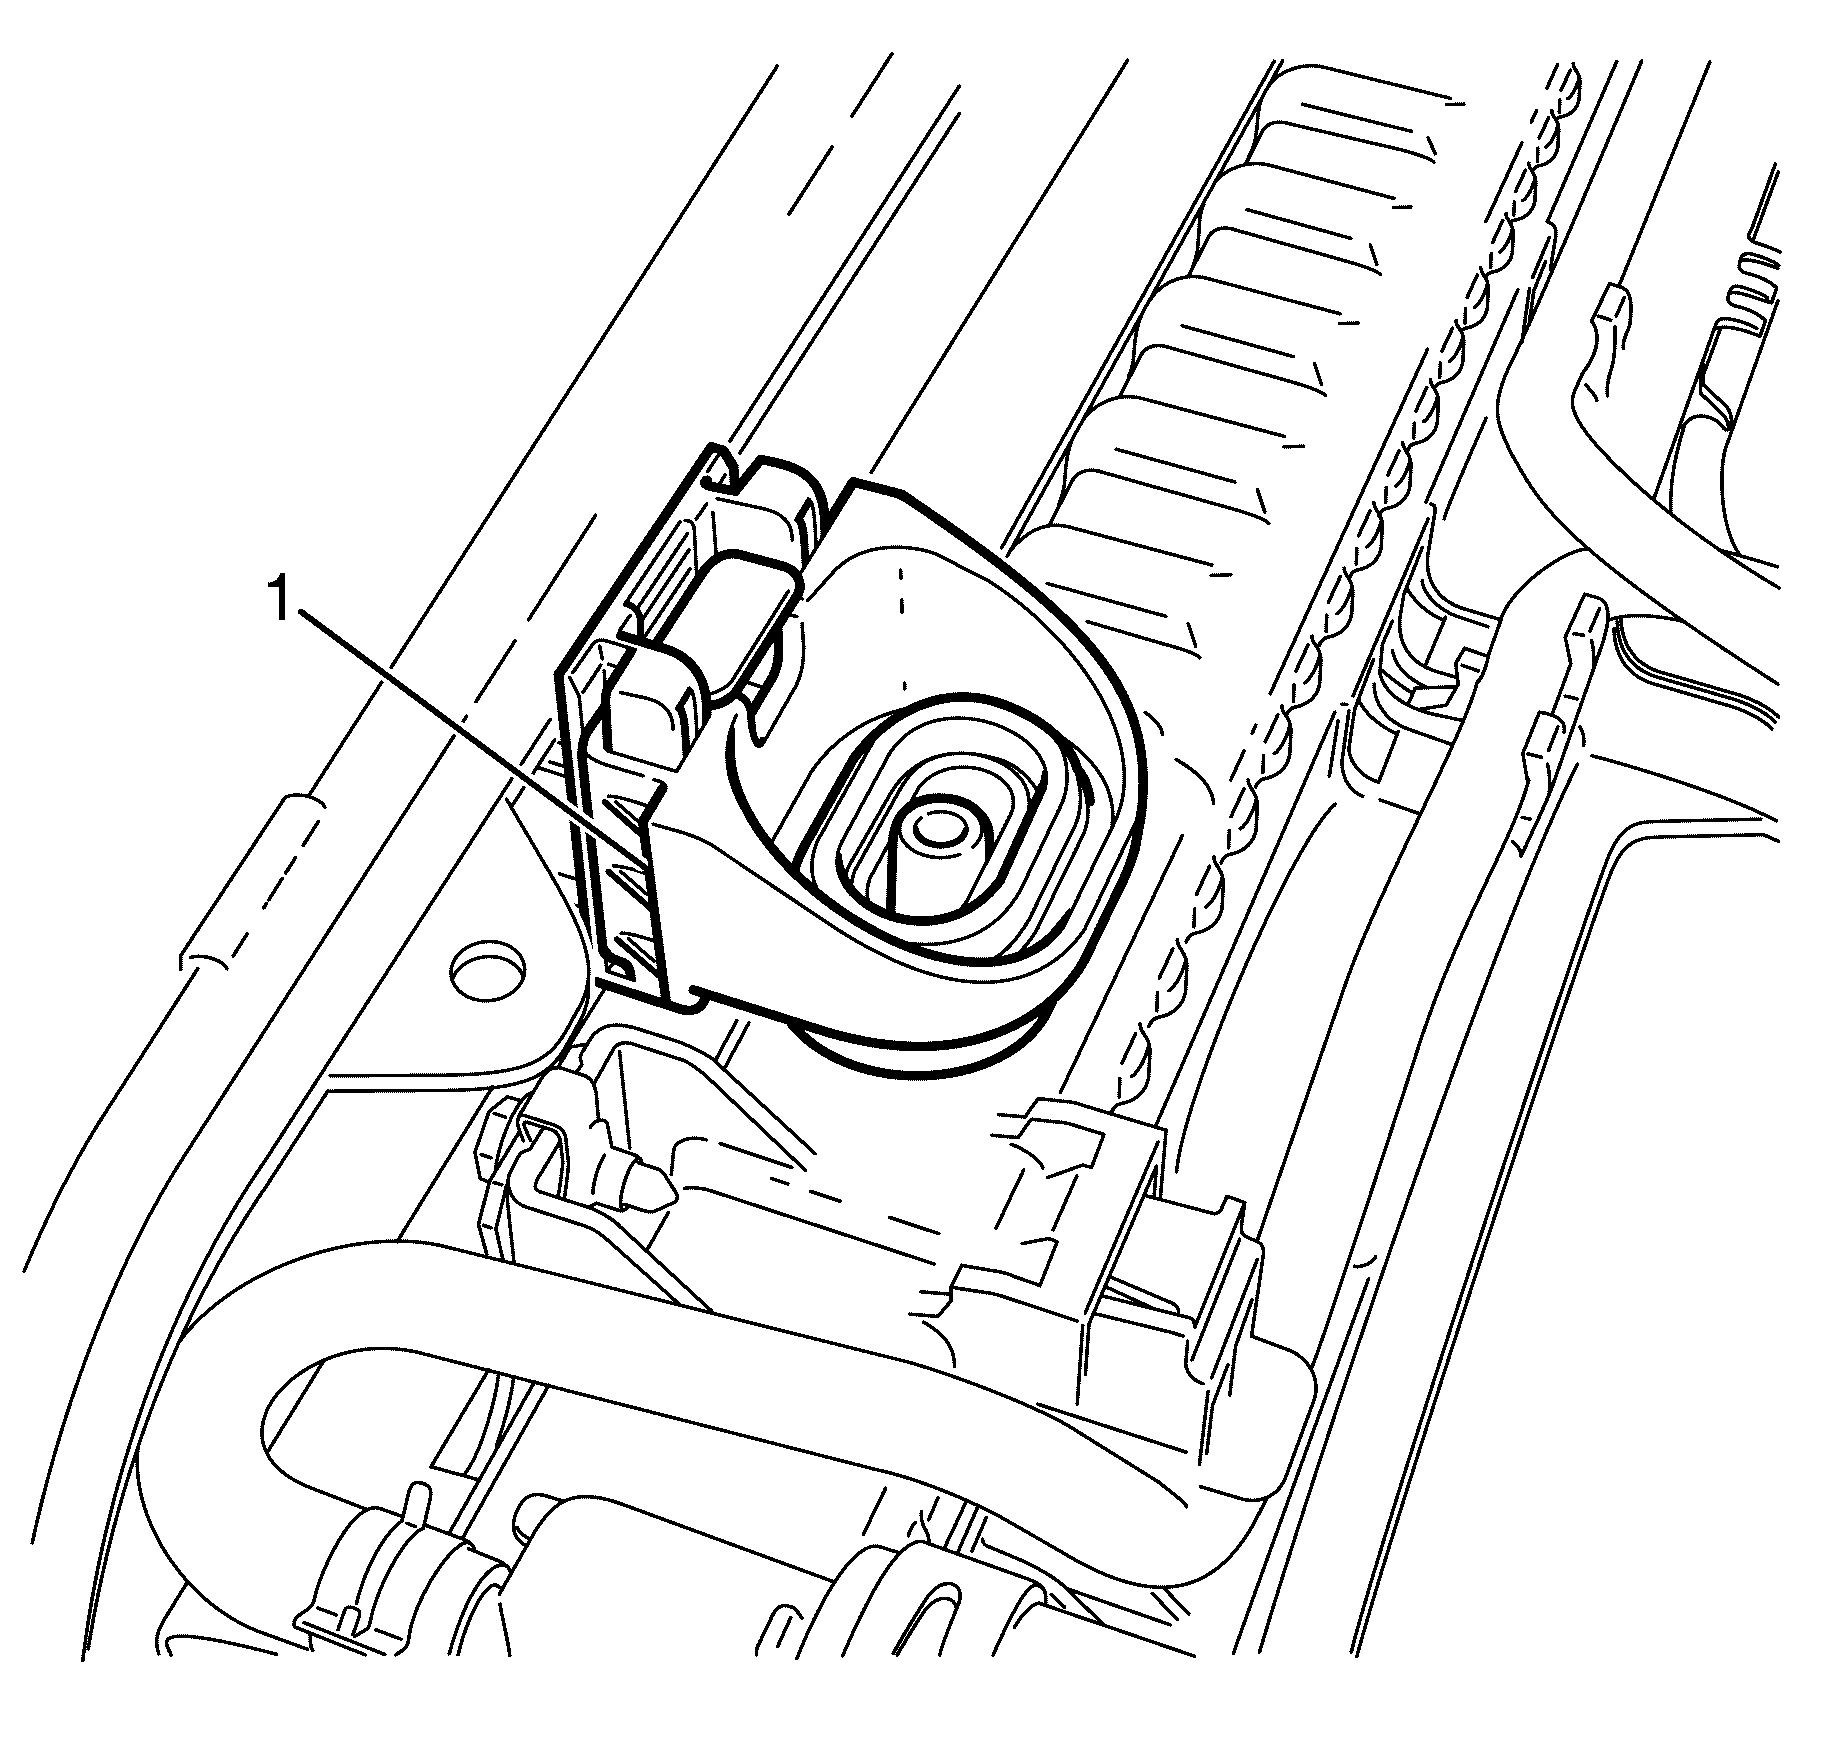
Important: Remove the upper radiator support brackets by raising the securing lock upwards 10mm and slide the bracket of the radiator slide pin.
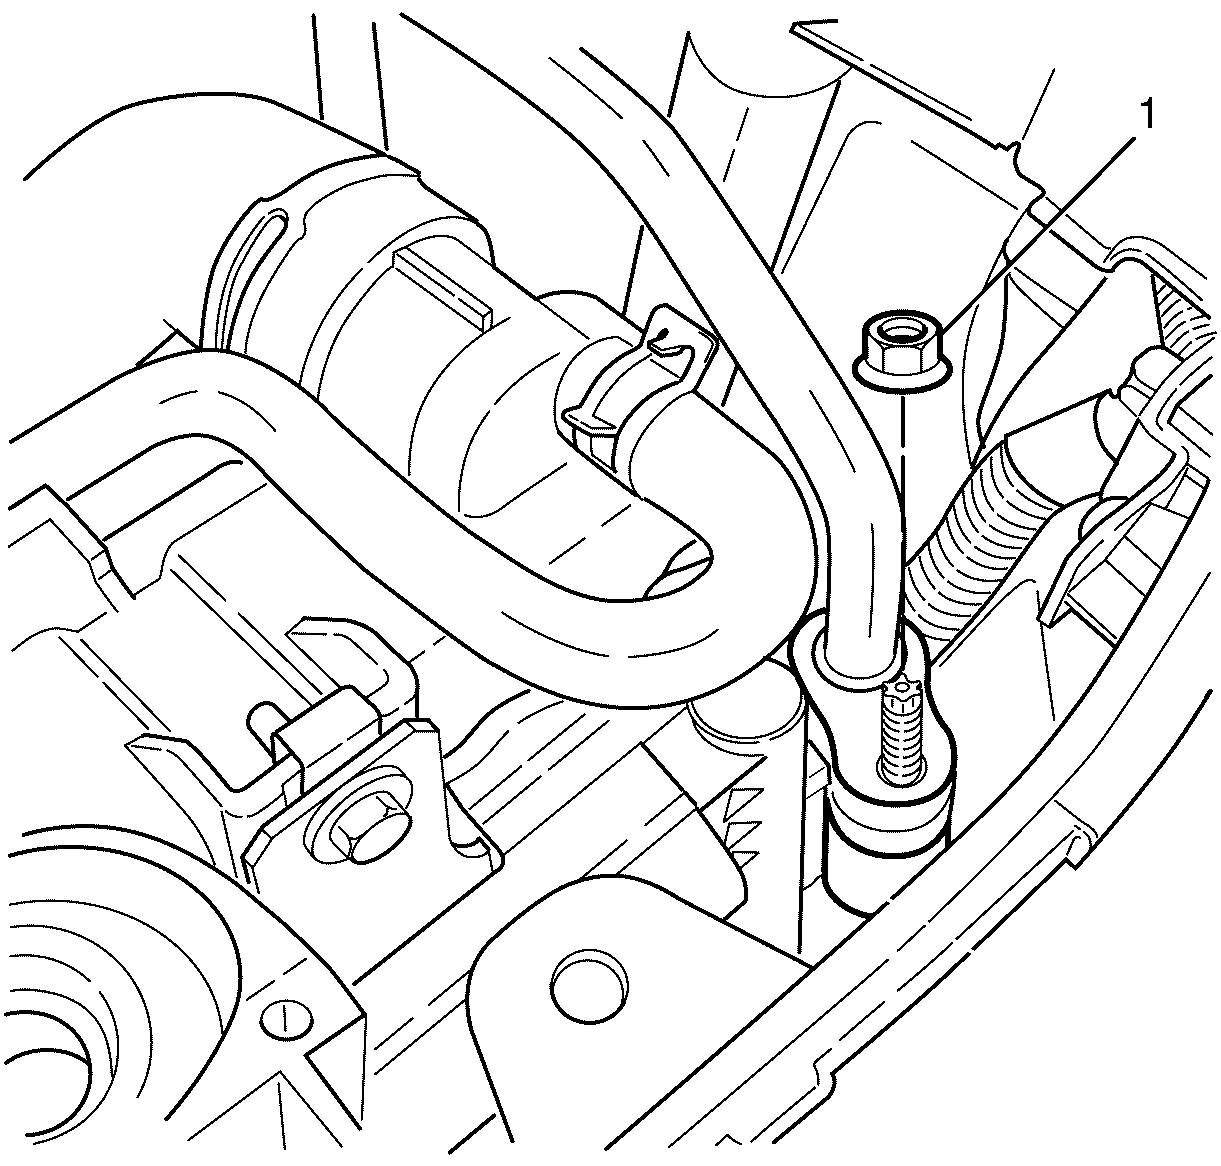
Important: Gently push the radiator and condenser towards the engine to allow removal of the discharge pipe to condenser retaining nut (1).
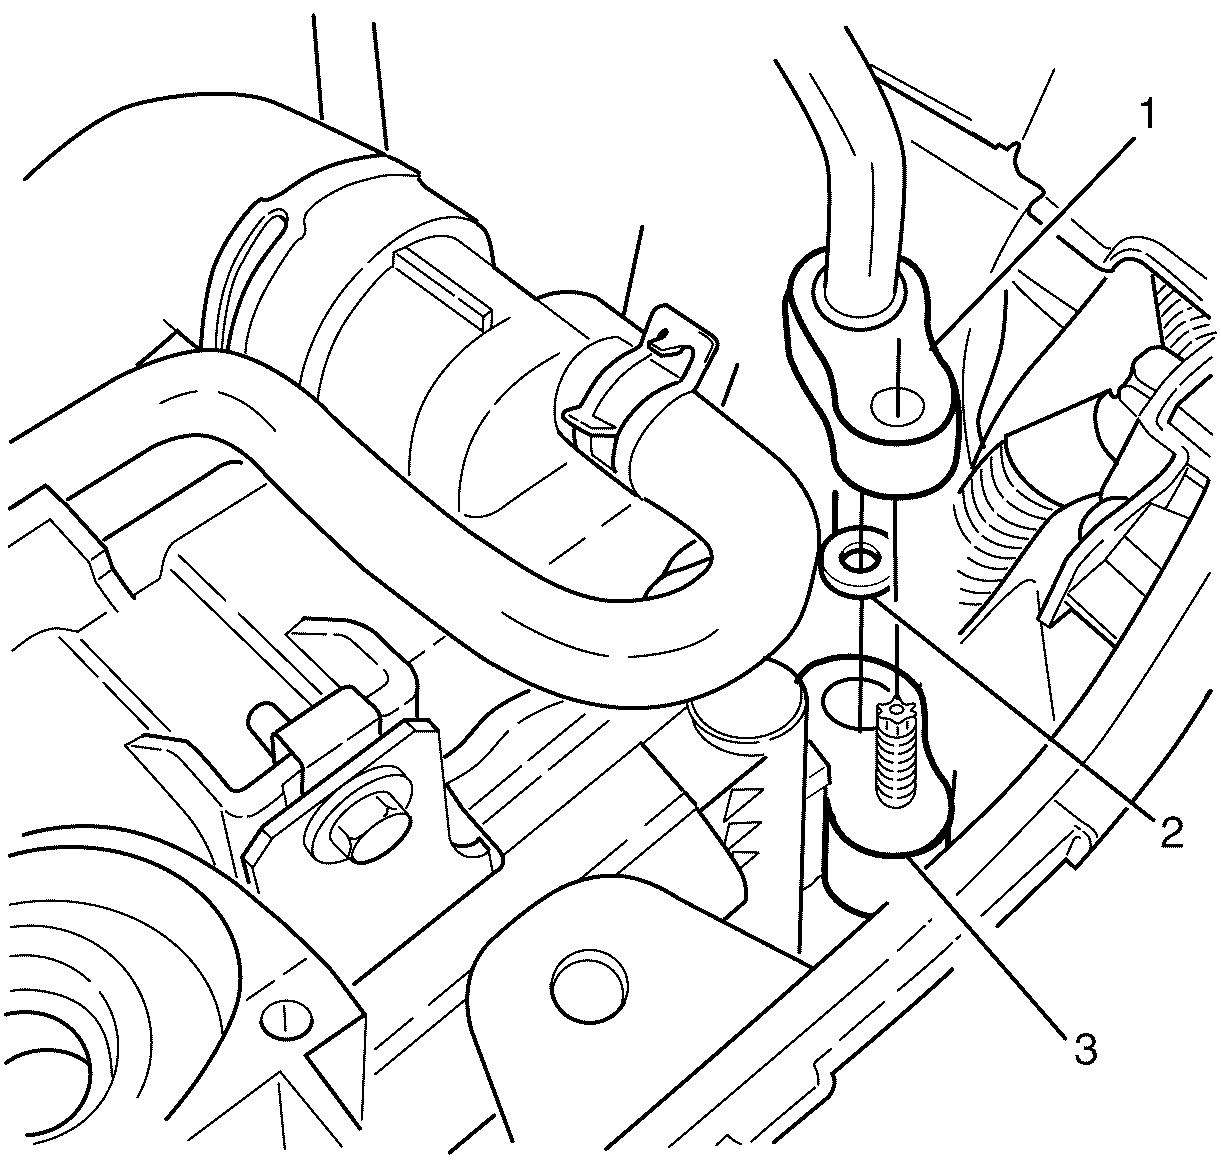
Discard the sealing washer.
Important: Cover any opening of the A/C system with a suitable cap or tape immediately, to prevent absorption of moisture from the atmosphere.
Installation Procedure
- Remove the plugs or caps from the discharge pipe (1) and the condenser (3).
- Install a NEW sealing washer (2). Refer to Sealing Washer Replacement .
- Install the discharge pipe (1) to condenser (3).
- Install the discharge pipe to condenser retaining nut (1).
- Install the upper radiator support brackets (1).
- Remove the plugs or caps from the suction/discharge pipes (1) and the ports on the compressor (3).
- Install two NEW sealing washers (2). Refer to Sealing Washer Replacement .
- Connect the suction/discharge pipes (1) to the compressor (3)
- Install the suction/discharge pipe to compressor retaining bolt (1).
- Install a NEW sealing washer (3). Refer to Sealing Washer Replacement .
- Install the suction pipe upper (1) to the suction pipe lower (2).
- Install the suction pipe upper to suction pipe lower retaining nut (1).
- Raise the vehicle.
- Position the discharge hose retaining bracket (2) to the compressor (3).
- Install the compressor to compressor mounting bracket bolt (1).
- Lower the vehicle to the ground.
- Install the passenger side engine dress cover. Refer to Engine Cover Replacement .
- Install the radiator air baffle and deflector. Refer to Radiator Air Upper Baffle and Deflector Replacement
- Install the air filter assembly. Refer to Air Cleaner Assembly Replacement .
- Connect the battery negative cable. Refer to Battery Negative Cable Disconnection and Connection .
- Evacuate and recharge the A/C system. Refer to Refrigerant Recovery and Recharging .
- Leak test the fittings of the component using J 39400 .

Important: DO NOT coat the NEW sealing washer (2) with oil, they must be fitted dry. The use of mineral oil will render the sealing washer (2) useless, as the sealing washer (2) WILL swell causing refrigerant to leak out.
Notice: Refer to Fastener Notice in the Preface section.

Important: Gently push the radiator and condenser towards the engine to allow installation of the discharge pipe to condenser retaining nut (1).
Tighten
Tighten the nut to 22 N·m( 16 lb ft).


Important: DO NOT coat the NEW sealing washers (2) with oil, they must be fitted dry. The use of mineral oil will render the sealing washers (2) useless, as the sealing washers (2) WILL swell causing refrigerant to leak out.
Tighten
Tighten the bolt to 22 N·m(16 lb ft).
Important: DO NOT coat the NEW sealing washer (3) with oil, they must be fitted dry. The use of mineral oil will render the sealing washer (3) useless, as the sealing washer (3) WILL swell causing refrigerant to leak out.
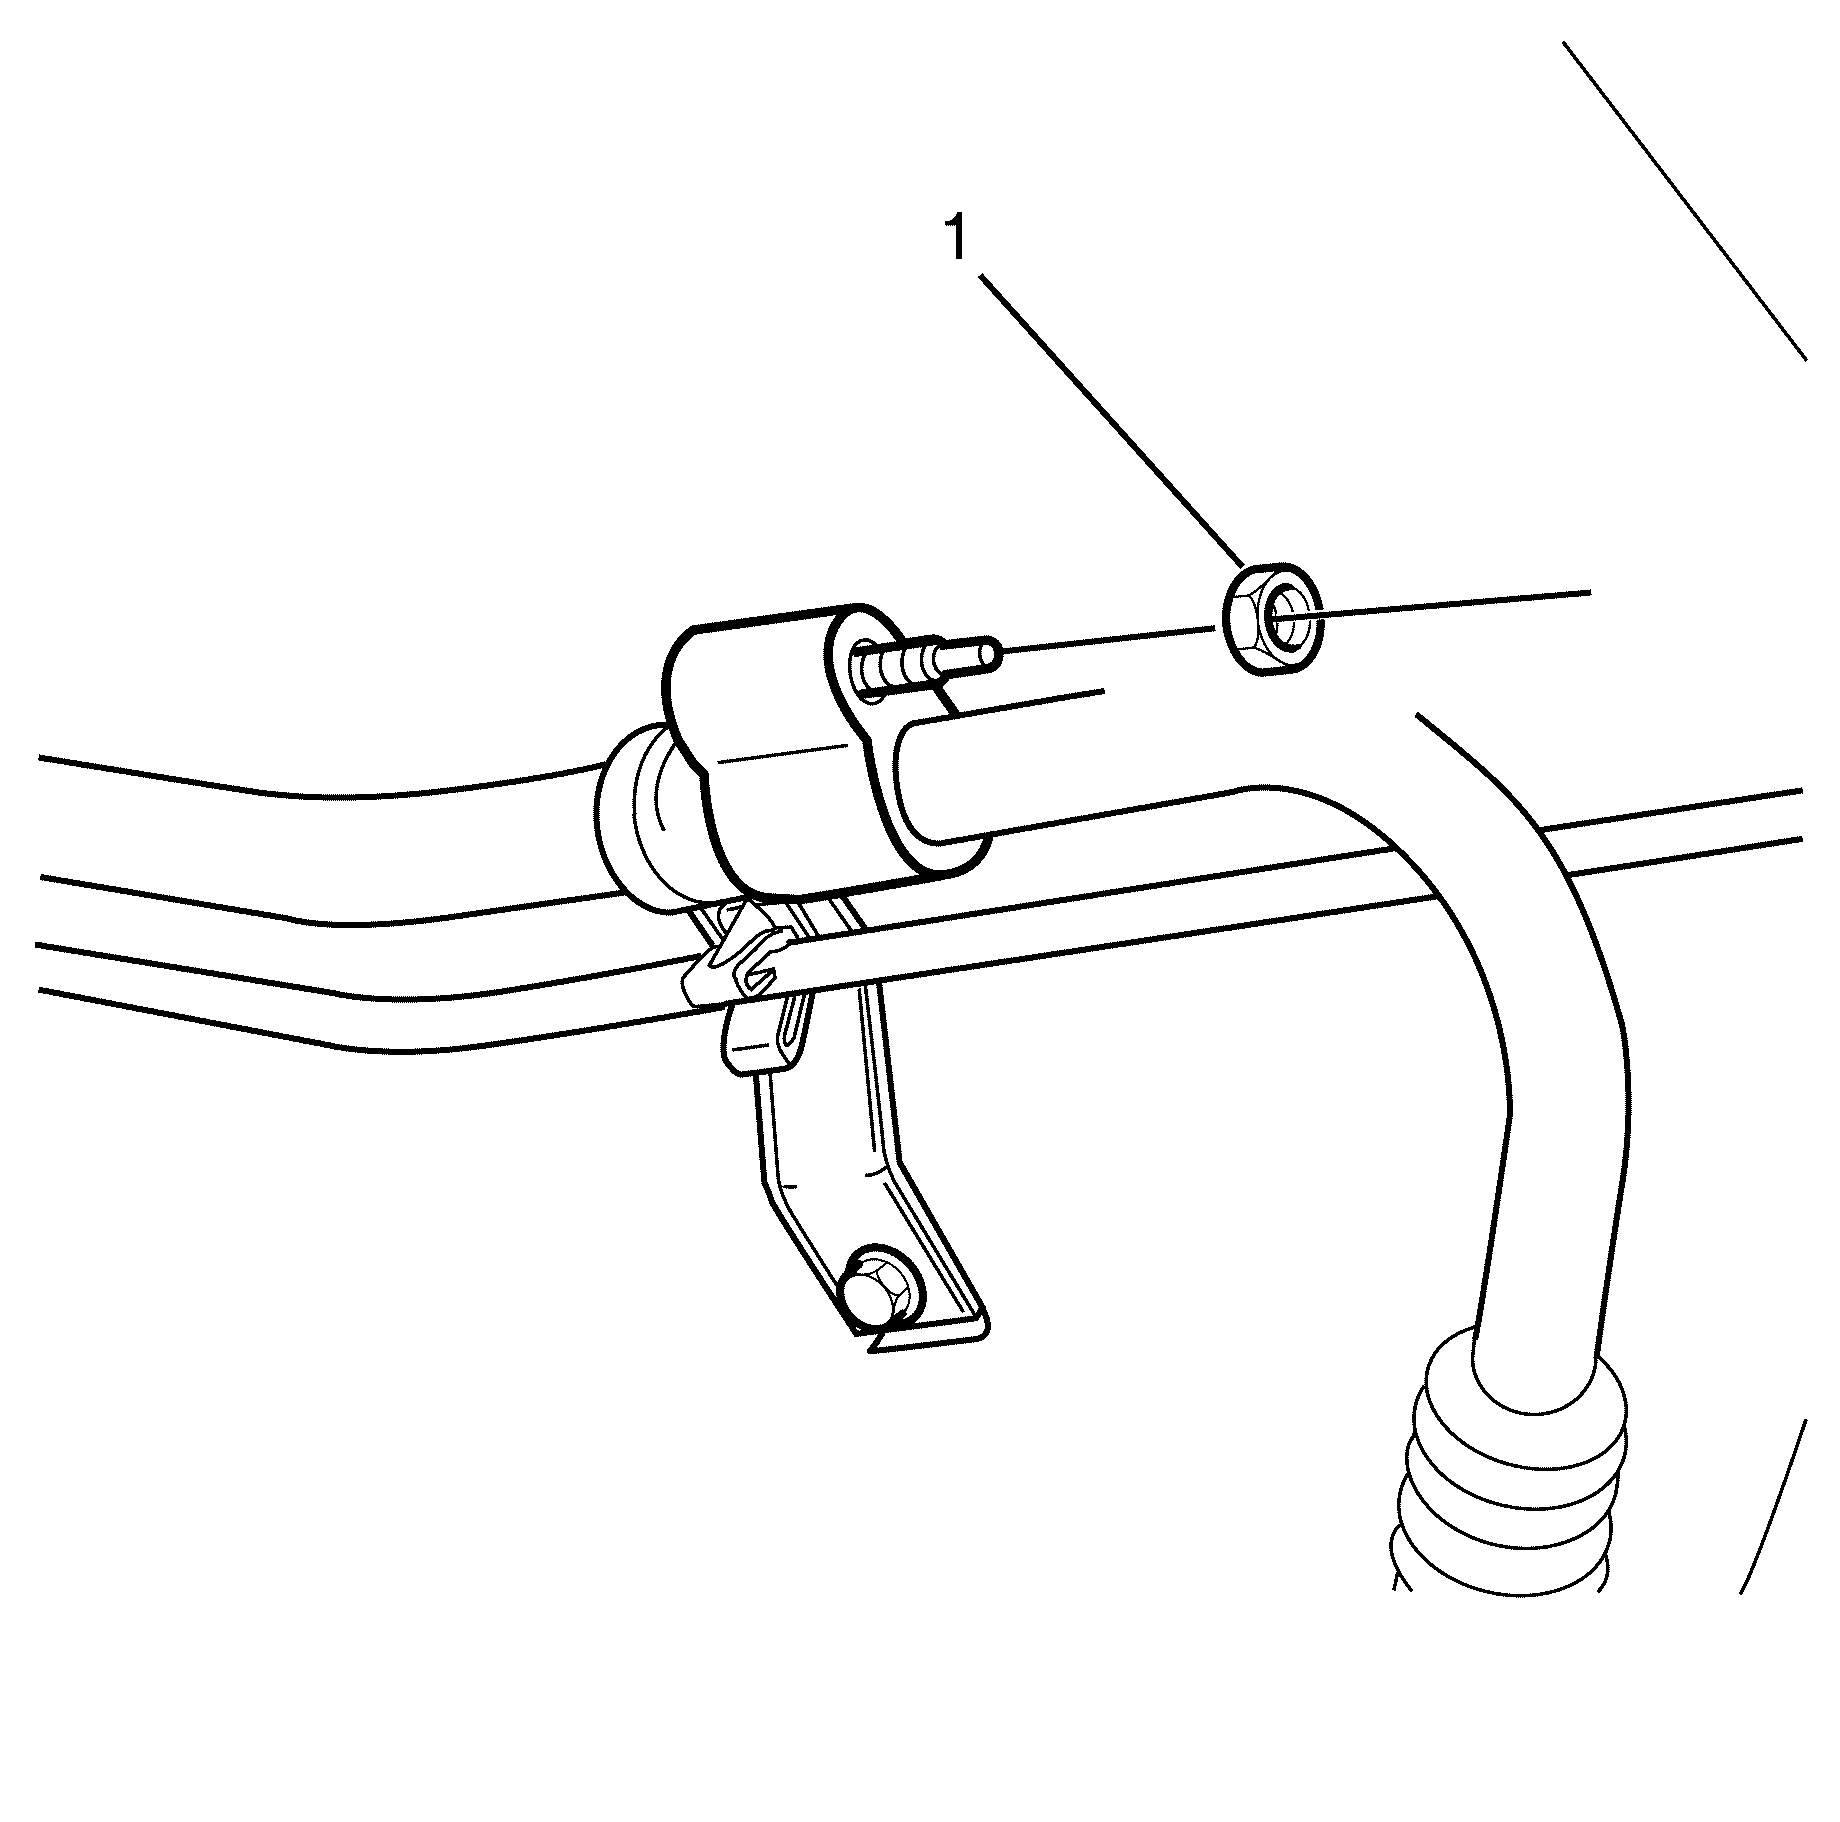
Tighten
Tighten the nut to 22 N·m( 16 lb ft).

Tighten
Tighten the bolt to 22 N·m (16 lb ft).
Discharge Hose Replacement 6.0L Engine
Tools Required
J 39400-A Halogen Leak Tester
Removal Procedure
- Recover the refrigerant. Refer to Refrigerant Recovery and Recharging.
- Disconnect battery negative cable. Refer to Battery Negative Cable Disconnection and Connection.
- Remove the air filter assembly. Refer to Air Cleaner Assembly Replacement.
- Remove the radiator air baffle and deflector. Refer to Radiator Air Upper Baffle and Deflector Replacement
- Remove the engine cover. Refer to Engine Cover Replacement.
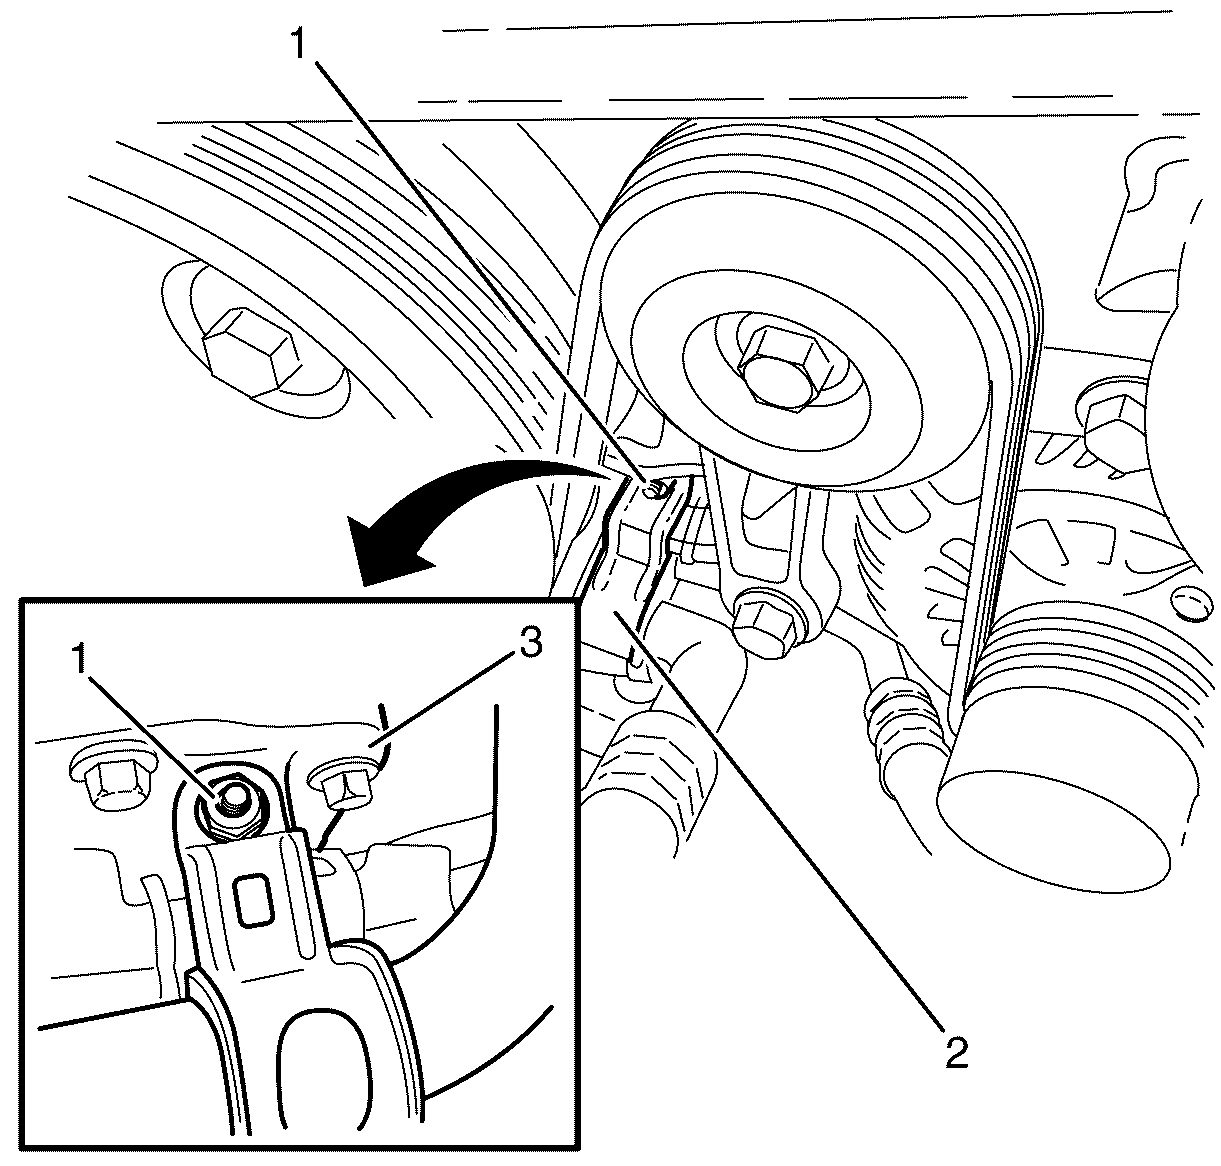
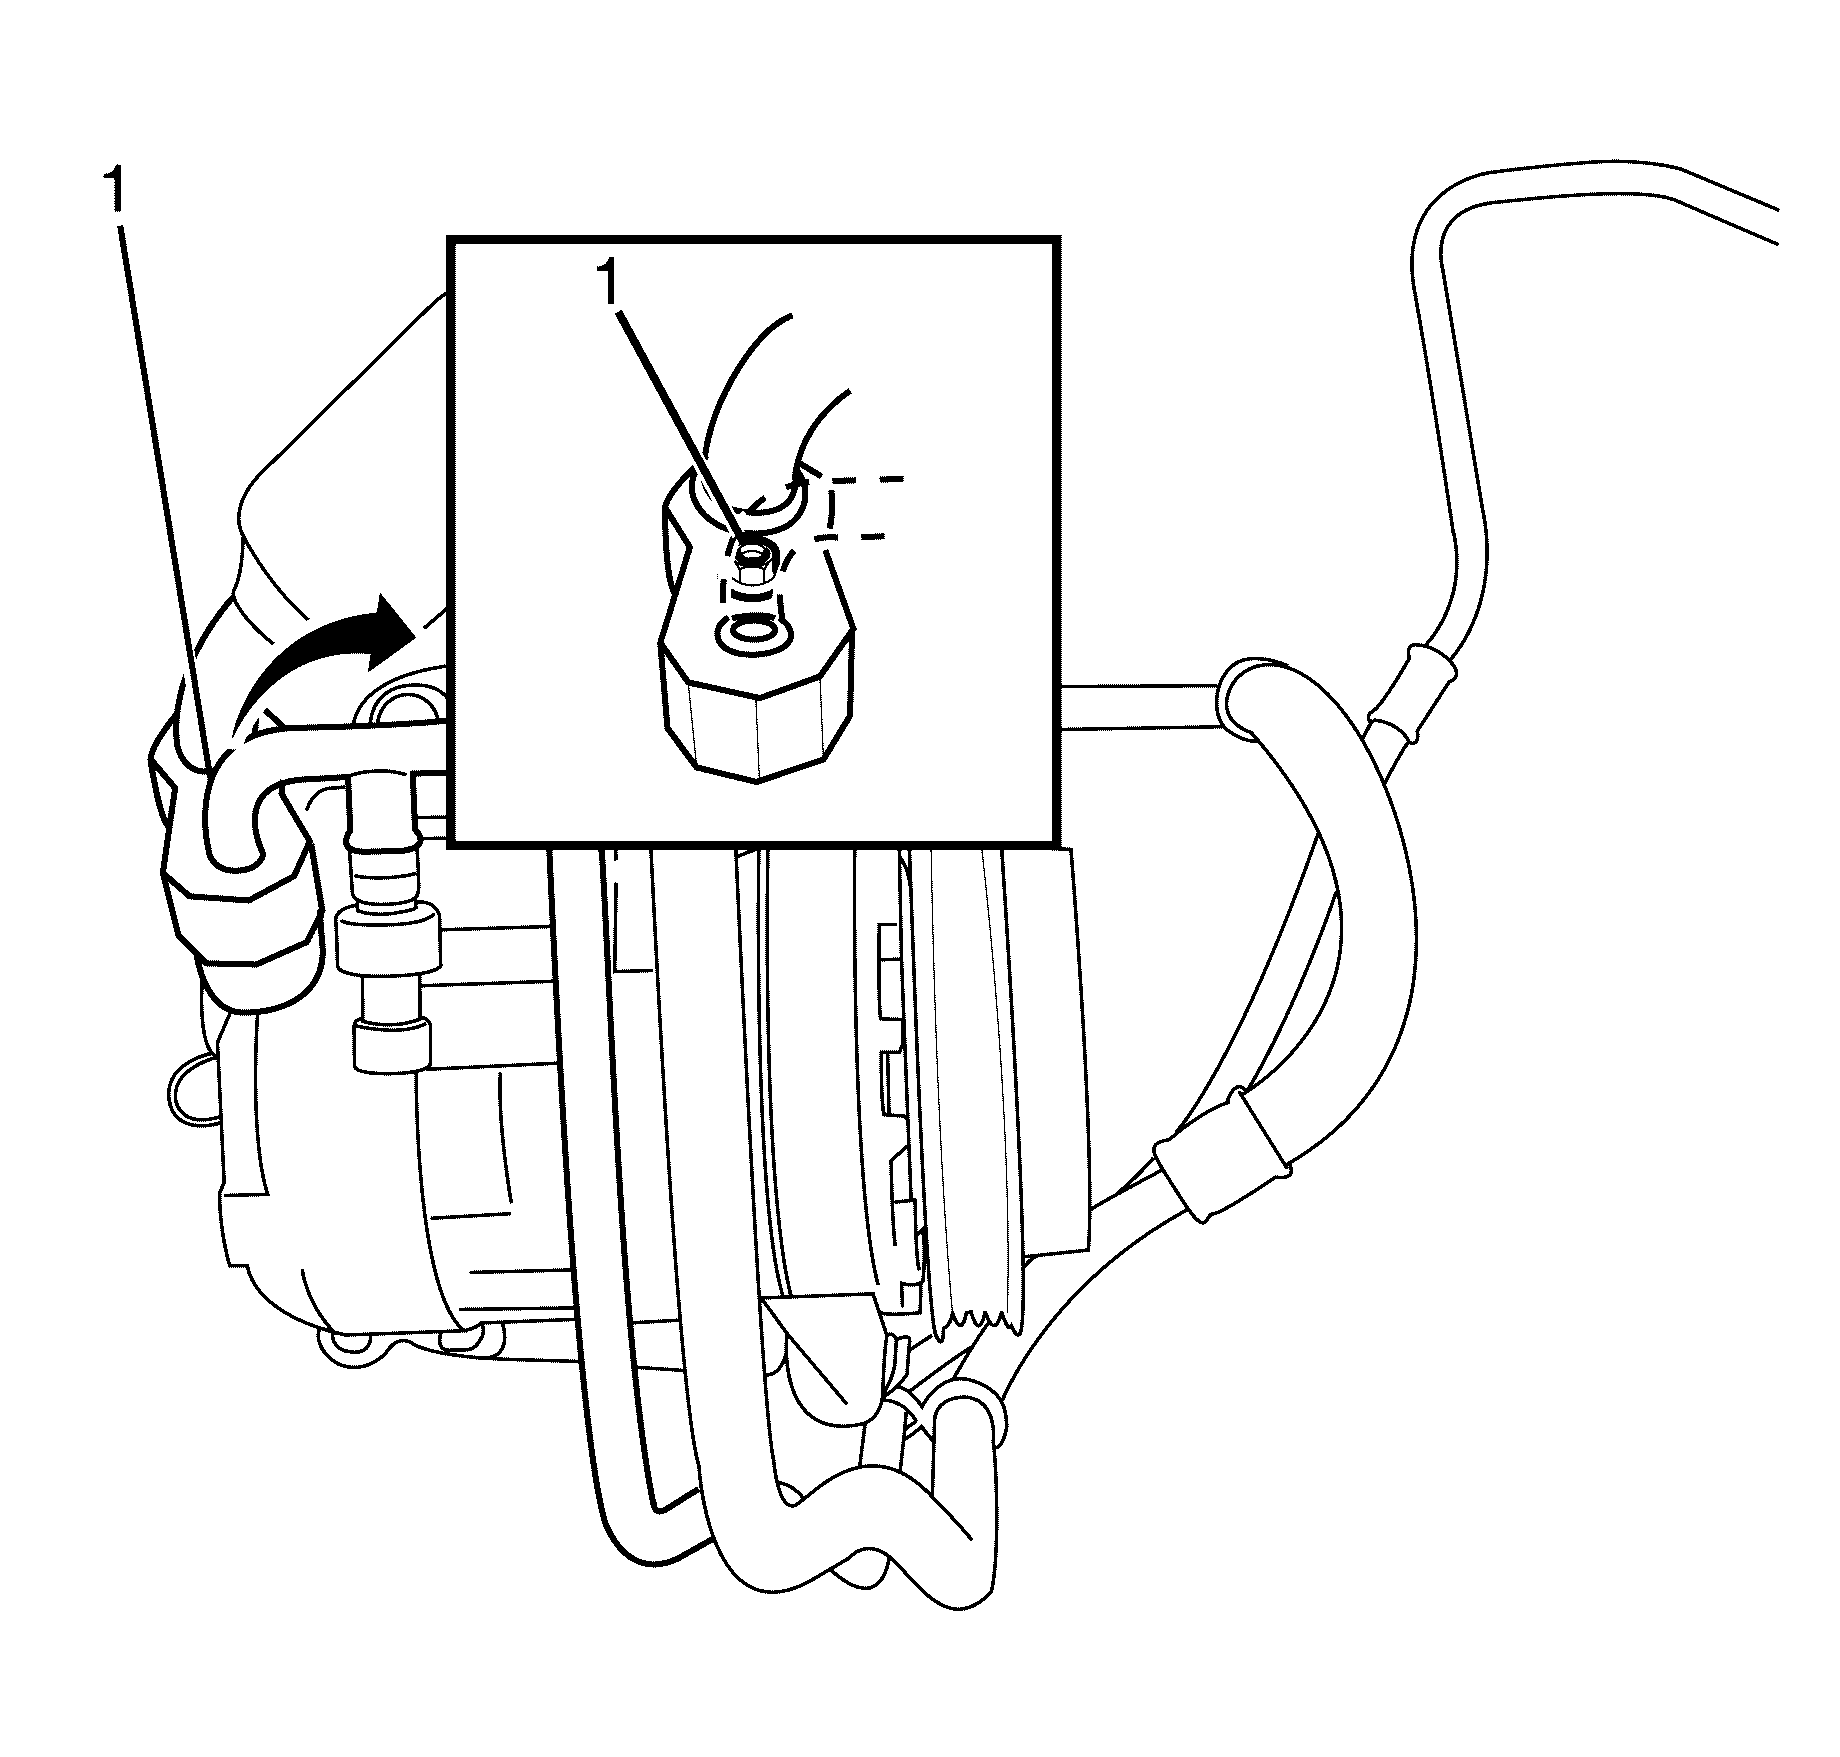
- Remove the discharge hose retaining bracket to oil pan retaining bolt (1).
- Position the discharge hose retaining bracket (2) away from the oil pan (3).
- Remove the suction pipe upper to suction pipe lower retaining nut (1).
- Disconnect the suction pipe upper (1) from suction pipe lower (2).
- Remove the sealing washer (3). Refer to Sealing Washer Replacement.
- Cap or plug the suction pipe upper (1) and the suction pipe lower (2).
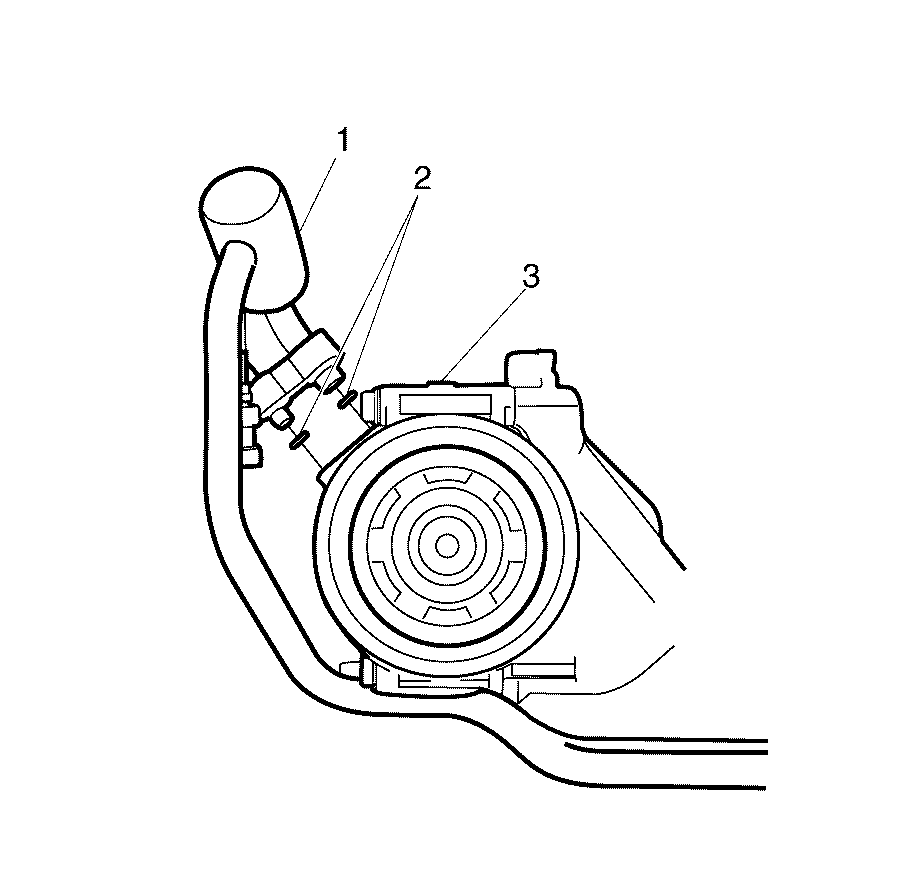
- Remove the suction/discharge pipe to compressor retaining bolt (2).
- Disconnect the suction/discharge pipes (1) from the compressor (3).
- Remove the sealing washers (2). Refer to Sealing Washer Replacement.
- Cap or plug the suction/discharge pipes (1) and the ports on the compressor (3).
- Remove the upper radiator support brackets (1).
- Remove the discharge pipe to condenser retaining nut (1).
- Disconnect the discharge pipe (1) from condenser (3).
- Remove the sealing washer (2). Refer to Sealing Washer Replacement.
- Cap or plug the discharge pipe (1) and the condenser (3).
Caution: Refer to Safety Glasses Caution in the Preface section.


Important: The sealing washer (3) is a single use item and must be discarded after use.
Discard the sealing washer
Important: Cover any opening of the A/C system with a suitable cap or tape immediately, to prevent absorption of moisture from the atmosphere.
Important: The sealing washers (2) are a single use item and must be discarded after use.
Discard the sealing washers.
Important: Cover any opening of the A/C system with a suitable cap or tape immediately, to prevent absorption of moisture from the atmosphere.

Important: Remove the upper radiator support brackets by raising the securing lock upwards 10mm and slide the bracket of the radiator slide pin.

Important: Gently push the radiator and condenser towards the engine to allow removal of the discharge pipe to condenser retaining nut (1).

Discard the sealing washer.
Important: Cover any opening of the A/C system with a suitable cap or tape immediately, to prevent absorption of moisture from the atmosphere.
Installation Procedure
- Remove the plugs or caps from the discharge pipe (1) and the condenser (3).
- Install a NEW sealing washer (2). Refer to Sealing Washer Replacement.
- Install the discharge pipe (1) to condenser (3).
- Install the discharge pipe to condenser retaining nut (1).
- Install the upper radiator support brackets (1).
- Remove the plugs or caps from the suction/discharge pipes (1) and the ports on the compressor (3).
- Install two NEW sealing washers (2). Refer to Sealing Washer Replacement.
- Connect the suction/discharge pipes (1) to the compressor (3).
- Install the suction/discharge pipe to the compressor retaining bolt (2).
- Remove the plugs or caps from the suction pipe upper (1) and the suction pipe lower (2).
- Install a NEW sealing washer (3). Refer to Sealing Washer Replacement.
- Install the suction pipe upper (1) to the suction pipe lower (2).
- Install the suction pipe upper to suction pipe lower retaining nut (1).
- Position the discharge hose retaining bracket (2) to the oil pan (3).
- Install the discharge hose retaining bracket to oil pan retaining nut (1).
- Install the engine cover. Refer to Engine Cover Replacement.
- Install the radiator air baffle and deflector. Refer to Radiator Air Upper Baffle and Deflector Replacement.
- Install the air filter assembly. Refer to Air Cleaner Assembly Replacement.
- Connect the battery negative cable. Refer to Battery Negative Cable Disconnection and Connection.
- Evacuate and recharge the A/C system. Refer to Refrigerant Recovery and Recharging.
- Leak test the fittings of the components using J 39400-A .

Important: DO NOT coat the NEW sealing washers (2) with oil, they must be fitted dry. The use of mineral oil will render the sealing washers (2) useless, as the sealing washers (2) WILL swell causing refrigerant to leak out.
Notice: Refer to Fastener Notice in the Preface section.

Important: Gently push the radiator and condenser towards the engine to allow installation of the discharge pipe to condenser retaining nut (1).
Tighten
Tighten the nut to 22 N·m (16 lb ft).


Important: DO NOT coat the sealing washers (2) with oil, they must be fitted dry. The use of mineral oil will render the washer useless, as the sealing washers (2) WILL swell causing refrigerant to leak out.

Tighten
Tighten the bolt to 22 N·m(16 lb ft).

Important: DO NOT coat the NEW sealing washer (3) with oil, they must be fitted dry. The use of mineral oil will render the sealing washer (3) useless, as the sealing washer (3) WILL swell causing refrigerant to leak out.

Tighten
Tighten the nut to 22 N·m(16 lb ft).

Tighten
Tighten the nut to 22 N·m (16 lb ft).
