GM Service Manual Online
For 1990-2009 cars only

Driver Seat Adjuster Memory Switch Replacement LHD

Removal Procedure

    Caution: Refer to Battery Disconnect Caution in the Preface section.

  1. Disconnect the battery ground cable from the battery. Refer to Battery Negative Cable Disconnection and Connection .
  2. Caution: Refer to SIR Caution in the Preface section.

  3. Disable the SIR system. Refer to SIR Disabling and Enabling in SIR.
  4. Remove the front seat. Refer to Front Seat Replacement - Bucket .
  5. Remove the outer trim panel. Refer to Seat Cushion Outer Trim Panel Replacement .
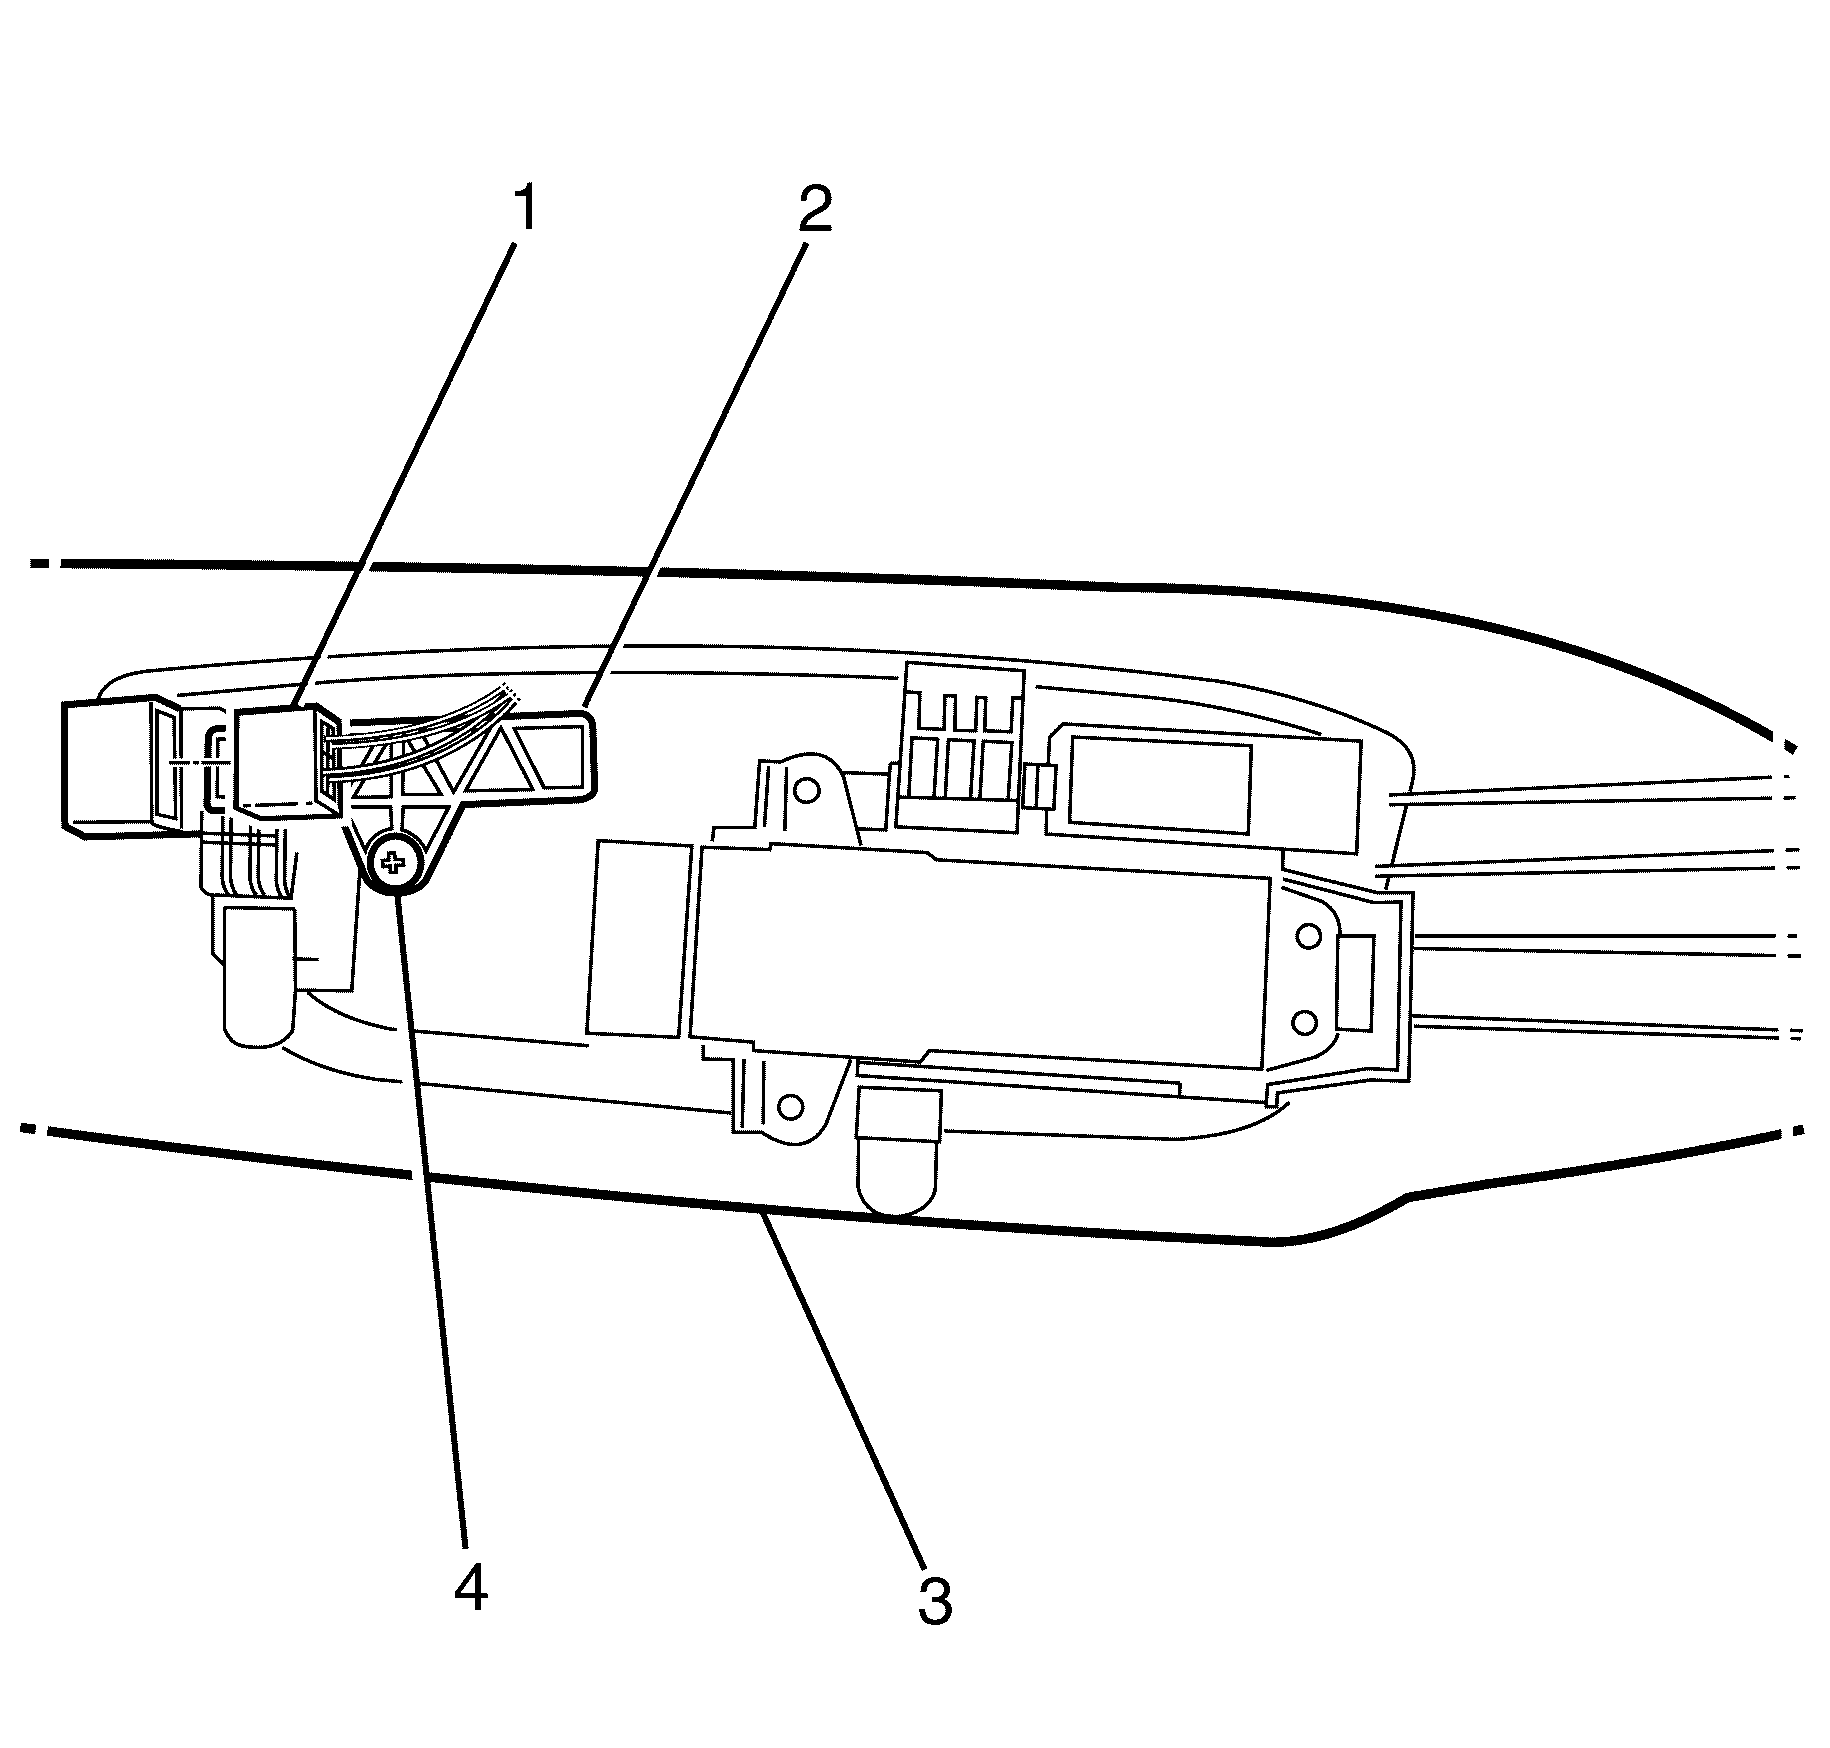
  6. Object Number: 1943517  Size: SH
  7. Disconnect the memory switch electrical connector (1).
  8. Remove screw (4) attaching the memory position switch (2) to the front seat outer side cover (3).
  9. Lift out the memory position switch (2) from its recess in the side cover (3).
  10. As required, each position switch button can be removed from the switch.

Installation Procedure

    Important: Ensure buttons are installed as per removal.

  1. As required, install the position button by pushing it into the memory position switch, listen for an audible click to confirm fitting

  2. Object Number: 1943517  Size: SH
  3. Install the seat memory position switch (2), into the its recess in the outer seat trim (3).
  4. Notice: Refer to Fastener Notice in the Preface section.

  5. Install the memory position switch retaining screw (4).
  6. Tighten
    Tighten the screw to 2.0  N·m (18 lb in).

  7. Connect the memory switch electrical connector (1).
  8. Install the outer trim panel. Refer to Seat Cushion Outer Trim Panel Replacement .
  9. Install the front seat. Refer to Front Seat Replacement - Bucket .
  10. Caution: Refer to Fastener Notice in the Preface section.

  11. Enable the SIR system. Refer to SIR Disabling and Enabling in SIR.
  12. Connect the battery ground cable to the battery. Refer to Battery Negative Cable Disconnection and Connection .
  13. Test the seat for correct mechanical and electrical operation.

Driver Seat Adjuster Memory Switch Replacement RHD

Seat Switch Identification

Type A Switch (8 Way)
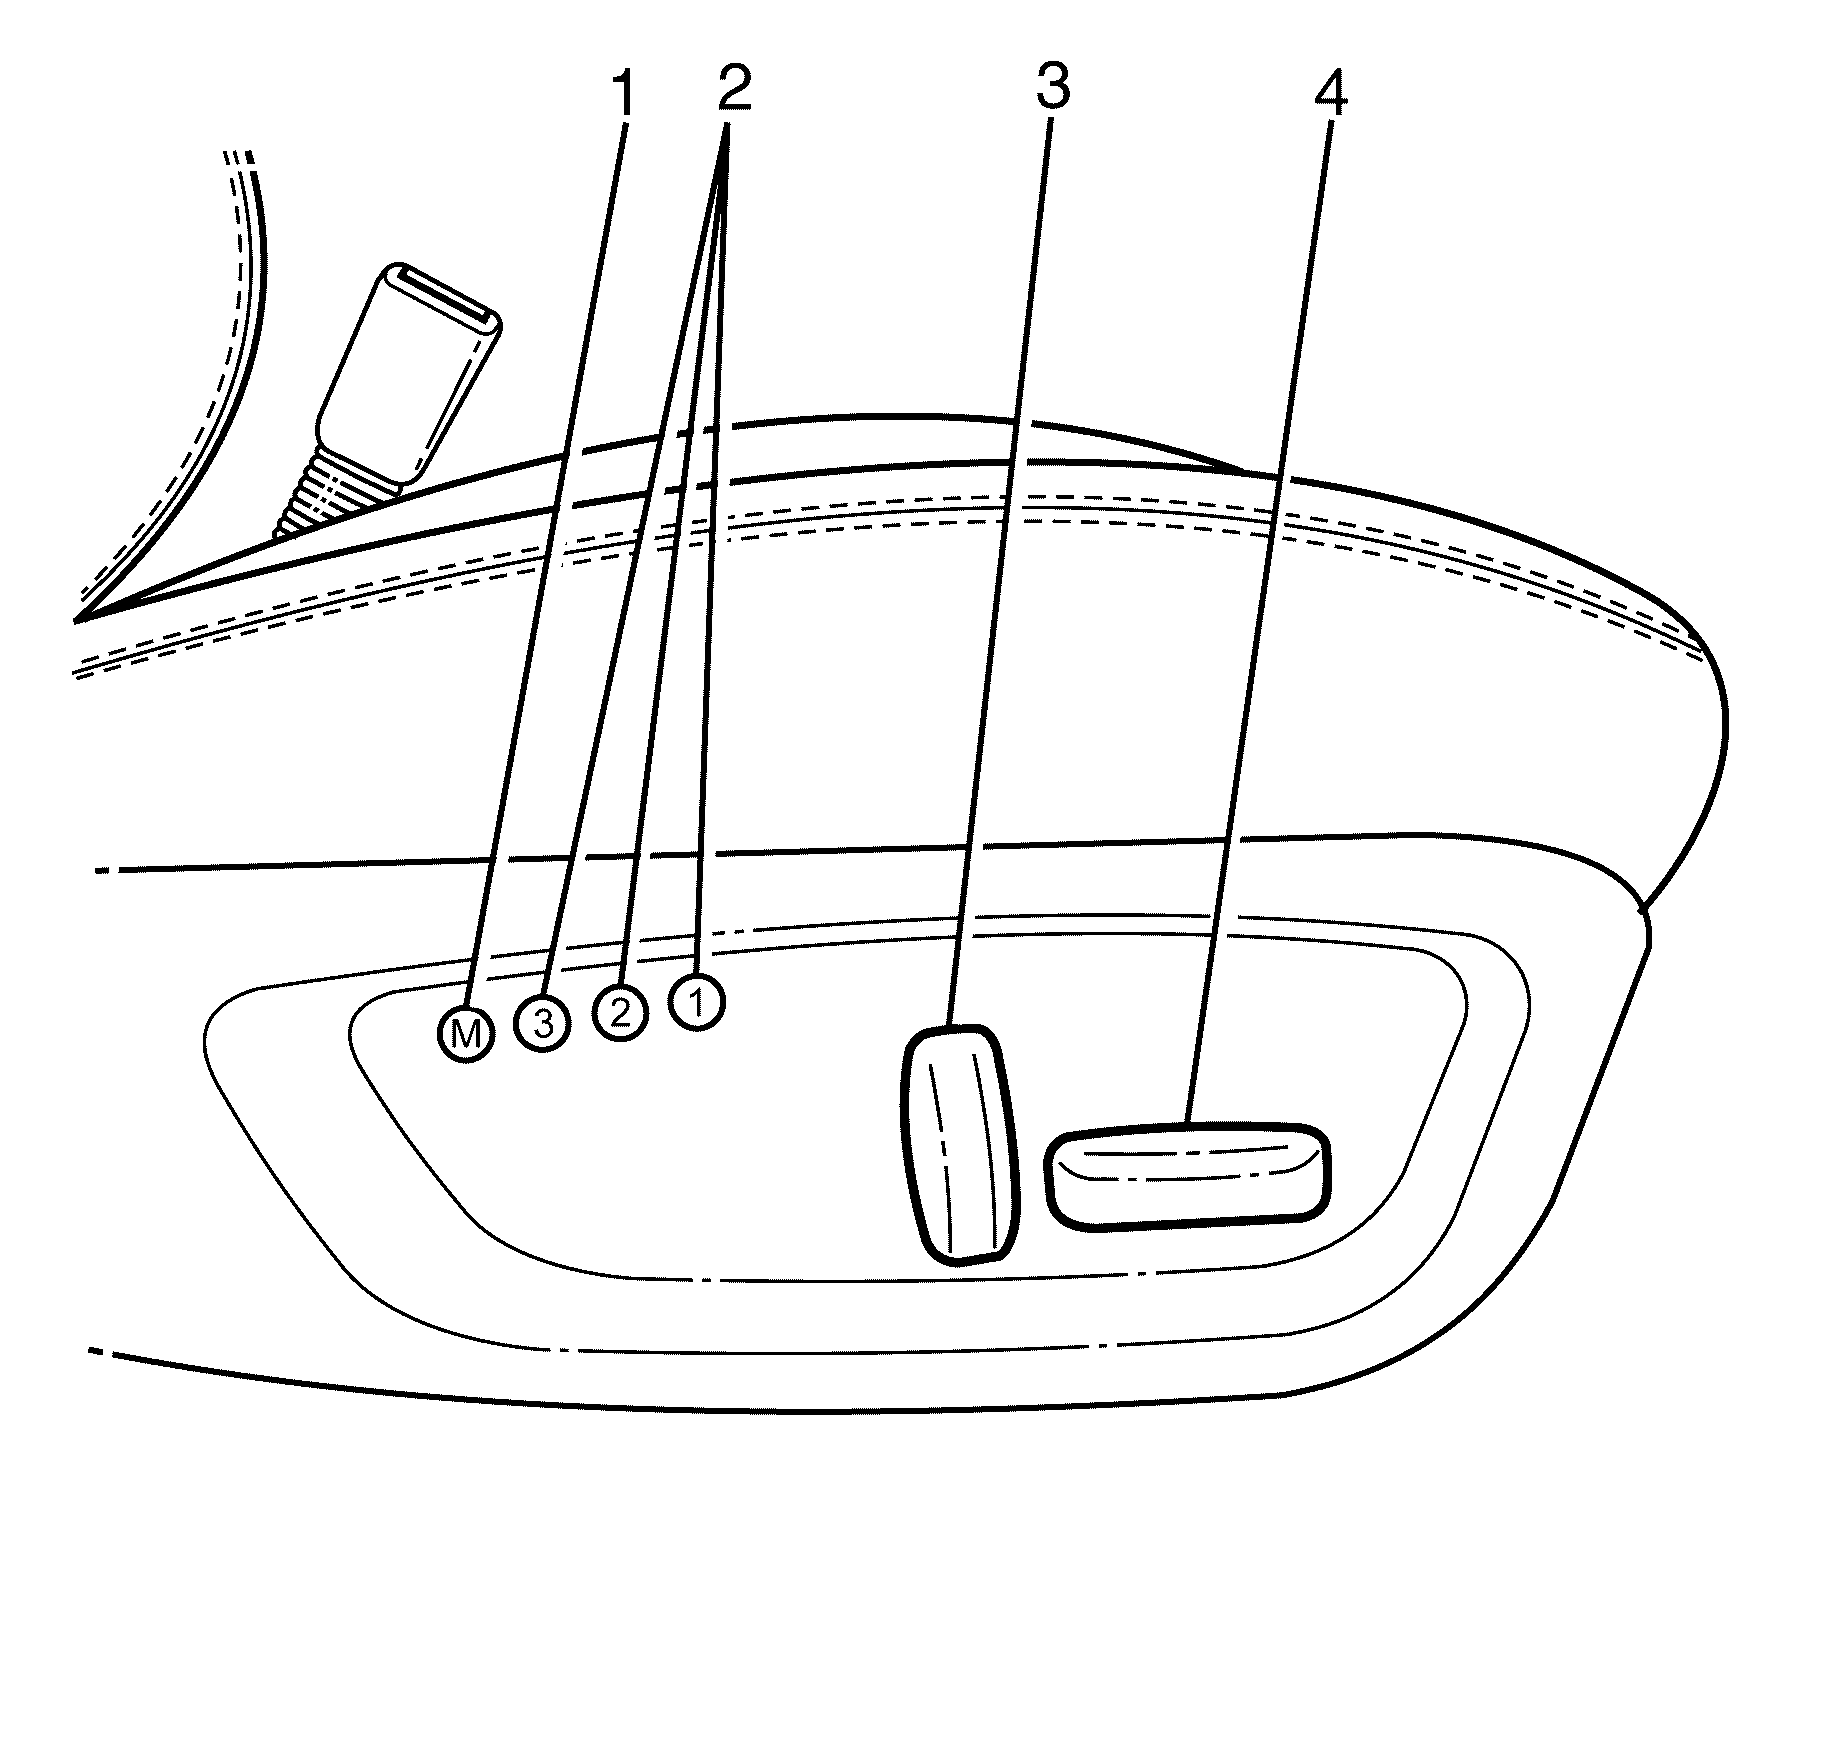

Object Number: 1943626  Size: SH
(1)Mirror Dip/Memory Store
(2)Seat Memory
(3)Recliner
(4)Fore/Up/Down/Tilt

Type B Switch (10 Way)


Object Number: 1943630  Size: SH
(1)Memory Dip/Memory Store
(2)Seat Memory
(3)Lumbar Switch
(4)Fore/Up/Down/Tilt
(5)Recliner

Removal Procedure - (Type A and B)

    Caution: Refer to Battery Disconnect Caution in the Preface section.

  1. Disconnect the battery ground cable from the battery. Refer to Battery Negative Cable Disconnection and Connection.
  2. Caution: Refer to SRS Caution in the Preface section.

  3. Disable the SIR system. Refer to SIR Disabling and Enabling.
  4. Remove the front seat. Refer to Front Seat Replacement - Bucket.
  5. Remove the outer trim panel. Refer to Seat Cushion Outer Trim Panel Replacement.

  6. Object Number: 1943641  Size: SH
  7. Disconnect the memory switch electrical connector (2).
  8. Remove screw (3) attaching the memory position switch (1) to the front seat outer side cover (4).
  9. Lift out the memory position switch assembly (1) from its recess in the side cover (4).
  10. As required, each position switch button can be removed from the switch.

Installation Procedure

    Important: Ensure buttons are installed as per removal.

  1. As required, install the position button by pushing it into the memory position switch, listen for an audible click to confirm fitting

  2. Object Number: 1943641  Size: SH
  3. Install the seat memory position switch (1), into the its recess in the outer seat trim (4).
  4. Notice: Refer to Fastener Notice in the Preface section.

  5. Install the memory position switch retaining screw (3).
  6. Tighten
    Tighten the retaining screw to 2.0  N·m (18 lb in).

  7. Connect the memory switch electrical connector (2).
  8. Install the outer trim panel. Refer to Seat Cushion Outer Trim Panel Replacement.
  9. Install the front seat. Refer to Front Seat Replacement - Bucket.
  10. Caution: Refer to SRS Caution in the Preface section.

  11. Enable the SIR system. Refer to SIR Disabling and Enabling.
  12. Caution: Refer to Battery Disconnect Caution in the Preface section.

  13. Connect the battery ground cable to the battery. Refer to Battery Negative Cable Disconnection and Connection.
  14. Test the seat for correct mechanical and electrical operation.

Driver Seat Adjuster Memory Switch Replacement Power LHD

Removal Procedure

  1. Remove the outer trim panel. Refer to Seat Cushion Outer Trim Panel Replacement.

  2. Object Number: 1943513  Size: SH
  3. Remove the power seat switch knobs (2) by gently prying the buttons off from the switch (1) with flat blade tool.

  4. Object Number: 1943514  Size: SH
  5. Remove the power seat switch (2) by releasing the retaining clips (1) and removing it out of its recess, located in the front seat trim panel.

Installation procedure


    Object Number: 1943515  Size: SH
  1. Install the power seat switch (1) into the its recess located in the outer trim panel, listen for an audible click from the retaining clip (2) to confirm fitting.

  2. Object Number: 1943516  Size: SH
  3. Install the power seat switch buttons (2) to the power seat switch (1), listen for an audible click to confirm fitting.
  4. Install the outer trim panel. Refer to Seat Cushion Outer Trim Panel Replacement.
  5. Test the power seat switch for the correct operation.