Master Cylinder Replacement LHD
Removal Procedure
- Disconnect the battery ground cable. Refer to Battery Negative Cable Disconnection and ConnectionBattery Negative Cable Disconnection and Connection l.
- Apply the park brake and chock the wheels.
- Deplete the vacuum brake booster power reserve.
- Clean the master cylinder, around the brake lines and the reservoir cap.
- Place a clean suitable container under the master cylinder.
- Remove the master cylinder reservoir cap.
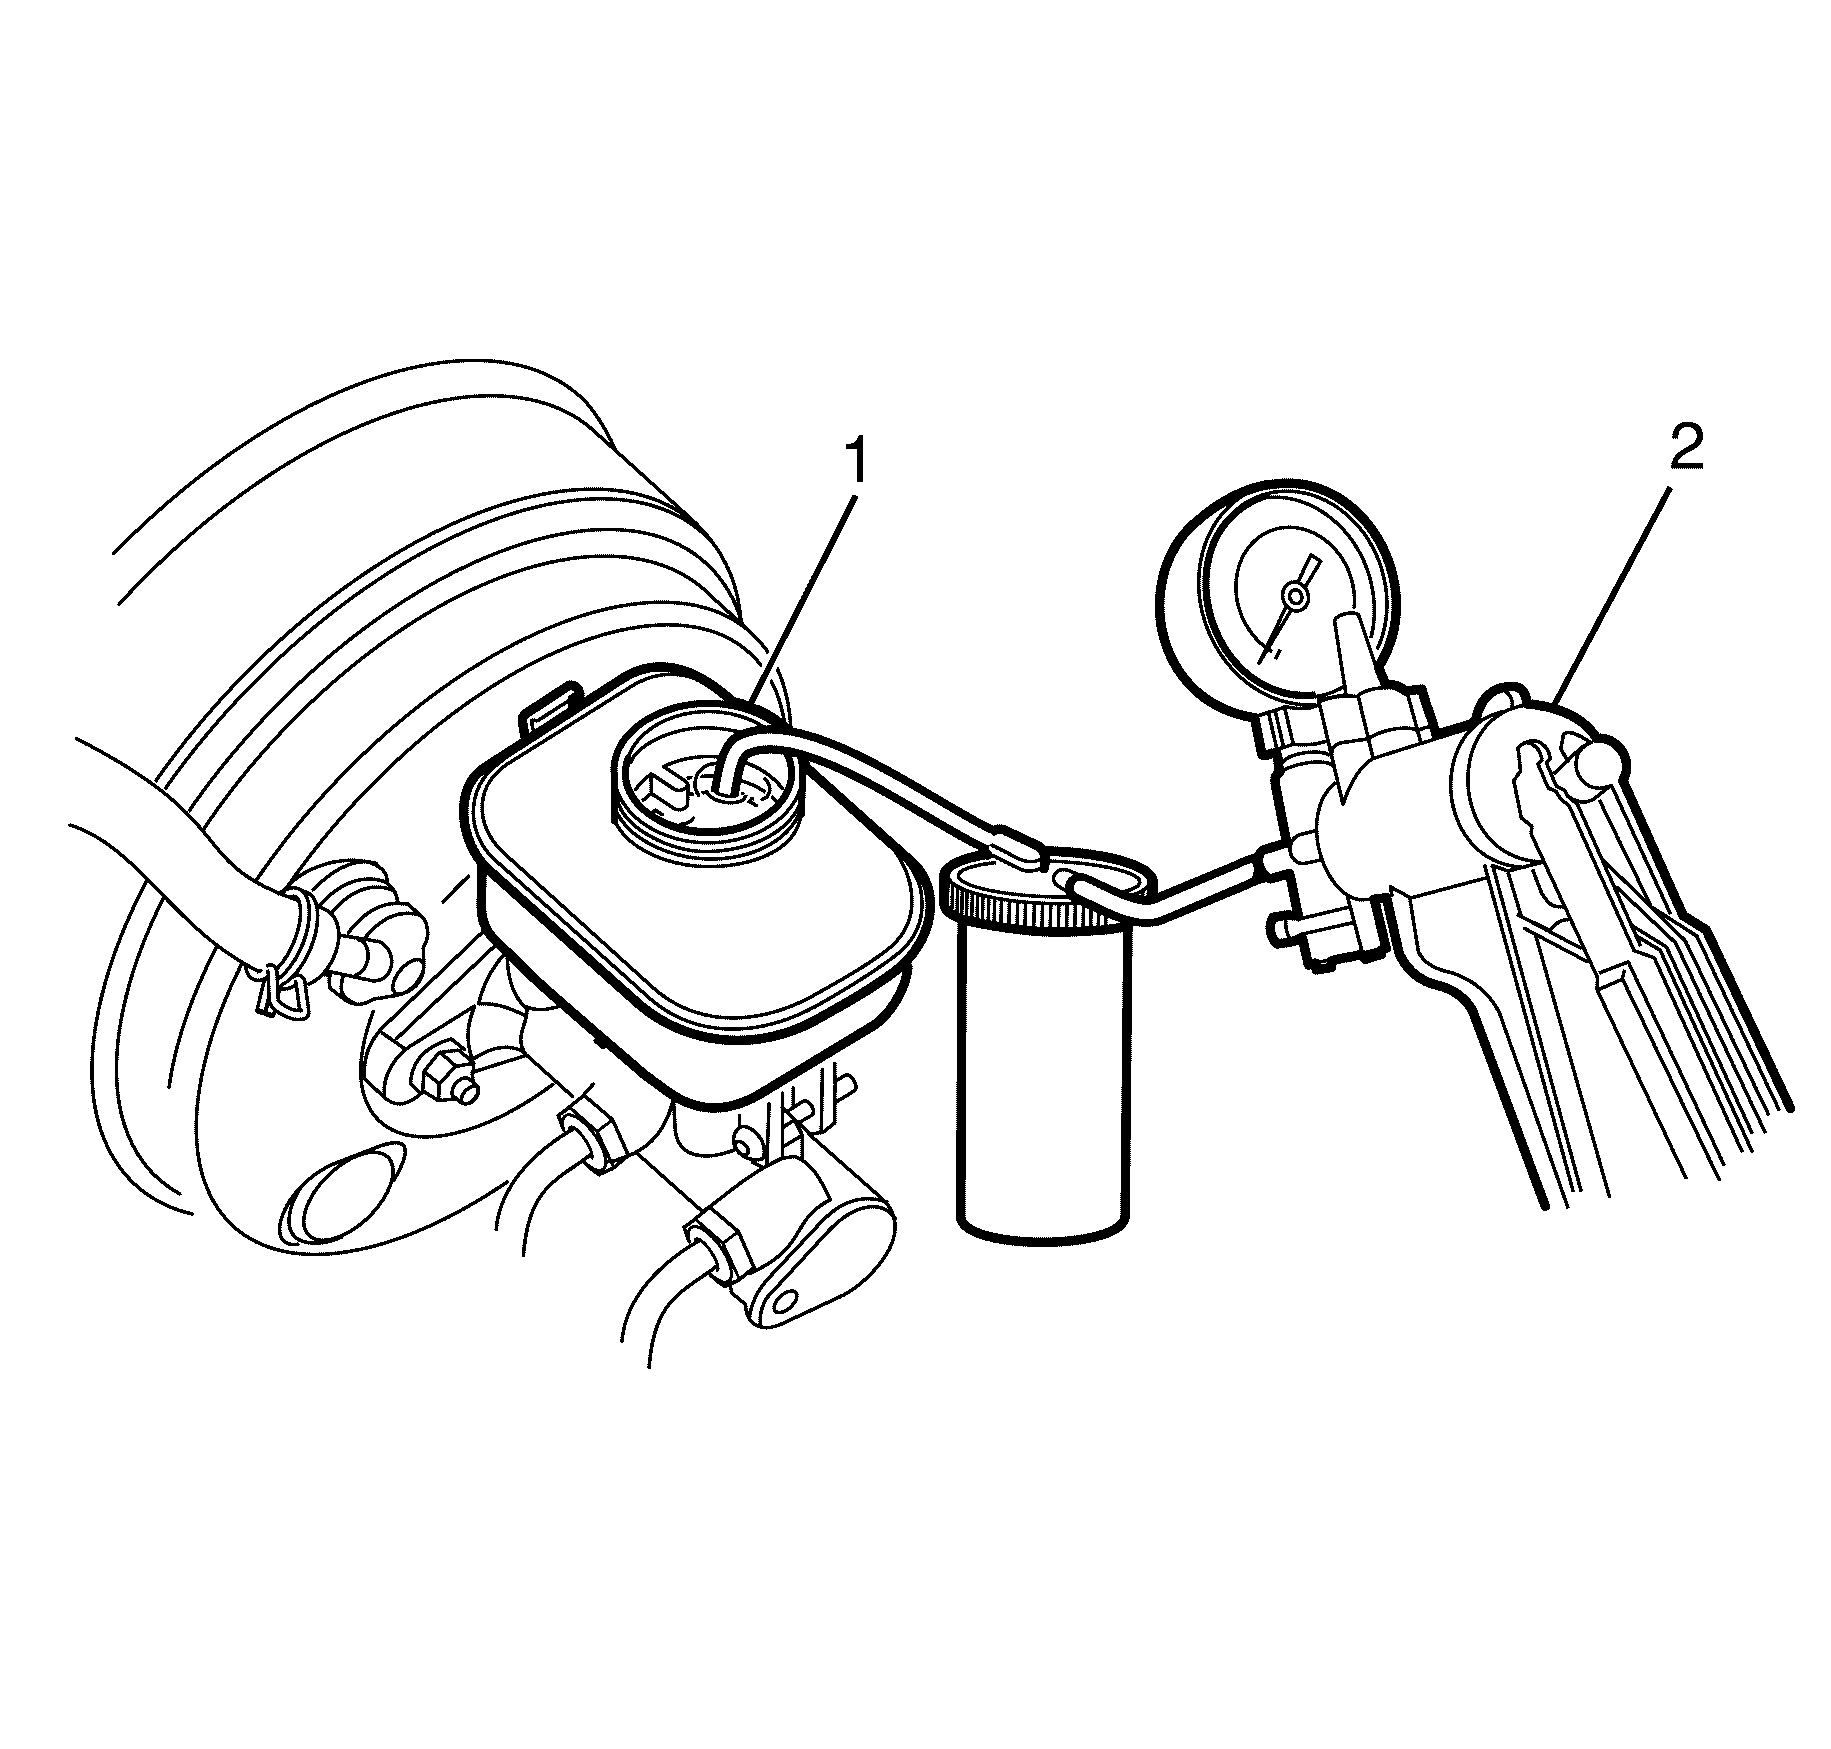
- Siphon the brake fluid out of the master cylinder reservoir (1) using a hand vacuum pump (2).
- Disconnect the brake fluid level switch electrical connector (4).
- Disconnect the brake pipes from the master cylinder (2).
- Plug both the exposed brake pipes.
- Remove the strut tower to master cylinder support bracket retaining nuts (7).
- Remove the master cylinder support bracket to master cylinder retaining bolt (5).
- Remove the master cylinder support bracket (5).
- Remove the master cylinder to vacuum brake booster retaining nuts (1,3).
- Remove the master cylinder (2) from the vacuum brake booster.
- Remove the vacuum brake booster to master cylinder sealing O-ring (1) from the master cylinder (2).
Caution: Refer to Battery Disconnect Caution in the Preface section.
Caution: Refer to Brake Fluid Caution in the Preface section.
Caution: Refer to Brake Fluid Irritant Caution in the Preface section.
Notice: Refer to Adding Fluid to the Brake System Notice in the Preface section.
Notice: Refer to Brake Fluid Effects on Paint and Electrical Components Notice in the Preface section.
Important: With the ignition OFF and the brakes cool, apply the brakes three to five times, or until the brake pedal effort increases significantly, in order to deplete the vacuum brake booster power reserve.
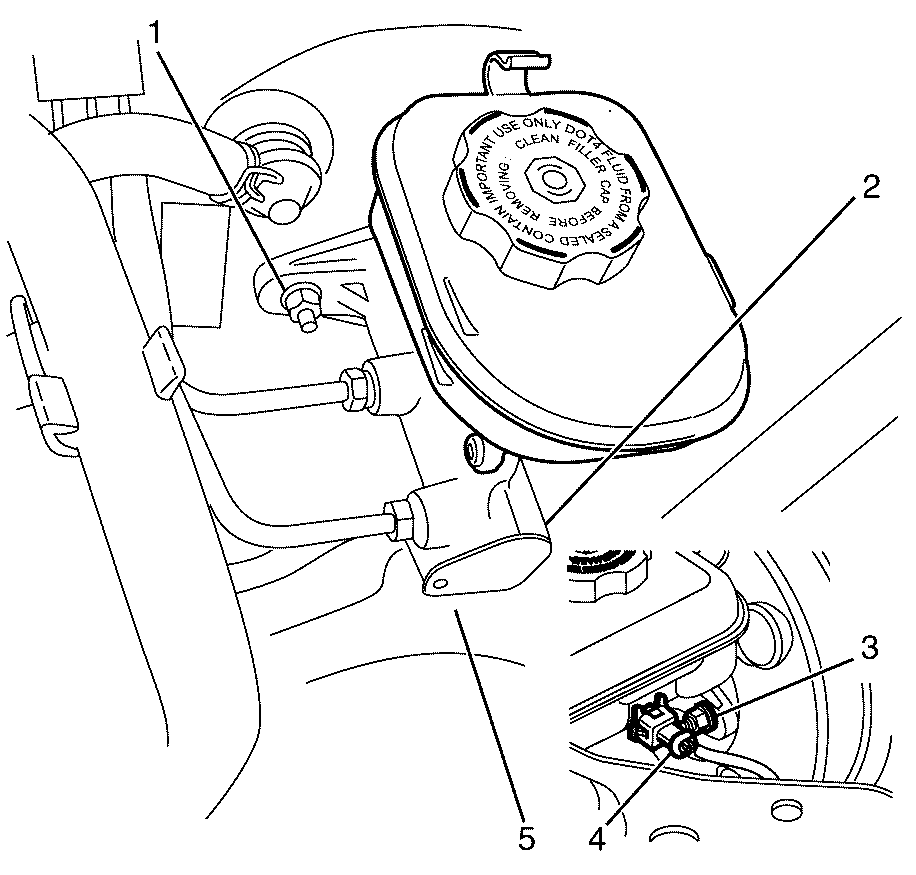
Important: Lift the connector security clip with a suitable tool or equivalent to release the brake fluid level switch electrical connector (8) from the brake fluid level switch.
Important: Install a rubber cap or plug on the exposed brake pipes (3) in order to prevent fluid loss and contamination.
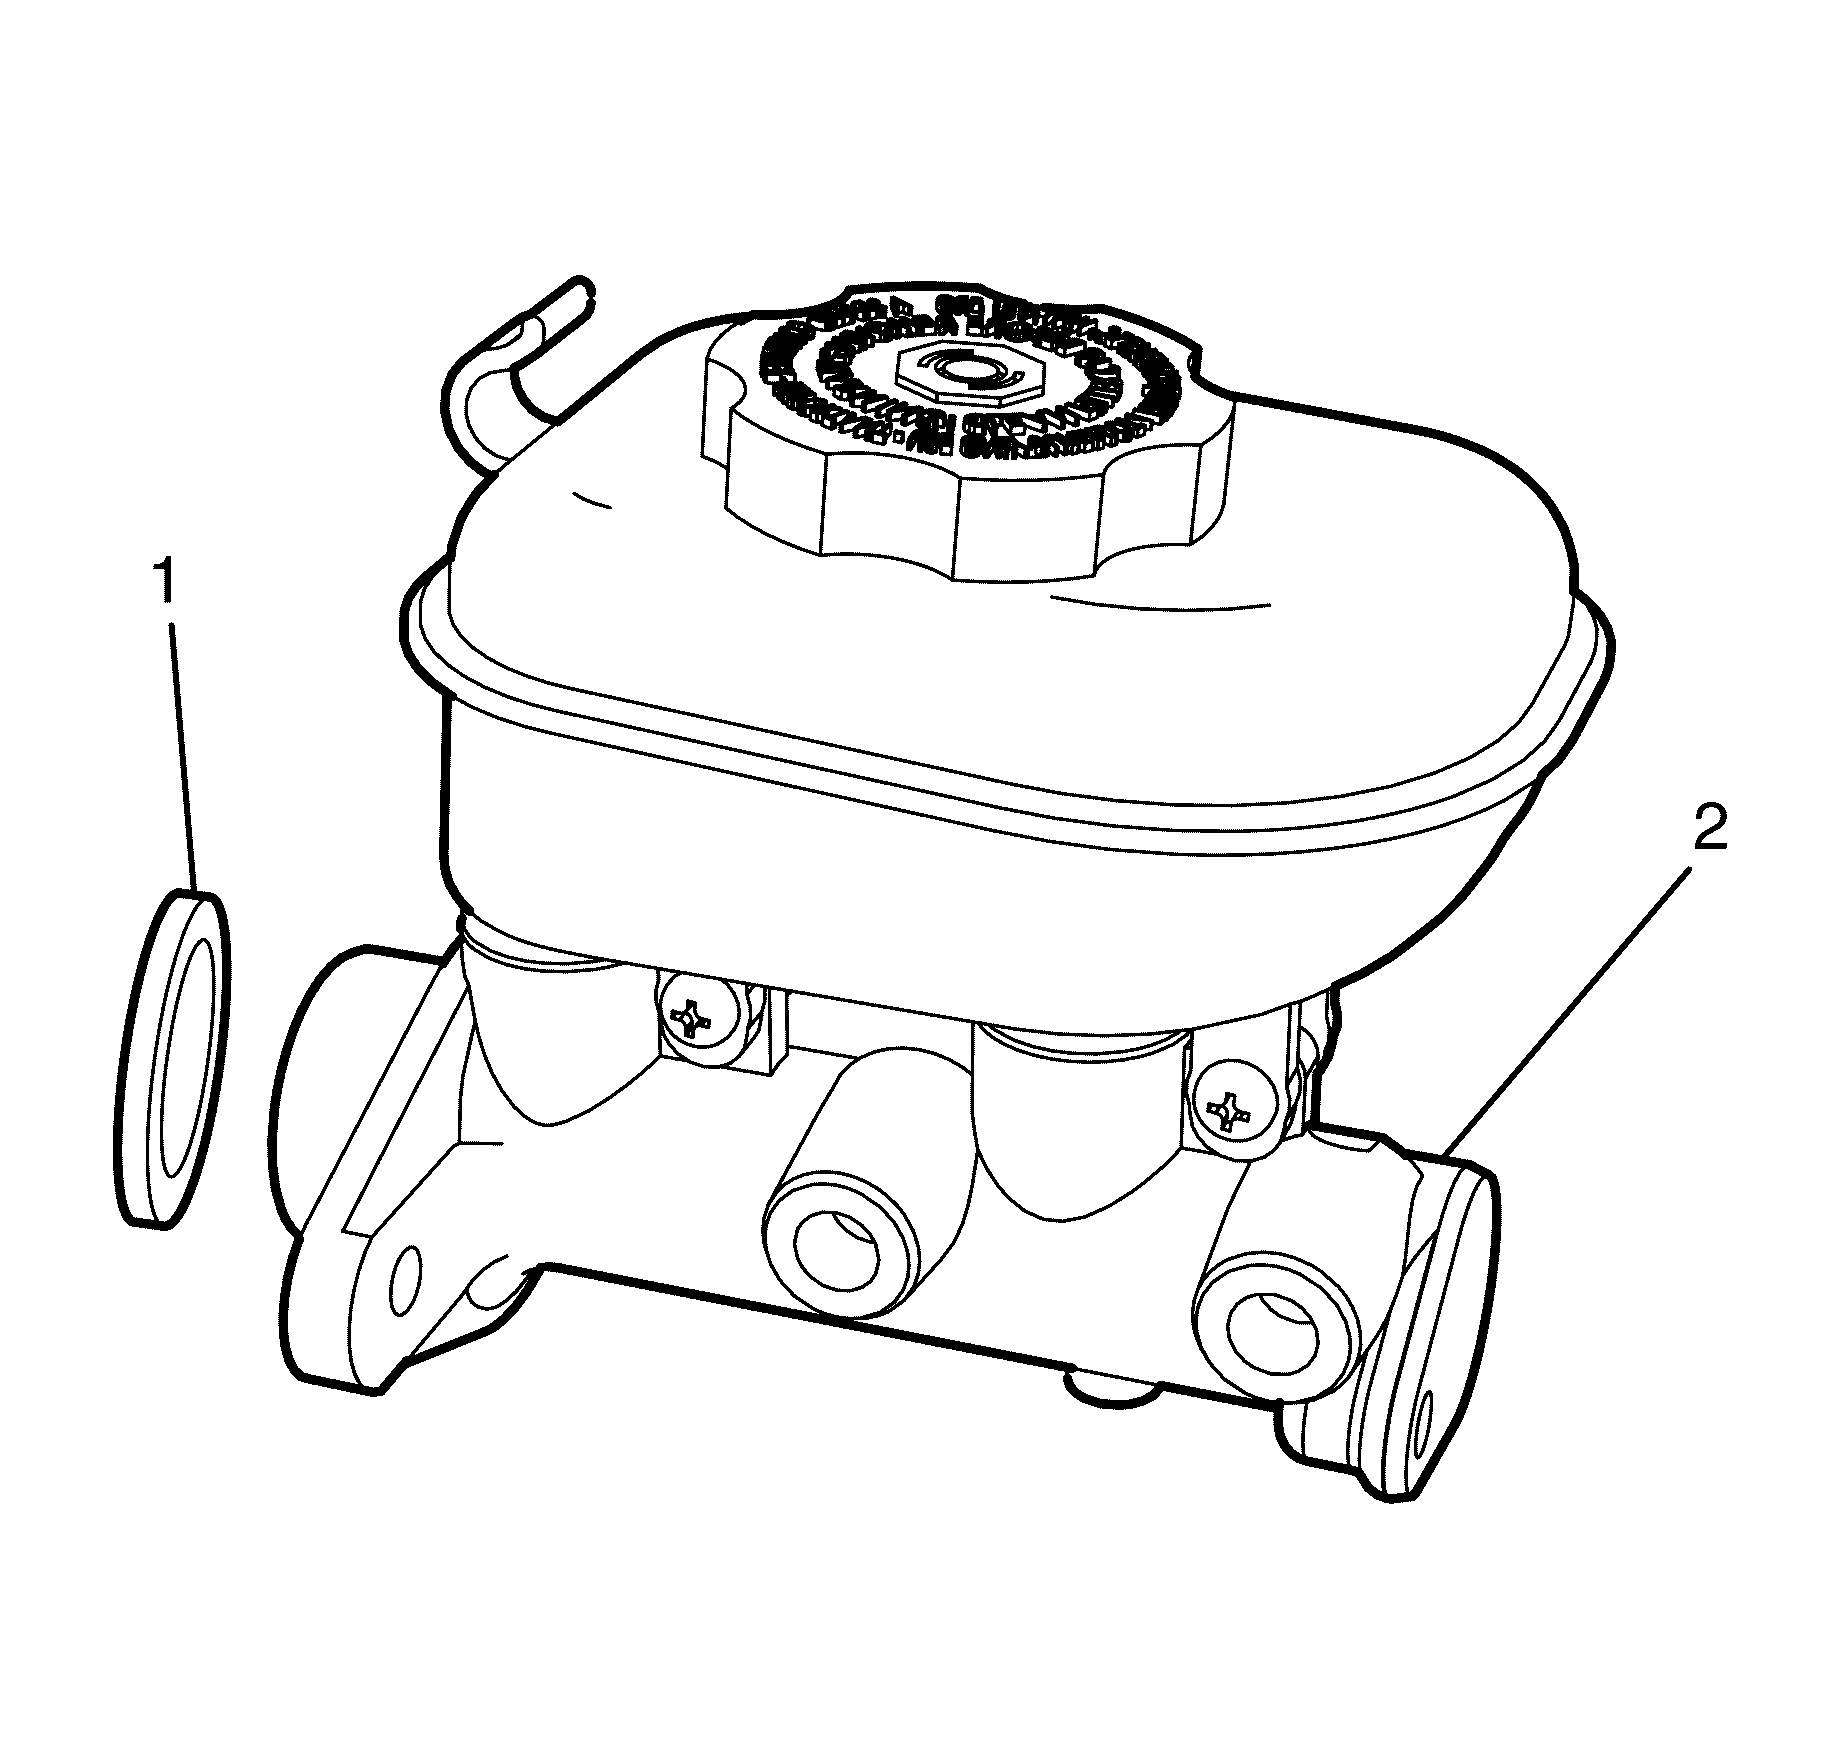
Important: The vacuum brake booster to master cylinder sealing O-ring (1) is a single use only component and will not reseal. Install a NEW master cylinder sealing O-ring (1) whenever the master cylinder (2) is removed from the vacuum brake booster.
Discard the master cylinder sealing O-ring (1).
Installation Procedure
- Install the master cylinder reservoir. Refer to Master Cylinder Reservoir ReplacementMaster Cylinder Reservoir Replacement .
- Bench bleed the master cylinder. Refer to Master Cylinder Bench BleedingMaster Cylinder Bench Bleeding.
- Install a NEW vacuum brake booster to master cylinder sealing O-ring (1) to the master cylinder (2).
- Place a clean suitable container under the master cylinder (2).
- Install the master cylinder (2) to the vacuum brake booster.
- Install the master cylinder to vacuum brake booster retaining nuts (1,3).
- Install the master cylinder support bracket (6).
- Install the master cylinder support bracket to strut tower retaining nuts (7).
- Install the master cylinder support bracket to master cylinder retaining bolt (5).
- Remove the rubber caps from the exposed brake pipes.
- Connect the brake pipes to the master cylinder (2).
- Connect brake fluid level switch electrical connector (3).
- Connect the battery ground cable. Refer to Battery Negative Cable Disconnection and ConnectionBattery Negative Cable Disconnection and Connection.
- Bleed the braking system. Refer to Hydraulic Brake System BleedingHydraulic Brake System Bleeding.
- Release the park brake and remove the wheel chocks.
Caution: Refer to Brake Fluid Caution in the Preface section.
Caution: Refer to Brake Fluid Irritant Caution in the Preface section.
Notice: Refer to Adding Fluid to the Brake System Notice in the Preface section.
Notice: Refer to Brake Fluid Effects on Paint and Electrical Components Notice in the Preface section.


Notice: Refer to Fastener Notice in the Preface section.
Tighten
Tighten the nuts to 15 Nm (11 lb ft).
Tighten
Tighten the nuts to 23 Nm (17 lb ft).
Tighten
Tighten the bolt to 17 Nm (13 lb ft).
Tighten
Tighten the pipe fittings to 16 Nm (12 lb ft).
Make sure the security clip is correctly installed.
Master Cylinder Replacement RHD
Tools Required
J 23738-A J 23738-A Hand Vacuum Pump
Removal Procedure
- Disconnect the battery ground cable. Refer to Battery Negative Cable Disconnection and ConnectionBattery Negative Cable Disconnection and Connection l.
- Apply the park brake and chock the wheels.
- Deplete the vacuum brake booster power reserve.
- Clean the master cylinder, around the brake lines and the reservoir cap.
- Place a clean suitable container under the master cylinder.
- Remove the master cylinder reservoir cap.
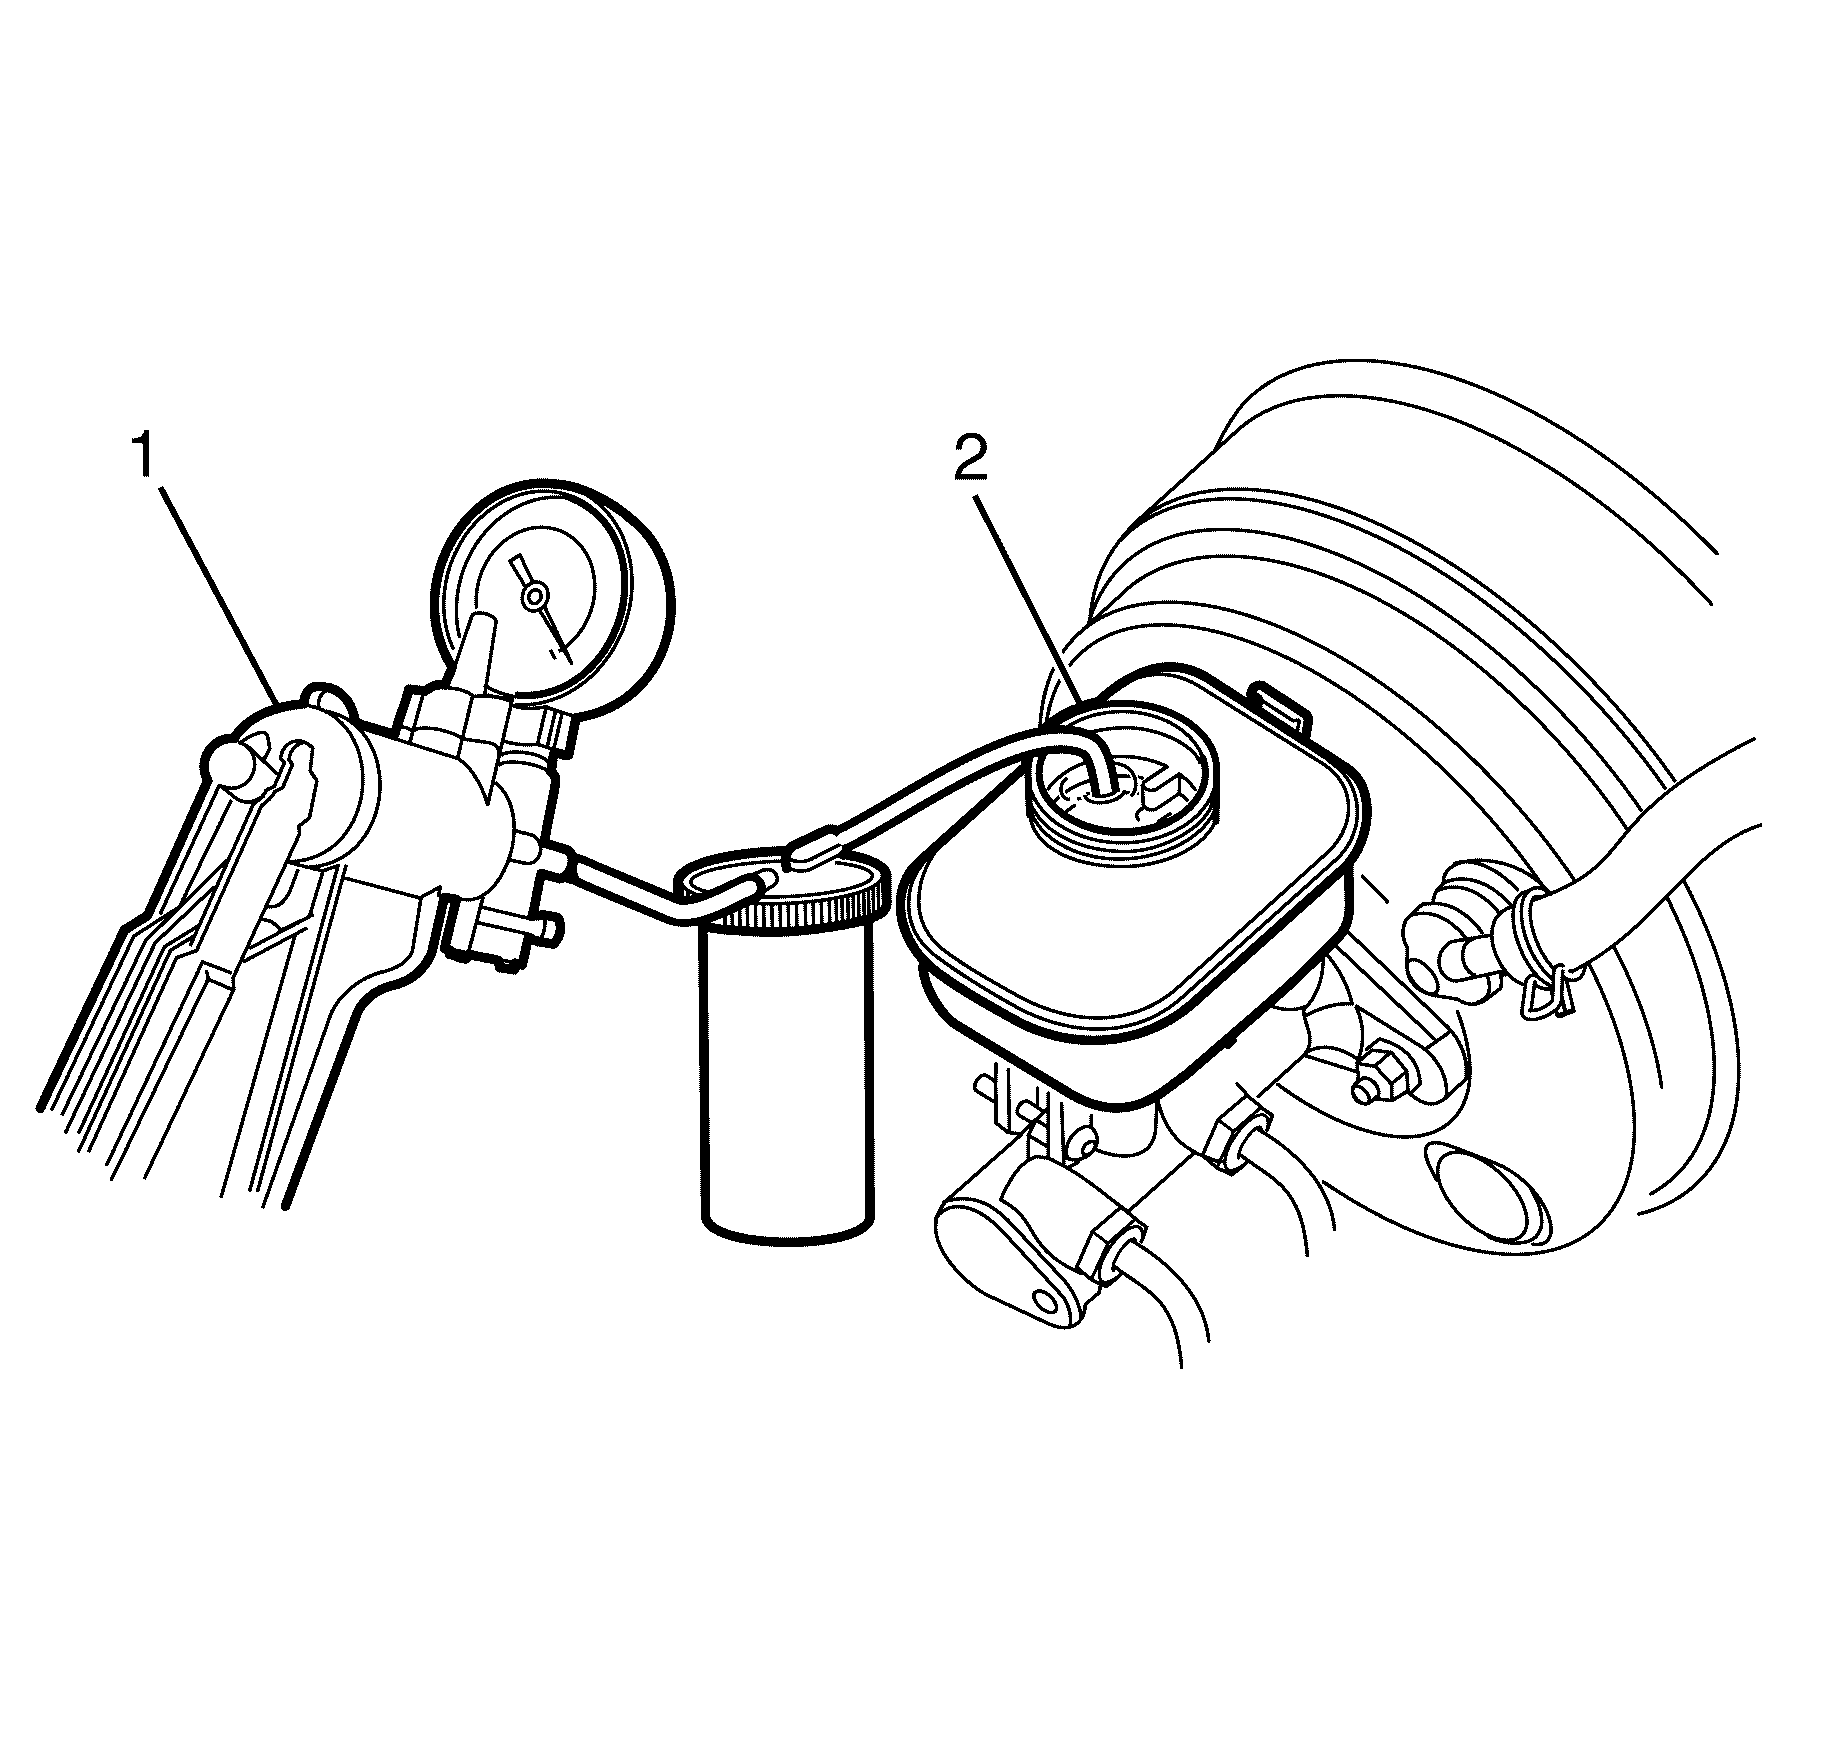
- Siphon the brake fluid out of the master cylinder reservoir (2) using J 23738-A J 23738-A (1).
- Disconnect the brake fluid level switch electrical connector (8).
- Disconnect the brake pipes (3) from the master cylinder (7).
- Plug both the exposed brake pipes (3).
- Remove the strut tower to master cylinder support bracket retaining nuts (4).
- Remove the master cylinder support bracket to master cylinder retaining bolt (6).
- Remove the master cylinder support bracket (5).
- Remove the master cylinder to vacuum brake booster retaining nuts (2).
- Remove the master cylinder (7) from the vacuum brake booster (1).
- Remove the vacuum brake booster to master cylinder sealing O-ring (2) from the master cylinder (1).
Caution: Refer to Battery Disconnect Caution in the Preface section.
Caution: Refer to Brake Fluid Caution in the Preface section.
Caution: Refer to Brake Fluid Irritant Caution in the Preface section.
Notice: Refer to Adding Fluid to the Brake System Notice in the Preface section.
Notice: Refer to Brake Fluid Effects on Paint and Electrical Components Notice in the Preface section.
Important: With the ignition OFF and the brakes cool, apply the brakes three to five times, or until the brake pedal effort increases significantly, in order to deplete the vacuum brake booster power reserve.
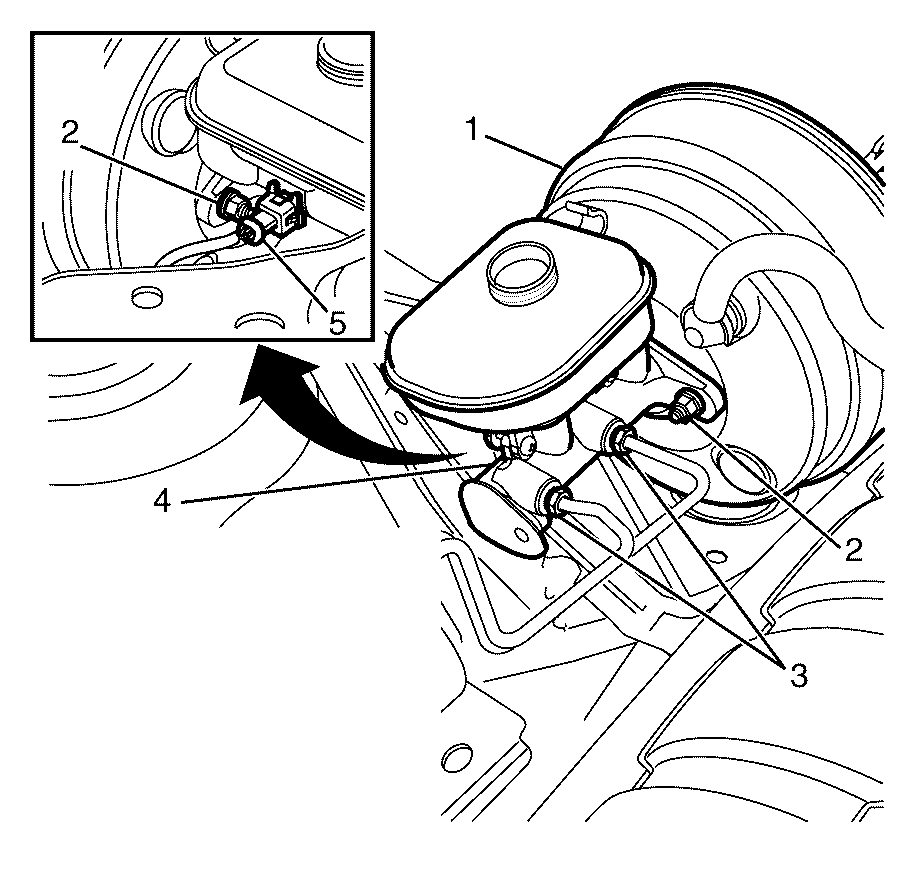
Important: Using a suitable tool lift the connector security clip to release the brake fluid level switch electrical connector (8) from the brake fluid level switch.
Important: Install a suitable rubber cap or plug on the exposed brake pipes (3) in order to prevent fluid loss and contamination.
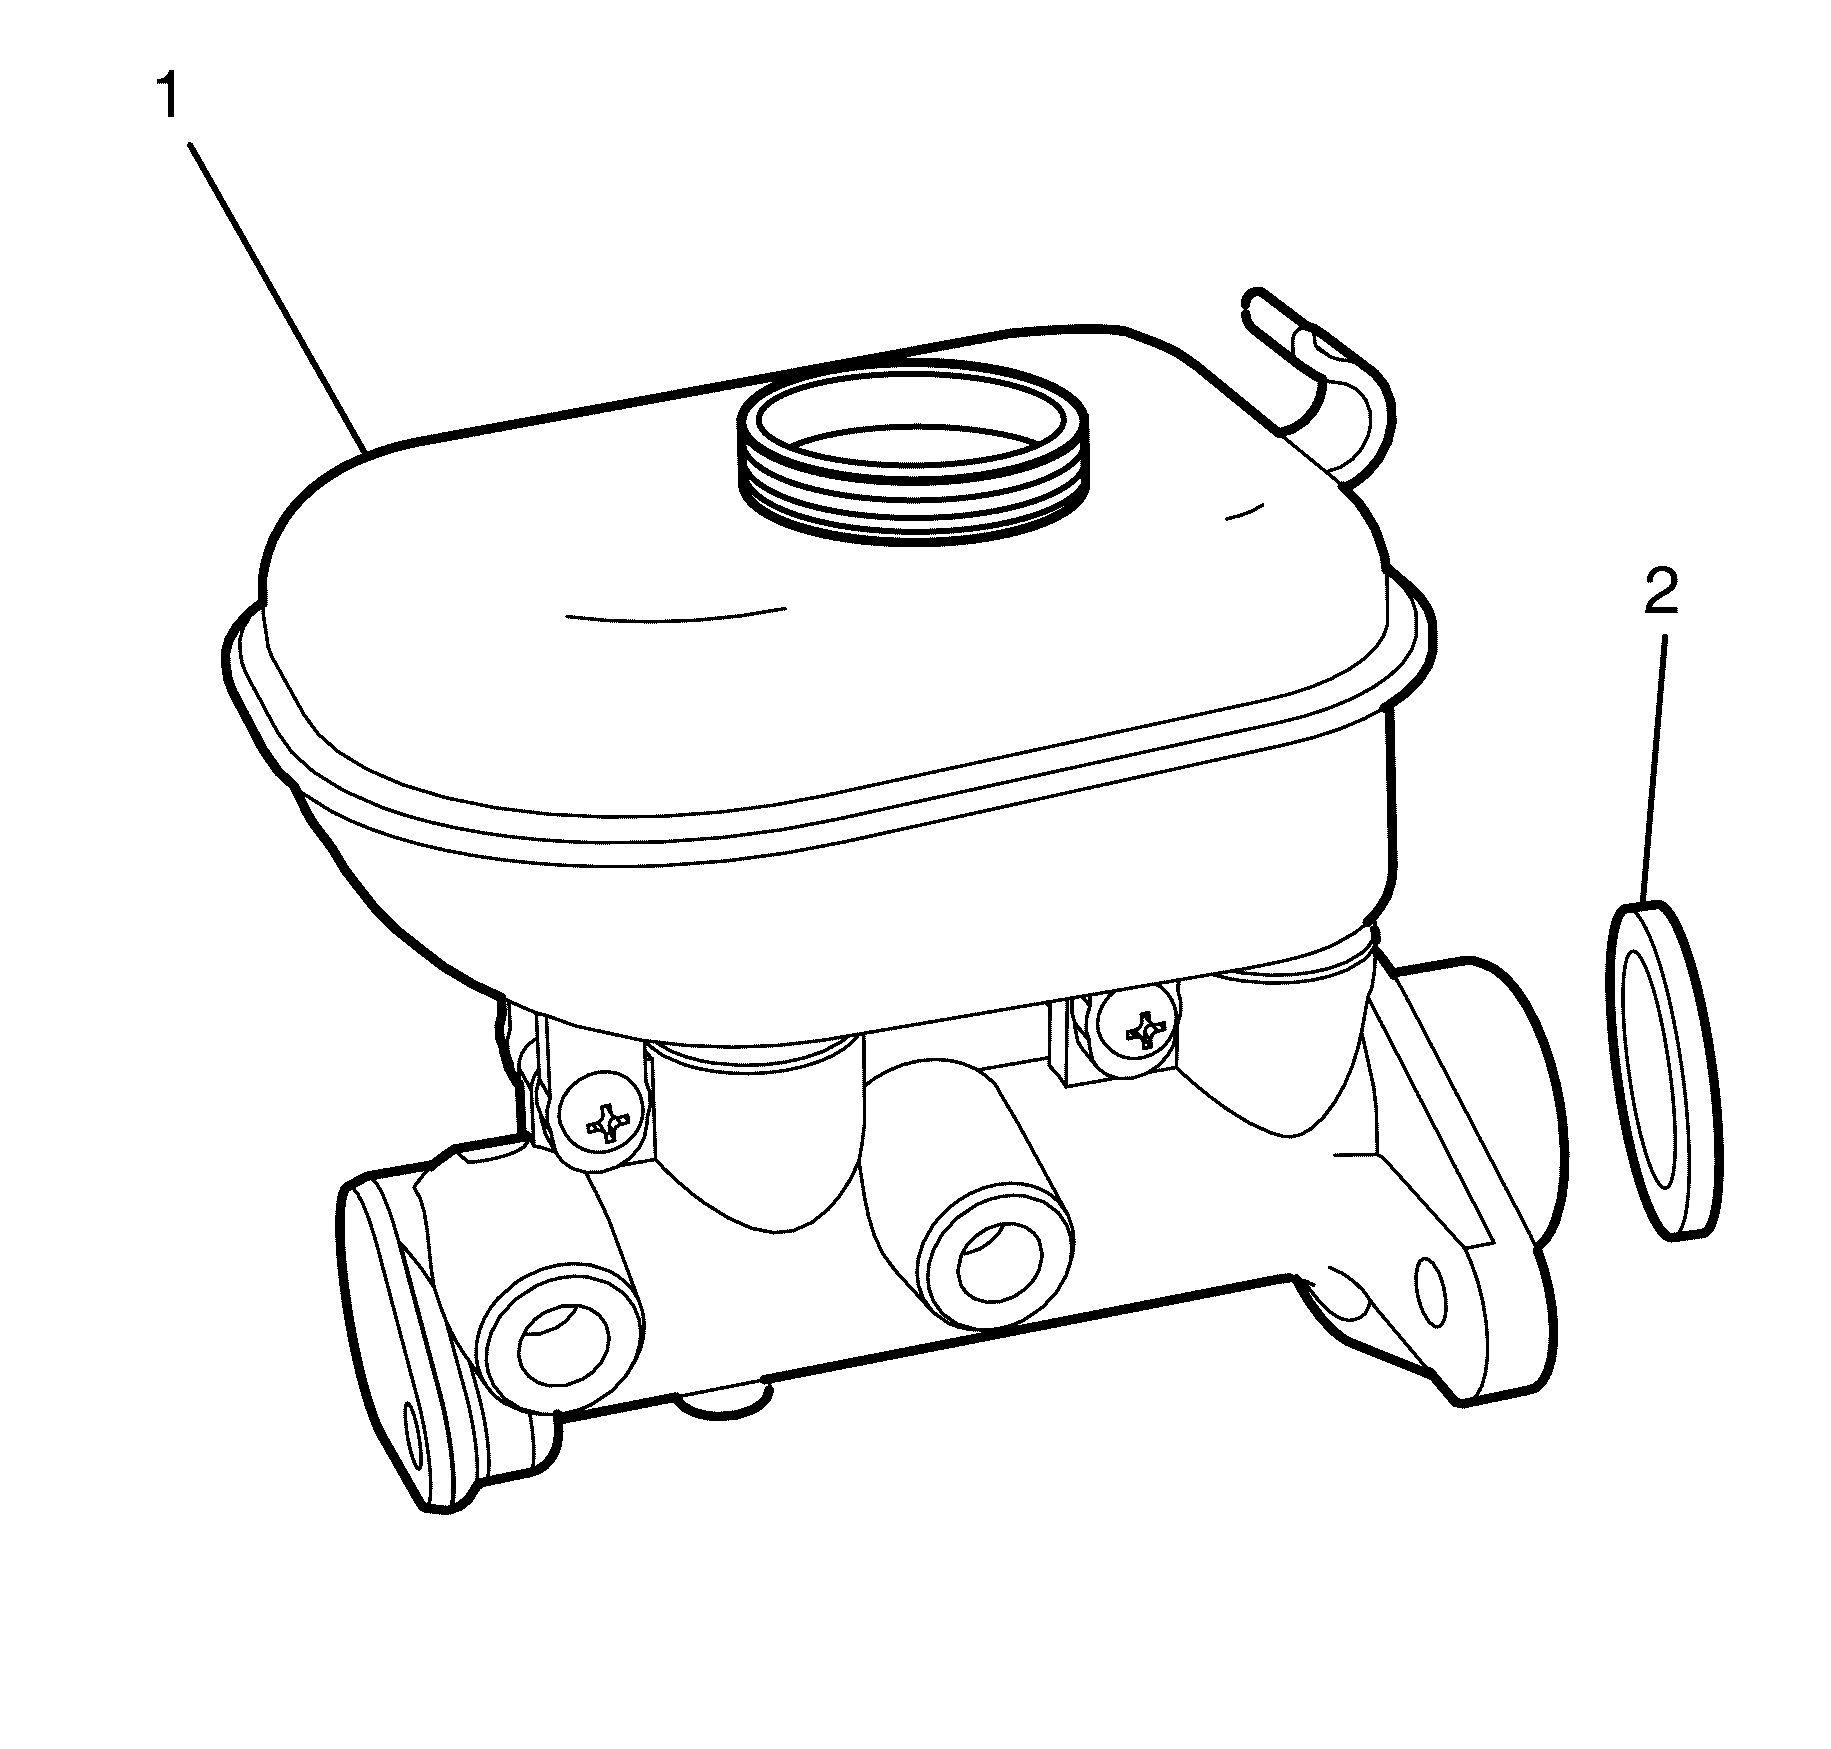
Important: The vacuum brake booster to master cylinder sealing O-ring (2) is a single use only component and will not reseal. Install a NEW master cylinder sealing O-ring (2) whenever the master cylinder (1) is removed from the vacuum brake booster.
Discard the master cylinder sealing O-ring (2).
Installation Procedure
- Install the master cylinder reservoir. Refer to Master Cylinder Reservoir ReplacementMaster Cylinder Reservoir Replacement .
- Bench bleed the master cylinder. Refer to Master Cylinder Bench BleedingMaster Cylinder Bench Bleeding.
- Install a NEW vacuum brake booster to master cylinder sealing O-ring (2) to the master cylinder (1).
- Place a clean suitable container under the master cylinder (1).
- Install the master cylinder (7) to the vacuum brake booster (1).
- Install the master cylinder to vacuum brake booster retaining nuts (2).
- Install the master cylinder support bracket (5).
- Install the master cylinder support bracket to strut tower retaining nuts (4).
- Install the master cylinder support bracket to master cylinder retaining bolt (6).
- Remove the rubber caps from the exposed brake pipes (3).
- Connect the brake pipes (3) to the master cylinder (7).
- Connect brake fluid level switch electrical connector (8).
- Connect the battery ground cable. Refer to Battery Negative Cable Disconnection and ConnectionBattery Negative Cable Disconnection and Connection.
- Release the park brake and remove the wheel chocks.
- Bleed the braking system. Refer to Hydraulic Brake System BleedingHydraulic Brake System Bleeding.
Caution: Refer to Brake Fluid Caution in the Preface section.
Caution: Refer to Brake Fluid Irritant Caution in the Preface section.
Notice: Refer to Adding Fluid to the Brake System Notice in the Preface section.
Notice: Refer to Brake Fluid Effects on Paint and Electrical Components Notice in the Preface section.


Notice: Refer to Fastener Notice in the Preface section.
Tighten
Tighten the nuts to 15 Nm (11 lb ft).
Tighten
Tighten the nuts to 22 Nm (16 lb ft).
Tighten
Tighten the bolt to 17 Nm (13 lb ft).
Tighten
Tighten the pipe fittings to 16 Nm (12 lb ft).
Make sure the security clip is correctly installed.
