For 1990-2009 cars only
Special Tools
J 39400-A Halogen Leak Detector
Removal Procedure
- Recover the refrigerant. Refer to Refrigerant Recovery and Recharging.
- Disconnect the electrical connector from the A/C pressure switch.
- Remove the A/C low pressure switch.
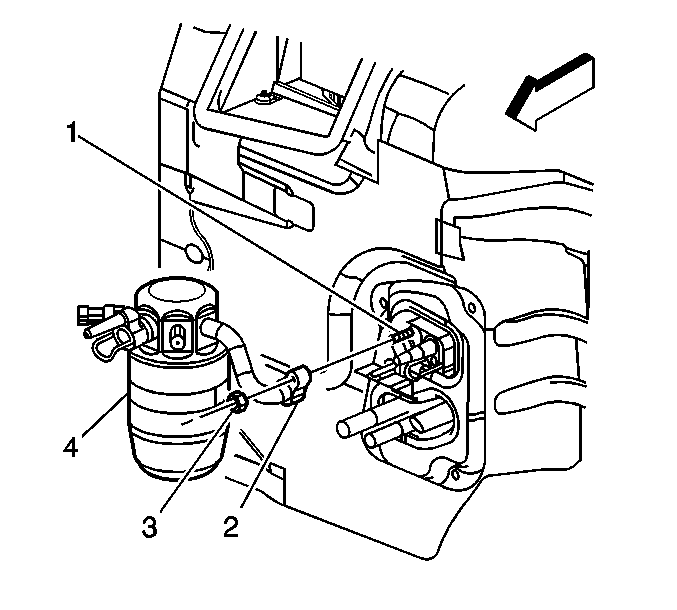
- Remove the nut (3) retaining the accumulator (4) to evaporator (1).
- Remove the compressor suction hose assembly from the accumulator.
- Remove and discard the O-ring seals.
- Remove the accumulator clamp nut.
- Remove the accumulator from the vehicle.

Installation Procedure
- Install the accumulator to the vehicle.
- Install the accumulator into the accumulator clamp.
- Install the accumulator clamp nut and tighten to 10 N·m (88 lb in).
- Install the A/C low pressure switch and tighten to 5 N·m (44 lb in).
- Install new O-ring seals. Refer to O-Ring Replacement.
- Install the accumulator to the evaporator.
- Install the accumulator retaining nut and tighten to 28 N·m (21 lb ft)
- Connect the compressor suction hose to the accumulator (4).
- Install the suction hose nut and tighten to 48 N·m (35 lb ft).
- Connect the electrical connector to the A/C low pressure switch.
- Evacuate and recharge the A/C system. Refer to Refrigerant Recovery and Recharging.
- Leak test the fitting of the component using the J 39400-A .
Note: If replacing the accumulator, add the refrigerant oil to the accumulator. Refer to Refrigerant System Capacities for the capacity information.
Caution: Refer to Fastener Caution in the Preface section.

