For 1990-2009 cars only
Removal Procedure
- Remove the left front door sill panel. Refer to Front Side Door Sill Plate Replacement in Interior Trim.
- Remove the left closeout/insulator panel. Refer to Instrument Panel Insulator Panel Replacement - Left Side in Instrument Panel, Gages and Console.
- Remove the grille. Refer to Grille Replacement in Exterior Trim.
- Remove the hood latch. Refer to Hood Primary and Secondary Latch Replacement .
- Release the hood latch release cable from the hood latch assembly.
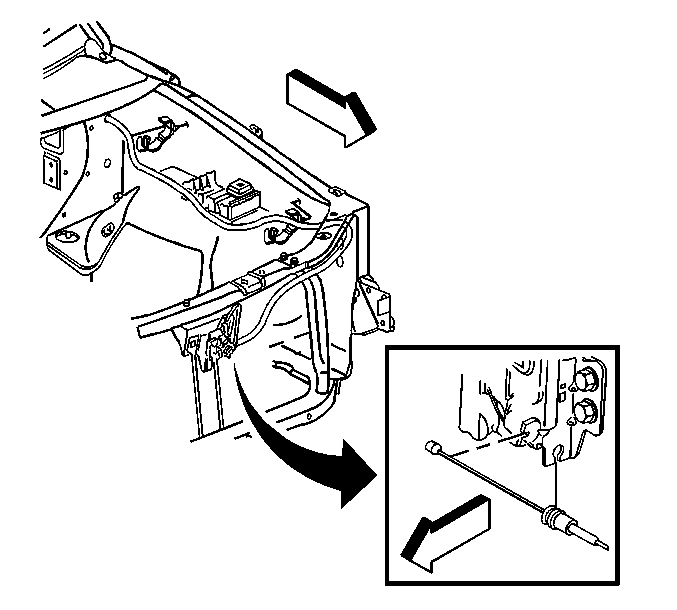
- Attach a length of mechanic's wire to the exterior end of the cable, and note the routing of the cable for later installation.
- Release the retainer that attaches the cable to the hood hold open rod bracket.
- Feed the cable out from between the headlamp panel and the radiator, then over the top of the battery tray.
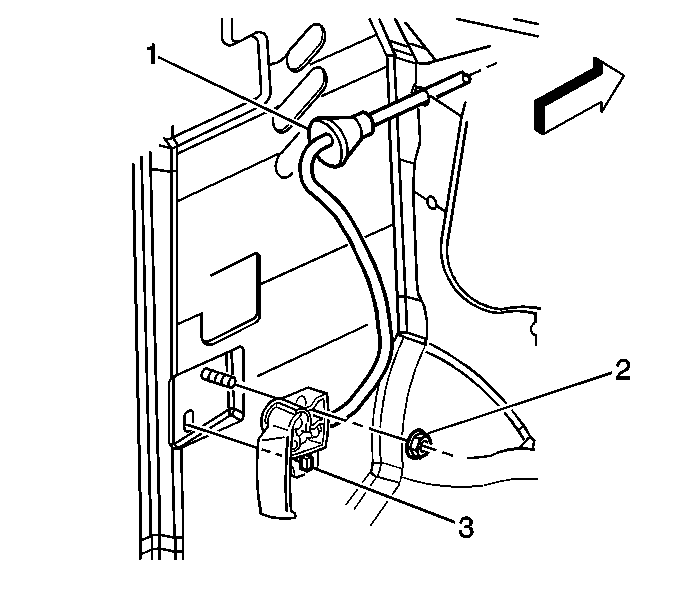
- Push the cable grommet (1) through the bulkhead and into the interior of the vehicle.
- Remove the nut (2) attaching the hood release handle (3) to the cowl trim panel on the left side.
- Remove the cable from the release handle (3).
- Pull the cable the rest of the way through the bulkhead and out from behind the sound insulation.
- Detach the mechanics wire from the cable, leaving the wire in position for aid in installation of the cable.
- Remove the cable from the vehicle.


Installation Procedure
- Attach the mechanics wire to the exterior end of the cable.
- Using the mechanic's wire as an aid, guide the cable underneath the sound insulation and pass the exterior portion of the cable through the bulkhead.
- Install the cable to the release handle (3).
- Seat the cable grommet (1) to the bulkhead.
- Install the release handle (3) to the left side cowl panel.
- Install the nut (2) that retains the release handle (3) to the left side cowl panel.
- Route the cable as previously noted, over the battery tray, between the headlamp panel assembly and the radiator.
- Attach the cable to the retainers on the wheelhouse and the hood hold open rod bracket.
- Install the cable to the hood latch assembly.
- Install the hood latch. Refer to Hood Primary and Secondary Latch Replacement .
- Install the front grille. Refer to Grille Replacement in Exterior Trim.
- Install the left closeout/insulator panel. Refer to Instrument Panel Insulator Panel Replacement - Left Side in Instrument Panel, Gages and Console.
- Install the left front door sill panel. Refer to Front Side Door Sill Plate Replacement in Interior Trim.

Notice: Use the correct fastener in the correct location. Replacement fasteners must be the correct part number for that application. Fasteners requiring replacement or fasteners requiring the use of thread locking compound or sealant are identified in the service procedure. Do not use paints, lubricants, or corrosion inhibitors on fasteners or fastener joint surfaces unless specified. These coatings affect fastener torque and joint clamping force and may damage the fastener. Use the correct tightening sequence and specifications when installing fasteners in order to avoid damage to parts and systems.
Tighten
Tighten the nut to 7 N·m (62 lb in).

