For 1990-2009 cars only
Rear Washer Hose Replacement XUV
Removal Procedure
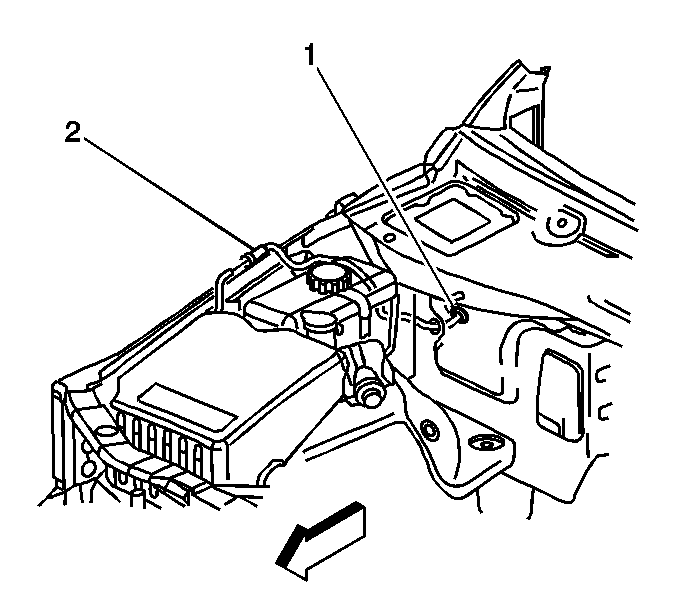
- Disconnect the rear washer hose connection (2) near the coolant tank.
- Remove the washer hose grommet (1) from the hole in the bulkhead, and feed the washer hose into the vehicle.
- Remove the right front sill plate. Refer to Rear Side Door Sill Plate Replacement in Interior Trim. Roll the carpet inward to expose the wiring harness/hose assembly.
- Remove the rear seat backs.
- Remove the rear compartment anchors.
- Roll the carpet forward to expose the wiring harness/hose assembly.
- Remove the left rear quarter upper trim panel. Refer to Rear Quarter Upper Trim Panel Replacement in Interior Trim.
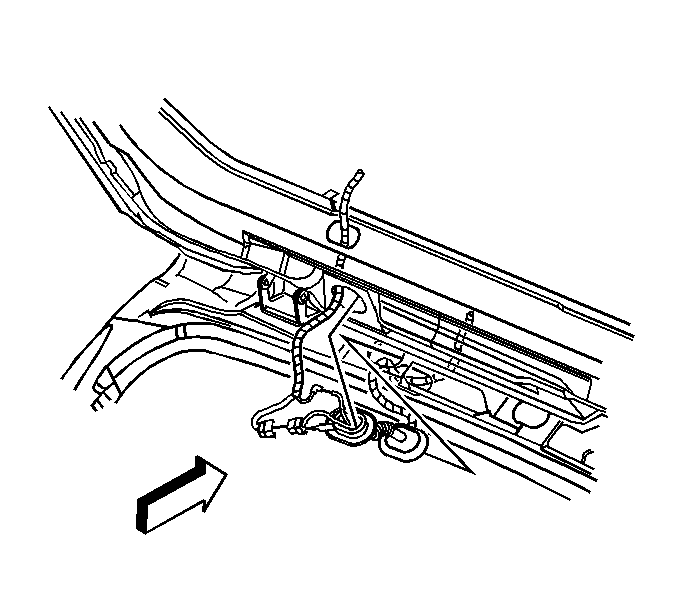
- Open the lift gate to access the pass-through grommet.
- Disconnect the grommet from the end gate to access the washer hose connection.
- Cut the exposed ends of the washer hose from the body wiring harness.
- Remove the hose from the vehicle.


Installation Procedure
- Install the washer hose to the vehicle.
- Route the hose along the body wiring harness.
- Tape the washer hose to the body wiring harness with 3 wraps of electrical tape, every 100 mm (4 in).
- Roll the carpet back into place along the floor panel.
- Install the rear compartment anchors.
- Install the rear seat backs.
- Install the right front sill plate. Refer to Rear Side Door Sill Plate Replacement in Interior Trim.
- Connect the washer hose connection at the end gate.
- Connect the pass-through grommet at the end gate.
- Install the left rear quarter upper trim panel. Refer to Rear Quarter Upper Trim Panel Replacement in Interior Trim.
- Install the rear washer hose out through the bulkhead, and seat the grommet (1).
- Connect the rear washer hose connection (2) near the coolant tank.

Rear Washer Hose Replacement TrailBlazer, Envoy
Removal Procedure
- Disconnect the rear washer hose connection (2) near the coolant tank.
- Remove the washer hose grommet (1) from the hole in the bulkhead, and feed the washer hose into the vehicle.
- Remove the right front sill plate. Refer to Rear Side Door Sill Plate Replacement .
- Roll the carpet inward to expose the wiring harness/hose assembly.
- Remove the rear seat backs.
- Remove the rear compartment anchors.
- Roll the carpet forward to expose the wiring harness/hose assembly.
- Remove the left rear quarter upper trim panel. Refer to Quarter Upper Trim Panel Replacement .
- Open the liftgate to access the pass-through grommet.
- Disconnect the grommet from the liftgate to access the washer hose connection.
- Cut the exposed ends of the washer hose from the body wiring harness.
- Remove the hose from the vehicle.


Installation Procedure
- Install the washer hose to the vehicle.
- Route the hose along the body wiring harness.
- Tape the washer hose to the body wiring harness with 3 wraps of electrical tape, every 100 mm (4 in).
- Roll the carpet back into place along the floor panel.
- Install the rear compartment anchors.
- Install the rear seat backs.
- Install the right front sill plate. Refer to Rear Side Door Sill Plate Replacement .
- Connect the washer hose connection at the liftgate.
- Connect the pass-through grommet the liftgate.
- Install the left rear quarter upper trim panel. Refer to Quarter Upper Trim Panel Replacement .
- Install the rear washer hose out through the bulkhead, and seat the grommet (1).
- Connect the rear washer hose connection (2) near the coolant tank.


