For 1990-2009 cars only
Removal Procedure
- Block the wheels to prevent the vehicle from moving.
- Remove the floor shift control knob. Refer to Floor Shift Control Knob Replacement.
- Remove the center console. Refer to Console Replacement.
- Disconnect the automatic transmission range selector cable. Refer to Range Selector Lever Cable Replacement.
- Disconnect the electrical connector from the automatic transmission shift interlock solenoid.
- Disconnect the electrical connector from the park brake.
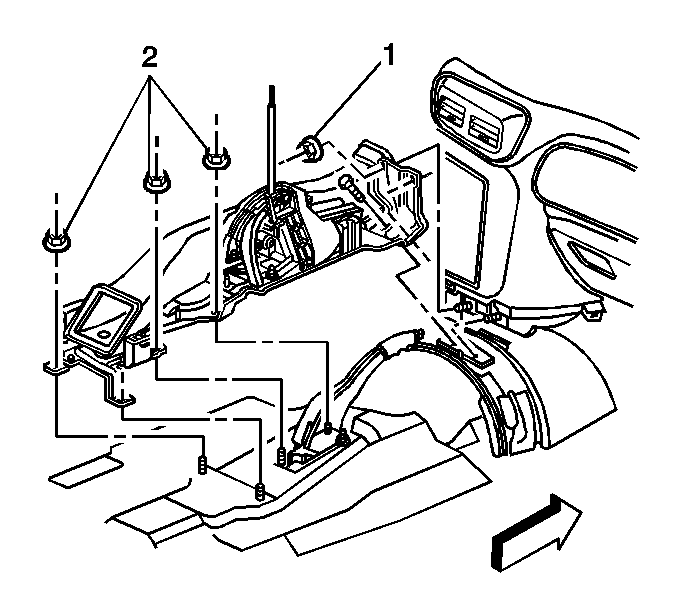
- Remove the console bracket from the vehicle, by removing the retaining nuts (1) from the center instrument panel (I/P) bracket.
- Remove the forward retaining screw, if equipped.
- Remove the remaining fasteners from the console bracket.
- Remove the console bracket from the vehicle.
- Remove the floor shift control. Refer to Transmission Control Replacement.

Installation Procedure
- Install the floor shift control. Refer to Transmission Control Replacement.
- Install the console bracket to the vehicle.
- Loosely install all the fasteners that retain the console bracket to the vehicle.
- Install the retaining nuts (1) to the center I/P bracket.
- Install the remaining fasteners that retain the console bracket to the vehicle.
- Connect the electrical connector to the park brake.
- Connect the electrical connector to the automatic transmission shift interlock solenoid.
- Connect the automatic transmission range selector cable. Refer to Range Selector Lever Cable Replacement.
- Install the center console. Refer to Console Replacement.
- Install the floor shift control knob. Refer to Floor Shift Control Knob Replacement.
- Remove the wheel blocks from the vehicle.

Caution: Refer to Fastener Caution in the Preface section.
Tighten
Tighten nuts to 10 N·m (88 lb in).
Tighten
Tighten the nuts to 25 N·m (18 lb ft).
