For 1990-2009 cars only
Pickup Box Side Emblem and Side Rear Nameplate Replacement Canyon 2WD
Special Tools
J 25070 Heat Gun
Removal Procedure
- Apply tape to the area around the decal.
- Heat the decal, using a J 25070 , 152 mm (6 in) from the surface.
- Apply the heat using a circular motion for about 30 seconds.
- Remove the decal from the painted surface using a plastic, flat-bladed tool.
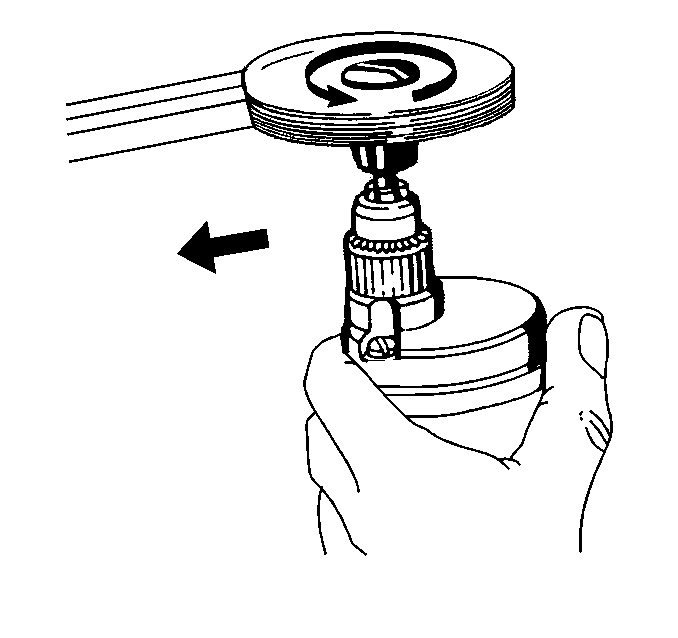
- Remove all adhesive from the painted surface using 3M™ ScotchBrite molding adhesive remover disk 3M™ P/N 07501 or equivalent.
- Clean the painted surface using varnish makers and painters (VMP) naphtha.
- Remove the tail lamp. Refer to Tail Lamp Replacement.
Note: Use the tape for protection and alignment marks for alignment of the new decal.
Caution: Refer to Exterior Trim Emblem Removal Caution in the Preface section.

Installation Procedure
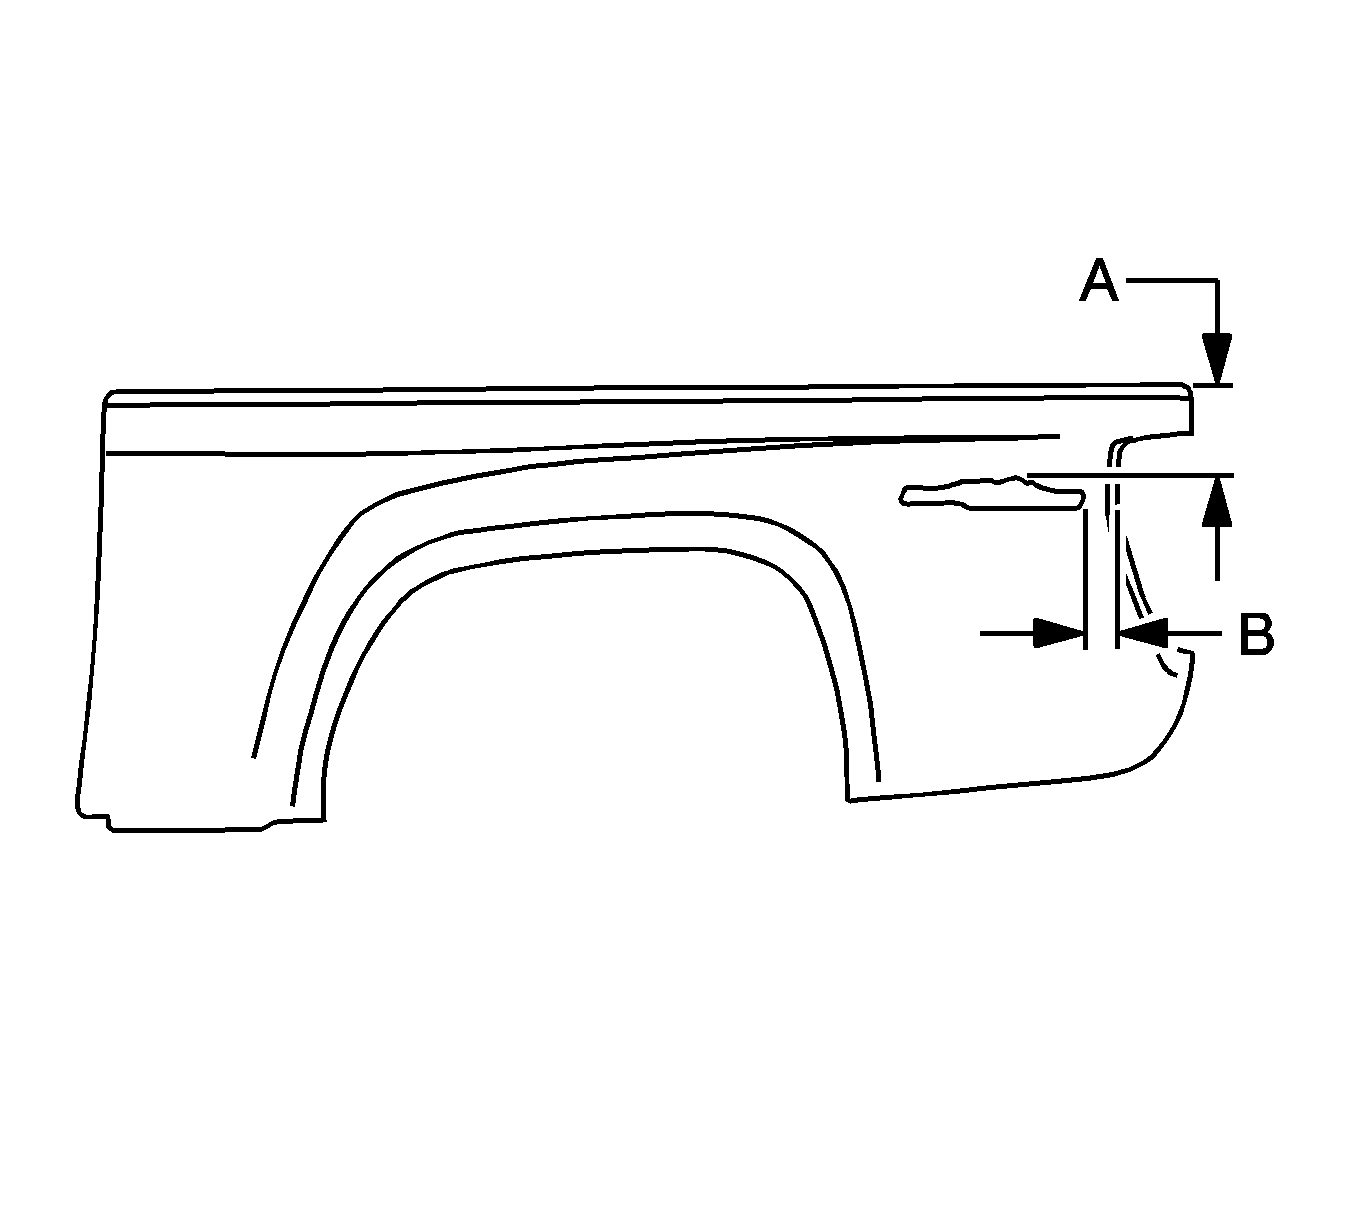
- If the location of the decal has not been marked, apply tape and use the following dimensions:
- Warm the door surface with a J 25070 , 152 mm (6 in) from the surface to a minimum of 21°C (70°F).
- Remove the backing from the front end of the decal.
- Press the decal to the painted surface while continuing to remove the backing.
- Hand roll the decal to the panel to ensure proper adhesion.
- Inspect the decal for bonding.
- Remove the tape from the area around the decal.
- Install the tail lamp. Refer to Tail Lamp Replacement.

| • | Dimension (a) is 176.5 mm (6.95 in) from the top edge of the pickup box to the highest point on the decal. |
| • | Dimension (b) is 68.5 mm (2.70 in) from the rear of the decal to the rear of the sheet metal in the tail lamp opening. |
Note: Do not touch the adhesive backing on the decal.
Pickup Box Side Emblem and Side Rear Nameplate Replacement Colorado
Special Tools
J 25070 Heat Gun
Removal Procedure
- Apply tape to the area around the decal.
- Heat the decal, using a J 25070 , 152 mm (6 in) from the surface.
- Apply the heat using a circular motion for about 30 seconds.
- Remove the decal from the painted surface using a plastic, flat-bladed tool.
- Remove all adhesive from the painted surface using 3M™ ScotchBrite molding adhesive remover disk 3M™ P/N 07501 or equivalent.
- Clean the painted surface using varnish makers and painters (VMP) naphtha.
- Remove the tail lamp. Refer to Tail Lamp Replacement.
Note: Use the tape for protection and alignment marks for alignment of the new decal.
Caution: Refer to Exterior Trim Emblem Removal Caution in the Preface section.

Installation Procedure
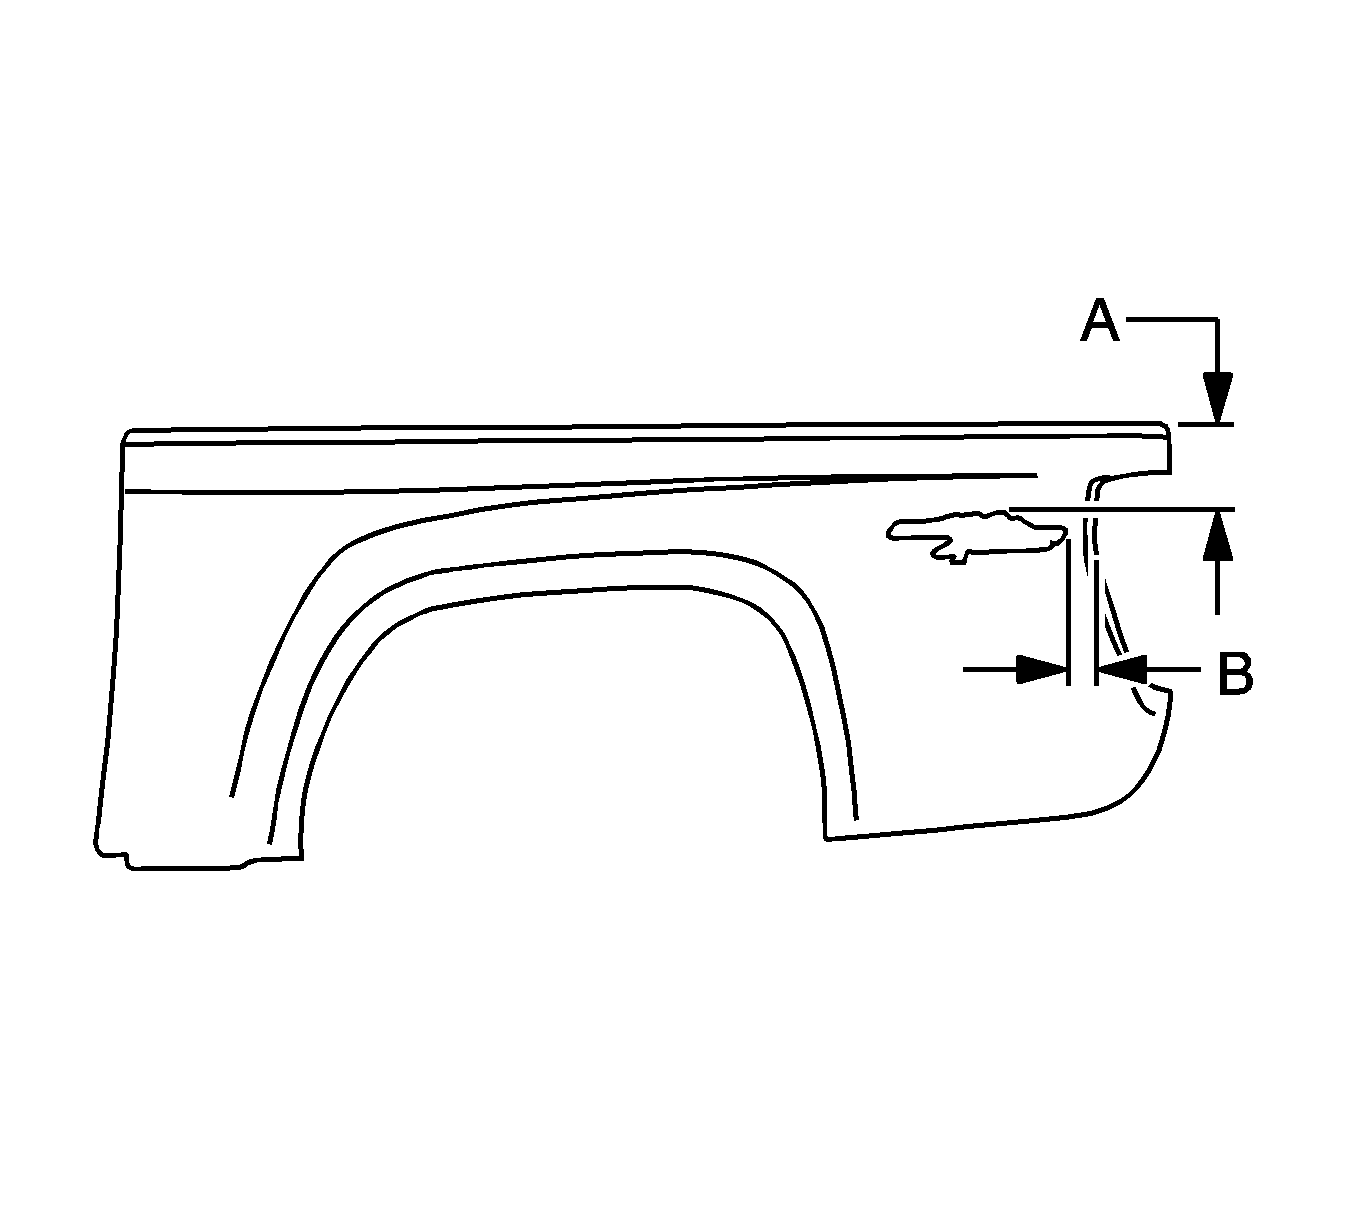
- If the location of the decal has not been marked, apply tape and use the following dimensions:
- Warm the door surface with a J 25070 , 152 mm (6 in) from the surface to a minimum of 21°C (70°F).
- Remove the backing from the front end of the decal.
- Press the decal to the painted surface while continuing to remove the backing.
- Hand roll the decal to the panel to ensure proper adhesion.
- Inspect the decal for bonding.
- Remove the tape from the area around the decal.
- Install the tail lamp. Refer to Tail Lamp Replacement.

| • | Dimension (a) is 207.1 mm (8.15 in) from the top edge of the pickup box to the highest point on the decal. |
| • | Dimension (b) is 71.8 mm (2.83 in) from the rear of the decal to the rear of the sheet metal in the tail lamp opening. |
Note: Do not touch the adhesive backing on the decal.
Pickup Box Side Emblem and Side Rear Nameplate Replacement Canyon 4WD
Special Tools
J 25070 Heat Gun
Removal Procedure
- Apply tape to the area around the decal.
- Heat the decal, using a J 25070 , 152 mm (6 in) from the surface.
- Apply the heat using a circular motion for about 30 seconds.
- Remove the decal from the painted surface using a plastic, flat-bladed tool.
- Remove all adhesive from the painted surface using 3M™ ScotchBrite molding adhesive remover disk 3M™ P/N 07501 or equivalent.
- Clean the painted surface using varnish makers and painters (VMP) naphtha.
- Remove the tail lamp. Refer to Tail Lamp Replacement.
Note: Use the tape for protection and alignment marks for alignment of the new decal.
Caution: Refer to Exterior Trim Emblem Removal Caution in the Preface section.

Installation Procedure
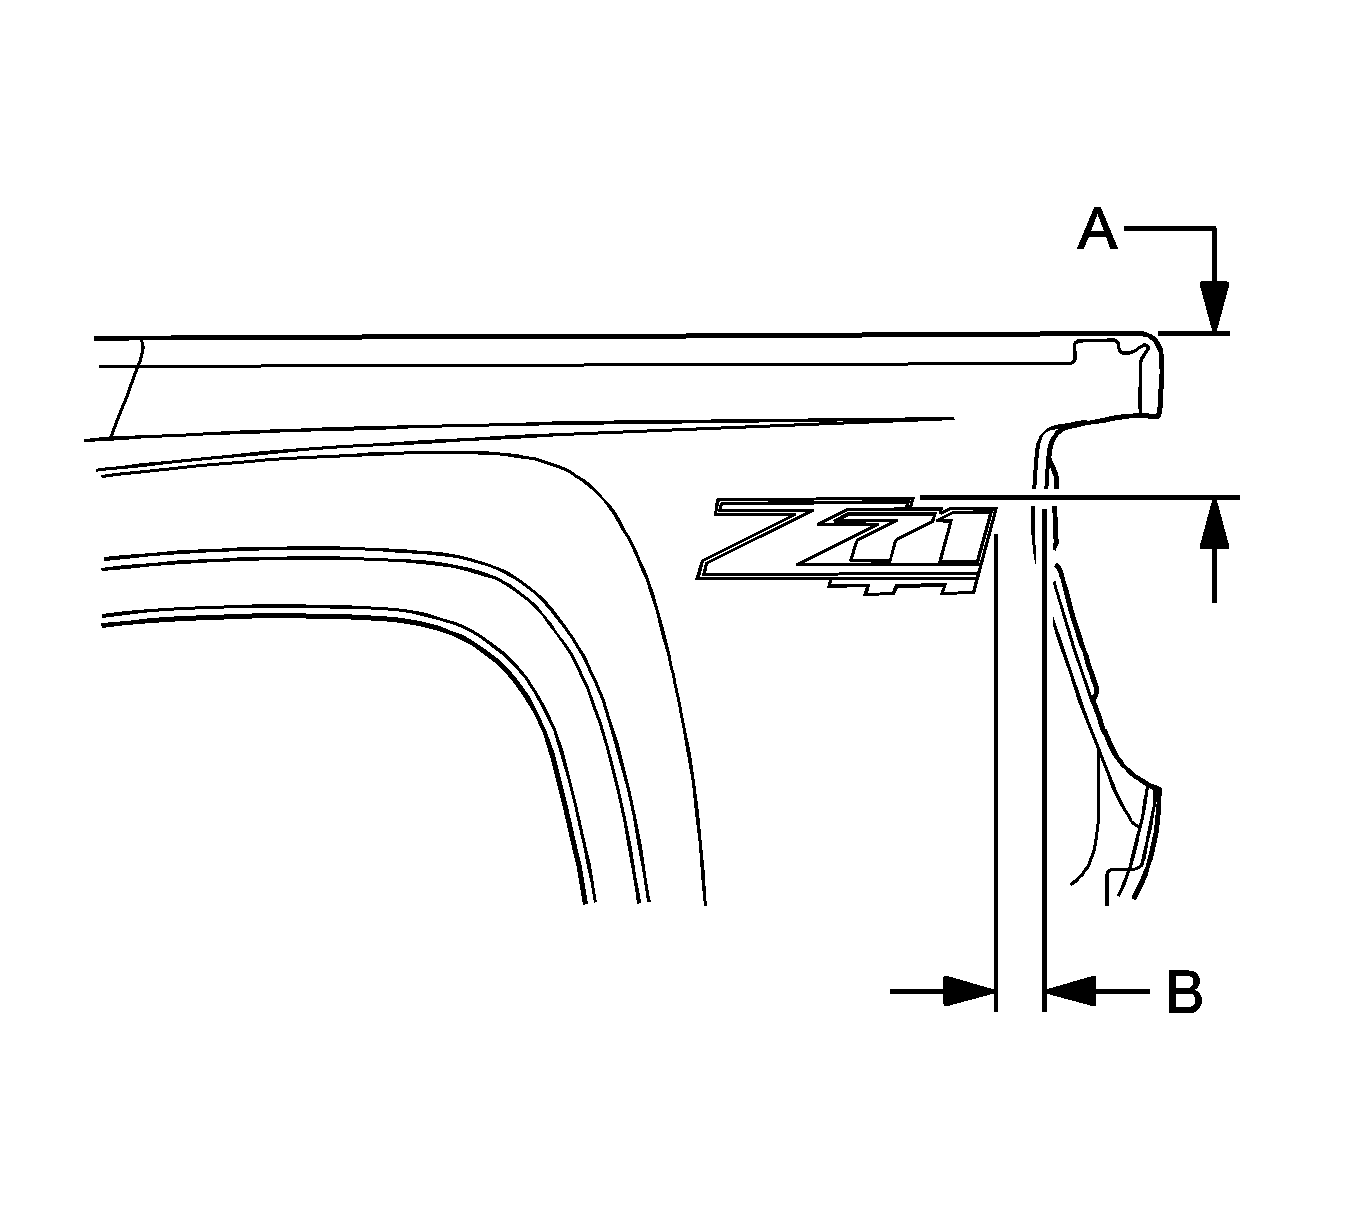
- If the location of the decal has not been marked, apply tape and use the following dimensions:
- Warm the door surface with a J 25070 , 152 mm (6 in) from the surface to a minimum of 21°C (70°F).
- Remove the backing from the front end of the decal.
- Press the decal to the painted surface while continuing to remove the backing.
- Hand roll the decal to the panel to ensure proper adhesion.
- Inspect the decal for bonding.
- Remove the tape from the area around the decal.
- Install the tail lamp. Refer to Tail Lamp Replacement.

| • | Dimension (a) is 178.5 mm (7.03 in) from the top edge of the pickup box to the highest point on the decal. |
| • | Dimension (b) is 66.3 mm (2.61 in) from the rear of the decal to the rear of the sheet metal in the tail lamp opening. |
Note: Do not touch the adhesive backing on the decal.
