For 1990-2009 cars only
Parking Brake Shoe Adjustment Bendix 254 mm - 10 in
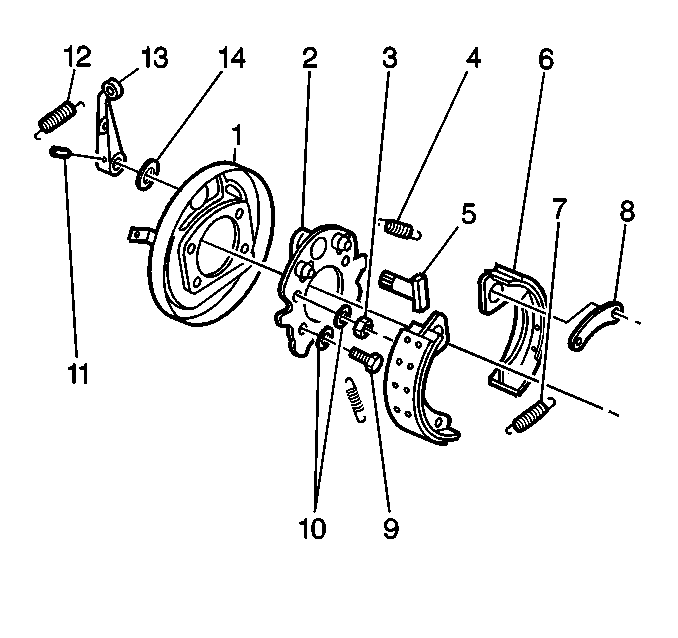
Removal Procedure
Park the vehicle on a level surface before performing service on the parking brake.
- Block the wheels of the vehicle.
- Release the parking brake.
- Raise the rear axle until the tires are off of the ground.
- Remove the cable at the lever (13).
- Rotate the drum (2) in order to align an access hole with the adjuster (6).
- Remove the bolt (4).
- Remove the cover (5).
- Move the lever (13) side to side several times in order to center the shoes (6).
- Insert a screwdriver in the access hole and rotate the adjuster upward until the shoes drag on the drum.
- Move the adjuster back 13 notches.
- Measure the gap at the middle of the shoe lining in order to ensure that the gap has a 0.23 mm (0.009 in) measurement.

Installation Procedure
- Install the cover (5).
- Install the bolt (4).
- Connect the cable to the lever (13).
- Verify the parking brake operation.
Notice: Use the correct fastener in the correct location. Replacement fasteners must be the correct part number for that application. Fasteners requiring replacement or fasteners requiring the use of thread locking compound or sealant are identified in the service procedure. Do not use paints, lubricants, or corrosion inhibitors on fasteners or fastener joint surfaces unless specified. These coatings affect fastener torque and joint clamping force and may damage the fastener. Use the correct tightening sequence and specifications when installing fasteners in order to avoid damage to parts and systems.
Lever Adjustment
- Block the wheels of the vehicle.
- Release the parking brake.
- Loosen the jam nut.
- Loosen the adjusting nut.
- When connecting the cable with the cam lever, use the adjusting nut in order to remove any clearance between the cam and the shoe.
- Lock the adjust nut with the locknut.
- Remove the blocks from the wheels.

