Removal Procedure
Important:
| • | To ensure correct reassembly, record or mark all information as
specified in the procedure. |
| • | Cap the hose connections. |
- Disconnect the hose connections.
- Remove the pump. Refer to
Power Steering Pump Replacement
.
- Clean exterior of pump with solvent.
- Tip the pump to drain oil from the intake port.
- Rotate the shaft to remove oil from the internal cavities.
Disassemble Procedure
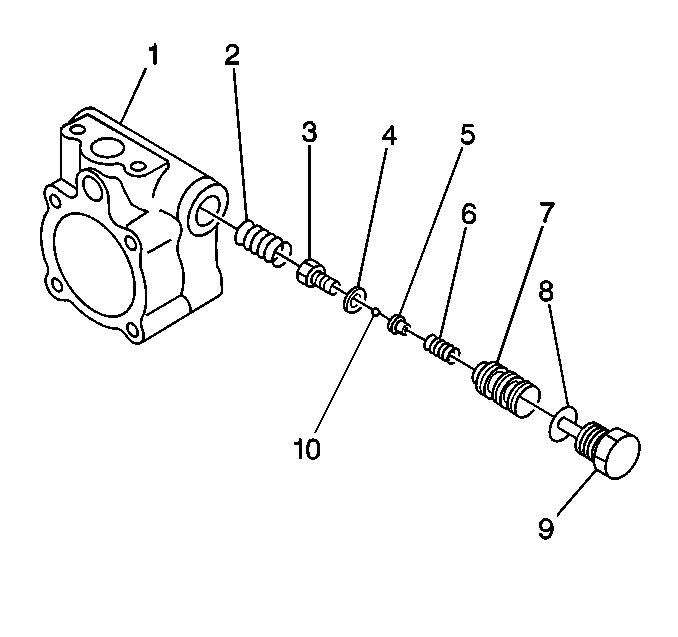
- Use the pump mounting
bracket or flange body (1) to clamp the pump assembly to a bench vise.
- Disassemble the following components.
| 2.4. | The retainer spring (6) and the retainer (5) |
| 2.5. | The ball (10) and shims (4) |
| 2.6. | The valve plug (3) and valve spring (2) |
Cleaning, Inspection, and Repair Procedure
- Clean all parts with clean solvent and blow dry.
- Inspect the valve plug for external damage, damage to the threads
and the cross hole on the orifice.
- If any damage is present, replace the necessary parts.
Inspect the following components for excessive burning, scoring, wear
or oversize condition:
If there is damage than the pump assembly must be replaced.
| 3.3. | The flow control valve assembly |
It is difficult to visually determine if internal valve components are
faulty. Low pressure may be a sign for valve replacement. The valve must move
smoothly in the valve bore.
If movement is not free or there is no movement than install a replacement
valve kit.
Assembly Procedure
- Lubricate the valve bore.
- Lubricate the new seal (4).
- Assemble the following components:
| 3.1. | The valve spring (2) and valve plug (3) into the
valve bore |
| 3.2. | The shims (4) and the ball (10) |
| 3.3. | The retainer (5) and the retainer spring (6) |
| 3.4. | The valve body (7). Inspect the valve for proper movement. |
| 3.5. | The O-ring (8) and the valve plug (9) |
| 3.6. | Tighten the valve plug finger tight |
Notice: Use the correct fastener in the correct location. Replacement fasteners
must be the correct part number for that application. Fasteners requiring
replacement or fasteners requiring the use of thread locking compound or sealant
are identified in the service procedure. Do not use paints, lubricants, or
corrosion inhibitors on fasteners or fastener joint surfaces unless specified.
These coatings affect fastener torque and joint clamping force and may damage
the fastener. Use the correct tightening sequence and specifications when
installing fasteners in order to avoid damage to parts and systems.
- Clamp the pump mounting
bracket or flange in a bench vise. DO NOT distort the sealing surface of the
flange mounting.
Tighten
Tighten the valve plug to 49 N·m (36 lb ft).
- Install the pump. Refer to
Power Steering Pump Replacement
.
