Intake Manifold Replacement Upper, 4.3L
Removal Procedure
- Drain the engine coolant. Refer to Cooling and Radiator.
- Remove the air cleaner assembly. Refer to Air Cleaner in Engine
Controls.
- Remove the following wire harnesses:
| • | The exhaust gas recirculation valve (EGR) |
| • | The coolant temperature sensor (CTS) |
| • | The throttle position sensor (TP sensor) |
| • | The idle air control (IAC) motor |
| • | The manifold absolute pressure (MAP) sensor |
- Unsnap the throttle cable.
- Unsnap the cruise control cable, if the vehicle is equipped with
cruise control.
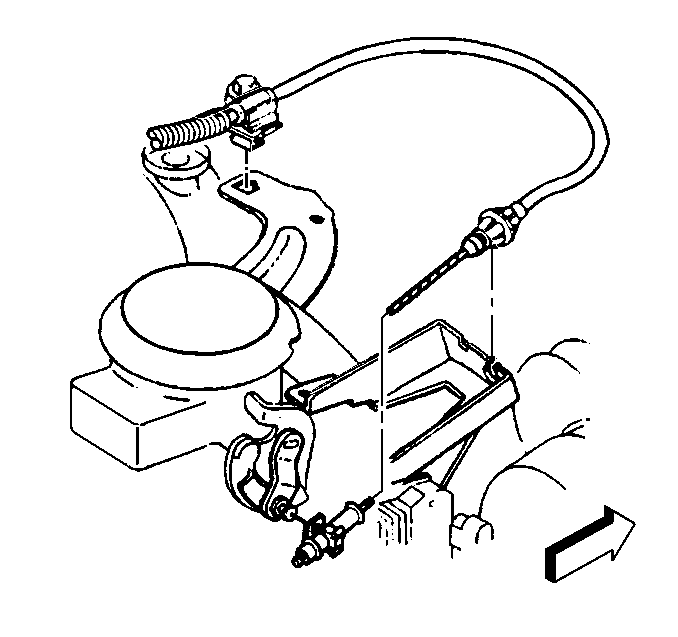
- Remove the throttle cable brackets.
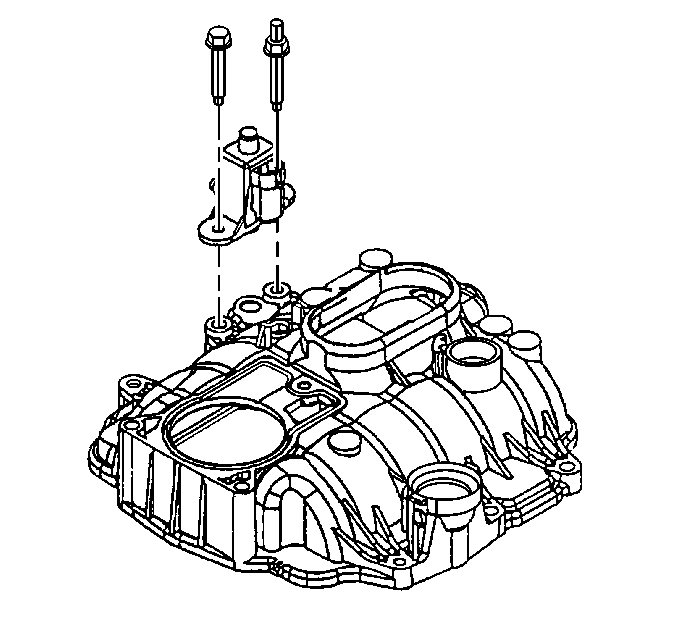
- Remove the purge solenoid. Refer to Engine Controls.
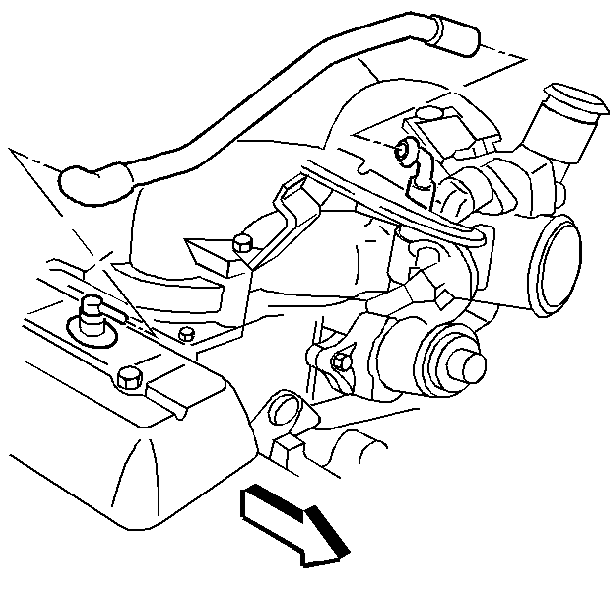
- Remove the PCV pipe.
- Remove the fuel injector electrical connector.
- Relieve the fuel system pressure. Refer to Engine Controls.
- Remove the fuel pipes.
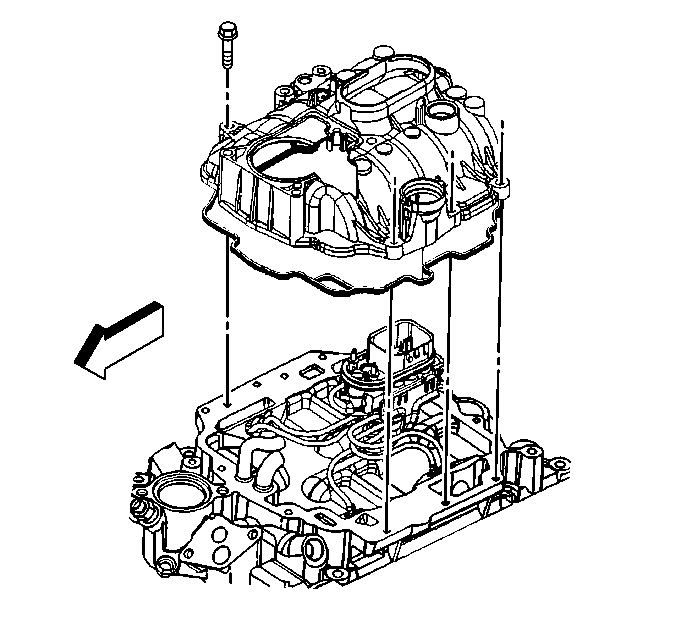
- Remove the upper intake manifold.
Installation Procedure
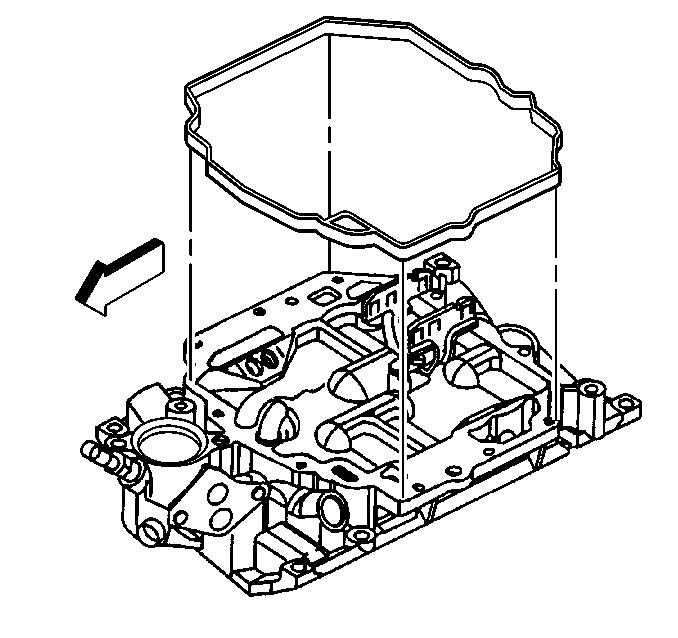
- Install a new upper intake manifold gasket.

- Install the upper intake manifold. Do not pinch the injector wires between
the upper and lower intake manifolds.
- Install the remaining intake manifold bolts and studs.
Important: Install two stud bolts through the upper intake manifold diagonally
opposite from each other to aid in positioning the upper intake manifold to
the lower intake manifold.
- Tighten the upper intake manifold bolts in two steps.
Tighten
| • | Tighten the bolts to 5 N·m (44 lb in). |
| • | Final tighten the bolts to 10 N·m (89 lb in). |
Notice: Use the correct fastener in the correct location. Replacement fasteners
must be the correct part number for that application. Fasteners requiring
replacement or fasteners requiring the use of thread locking compound or sealant
are identified in the service procedure. Do not use paints, lubricants, or
corrosion inhibitors on fasteners or fastener joint surfaces unless specified.
These coatings affect fastener torque and joint clamping force and may damage
the fastener. Use the correct tightening sequence and specifications when
installing fasteners in order to avoid damage to parts and systems.

- Install the PCV pipe.

- Install the throttle cable brackets.
- Install the throttle cable.
- Install the cruise control cable, if the vehicle is equipped with
cruise control.

- Install the purge solenoid. Refer to Engine Controls.
- Install the following wiring harnesses:
| • | The Exhaust Gas Recirculation valve (EGR) |
| • | The Coolant Temperature Sensor (CTS) |
| • | The Throttle Position Sensor (TP sensor) |
| • | The Idle Air Control (IAC) motor |
| • | The Manifold Absolute Pressure (MAP) sensor |
- Install the fuel pipes.
- Install the fuel injector electrical connector.
- Install the air cleaner assembly. Refer to Air Cleaner in Engine
Controls.
- Fill the cooling system. Refer to Cooling and Radiator.
Intake Manifold Replacement Lower, 4.3L
Removal Procedure
- Disconnect the negative battery cable. Refer to
Caution: Unless directed otherwise, the ignition and start switch must be in the OFF or LOCK position, and all electrical loads must be OFF before servicing
any electrical component. Disconnect the negative battery cable to prevent an electrical spark should a tool or equipment come in contact with an exposed electrical terminal. Failure to follow these precautions may result in personal injury and/or damage to
the vehicle or its components.
.
- Drain the cooling system. Refer to Draining and Filling the Cooling
System in Engine Cooling.
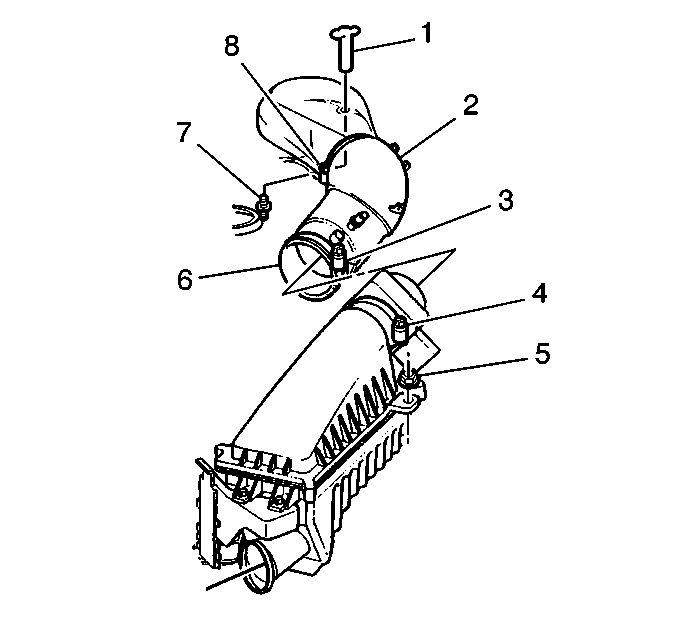
- Remove the air cleaner assembly. Refer to
Air Cleaner in Engine Controls.
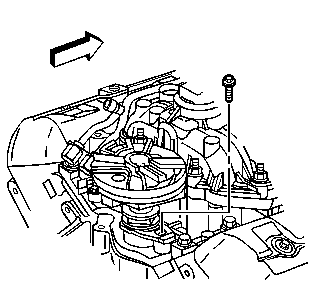
- Remove the distributor. Refer to Distributor Replacement in Engine Electrical.
- Remove the upper radiator hose. Refer to Radiator Hose Replacement
in Engine Cooling.

- Remove the throttle cable and brackets from the throttle body.
- Remove the heater hose at the front of the engine.
- Remove the transmission oil level indicator and tube (automatic
transmissions only). Refer to Oil Level Indicator and Tube Replacement in
Automatic Transmission.
- Remove the fuel injector electrical connector.
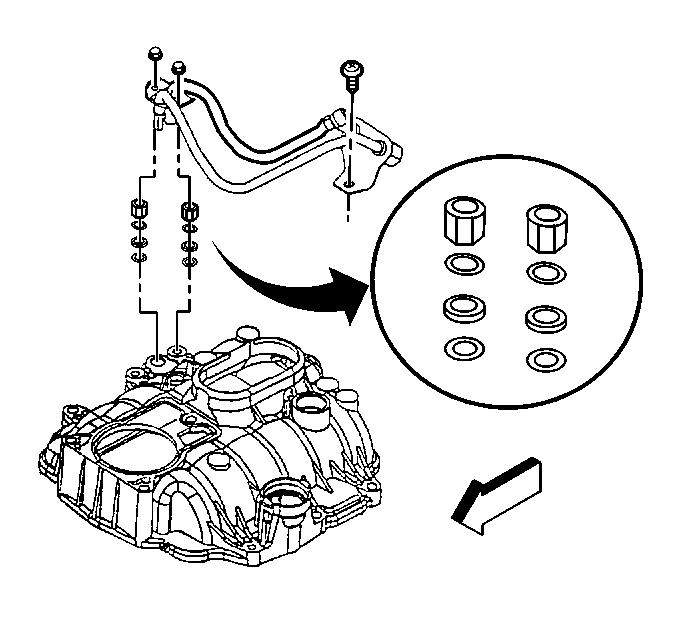
- Remove the fuel supply and return pipes at the rear of the lower intake
manifold.
- Remove the bolts attaching the air conditioning compressor and
lay the compressor aside. Refer to Heating, Ventilation and Air Conditioning.
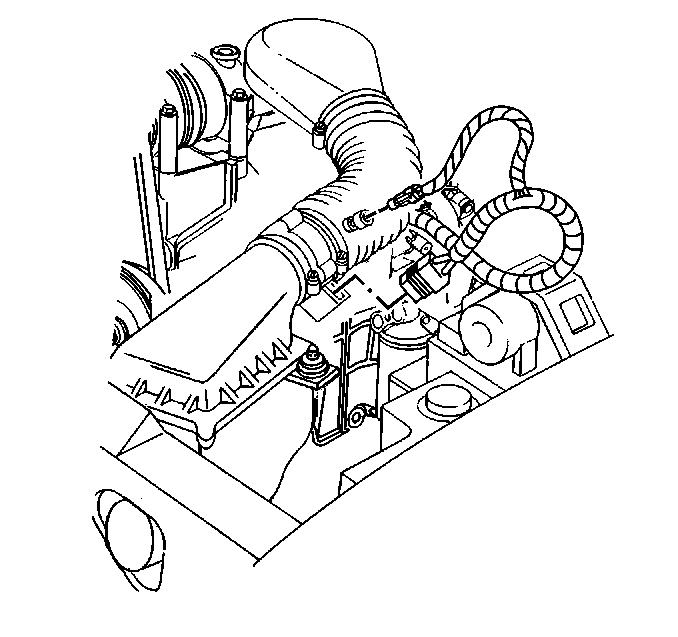
- Remove the electrical connectors from the following items:
| • | The Exhaust Gas Recirculation (EGR) valve |
| • | The Engine Coolant Temperature (ECT) sensor |
| • | The Manifold Absolute Pressure (MAP) sensor |
| • | The Mass Air Flow (MAF) sensor |
- Remove the distributor spark plug wires.

- Remove the PCV pipe.
- Remove the EGR valve inlet tube from the intake manifold.
- Remove the oxygen sensor wire support bracket and nut.
- Remove the canister purge system tubing.
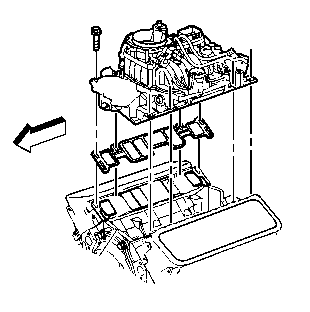
- Remove the lower intake manifold.
Installation Procedure
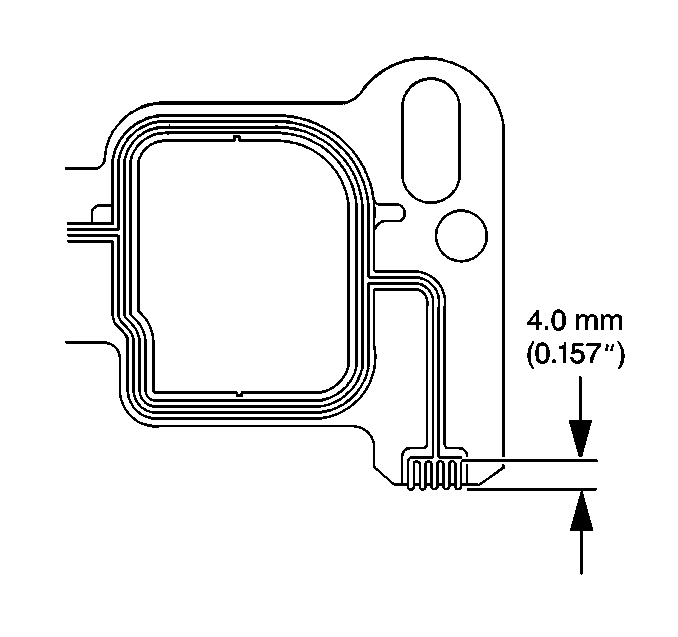
- Apply a 4 mm wide bead of an approved sealant to the intake manifold
gasket, on the cylinder head side.
Important: Do not reuse intake manifold gaskets. Always install new gaskets.
- Install the gaskets onto the cylinder head.
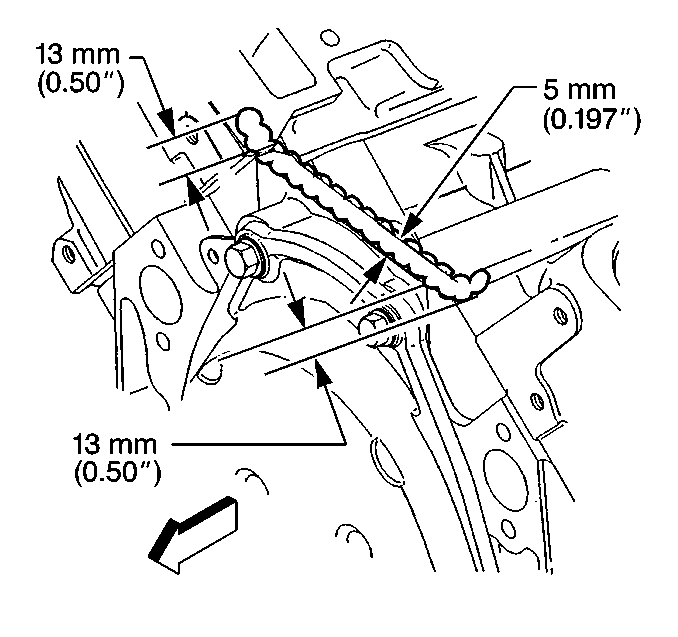
Important: Care must be used to apply the correct amount of sealant onto the gaskets.
Applying excessive amounts of sealant may prohibit the intake manifold gaskets
from sealing properly.
- Apply a 5 mm (0.197 inch) bead of an approved RTV to the front of the
engine block sealant areas. Extend the RTV bead 13 mm (0.500 inch) up the
cylinder head in order to seal and retain the gaskets.
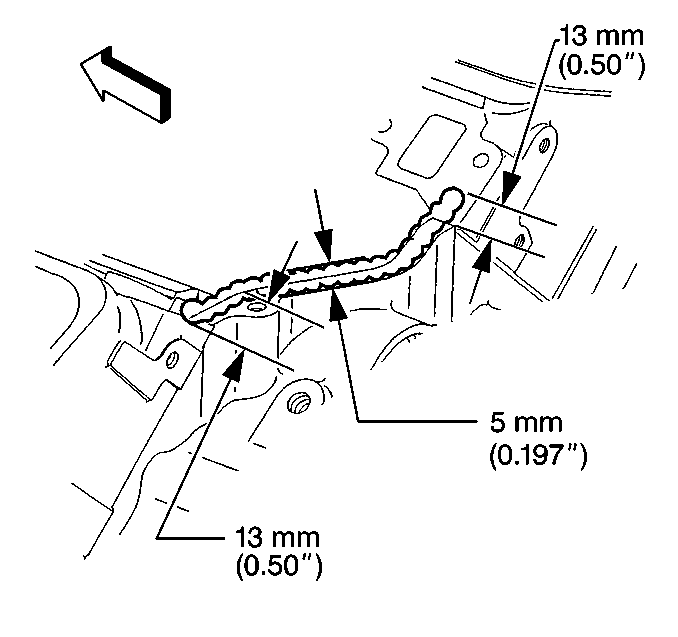
- Apply a 5 mm (0.197 inch) bead of an approved RTV to the back of the
engine block sealant areas. Extend the RTV bead 13 mm (0.500 inch) up the
cylinder head in order to seal and retain the gaskets.

- Install the lower intake manifold to the
engine. Apply an approved thread locking sealant to the lower intake manifold
bolts.
- Install the lower intake manifold bolts.
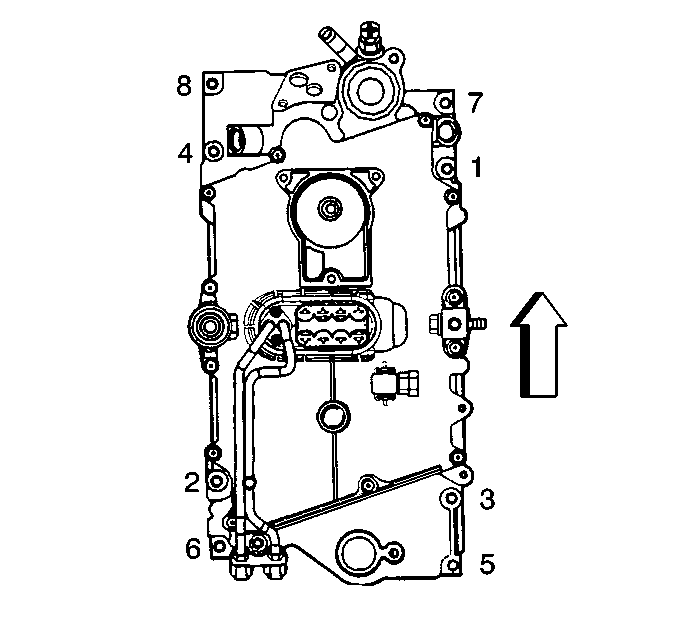
- Use the tightening sequence shown in order to tighten the bolts in three
steps.
Tighten
| • | Tighten the bolts in the first pass to 3 N·m (27 lb in). |
| • | Tighten the bolts in the second pass to 12 N·m (106 lb in). |
| • | Tighten the bolts in the final pass to 15 N·m (11 lb ft). |
Notice: Use the correct fastener in the correct location. Replacement fasteners
must be the correct part number for that application. Fasteners requiring
replacement or fasteners requiring the use of thread locking compound or sealant
are identified in the service procedure. Do not use paints, lubricants, or
corrosion inhibitors on fasteners or fastener joint surfaces unless specified.
These coatings affect fastener torque and joint clamping force and may damage
the fastener. Use the correct tightening sequence and specifications when
installing fasteners in order to avoid damage to parts and systems.

- Install the fuel supply and return pipes to the rear of the lower intake
manifold.

- Install the PCV pipe.
- Install the oxygen sensor wire support bracket and nut.
- Install the purge solenoid. Refer to Engine Controls.
- Install the EGR inlet tube, clamp, and bolt.
- Install the wiring harnesses, including the following items:
| • | The Exhaust Gas Recirculation (EGR) valve |
| • | The Engine Coolant Temperature (ECT) sensor |
| • | The Manifold Absolute Pressure (MAP) sensor |
| • | The Mass Air Flow (MAF) sensor |
| • | The Central (Sequential Fuel Injector) |
- Install the distributor spark plug wires. Refer to Engine Electrical.
- Install the air conditioning compressor. Refer to Heating, Ventilation
and Air Conditioning.
- Install the transmission oil level indicator and tube (Automatic
transmissions only). Refer to Oil Level Indicator and Tube Replacement in
Automatic Transmission.

- Install the throttle cables and bracket
to the throttle body.
- Install the heater hose at the lower intake manifold.
- Install the upper radiator hose. Refer to Radiator Hose Replacement
in Engine Cooling.

- Install the distributor. Refer to Distributor Replacement in Engine
Electrical.

- Install the air cleaner assembly. Refer
to Air Cleaner in Engine Controls.
- Refill the cooling system. Refer to Draining and Filling the Cooling
System in Engine Cooling.
- Connect the negative battery cable.


