Accelerator Controls Accelerator Pedal

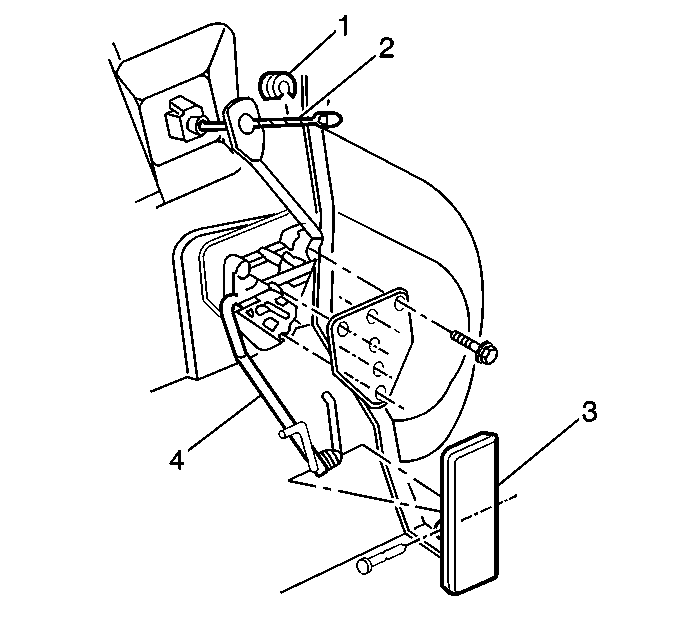
The accelerator pedal (3) through a cable (2) controls the throttle. There are no linkage adjustments. Replace the accelerator control cable with an identical replacement part.
Check all linkages and cables in order to assure free movement with no rubbing, chafing, or binding. The accelerator pedal must operate freely, without binding, between the full closed and the wide open throttle (WOT).
Observe the following when performing service on the accelerator pedal:
| • | The mounting surface between the support and the dash panel must be free of insulation. The carpet and padding in the pedal and tunnel area must be positioned to lay flat and be free of wrinkles and bunches. |
| • | Slip the accelerator control cable through the slot in the rod (4) before installing the retainer (1) in the rod. Make sure it is seated properly. Use care in pressing the retainer into the hole, so the cable is not kinked or damaged. |
| • | The linkage must operate freely without binding between the closed throttle and the full throttle position. |
| • | Do not place the wire, hoses, cable, and other flexible components within 13 mm (0.52 in.) of the cable or rod, at any point in their travel. |
Accelerator Controls Accelerator Control Cable
Removal Procedure
- Remove the left sound insulator.
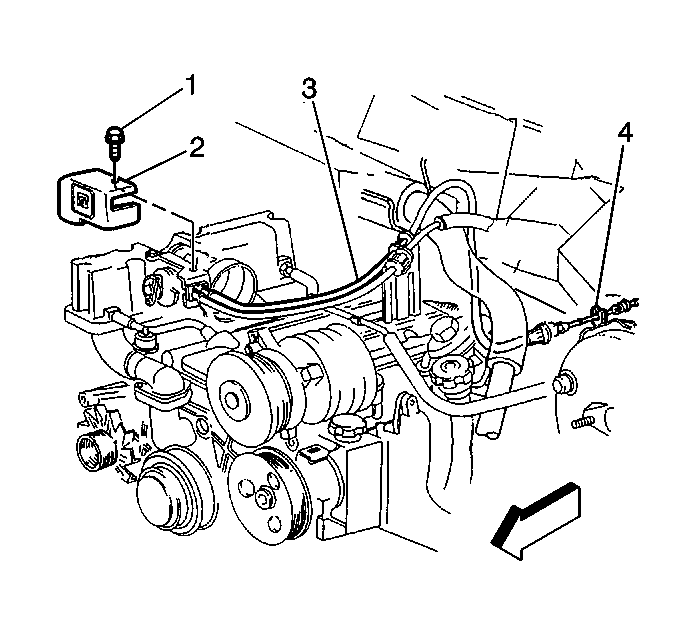
- Remove the accelerator cable (3) from the slot in rod (4).
- Remove the air intake duct.
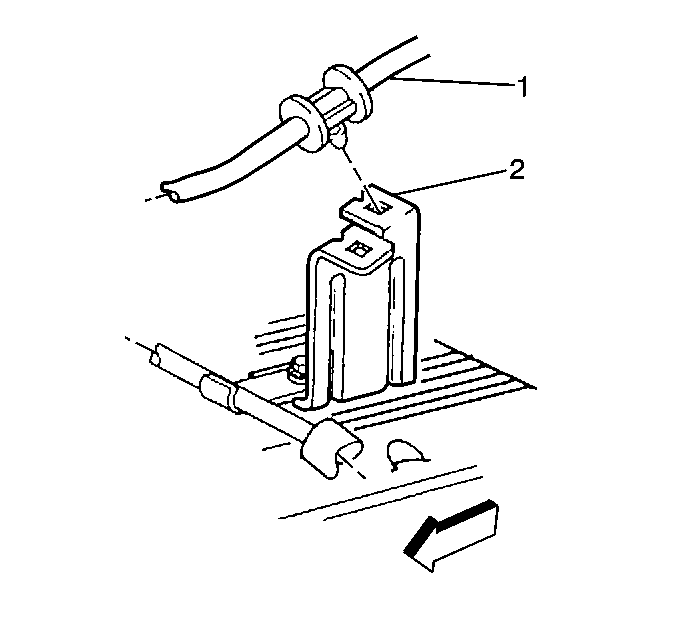
- Remove the locator clip (1) from the cable routing bracket (2).
- Remove the accelerator control cable splash shield.
- Remove the cruise control cable.
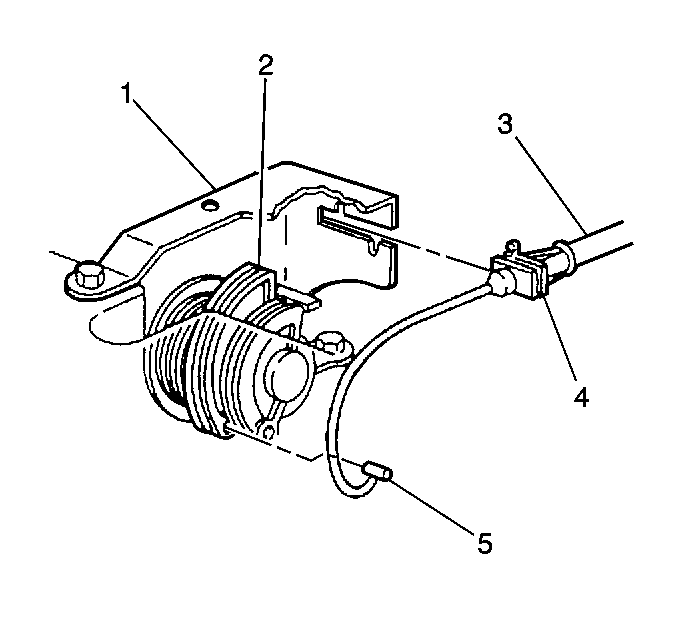
- Remove the accelerator cable (3) from the accelerator cable bracket (1).
- Remove the accelerator cable from the throttle lever cam (2).


Installation Procedure
- Route cable through the accelerator cable bracket (1).
- Insert the cable lug (5) and the cable wire (3) into the pulley slot.
- Pull the cable conduit fitting away from the throttle lever cam (2).
- Install the tab (4) into the rectangular slot in the accelerator cable bracket.
- Install the cruise control cable.
- Install the accelerator control splash shield (2).
- Install the screw (1) to shield.
- Install locator clip (1) to cable routing bracket (2).
- Install the air intake duct.
- Route cable (3) through cowl.
- Slip accelerator cable through slot in rod (4) and then install retainer in rod, being sure it is seated.
- Install the left sound insulator.


Tighten
Tighten the screw to 3 N·m (27 lb in).
Notice: Use the correct fastener in the correct location. Replacement fasteners must be the correct part number for that application. Fasteners requiring replacement or fasteners requiring the use of thread locking compound or sealant are identified in the service procedure. Do not use paints, lubricants, or corrosion inhibitors on fasteners or fastener joint surfaces unless specified. These coatings affect fastener torque and joint clamping force and may damage the fastener. Use the correct tightening sequence and specifications when installing fasteners in order to avoid damage to parts and systems.


Important: Flexible components (hoses, wires, conduits, etc.) must not be routed within 50 mm (2.0 in) of moving parts of accelerator linkage outboard of support unless routing is positively controlled.
Check for correct opening and closing positions by operating accelerator pedal. Make sure that the throttle valve reaches wide-open throttle position. If it does not, inspect for damaged or bent brackets, levers, or other components; or, for poor carpet fit under the accelerator pedal.Accelerator Controls Accelerator Cable Bracket
Removal Procedure
- Remove the accelerator cable splash shield attaching screw (1) and splash shield (2) from accelerator cable bracket.
- Remove the accelerator, cruise and transmission cables, (If so equipped).
- Remove the accelerator cable bracket attaching bolts and the accelerator cable bracket.

Installation Procedure
- Install the accelerator cable bracket with attaching bolts.
- Install the bolts to the bracket.
- Install the accelerator cable splash shield (2).

Notice: Align the accelerator bracket with the accelerator cam in order to prevent cable wear which could cause the cable to break.
Tighten
| • | Tighten the top bolt first. |
| • | Tighten bolt to 25 N·m (18 lb ft). |
Notice: Use the correct fastener in the correct location. Replacement fasteners must be the correct part number for that application. Fasteners requiring replacement or fasteners requiring the use of thread locking compound or sealant are identified in the service procedure. Do not use paints, lubricants, or corrosion inhibitors on fasteners or fastener joint surfaces unless specified. These coatings affect fastener torque and joint clamping force and may damage the fastener. Use the correct tightening sequence and specifications when installing fasteners in order to avoid damage to parts and systems.
