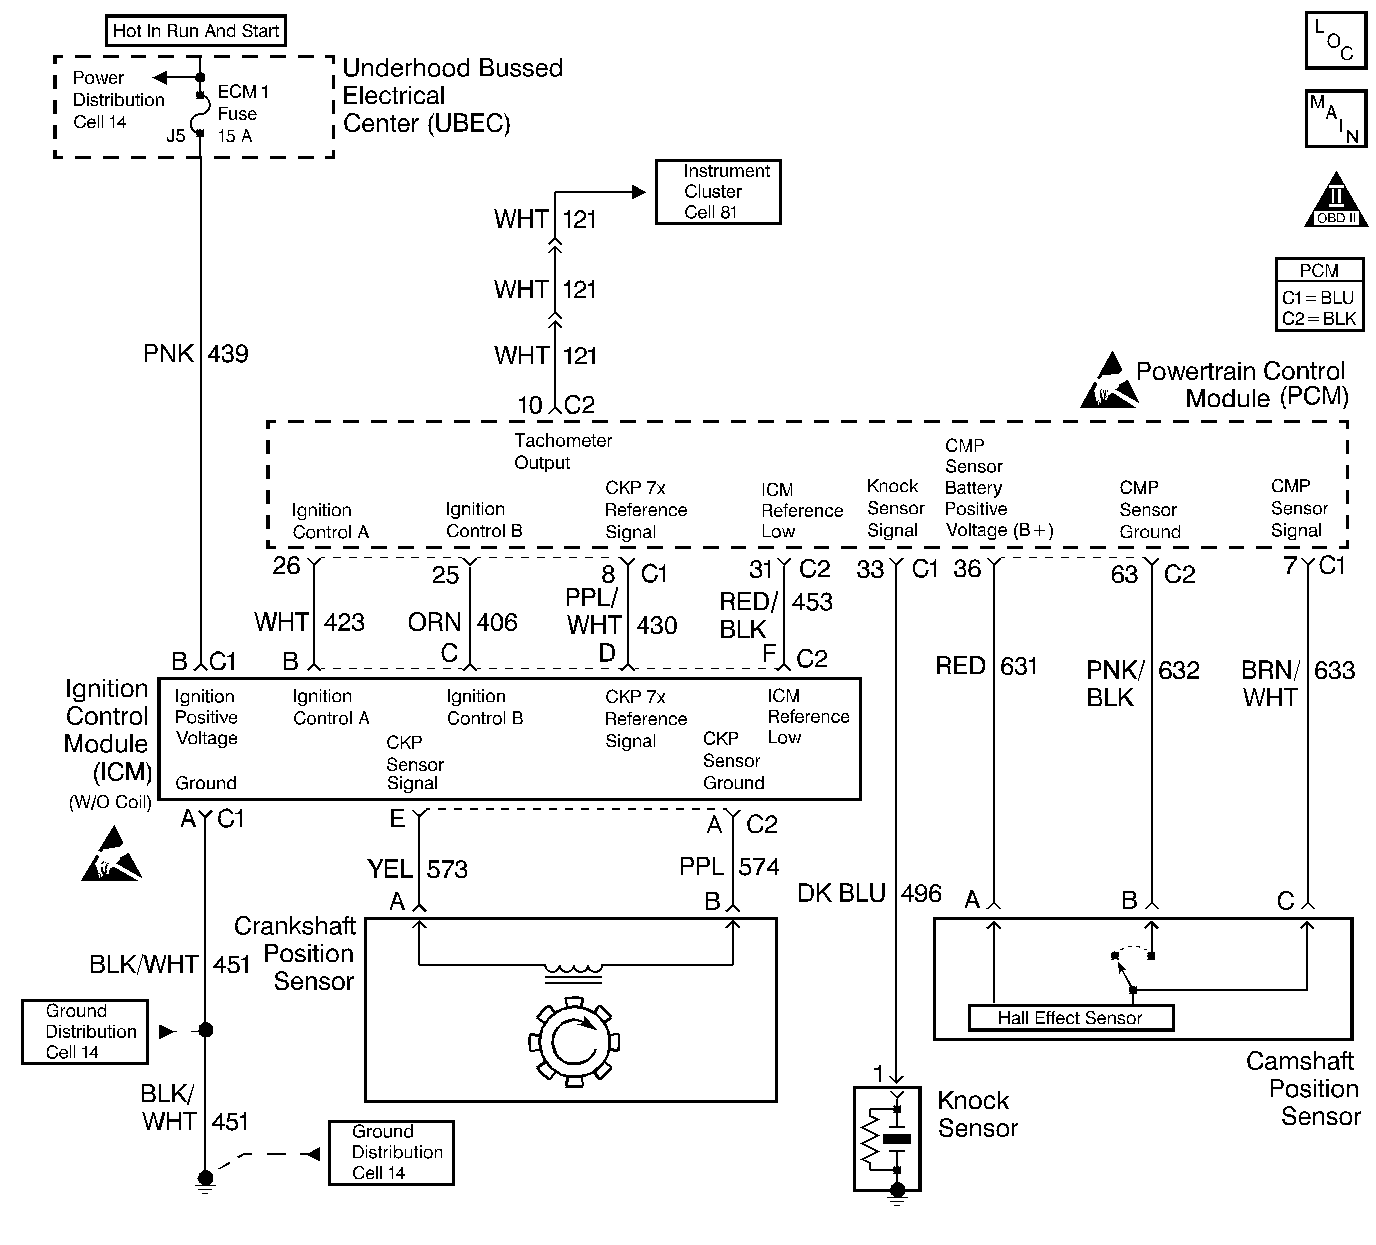
Circuit Description
This engine is equipped with a distributorless ignition system called the electronic ignition (EI) system. The primary circuit of the EI system consists of 2 separate ignition coils, an electronic ignition control module (ICM) and a crankshaft position (CKP) sensor as well as the related connecting wires and the ignition control (IC) portion of the PCM. Each secondary circuit consists of the secondary winding of the coil, spark plug wires, and the spark plugs.
Important: The camshaft position (CMP) sensor is only used for a misfire detection and is not part of the ignition system.
Diagnostic Aids
Test/Inspect for the following conditions:
| • | A TP sensor that reads too high or skewed may cause an incorrect fueling condition. |
| • | A TP sensor binding or sticking in wide open position. |
| • | A TP sensor shorted or open. |
| • | Fuel contamination |
| • | Out of fuel |
| • | Low compression. Refer to Engine Compression Test in Engine Mechanical. |
| • | PCM grounds. The PCM grounds will only cause a problem if all the grounds are not making a good connection. If a PCM ground problem is suspected, the most probable place to inspect is where the grounds meet at the engine block. |
| • | A cold engine that has not been started should display ECT and IAT temperatures that are relatively close to each other. |
| • | A skewed MAP sensor. The MAP sensor value should change when cranking the engine. Compare any questionable barometer readings with that of a known good vehicle. |
Test Description
The numbers below refer to the step numbers on the diagnostic table:
-
While cranking the engine, the CKP activity (CKP reference signal) should increment to 255, then rollover to 0.
-
The CKP sensor should output a voltage near 1100-1300 mV as the crankshaft turns. It is possible to trigger the ICM with a voltage as low as 200 mV. If no voltage is produced, a poor CKP sensor connection or malfunctioning CKP sensor is indicated.
-
A test lamp connected to B+ simulates a reference signal to the PCM.
-
The replacement PCM must be programmed and the Crankshaft Position System Variation Learn procedure must be performed.
Step | Action | Values | Yes | No | ||||||||
|---|---|---|---|---|---|---|---|---|---|---|---|---|
1 | Did you perform the Powertrain On-Board Diagnostic (OBD) System Check? | -- | ||||||||||
2 | Are DTCs P0601, P0602, P1621, P1626, P1631, or P1632 set? | -- | ||||||||||
With the scan tool, observe the CKP activity counter while cranking the engine. Does the CKP activity counter increment while cranking the engine? | -- | |||||||||||
4 | With the scan tool, command the fuel pump ON. Does the fuel pump run? | -- | ||||||||||
5 |
Does the fuel pressure read within the specified value? | 248-325 kPa (41-47 psi) | Go to Fuel System Diagnosis | |||||||||
6 |
Did spark occur on all cylinders? | -- | ||||||||||
7 |
Did you find and correct the condition? | -- | Go to Diagnostic Aids | |||||||||
8 |
Does the DMM read at the specified value? | B+ | ||||||||||
9 |
Does the DMM measure within the specified value? | 700-1,300 ohms | ||||||||||
Does the DMM read greater then the specified value? | 200 mV | |||||||||||
Does the CKP Activity Counter increment? | -- | |||||||||||
12 | With a DMM, measure the resistance of each spark plug wire. Refer to Spark Plug Wires Not Operating Properly in Engine Electrical. Does each spark plug wire measure less then the specified value? | 30000 ohms | ||||||||||
13 |
Important:: DO NOT use a test lamp in the next test. Does the DMM read the specified value? | B+ | ||||||||||
14 |
Did you find and correct the condition? | -- | ||||||||||
15 |
Did you find and correct the condition? | -- | ||||||||||
16 |
Did you find and correct the condition? | -- | ||||||||||
17 |
Did you find and correct the condition? | -- | ||||||||||
18 |
Did you find and correct the condition? | -- | ||||||||||
19 | Repair open in ICM ground circuit and/or Ignition Positive Voltage circuit. Refer to Wiring Repairs in Wiring Systems. Did you complete the repair? | -- | -- | |||||||||
20 | Replace the affected spark plug wires as necessary. Refer to Spark Plug Wire Harness Replacement in Engine Electrical. Did you complete the replacement? | -- | -- | |||||||||
21 |
Important:: The Crankshaft Position System Variation Learn procedure must be performed. Refer to Crankshaft Position System Variation Learn . Replace the CKP sensor. Refer to Crankshaft Position Sensor Replacement . Did you complete the replacement? | -- | -- | |||||||||
22 | Replace the ICM. Refer to Ignition Control Module Replacement . Did you complete the replacement? | -- | -- | |||||||||
|
Important:: The replacement PCM must be programmed. Replace the PCM. Refer to Powertrain Control Module Replacement/Programming . Did you complete the replacement? | -- | -- | ||||||||||
24 | Attempt to start the engine. Does the engine start and continue to run? | -- |
