GM Service Manual Online
For 1990-2009 cars only

ABS Indicator Lamp Operation

The system uses an amber ABS indicator lamp in the instrument cluster in order to show system operation and malfunctions.

Normal Lamp Operation

Whenever the key is turned to the RUN position, the instrument cluster starts a bulb check by illuminating the ANTILOCK and BRAKE indicators. The bulb check ends when the instrument cluster receives a Class 2 serial data message from the EBCM and BCM that no malfunctions were detected. If no malfunctions were detected, the instrument cluster will turn OFF the ANTILOCK indicator after two seconds, and the BRAKE indicator will turn OFF a second later. This confirms correct operation of the EBCM and the indicators.

If the EBCM detects a malfunction, either on power-up or during operation, it will notify the instrument cluster via a Class 2 message to illuminate the ANTILOCK indicator. If the malfunction can affect operation of the base brakes, the BRAKE indicator may be illuminated as well. In order to determine the specific cause of the malfunction, refer to Diagnostic System Check .

The ANTILOCK indicator can be illuminated when one of the following conditions occurs:

    • When the EBCM detects a permanent, ignition, or condition latched diagnostic trouble code (DTC).
    • The instrument cluster cannot communicate with the EBCM module using Class 2 serial data communications.

The BRAKE lamp can be illuminated when one of the following conditions occurs:

    • If flashing, the parking brake is not released.
    • DRP Critical Malfunctions
    • Two or more DRP Non-Critical Malfunctions
    • Low brake fluid

Self-Test

A self-test is performed when the vehicle reaches a speed of greater than 3 mph. At this time the internal EBCM relay, six solenoid coils and BPMV pump motor are cycled and checked for shorts/opens. The BPMV pump will make a slight sound when this function occurs.
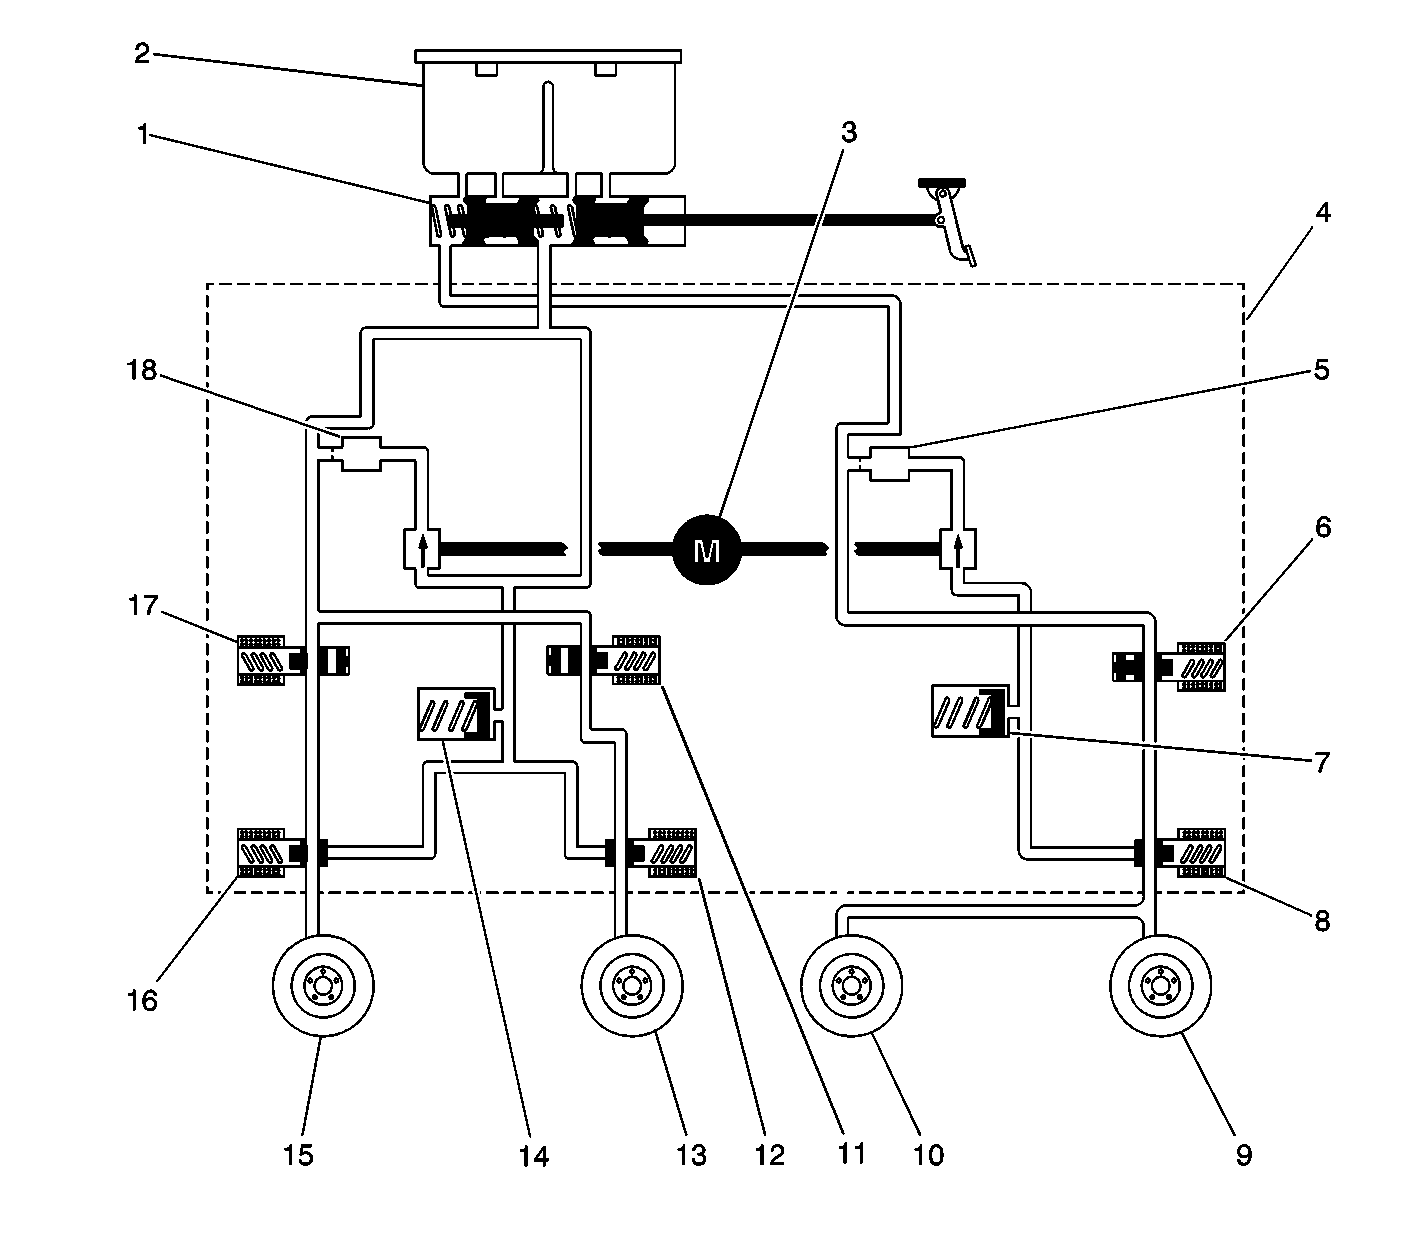
Normal Braking Mode

BPMV Hydraulic Flow


Object Number: 394564  Size: LF
(1)Master Cylinder
(2)Master Cylinder Reservoir
(3)Pump
(4)Brake Pressure Modulator Valve (BPMV)
(5)Damper
(6)Rear Isolation Valve
(7)Accumulator
(8)Rear Dump Valve
(9)Right Rear Brake
(10)Left Rear Brake
(11)Left Front Isolation Valve
(12)Left Front Dump Valve
(13)Left Front Brake
(14)Accumulator
(15)Right Front Brake
(16)Right Front Dump Valve
(17)Right Front Isolation Valve
(18)Damper

During normal braking, pressure is applied through the brake pedal. Fluid travels from the master cylinder (2) into the BPMV (14). Once in the BPMV, the fluid travels through the normally-open isolation valves (3, 5, 13), through the normally-closed (6, 9, 12) dump valves and out into the brakes (7, 10).

During normal braking, the pump (4, 15) is not turned on. The low pressure accumulators (8, 11) are empty. Only residual pressure is stored in these accumulators.

The EBCM constantly monitors wheel speed sensor inputs for rapid deceleration. If the ABS becomes disabled for any reason, the driver will always have base brakes. The normally-open isolation valves (3, 5, 13) and normally-closed dump valves (6, 9, 12) will remain in these positions in order to allow normal fluid pressure to the wheels (7, 10).

ABS will not operate without wheel slip. The vehicle must be going at least 13 km/h (8 mph) in order to begin ABS operation.

ABS Braking Mode

The ABS will monitor the three-wheel speed sensors and control the hydraulic pressure changes at each wheel until the vehicle has come to a complete stop or until the driver has released the brake pedal. The system operates through the following process:

  1. Pressure isolation/maintain
  2. Pressure decrease
  3. Pressure increase
  4. Brake release (fluid return)

Sequence Of Events

  1. With the vehicle at 13 km/h (8 mph) or greater, the driver depresses the brake pedal.
  2. The wheel speed begins to decrease as the master cylinder (2) pressure and brake pressure increase.
  3. As the wheel speed continues to decrease from vehicle speed, the normally-open isolation valve (3, 5, 13) for the affected channel closes to stop additional pressure to the wheel. The master cylinder (2) pressure continues to increase as the driver depresses the pedal, but the wheel brake pressure is now limited to the ABS system pressure.
  4. When the EBCM determines that the wheel is about to lock-up, the normally-closed dump valve (6, 9, 12) opens. This bleeds off some of the pressure at the wheel cylinder (or caliper) in order to allow the wheel to return to a speed closer to the speed of the vehicle.
  5. The dump valve (6, 9, 12) is again closed and the isolation valve (3, 5, 13) remains closed in order to allow the wheel speed to completely recover from the lock-up.
  6. Once the vehicle has recovered from the lock-up tendency, the isolation valve (3, 5, 13) is momentarily pulsed open in order to allow the master cylinder (2) pressure and pump (4, 15) pressure to reach the brakes (7, 10). This controlled pressure rise continues until the wheel is at optimum brake output or until the brake pressure is brought up to master cylinder (2) output pressure. The ABS allows the brake fluid to flow to the wheel, build pressure and try to force another departure, repeating Step 3 through Step 6.
  7. The following paragraphs describe the various modes in detail.

Isolation Mode (Pressure Maintain)

Isolation will occur when the driver applies excessive braking for the given road conditions, causing the wheels to decelerate at a rate which exceeds the vehicle's capability.

If the information from the wheel speed sensors indicate excessive wheel deceleration (imminent lock-up), the first step in the antilock sequence is to isolate the brake pressure being applied by the driver.

The EBCM applies a voltage to the isolation coil in order to close the isolation valve (3, 5, 13). This will prevent any additional brake pressure applied by the driver from reaching the wheel. With the isolation valve (3, 5, 13) closed, further increases in brake pressure from the driver will be prohibited.

Dump Mode (Pressure Decrease)

Once the pressure is isolated, it must be reduced in order to get the wheels rolling once again. Reducing pressure is accomplished by dumping a portion of the brake fluid pressure into a low pressure accumulator (LPA) (8, 11).

The EBCM energizes the dump valve coil(s) in order to open the dump valve (6, 9, 12), allowing fluid from the wheels to be dumped into the LPA (8, 11). Very short activation pulses open and close the dump valve passageway in order to control this action. Brake pressure is lowered at the wheel and allows the affected wheel to begin rolling again.

The fluid taken from the wheels forces a spring back. The fluid is stored in the LPA (8, 11) at approximately 1034 kPa (150 psi). A portion of the fluid also primes the pump (4, 15) so it can begin building reapply pressure. The dump valves (6, 9, 12) are opened independently in order to control the deceleration of the wheel.

Reapply Mode (Pressure Increase)

The reapply sequence is initiated in order to obtain optimum braking at each wheel. The isolation valve (3, 5, 13) is momentarily pulsed open in order to allow the master cylinder (2) and pump (4, 15) pressure to reach the brakes (7, 10). This controlled pressure rise continues until the wheel is at optimum brake output or until the brake pressure is brought up to the master cylinder output pressure.

If more pressure is required, more fluid is drawn from the master cylinder (2) and applied to the brakes (7, 10). The driver will feel pedal pulsations or pedal drop. This is normal and expected when in the antilock mode.

As fluid is reapplied, the wheels begin to slow down at the optimum rate. If the wheels approach imminent lock-up again, the module will isolate, dump and reapply. These control cycles (isolation, dump and reapply) occur in millisecond intervals, allowing several cycles to occur each second.

Brake Release

At the end of the antilock stop, when the driver releases the brake pedal, the pump (4, 15) will remain on for a short time in order to help drain any fluid left in the LPA (8, 11). As the fluid drains back into the system, the spring force in the LPA (8, 11) pushes the piston to the home position. The isolation valve (3, 5, 13) is turned off and fluid returns through the isolation orifice.

Dynamic Rear Proportioning (DRP)

Dynamic Rear Proportioning is a control system that replaces the hydraulic proportioning function of the combination valve in the base brake system of vehicles with front/rear disk brakes. The combination valve remains in the circuit to assist DRP in vehicles with front disk/rear drum brakes. The DRP control system is part of the operating software in the EBCM. It utilizes active control with the existing ABS to regulate the vehicle's rear brake pressure. The resulting benefits are:

    • Optimized front/rear brake balance
    • Improved braking efficiency
    • Improved front to rear brake pad wear balance

DRP is active when the vehicle is decelerating above a programmed threshold and the rear wheels are at low levels of slip. This threshold is particular to each weight class of vehicle. DRP can not activate if any of the following conditions exist

    • Vehicle is in 4WD mode
    • BRAKE warning lamp is illuminated
    • Brake pedal not depressed, or brake switch closed
    • An ABS system malfunction critical to DRP operation is present
    • More than two ABS system malfunctions of different types are present

DRP operation is transparent to the driver. If the vehicle is braking under DRP control and the wheel speed sensors detect an ABS event, the ABS will take control over DRP until conditions warrant the return to normal braking/DRP operation. For further discussion of DRP malfunction modes, refer to Self-Diagnostics .

Tires and ABS

Correct tire size, proper inflation, accurate alignment and even wear are needed for good brake performance. These items are essential for proper ABS performance.

Spare Tire

Use of the spare tire supplied with the vehicle will not affect the performance of the system.

Replacement Tires

If the replacement tires are not the same size as the original tires, you must change the tire size calibration within the EBCM using a Scan Tool. Refer to Tire Size Calibration portion in Scan Tool Diagnostics . Failure to change the tire calibration when replacing the original tires with a different size tire can affect the performance of the ABS.