Removal Procedure
- Remove the oil pan, gasket, and filter. Refer to
Automatic Transmission Fluid and Filter Replacement
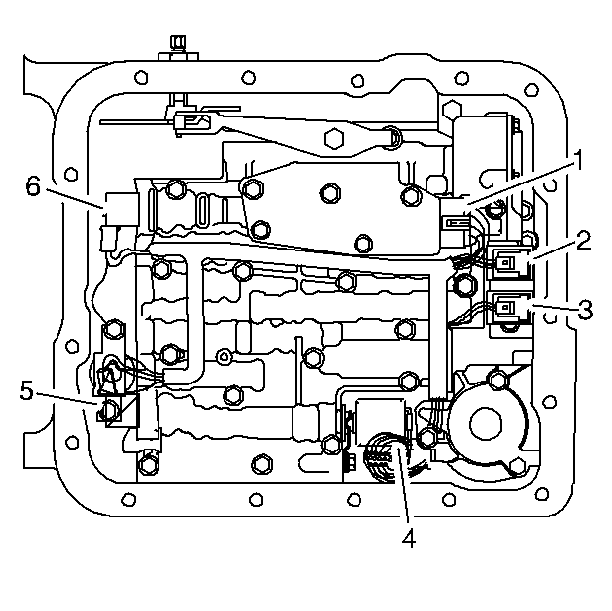
- Disconnect the electrical
connectors from the control valve body components.
The electrical connectors locations are referenced by callouts (1) through
(6).
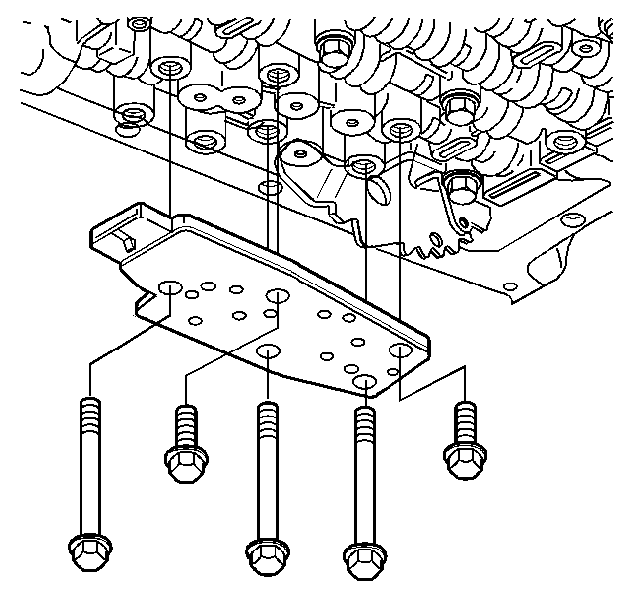
- Remove the bolts securing
the pressure switch to the control valve body.
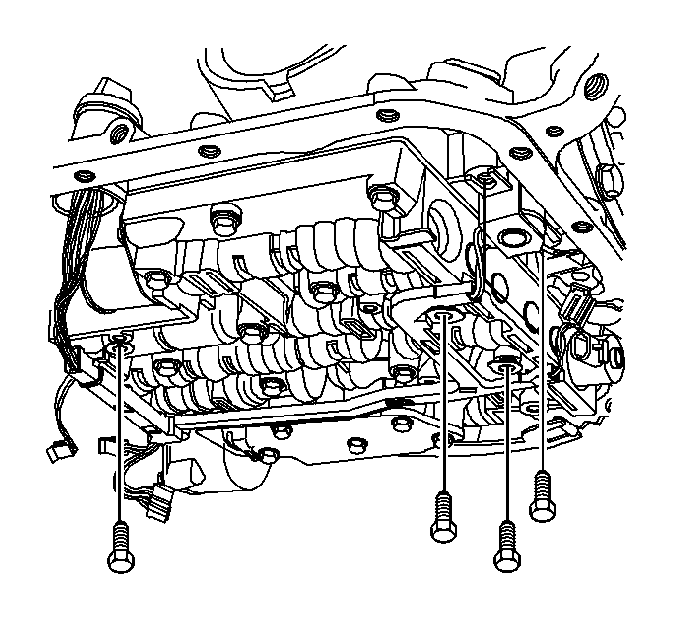
- Remove the torque converter
clutch solenoid bolts.
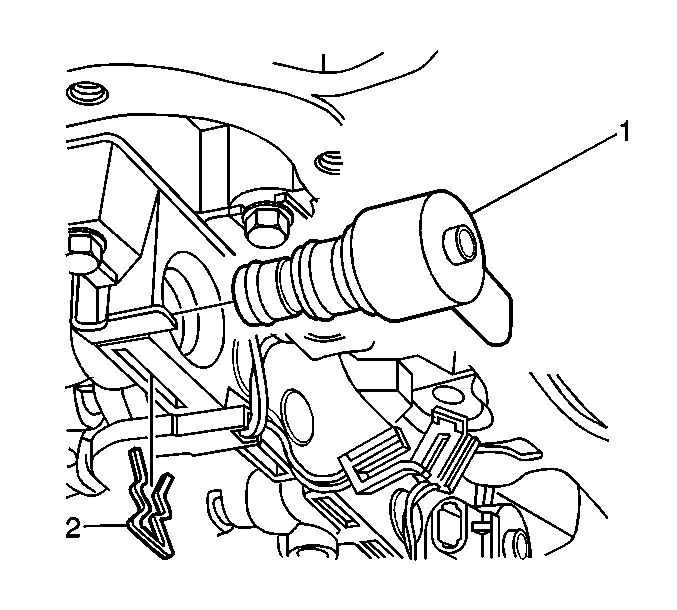
- Remove the retainer clip (2) and torque converter clutch solenoid (1).
- Remove the wiring harness bolts and let the wiring harness hang.
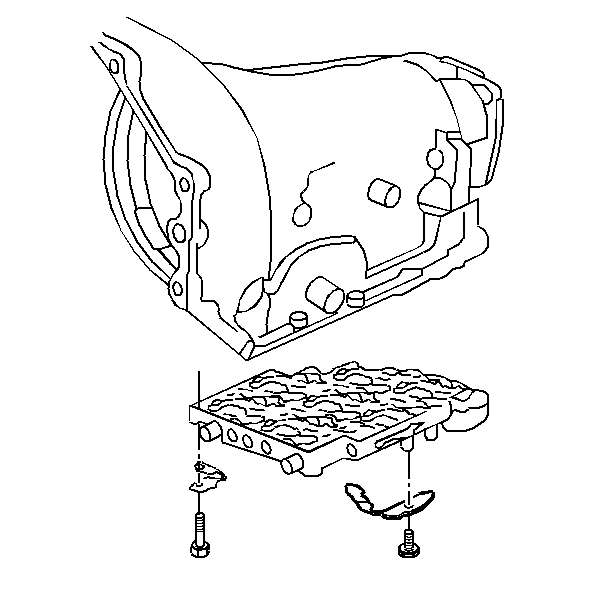
- Remove the manual shift
detent spring bolt.
- Remove the manual shift detent spring assembly.
- Remove the remaining control valve body bolts.
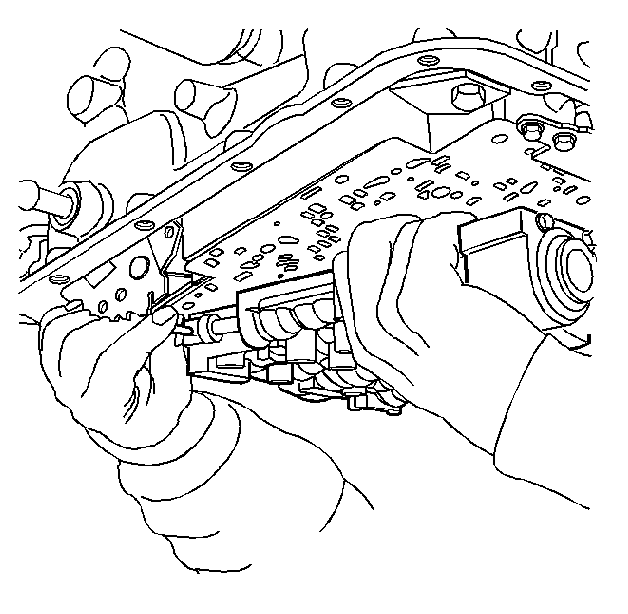
- Remove the manual valve
link and the control valve body from the transmission case.
- Remove the accumulator, spacer plate, and gaskets. Refer to
Accumulator Assembly, Spacer Plate, and Gaskets
Disassembly Procedure
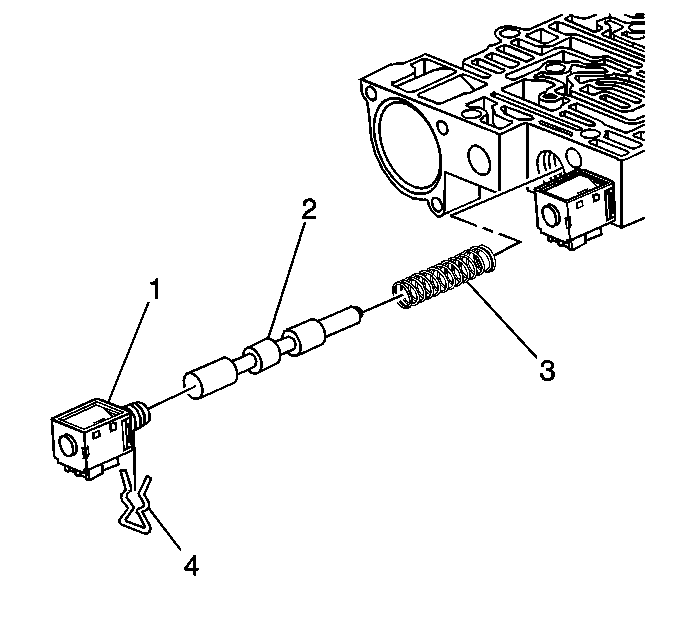
- Remove the solenoid retainer
(4) and the 1-2 shift solenoid (1).
- Remove the 1-2 shift valve (2) and the 1-2 shift valve spring
(3).
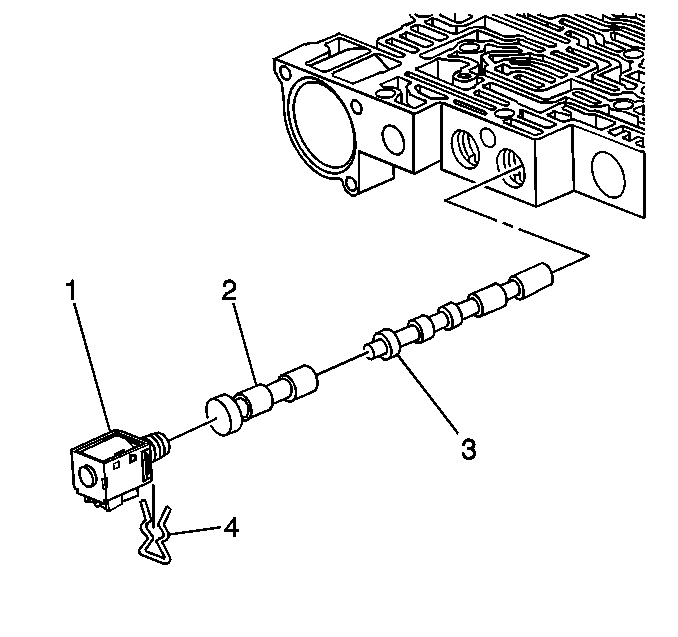
- Remove the solenoid retainer
(4) and the 2-3 shift solenoid (1).
- Remove the 2-3 shuttle valve (2) and the 2-3 shift valve (3).
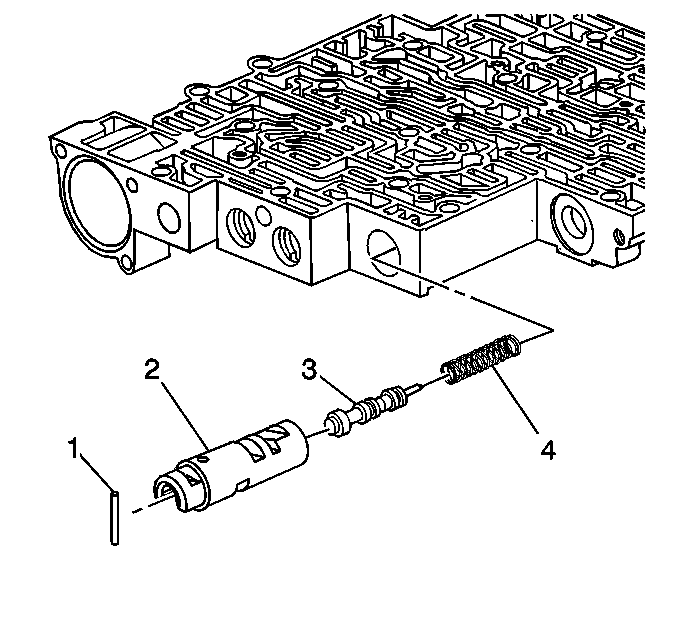
- Remove the coiled spring
pin (1).
- Remove the 1-2 accumulator valve sleeve (2).
- Remove the 1-2 accumulator valve (3) and the 1-2 accumulator valve
spring (4).
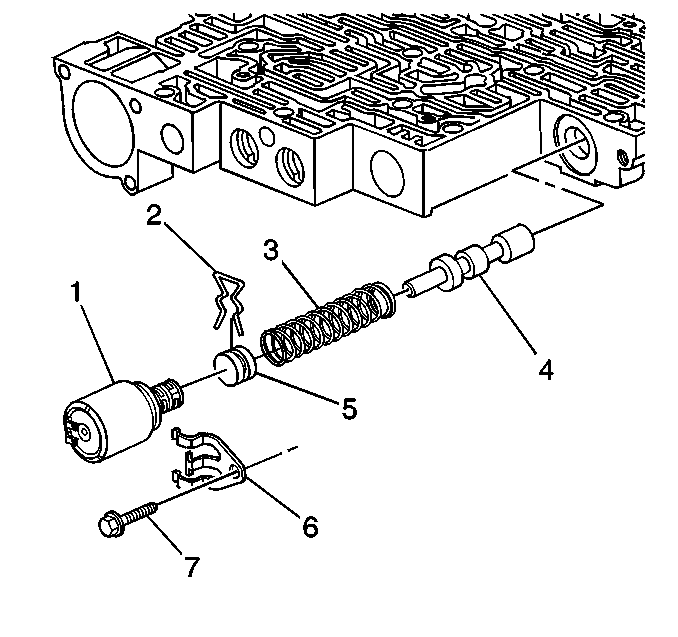
- Remove the solenoid retainer
bolt (7) and the solenoid retainer (6). Remove the pressure control solenoid
(1).
- Compress the actuator feed limit valve spring (3).
- Remove the bore plug retainer (2) and release the spring slowly.
- Remove the bore plug (5).
- Remove the actuator feed limit valve spring (3) and the actuator
feed limit valve (4).
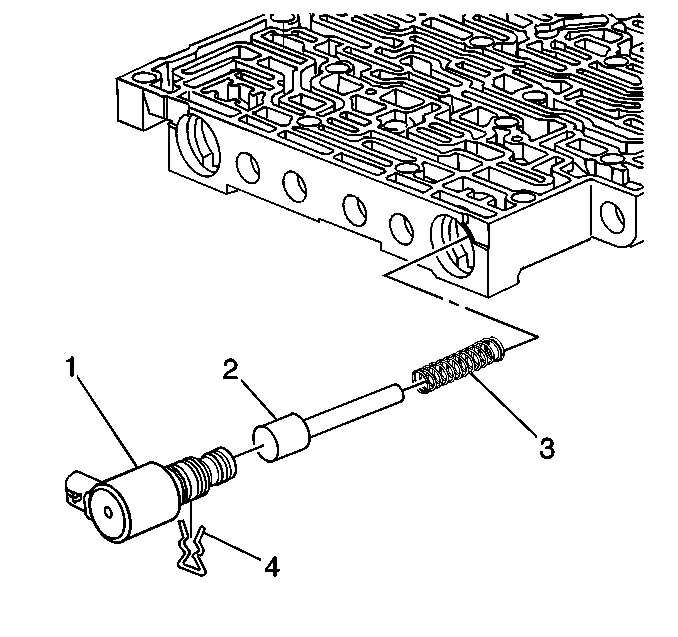
- Remove the solenoid retainer
(4) and the 3-2 control solenoid (1).
- Remove the 3-2 control valve (2) and the 3-2 control valve spring
(3).
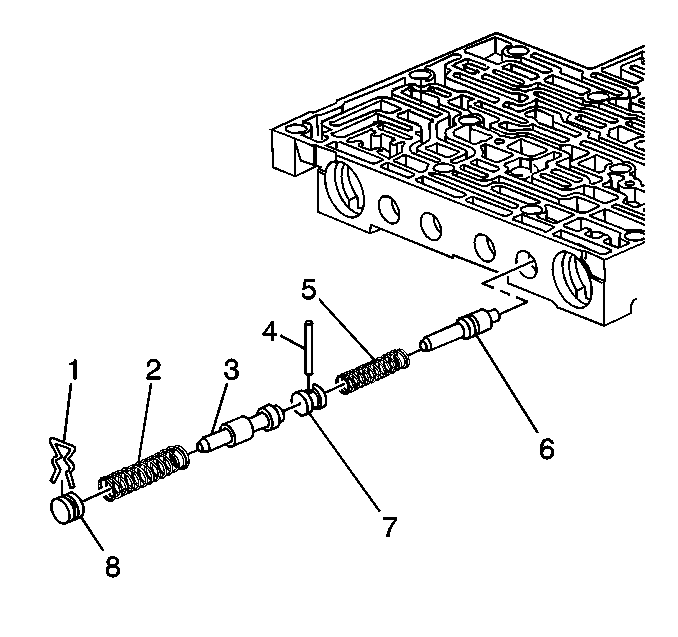
- Remove the bore plug retainer
(1) and the bore plug (8).
- Remove the 3-2 downshift valve spring (2) and the 3-2 downshift
valve (3).
- Remove the coiled spring pin (4) and the bore plug (7).
- Remove the reverse abuse valve spring (5) and the reverse abuse
valve (6).
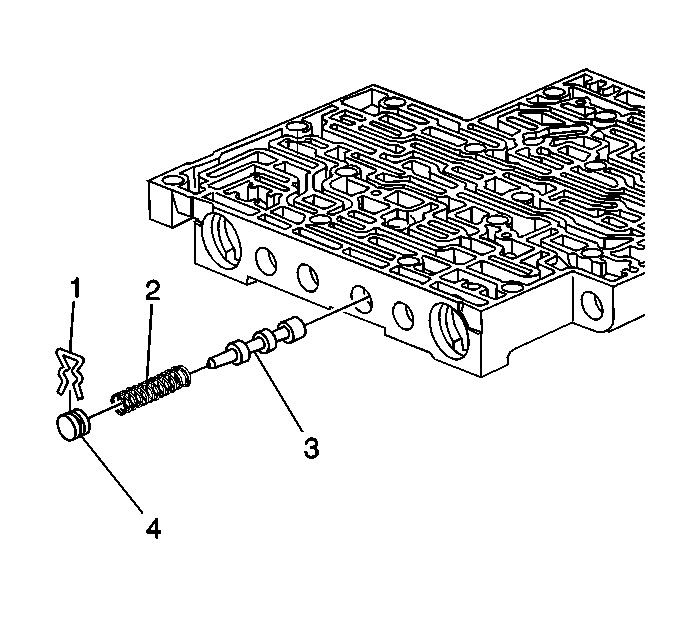
- Remove the bore plug retainer
(1) and the bore plug (4).
- Remove the 3-4 shift valve spring (2) and the 3-4 shift valve
(3).
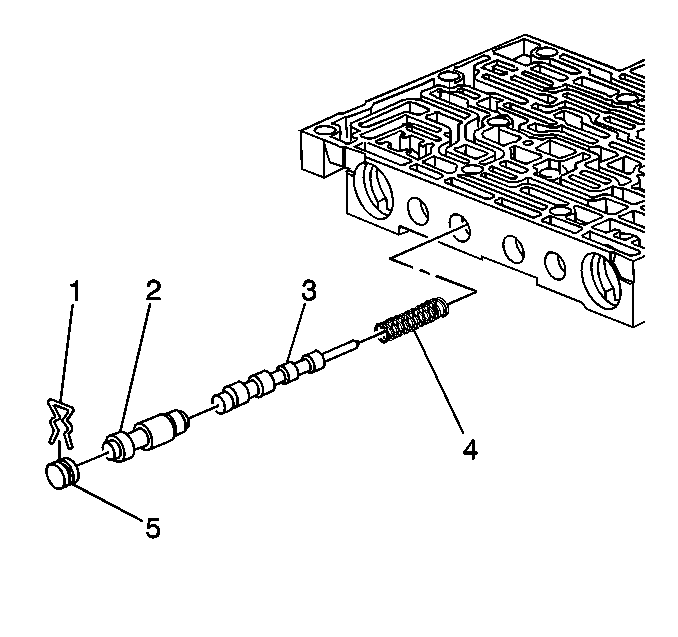
- Remove the bore plug retainer
(1) and the bore plug (5).
- Remove the 3-4 relay valve (2) and the 4-3 sequence valve (3)
and the 4-3 sequence valve spring (4).
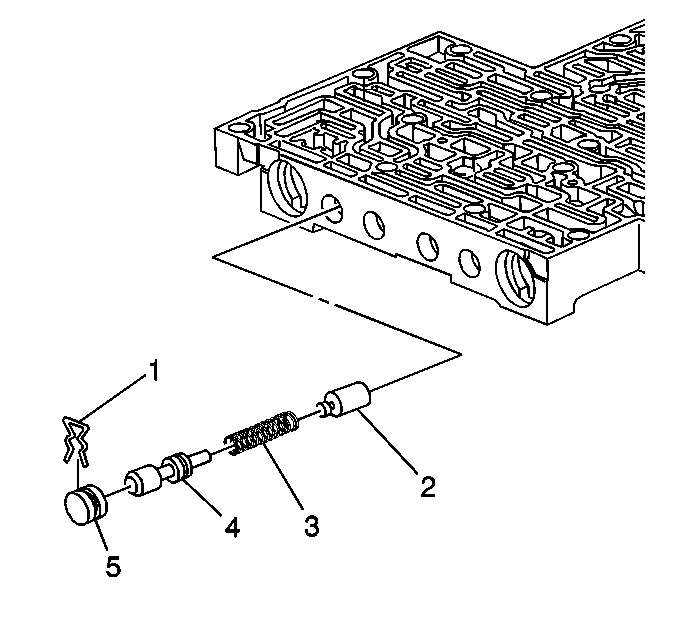
- Remove the bore plug retainer
(1) and the bore plug (5).
- Remove the regulator apply valve (4) and the regulator apply spring
(3) and the isolator valve (2).
Assembly Procedure

- Install the following
items:
| 1.1. | The isolator valve (2) |
| 1.2. | The regulator apply spring (3) |
| 1.3. | The regulator apply valve (4) |
| 1.5. | The bore plug retainer (1) |

Important: Lubricate all parts with Dexron®-lll automatic transmission fluid
before installation.
- Install the following items:
| 2.1. | The 4-3 sequence valve spring (4) |
| 2.2. | The 4-3 sequence valve (3) |
| 2.3. | The 3-4 relay valve (2) |
| 2.5. | The bore plug retainer (1) |

- Install the following
items:
| 3.1. | The 3-4 shift valve (3) |
| 3.2. | The 3-4 shift valve spring (2) |
| 3.4. | The bore plug retainer (1) |

- Install the following
items:
| 4.1. | The reverse abuse valve (6) |
| 4.2. | The reverse abuse valve spring (5) |
| 4.4. | The coiled spring pin (4) |
| 4.5. | The 3-2 downshift valve (3) |
| 4.6. | The 3-2 downshift valve spring (2) |
| 4.8. | The bore plug retainer (1) |

- Install the following
items:
| 5.1. | The 3-2 control valve spring (3) |
| 5.2. | The 3-2 control valve (2) |
| 5.3. | The 3-2 control solenoid (1) |
| 5.4. | The solenoid retainer (4) |

- Install the following
items:
| 6.1. | The actuator feed limit valve (4) |
| 6.2. | The actuator feed limit valve spring (3) |
| 6.4. | The bore plug retainer (2) |
| 6.5. | The pressure control solenoid (1) |
| 6.6. | The solenoid retainer (6) |
| 6.7. | The solenoid retainer bolt (7) |

- Install the following
items:
| 7.1. | The 1-2 accumulator valve spring (4) |
| 7.2. | The 1-2 accumulator valve (3) in the 1-2 accumulator valve sleeve
(2) |
| 7.3. | The 1-2 accumulator valve and sleeve assembly |
| 7.4. | The coiled spring pin (1) |

- Install the following
items:
| 8.1. | The 2-3 shift valve (3) |
| 8.2. | The 2-3 shuttle valve (2) |
| 8.3. | The 2-3 shift solenoid valve (1) |
| 8.4. | The solenoid retainer (4) |

- Install the following
items:
| 9.1. | The 1-2 shift valve spring (3) |
| 9.2. | The 1-2 shift valve (2) |
| 9.3. | The 1-2 shift solenoid valve (1) |
| 9.4. | The solenoid valve retainer (4) |
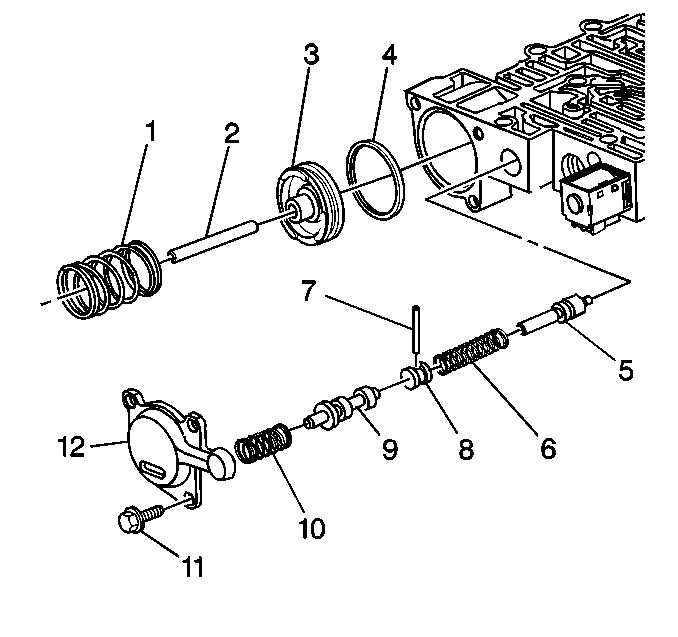
- Install the following
items:
| 10.1. | The forward abuse valve (5) |
| 10.2. | The forward abuse valve spring (6) |
| 10.4. | The coiled spring pin (7) |
| 10.5. | The low overrun valve (9) |
| 10.6. | The low overrun valve spring (10) |
- Install the following items:
| 11.1. | The forward accumulator oil seal (4) on the forward accumulator
piston (3) |
| 11.2. | The forward accumulator pin (2) |
| 11.3. | The forward accumulator piston (3) |
| 11.4. | The forward accumulator spring (1) |
| 11.5. | The forward accumulator cover (12) |
| 11.6. | The forward accumulator cover bolts (11) |
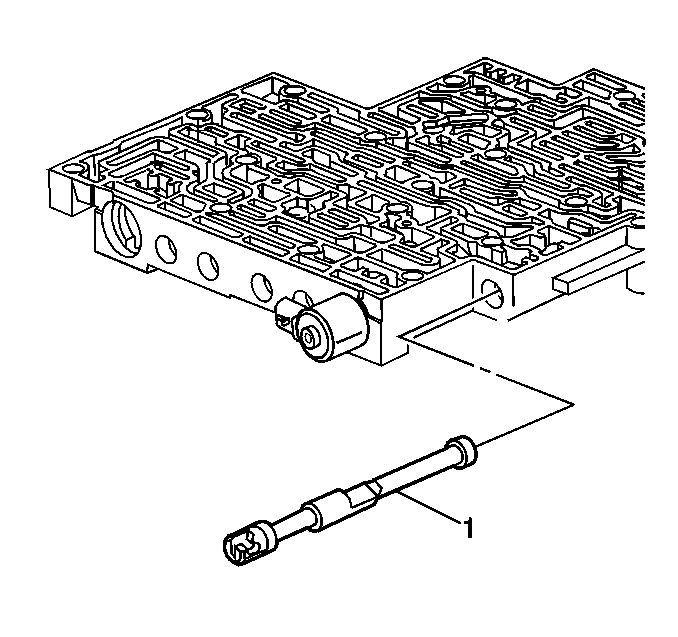
- Install the manual valve
(1).
Installation Procedure
- Install the accumulator, spacer plate, and gaskets. Refer to
Accumulator Assembly, Spacer Plate, and Gaskets

- Install the manual valve
link and the control valve body to the transmission case.
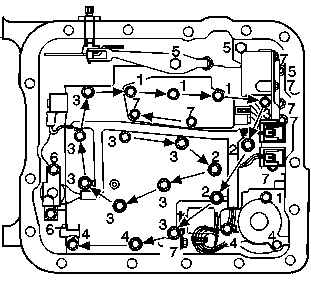
Notice: Use the correct fastener in the correct location. Replacement fasteners
must be the correct part number for that application. Fasteners requiring
replacement or fasteners requiring the use of thread locking compound or sealant
are identified in the service procedure. Do not use paints, lubricants, or
corrosion inhibitors on fasteners or fastener joint surfaces unless specified.
These coatings affect fastener torque and joint clamping force and may damage
the fastener. Use the correct tightening sequence and specifications when
installing fasteners in order to avoid damage to parts and systems.
- Install the remaining control valve body
bolts in sequence.
Tighten
Tighten the bolts to 11 N·m (8 lb ft).
- Install the manual shift detent spring assembly.
- Install the manual shift detent spring bolt.

- Install the torque converter clutch solenoid (1) and retainer clip (2).
- Install the wiring harness and bolts.
Tighten
Tighten the bolts to 11 N·m (8 lb ft).

- Install the torque converter
clutch solenoid bolts.
Tighten
Tighten the bolts to 11 N·m (8 lb ft).

- Install the bolts securing
the pressure switch to the control valve body.
Tighten
Tighten the bolts to 11 N·m (8 lb ft).
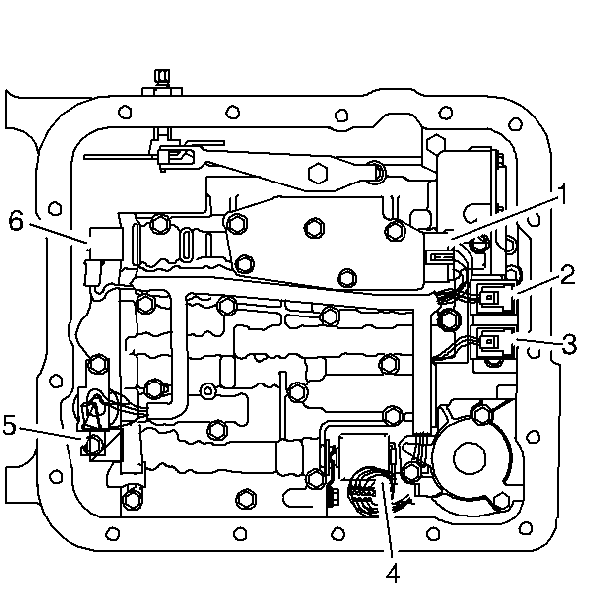
- Connect the electrical
connectors to the control valve body components.
The electrical connectors locations are referenced by callouts (1) through
(6).
- Install the filter, gasket, and oil pan . Refer to
Automatic Transmission Fluid and Filter Replacement


