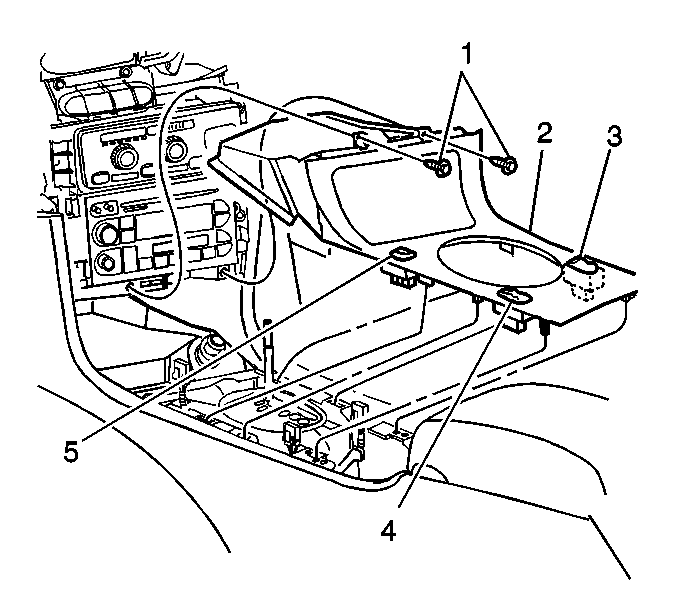
Removal Procedure
Notice: To prevent component damage, DO NOT use metal tools to remove the trim.
- Engage the parking brake.
- Block the vehicles wheels.
- Remove the center Instrument Panel (IP) trim plate. Refer to
Instrument Panel Center Trim Panel Replacement
.
- Place protective tape between the console vinyl trim and the console
trim plate.
- Remove the shift knob by pulling straight up. There are no clips,
pins or fasteners.

- Remove the console trim
plate screws (1).
- Between the rear edge of the console trim plate (2) and
the closed cup holder door, carefully insert a plastic trim tool. Insert the
plastic trim tool far enough to ensure it is behind the plastic substrate
of the trim plate.
- Pry upward in order to disengage the two rear retainer clips.
Important: DO NOT allow the SHARP edges of the trim to come in contact with the
soft vinyl trim on the console.
- Disengage the remaining retainer clips.
| 9.1. | 9.1 Use one hand to carefully push the left hand side of the console
away from the trim plate. |
| 9.2. | 9.2 Use the other hand to grasp the left hand side of the trim
plate through the chrome ring. |
| 9.3. | 9.3 Gently pull up the left side of the trim plate just far enough
to disengage the retainer clips. |
| 9.4. | 9.4 Repeat steps 9.1 -- 9.3 for the right hand side of the
trim. |
- Put the shift lever in third (3).
- Disconnect the electrical connectors.
- Remove the console trim plate. Avoid contact with the console
vinyl trim.
| 12.1. | 12.1 Grasp the top and bottom of the chrome ring on the console
trim plate with both hands and gently pull the trim plate assembly rearward
until the 2 upper attaching brackets are clear of the radio. |
| 12.2. | 12.2 Tip the trim plate up and pull the trim rearward until it
is clear of the instrument panel. |
- Remove the trim plate from the vehicle.
Installation Procedure

- Ensure the protective
tape is still in place.
Important: DO NOT allow the SHARP edges of the trim to come in contact with the
soft vinyl trim on the console.
- Position the trim plate to the console.
- Connect the electrical connectors.
- Engage the retainer clips.
| 4.1. | 4.1 Use one hand to carefully push the left hand side of the console
away from the trim plate. |
| 4.2. | 4.2 Use the other hand to grasp the left hand side of the trim
plate through the chrome ring. |
| 4.3. | 4.3 Align the retainer clips on the left side of the trim plate
to the openings in the console. |
| 4.4. | 4.4 Repeat steps 4.1 -- 4.3 for the right side. |
- Apply even downward pressure on the trim plate (2) to engage
the retaining clips. DO NOT USE FORCE!
Notice: Use the correct fastener in the correct location. Replacement fasteners
must be the correct part number for that application. Fasteners requiring
replacement or fasteners requiring the use of thread locking compound or sealant
are identified in the service procedure. Do not use paints, lubricants, or
corrosion inhibitors on fasteners or fastener joint surfaces unless specified.
These coatings affect fastener torque and joint clamping force and may damage
the fastener. Use the correct tightening sequence and specifications when
installing fasteners in order to avoid damage to parts and systems.
- Install the screws (1).
Tighten
Tighten the screws to 2 N·m (18 lb in).
- Install the center IP trim plate. Refer to
Instrument Panel Center Trim Panel Replacement
.
- Remove the protective tape.
- Install the shift lever knob.
- Shift the vehicle into park.
- Remove the blocks from the wheels.
- Disengage the parking brake.


