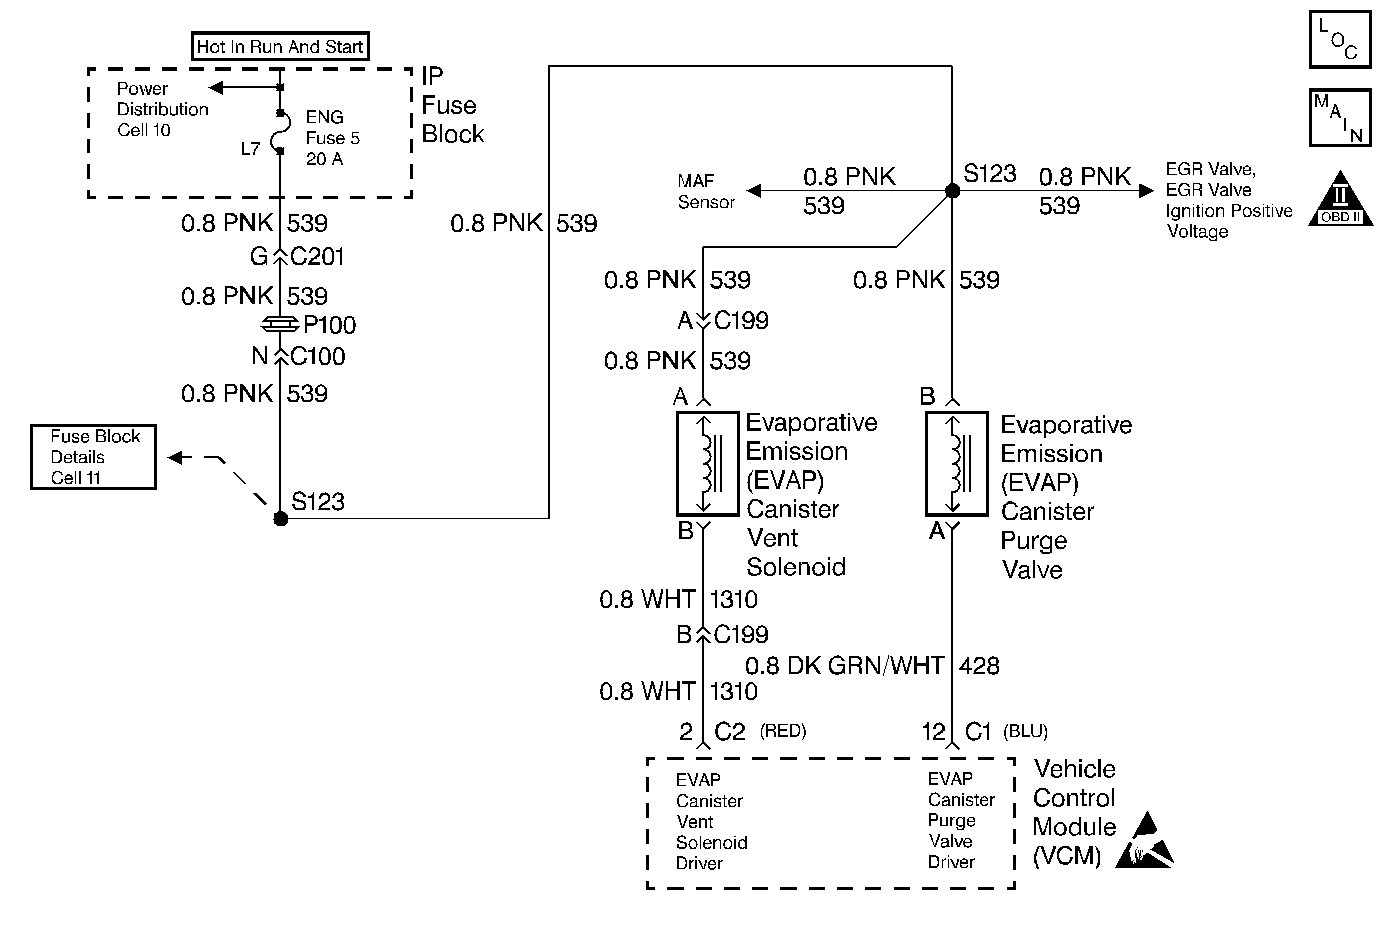
Circuit Description
The evaporative system includes the following components:
| • | The fuel tank |
| • | The EVAP vent solenoid |
| • | The fuel tank pressure sensor |
| • | The fuel pipes and hoses |
| • | The vapor lines |
| • | The fuel cap |
| • | The evaporative emission canister |
| • | The purge lines |
| • | The EVAP purge solenoid |
The following items detect a restricted or blocked EVAP canister vent path:
| • | Drawing a vacuum into the EVAP system |
| • | Turning OFF the EVAP vent solenoid and the EVAP purge solenoid (EVAP vent solenoid Open, the EVAP purge PWM 0%) |
| • | Monitoring the fuel tank vacuum sensor input |
With the EVAP vent solenoid open, any vacuum in the system should decrease quickly unless the vent path is blocked. The following conditions can cause a blockag:
| • | A malfunctioning EVAP vent solenoid (stuck closed) |
| • | A plugged kinked or pinched vent hose |
| • | A shorted EVAP vent solenoid driver circuit |
| • | A plugged evaporative canister. |
If any of these conditions are present, a DTC P0446 set. This DTC is a type A DTC.
Conditions for Setting the DTC
The following conditions will set the DTC:
| • | No MAP sensor DTCs |
| • | No TP sensor DTCs |
| • | No VSS DTCs |
| • | No HO2S DTCs |
| • | No ECT DTCs |
| • | The DTC P0125 not active |
| • | No IAT sensor DTCs |
| • | No Fuel Level DTCs |
| • | The ECT is greater than 3.75°C (38.75°F) but less than 30°C (86°F). |
| • | The IAT is greater than 3.75°C (38.75°F) but less than 30°C (86°F). |
| • | Start up ECT is not more than 8.25°C (46.85°F) greater than the start up IAT. |
| • | Start up IAT is not more than 1.5°C (34.7°F) greater than the start up ECT. |
| • | The Fuel Level is greater than 10% and 85%. |
| • | The Baro is greater than 72.5 kPa. |
| • | The System Voltage is greater than 10 volts but less than 17 volts.. |
| • | Excess vacuum present in the EVAP system. |
Action Taken When the DTC Sets
| • | The VCM illuminates the MIL during the first key cycle in which the DTC sets. |
| • | The VCM stores the conditions which were present when the DTC sets as a Freeze Frame and Fail Records data. |
Conditions for Clearing the MIL/DTC
The following conditions will clear the DTC:
| • | The VCM turns the MIL OFF on the third consecutive trip cycle during which the diagnostic has been run and the fault condition is no longer present |
| • | A history DTC clears after 40 consecutive warm-up cycles have occurred without a fault |
| • | The scan tool Clear Info function or disconnecting the VCM battery feed can clear the DTC |
Diagnostic Aids
Check for the following conditions:
| • | A poor connection at the VCM: Inspect the harness connectors for the following conditions: |
| - | Backed out terminals |
| - | Improper mating |
| - | Broken locks |
| - | Improperly formed or damaged terminals |
| - | Poor terminal to wire connection. |
| • | A damaged harness: Inspect the wiring harness to the EVAP vent solenoid EVAP purge solenoid and the fuel tank pressure sensor for an intermittent open or short circuit. |
| • | A kinked, pinched or plugged vent hose. Verify that the vent hose between the canister and the EVAP vent solenoid is not restricted. |
Refer to Carbon Particle Removal from EVAP System before starting repairs.
Reviewing the Fail Records vehicle mileage since the diagnostic test last failed may help determine how often the condition that caused the DTC to be set occurs. This may assist in diagnosing the condition.
Test Description
The numbers below refer to the step numbers in the diagnostic table.
-
This step checks the fuel tank pressure sensor at ambient pressure. The fuel tank pressure sensor is zeroed at every key on to compensate for changes in atmospheric pressure.
-
This step verifies that the fuel tank pressure accurately reacts to EVAP system pressure changes.
-
Checks for a blocked EVAP canister.
Step | Action | Value(s) | Yes | No |
|---|---|---|---|---|
1 |
Important: Before clearing the DTCs, use the scan tool to record the Freeze Frame and the Failure Records for reference. This data will be lost when the Clear Info function is used. Was the Powertrain On-Board Diagnostic (OBD) System Check performed? | -- | ||
Is the Fuel Tank Pressure at the specified value? | 0 in. H2O ±1 in. H2O | |||
|
Important: Before continuing with the diagnosis, zero the EVAP Pressure and Vacuum gauges on the Enhanced EVAP Pressure Purge Diagnostic Cart J 41413. Refer to the tool operating instructions.
Does the scan tool indicate the fuel tank pressure at the specified value? | 5 in. H2O 5 in. H2O ±1 in. H2O | |||
4 |
Does the EVAP pressure return to the specified value within 10 seconds? | 5 in. H2O 0 in. H2O ±1 in. H2O | Refer to Diagnostic Aids | |
Does the vacuum remain below the specified value? | 30 in. H2O | |||
6 |
Was a problem found? | -- | ||
7 | Replace the EVAP vent valve. Refer to Diagnostic Aids. Refer to EVAP Vent Valve Replacement . Is the action complete? | -- | -- | |
8 | Replace EVAP Canister. Refer to Diagnostic Aids. Refer to EVAP Canister Replacement . Is the action complete? | -- | ||
9 |
Does the EVAP pressure return to the specified value within 5 seconds? | 5 in. H2O 0 in. H2O | System OK |
