General Water Leak Guide

| Subject: | General Waterleak Guide |
| Models: | 1996-2002 Chevrolet S-10, Blazer |
| 1996-2002 GMC Sonoma, Jimmy |
| 1996-2001 Oldsmobile Bravada |
The conditions below are prioritized in order of most common leak areas.
When watertesting at the front of the vehicle, run water down the center of the windshield to fill the plenum, as well as the corners of the windshield for hinge pillar entry.
Leak Area | Condition |
|---|---|
Right front floor wet | 1 |
Right or left floor wet under carpet | 2 |
Front or rear floor wet under carpet | 3 |
Water coming out of kick pad | 4 |
Windshield leak | 5 |
"A" Pillar leak | 6 |
Third door waterleak | 7 |
Carpet wet in the rear | 8 |
Carpet wet in the rear and or in the corners at the base of the "C" pillar | 9 |
Rear floor wet | 10 |
Rear floor wet (1/4 Window Pickup) | 11 |
Water at the base of the "D" pillar. | 12 |
Condition 1
Right front floor wet.
Cause A
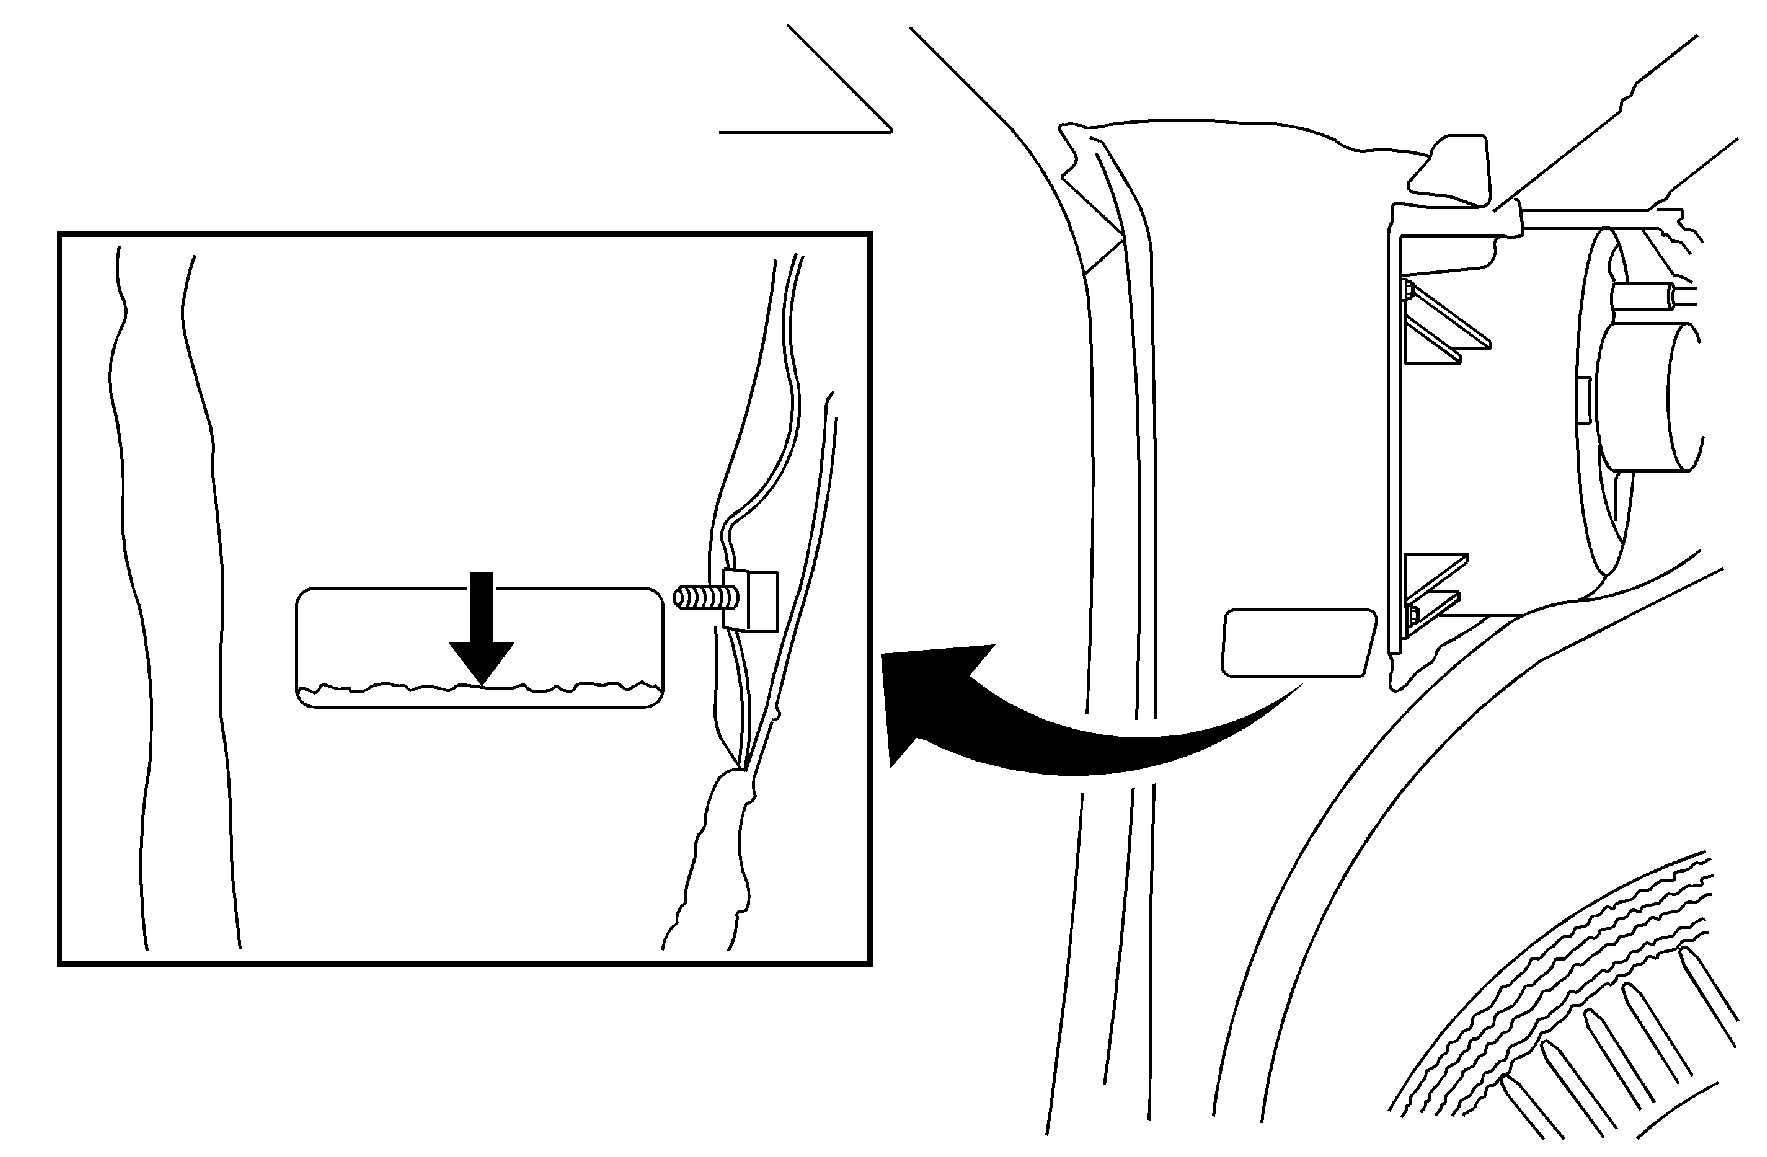
The right or left plenum drain may be plugged or the drain has excess sealer that acts as a dam. (Right side shown, left side typical). Refer to the illustration above.
Cause B
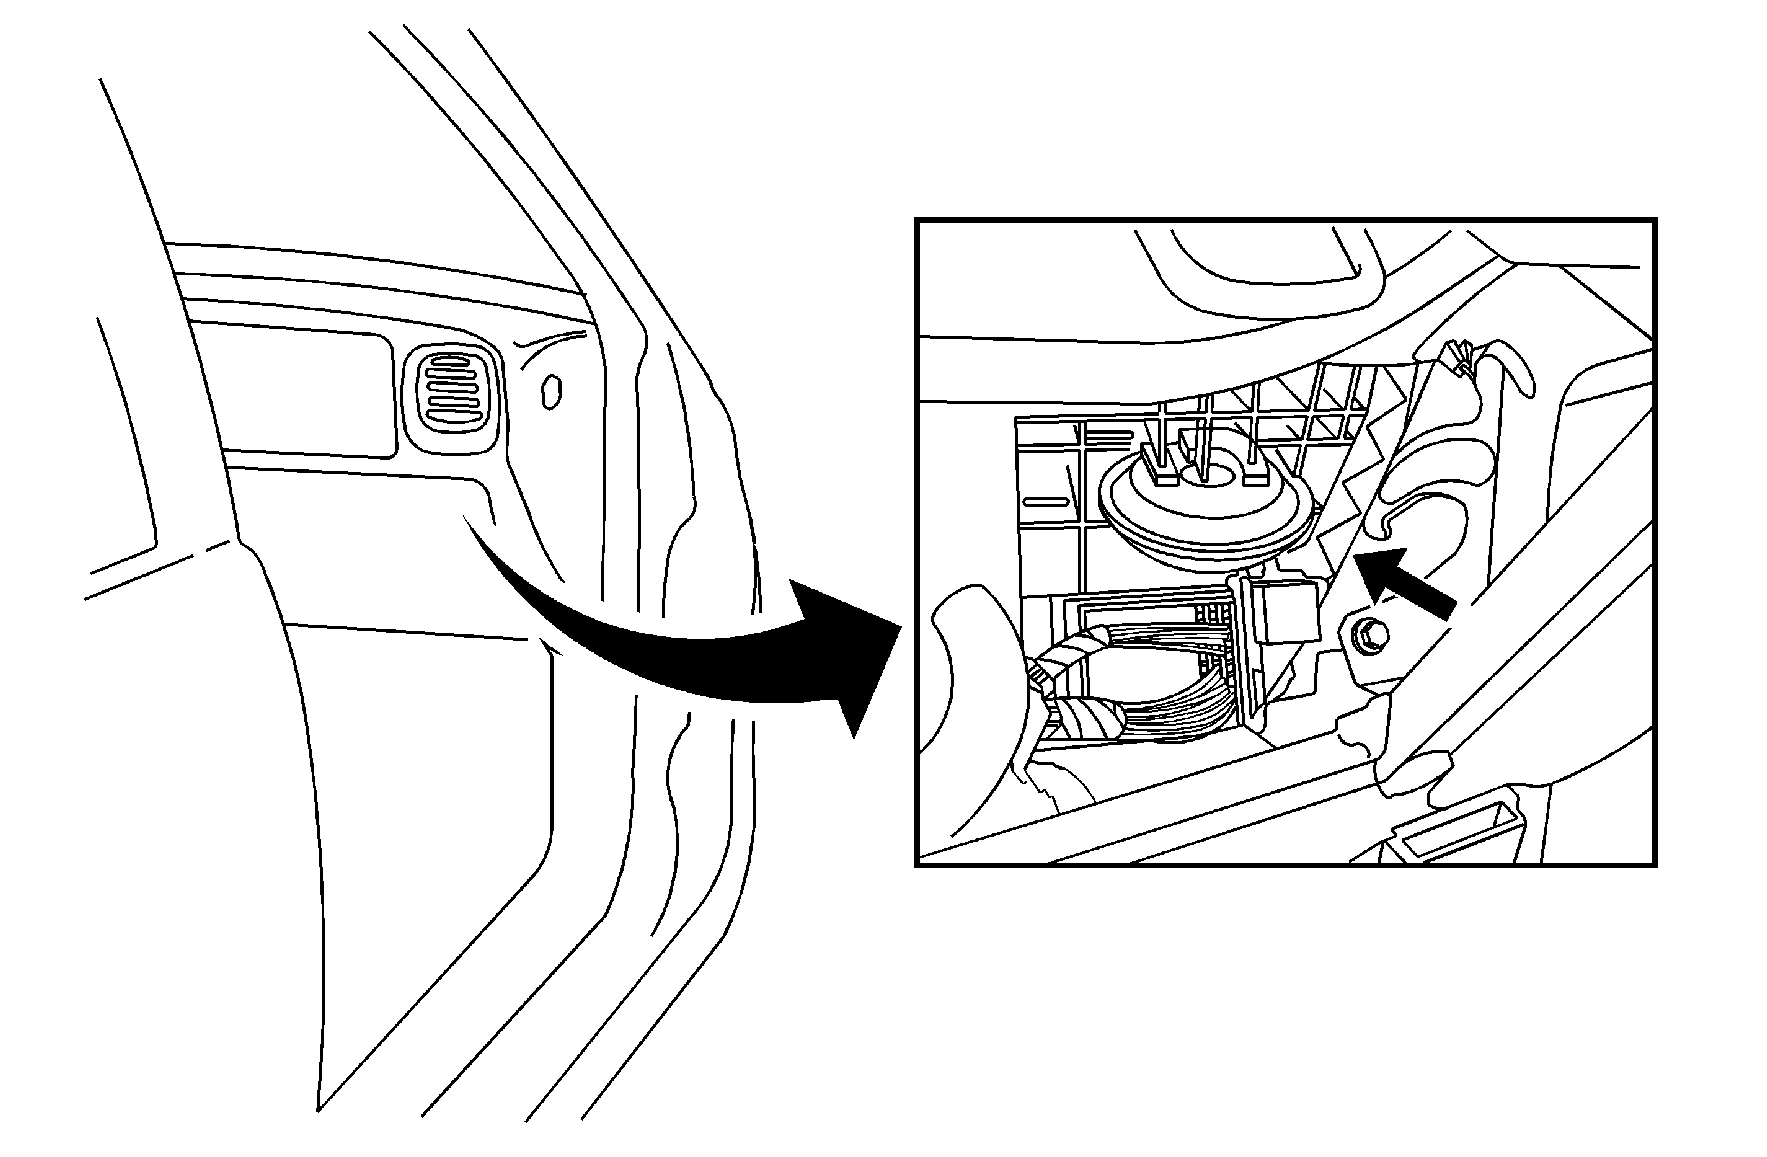
- Water may enter through the air box if the air box is loose. Refer to the illustration above.
- The air box may have excess sealer causing interference and not allowing the air box to seat properly.
- Max A/C is turned on through a car wash or heavy rain.
Correction A
Remove the obstruction or trim away excess sealer leaving no higher than 6.35 mm (1/4 in) to the bottom edge of the drain.
Correction B
- If the air box is loose, tighten the lower right fastener first, then the other fasteners in a clockwise order (lower right, lower left, upper left, upper right) to 10 N·m (89 lb in).
- If the air box cannot be seated properly against the front of dash due to an interference from the sealer, cut away excess sealer in order to allow a proper seal.
- Max A/C opens the recirculation/air box door (upward) in the air box. Water can pool on the door and gain entry to the front passenger compartment. Excess water can enter through the cowl grill fasteners and drop onto an open air box door, or splash onto the door from the plenum. It is sometimes possible to minimize the amount of water gaining access to the door by applying thumb grade sealer to the right most cowl grille fastener and the upper fender bolt holes before securing.
Condition 2
Right or left front floor wet under carpet.
Cause A
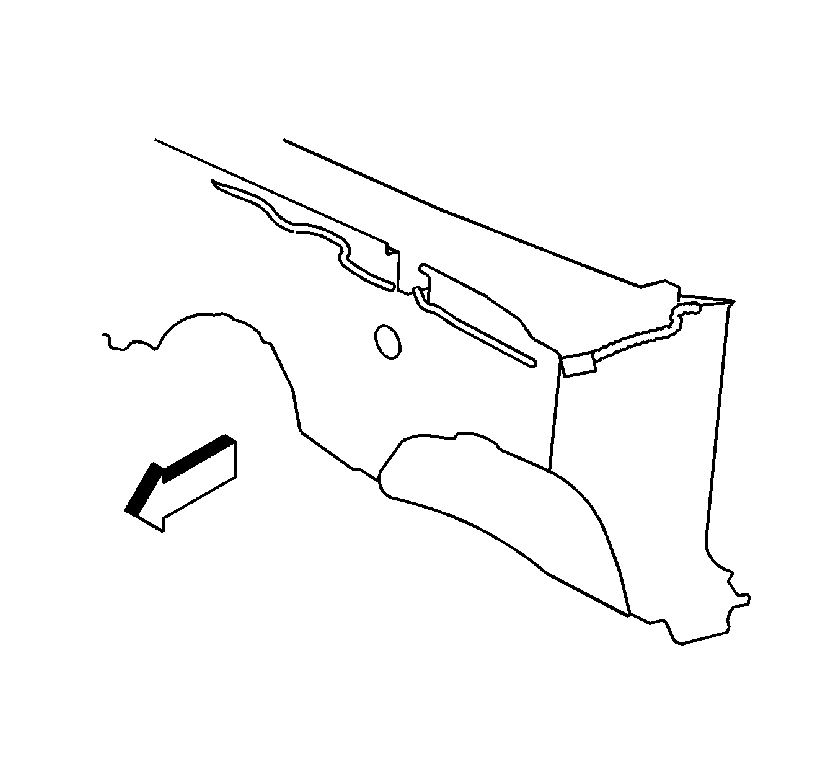
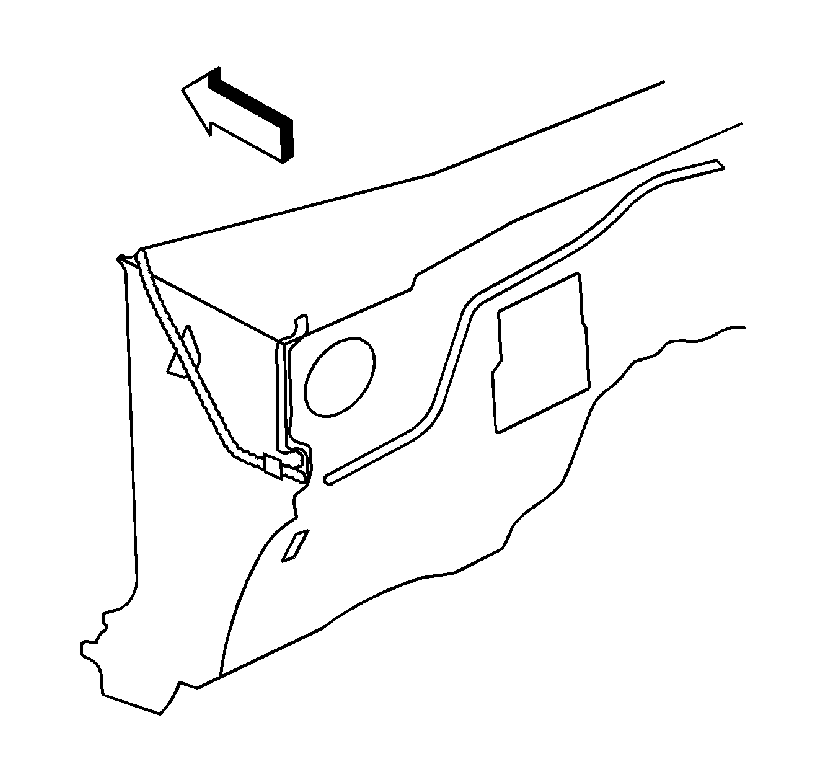
The inside of the plenum along the hinge pillar may have a void in the sealer. Refer to the illustration above.
Cause B
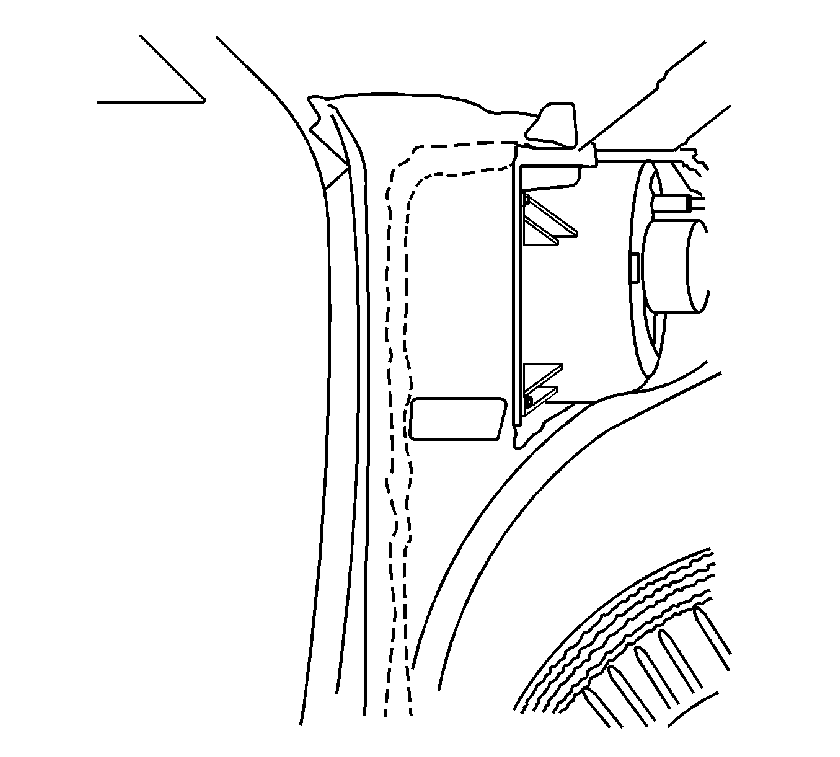
Inspect for voids outside the plenum along the hinge pillar. Refer to the illustration above.
Correction
Clean the area with one of the cleaners listed below and seal the area with one of the sealers listed below.
Condition 3
Front or rear floor wet under carpet.
Cause A
- Make sure the primary door weatherstrip is properly seated (especially in the corners) and not warped or damaged.
- Excess sealer to the primary seal mounting flange may prevent the seal from seating all the way.
Cause B
The front or rear door water deflector may not be seated properly to the door frame.
Correction A
- Seat the seal to the flange.
- Remove the seal and remove the excess sealer from the mounting flange.
- If you have verified the above and water is still entering the vehicle in this area, the outer flap of the weatherstrip can be trimmed at the butt joint to allow water to exit rather than enter the vehicle. Refer to the illustration above.
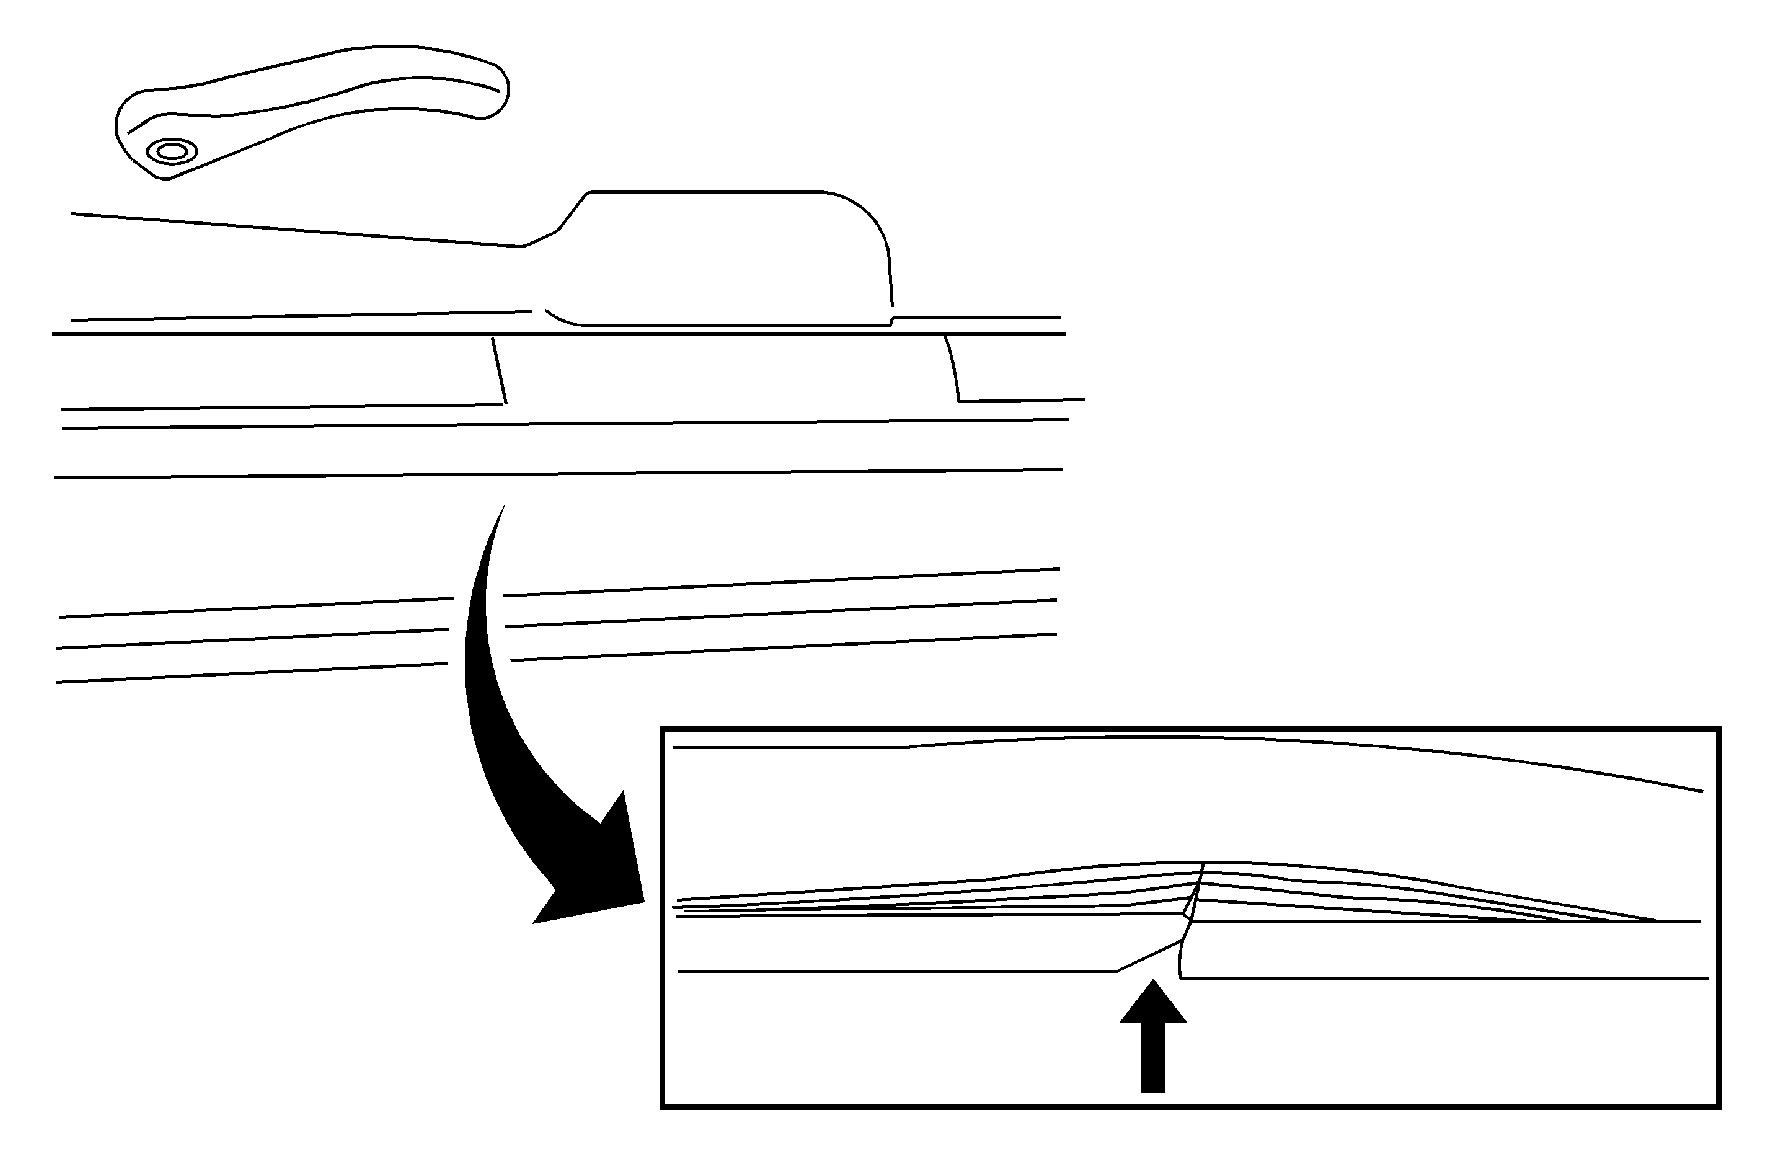
Important: Once a weatherstrip has been improperly seated, it is sometimes necessary to completely remove, reinstall or replace the weatherstrip.
Correction B
- Clean the door surface (around the perimeter of the water deflector) with one of the cleaners listed below, or equivalent.
- Using a 51 mm (2 in) wallpaper roller, roll out the butyl adhesive. Start at the bottom center and work outboard up the right and left sides.
Important: The door surface must be at room temperature or the adhesive will not stick.
A 51 mm (2 in) roller may be purchased at your local hardware or wallpaper store.
Condition 4
Water coming out of lower kick pad.
Cause
The door wire harness grommet may not be seated to the "A" pillar.
Correction
Make sure the grommet is fully seated to the "A" pillar.
Condition 5
Windshield leak.
Cause
There may be a void in the urethane sealer.
Correction
- Use compressed air and soap and water to determine whether the windshield is leaking.
- Remove and reseal the windshield.
Condition 6
"A" pillar leaks.
Cause
Verify that the sunroof drain hole is not plugged, and that the drain hose is correctly routed through the "A" pillar.
Correction
If the drain hole is not plugged, and the drain hose is correctly routed, inspect the primary seal for gaps, warping or disfigurement.
Condition 7
Third door waterleak to the primary seal.
Cause
Third door waterleaks are generally caused by insufficient compression at the top of the door or by an improperly seated third door weatherstrip.
Correction A
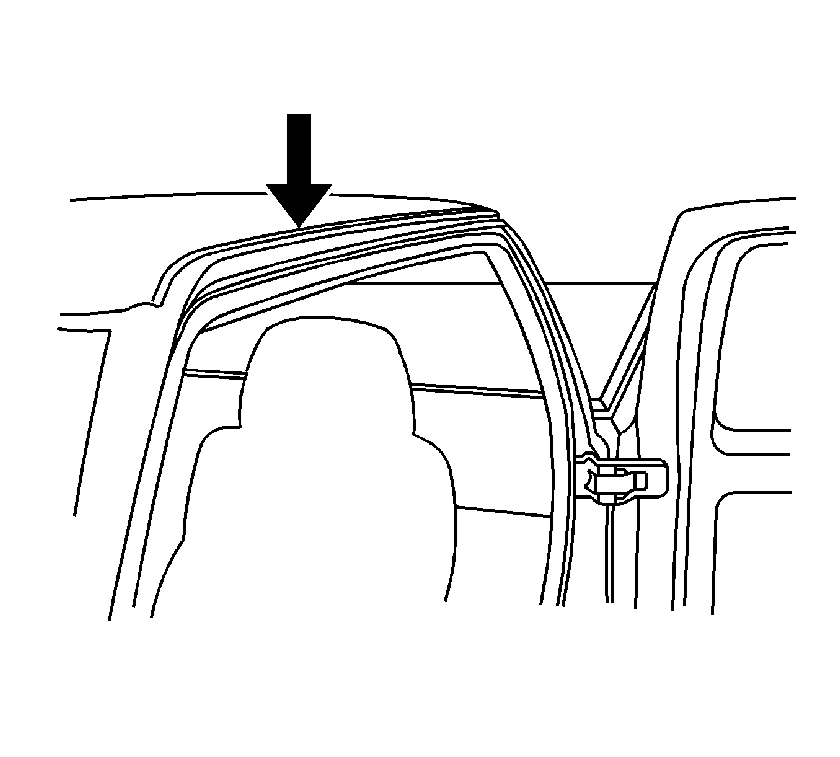
Repair insufficient compression by adding an additional piece of itch tape behind the secondary weatherstrip. Refer to the illustration above. A double thickness is supplied at the factory in this location. Adding one more thickness will stop some leaks. If adding itch tape does not stop the leak, bend the top of the door slightly so that it contacts the secondary seal.
Correction B
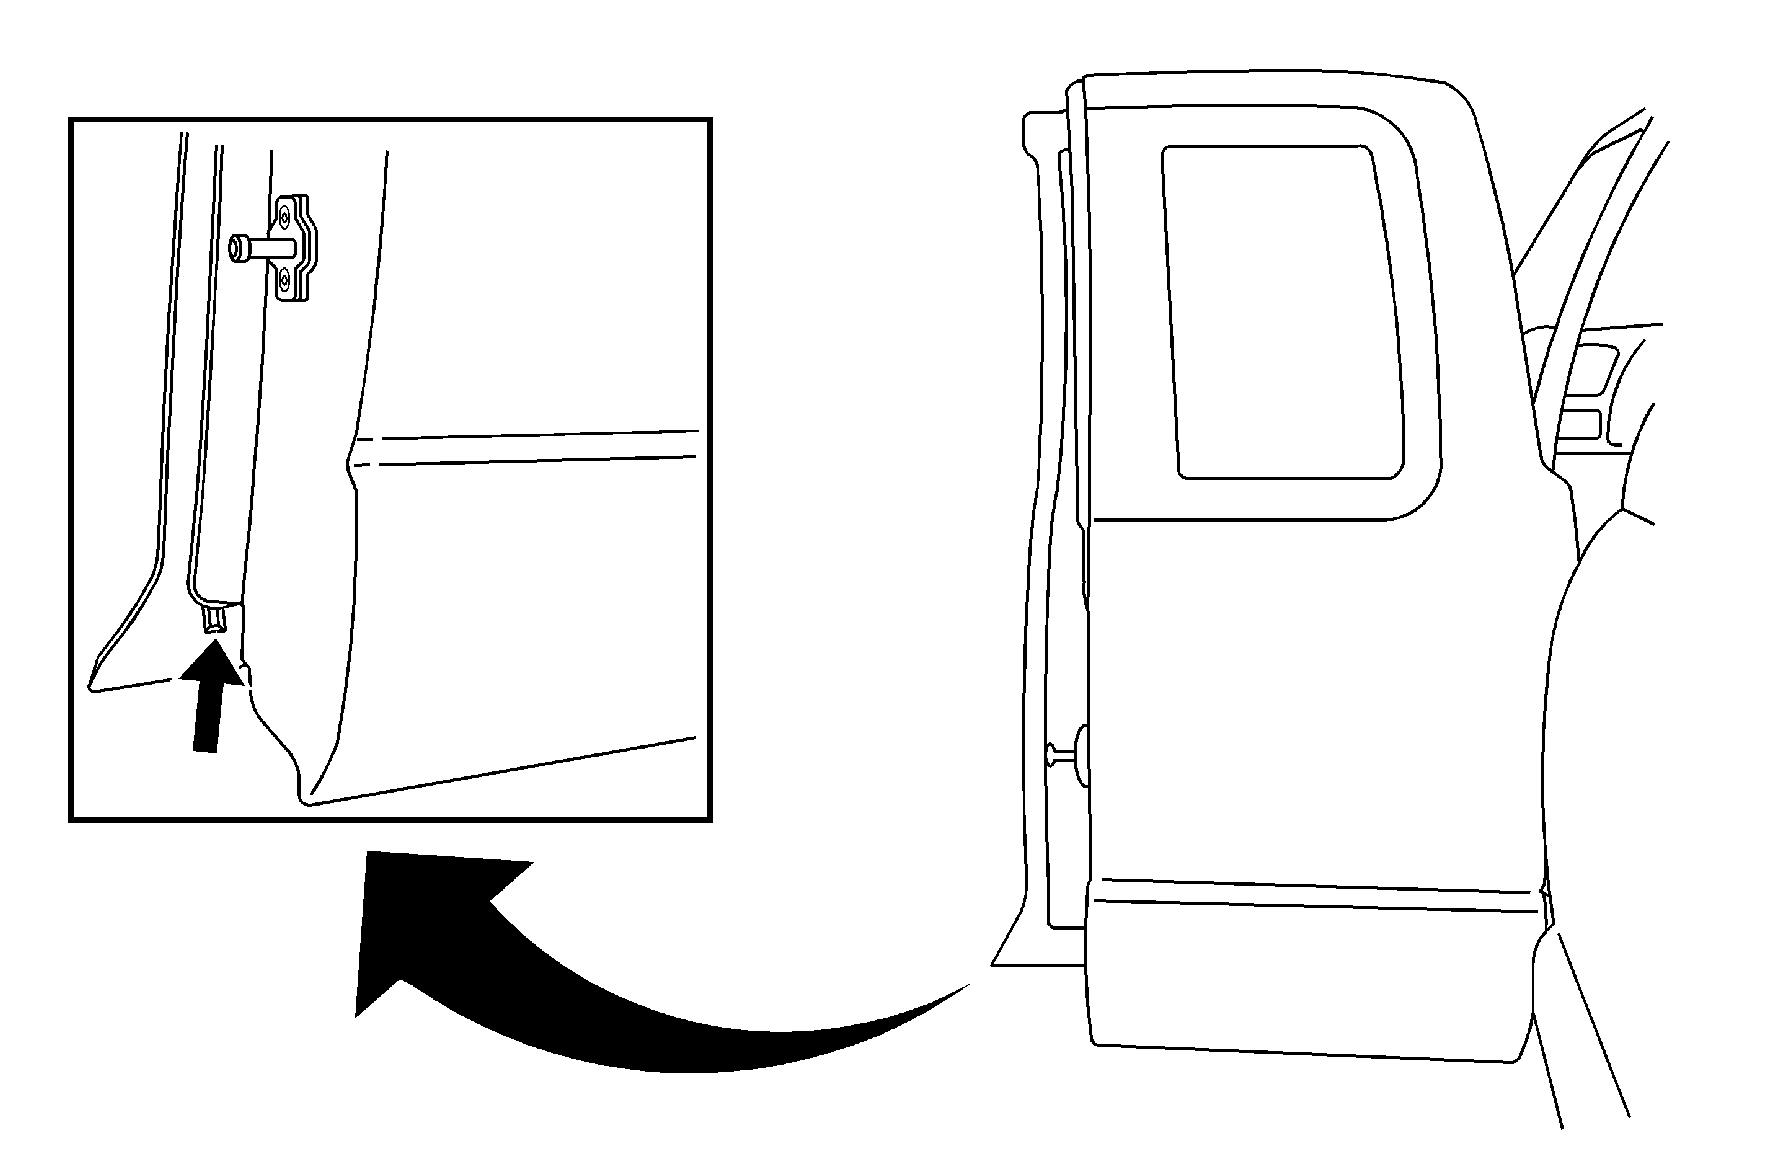
Third door weatherstrip related leaks are caused by the bottom push pin not being seated (refer to the illustration above), or by a gap anywhere along the vertical surface of the seal. If the bottom pin is seated, remove the seal and reinstall using the following sequence.
| • | Seat the upper weatherstrip pin. |
| • | Seat the lower weatherstrip pin. |
| • | Seat the vertical portion of the weatherstrip onto the third door flange. Seating the vertical portion of the seal before installing the bottom pin will allow the seal to stretch, which causes a gap just above the bottom pin. |
Condition 8
Carpet wet in the rear.
Cause
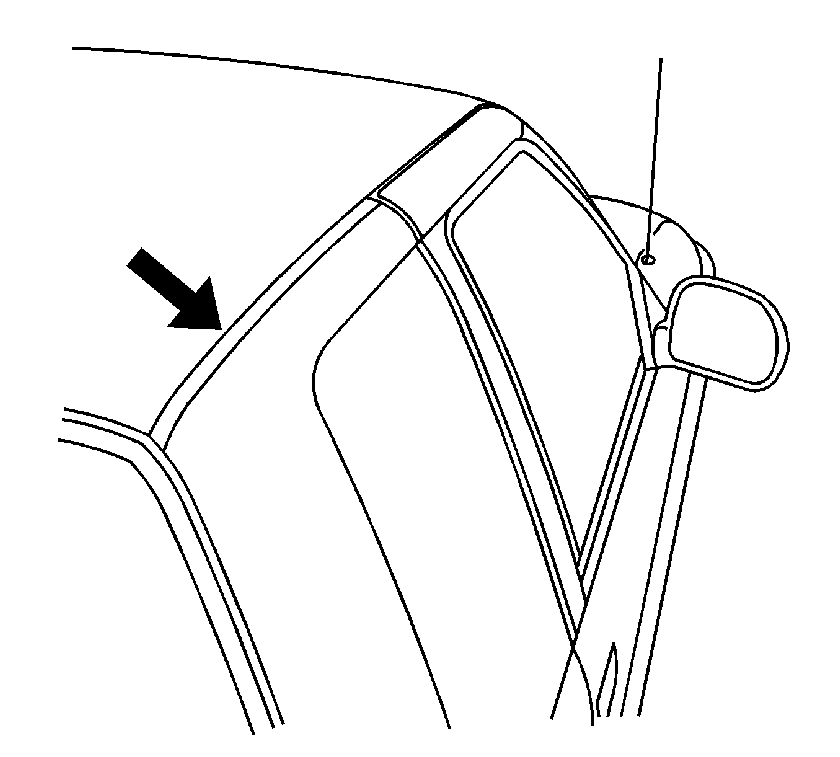
Sealer under the roof molding may have a void in it. Refer to the illustration above.
Correction
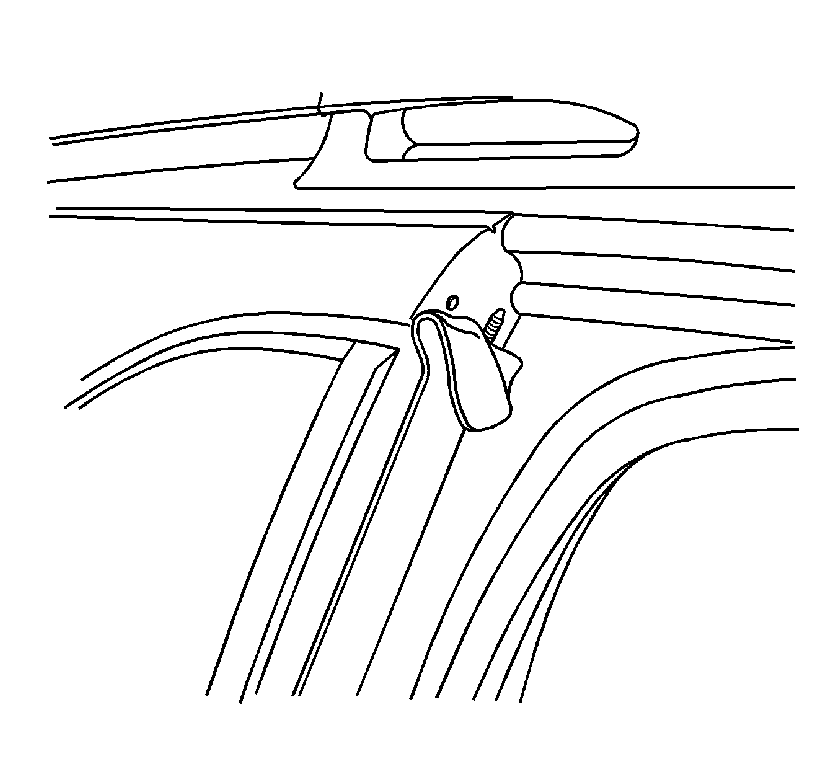
Test for a leak before removing the roof ditch molding. For pickups, remove the trim and insert air into the inside "C" pillar corner while applying soapy water to the suspected area of the roof. Dry and seal as necessary. For utilities, test for a void using air forced from inside the vehicle while spraying soapy water along roof seam. Air can be forced up the "D" pillar behind the trim panel, or through the top weatherstrip attachment hole in the "B" pillar for two-door utilities and behind the trim on "C" pillar for four-door utilities. Refer to the illustration above. Clean the area with one of the cleaners listed below and seal the area with one of the sealers listed below.
Condition 9
Carpet wet in the rear and or in the corners at the base of the "C" pillar.
Cause
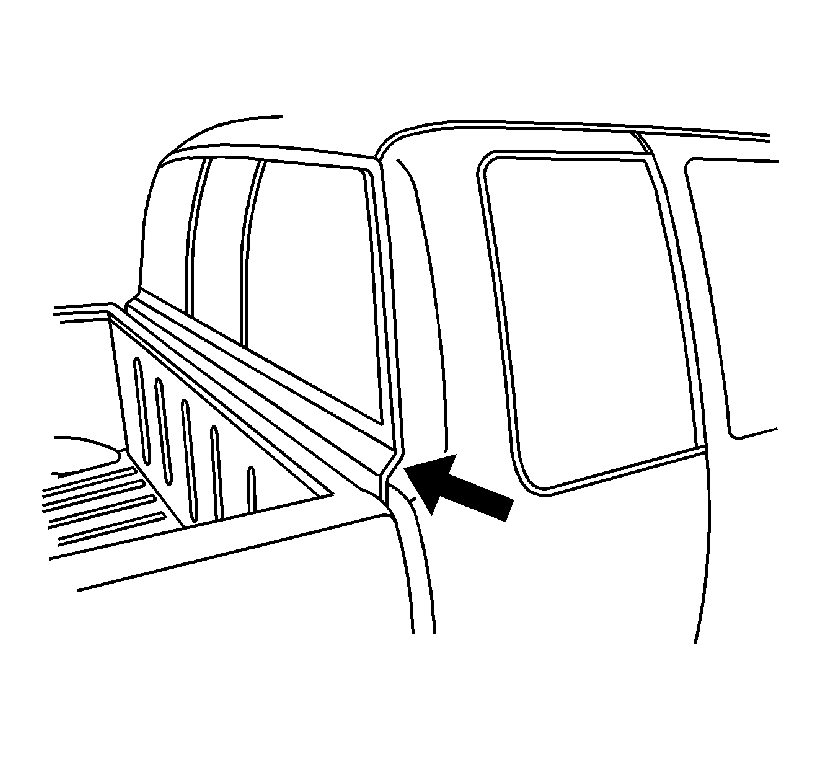
There may be a void in the body seam below the window. Refer to the arrow in the illustration.
Correction
Clean, dry and reseal with one of the sealers listed below.
Condition 10
Rear floor wet.
Cause A
There may be a void in the roof seam sealer.
Cause B
There may be a void in the urethane around the back glass (Pickup).
Cause C
The vent window may have a bent flange or it may be mispositioned.
Correction A
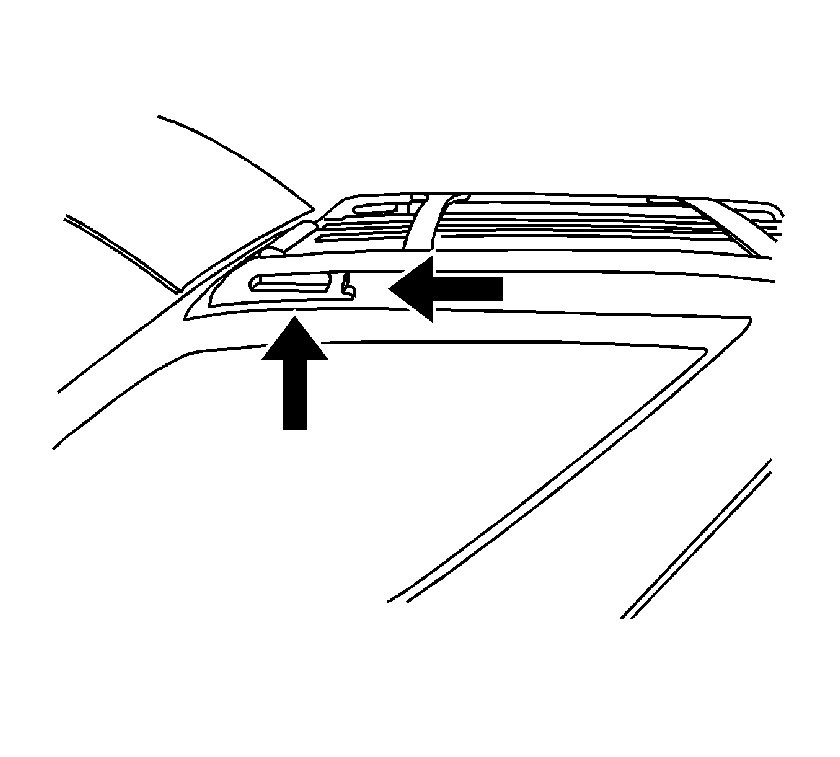
For utilities, test for a void using air forced from inside the vehicle while spraying soapy water along the roof seam. Air can be forced up the "D" pillar behind the trim panel, or through the top weatherstrip attaching hole in the "B" pillar for two door utilities and behind the trim on the "C" pillar for four door utilities. Refer to the illustration above. Clean, dry and reseal with one of the sealers listed below.
Correction B
While leaks can occur at any point around the back glass, the upper left radius of the back glass opening is the point that should be inspected first. Leaks will surface at this location when the urethane bead is pushed out of the correct sealing path. Generally, the urethane bead can be repaired by injecting urethane into the void.
Correction C
Inspect the primary weatherstrip seal in order to verify that it is seated properly, especially at the flange corners. Ensure that the positioning holes are properly sealed and that there is no damage to the flange as well.
| • | A damaged flange can cause a loss of seal compression. |
| • | Positioning holes are the attaching rivets at the front. If they are loose or misinstalled, drill out the loose rivet and install a new one. A new rivet usually does not require additional sealer. |
Condition 11
Rear floor wet (1/4 Window Pickup).
Cause
Leaks around the 1/4 window are a result of the weatherstrip being damaged, not properly seated or not properly aligned at the butt joint.
Correction
| • | Inspect the primary weatherstrip seal in order to verify that it is seated properly, especially at the flange corners. |
| • | Ensure that the positioning holes are properly sealed and that the sheet metal flange is not misaligned with the inside sheet metal further into the window opening than outer. If the inside sheet metal extends into the window opening farther than outer, grind down the excess metal to meet the outer flange. |
| • | Inspect the seal in order to verify that it has not been impacted during the quarter trim panel installation process. In this instance, the weatherstrip will exhibit a slight bulge on the visible surface, and may appear slightly twisted at the impact point. Properly seat the weatherstrip. In some cases, the weatherstrip may need to be replaced. |
| • | If the leak path visibly permeates from the butt joint of the weatherstrip, adjust the joint so that all mating surfaces are parallel and make an unbroken transition. |
Condition 12
Water at the base of the "D" pillar.
Cause
- Inspect for voids in the seam sealer in the hatch opening or the primary seal weatherstrip to make sure it is properly seated, not warped or deformed.
- The rear high mount stop lamp may be loose.
- The pressure relief valve may be loose.
Correction
- Seal as necessary, using seam sealer at the joints and thumb grade at the corners.
- Secure the rear high mount stop lamp properly.
- Secure the pressure relief valve properly.
Parts Information
Cleaners
| • | Kent Acrosol |
| • | 3M® General Purpose Adhesive Cleaner, P/N 08984 |
| • | Dominion Sure Seal, Sure Solve BSS |
Sealers
| • | Medium body seam sealing compound, GM P/N 12378500 (in Canada, P/N 10952233) |
| • | Kent Automotive™, Wet/Dry Re-Sealant, P/N 10570 (11 fl. oz.) cartridge (in Canada, P/N 10570 (325 ml) |
| • | Kent Wet Dry Re-Sealant can be purchased by calling 1-800-654-6333 (in Canada, 1-800-563-1717) |
| • | GM Weather Strip Adhesive Gel-Black (2 fl. oz.) tube, P/N 12345096 (in Canada, P/N 993365) |
