CAMPAIGN: SECONDARY LATCH ASSY (UNEXPECTED HOOD OPENING)

Subject: UNEXPECTED HOOD OPENING
Models/Years: CERTAIN 1991 AND 1992 CUSTOM CRUISER
CONDITION
General Motors has determined that a defect which relates to motor vehicle safety exists in certain 1991 and. 1992 Oldsmobile Custom Cruiser model vehicles. The secondary hood latch assemblies in these vehicles can corrode causing a very high latch release effort and possibly preventing the hood from latching properly when it is closed.
If the secondary hood latch is not properly engaged and the primary hood latch was also not engaged, the hood could open unexpectedly. If this were to occur while the vehicle was in motion, the hood may contact the windshield, reducing the forward vision area of the driver, and a vehicle crash without prior warning could result.
To prevent this condition from occurring, dealers are to install a new secondary hood latch assembly with improved corrosion resistance.
VEHICLES INVOLVED
Involved are certain 1991 and 1992 Oldsmobile Custom Cruiser station wagons within the breakpoints listed below:
Beginning Through & Year Model Model Name Plant VIN Including ---- ------ --------------- ---------- --------- ----------- 1991 B Custom Cruiser Willow Run MW300001 MW307663 1992 B Custom Cruiser Willow Run NW300001 NW300183
DEALER ACTION
Dealers are to perform this campaign on all involved vehicles at no charge to owners, regardless of mileage, age of vehicle, or ownership from this time forward.
Whenever a vehicle subject to this campaign is taken into your new or used car inventory, or it is in your dealership for service, you are to ensure the campaign correction has been made before selling or releasing the vehicle.
Dealers are to contact owners of vehicles recently sold from your new or used vehicle inventory and arrange for the campaign correction to be performed.
SERVICE PROCEDURE
1. Raise the hood.
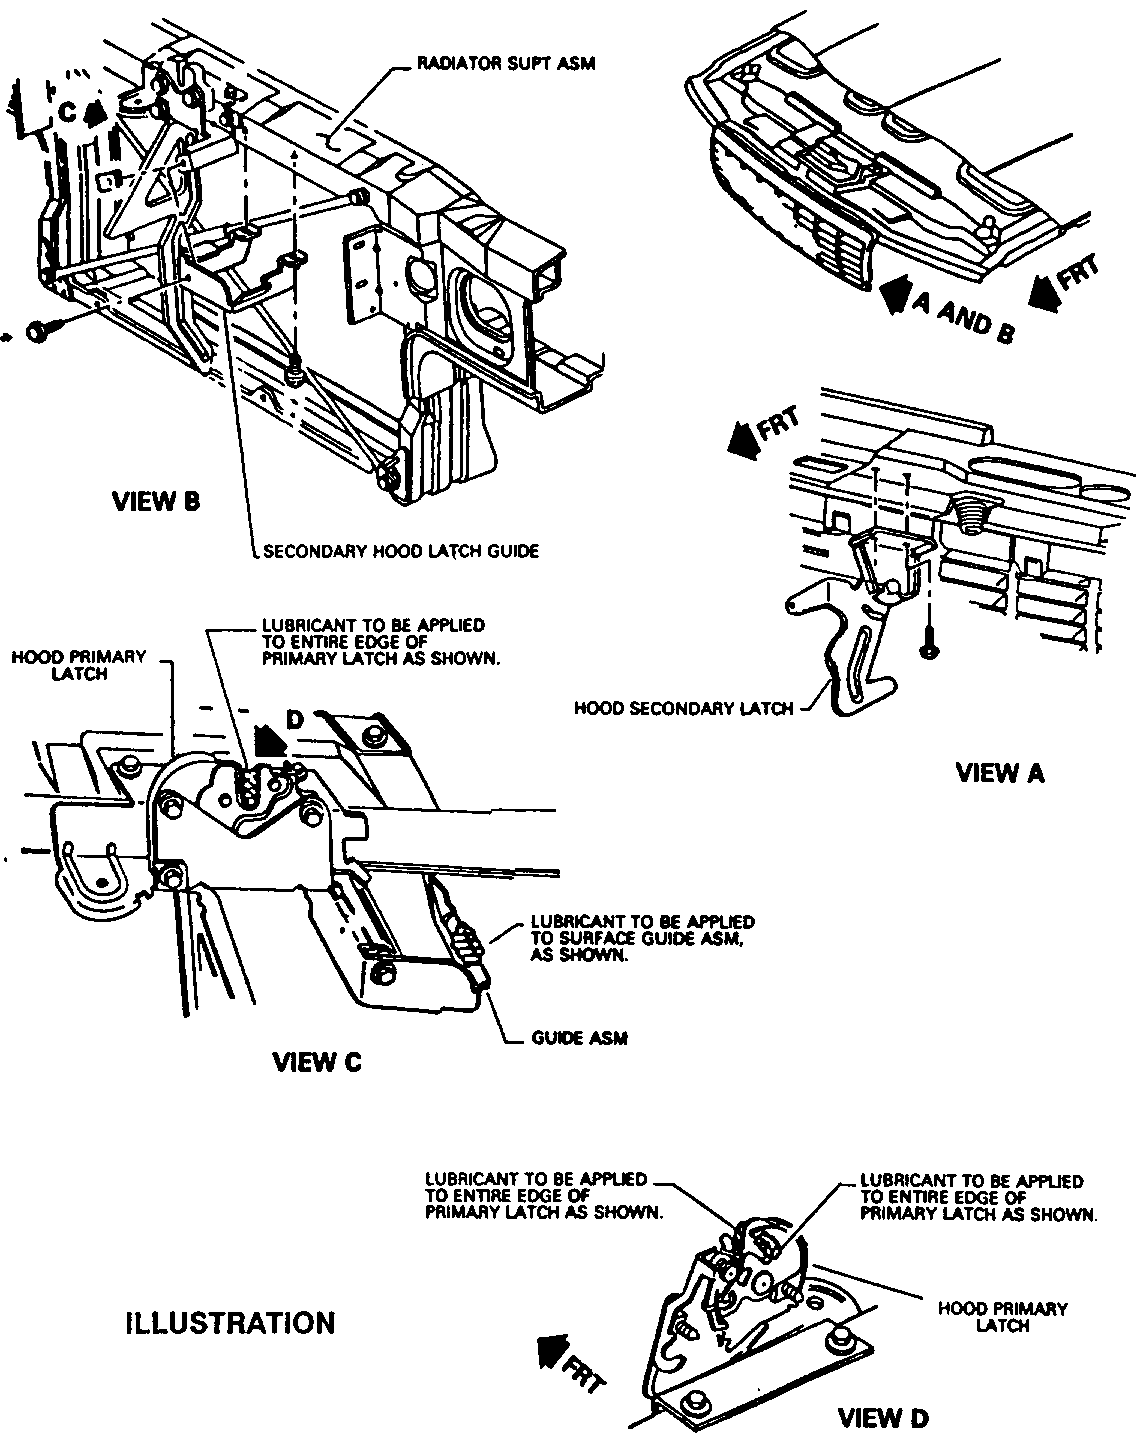
2. Remove the two (2) secondary hood latch to hood inner panel attaching bolts, rotate latch to disengage from rod and remove latch (See View A of the Illustration).
3. Install new secondary hood latch to rod, position to hood inner panel, and install with two (2) attaching bolts. Torque to 10 N. m (89 lb. in.).
4. Remove three (3) secondary latch guide attaching bolts and remove the guide from the upper radiator support (See View B of the Illustration).
NOTICE: It is helpful to disconnect the wiring harness clip from the radiator support to improve access to the rear attaching bolts.
5. Position the new secondary latch guide to the upper radiator support, install three (3) attaching bolts and torque to 10 N.m (89 lb. in.). Reinstall the wiring harness clip to the radiator support if previously disconnected.
6. Apply coating of chassis grease (GM # 1052497 or equivalent) to the primary hood latch pawl and contact areas of the hood striker (See Views C and D of the Illustration).
7. Lower the hood to closed position several times to ensure proper operation.
8. Install a Campaign Identification Label.
CAMPAIGN IDENTIFICATION LABEL
Each label provides space to print the campaign number, and the five (5) digit dealer code of the dealer performing the campaign. Insert this information with a typewriter or ballpoint pen. When installing label, clean and dry the surface of the radiator support tie bar and apply the campaign label where it is readily visible.
PARTS INFORMATION
To ensure that the parts your dealership may require are obtained as soon as possible, order them from GM Service Parts Operations (GMSPO) on a C.I.O. order, with NO special instruction code, but order on an advise code (2). Use the following part numbers:
Description Part Number Quantity Per Vehicle ---------------------- ----------- -------------------- Hood Latch, Secondary 10196200 1 Latch Guide, Secondary Hood Latch 10198163 1
WARRANTY CLAIM INFORMATION
REPAIR PERFORMED TOT-PTS FC LAB-OP LHRS ST ------------------ ------ -- ------ ----- --- Install New Secondary 96 V7090 0.3 .1* Hood Latch And Guide
* .1 hour for clerical administration may be applied for in the Straight Time (ST) column.
Parts Allowance: Current dealer price, plus 30% allowance for handling.
General Motors bulletins are intended for use by professional technicians, not a "do-it-yourselfer". They are written to inform those technicians of conditions that may occur on some vehicles, or to provide information that could assist in the proper service of a vehicle. Properly trained technicians have the equipment, tools, safety instructions and know-how to do a job properly and safely. If a condition is described, do not assume that the bulletin applies to your vehicle, or that your vehicle will have that condition. See a General Motors dealer servicing your brand of General Motors vehicle for information on whether your vehicle may benefit from the information.
