WATERLEAKS-COWL AREA & DOOR WEATHESTRIPS-REAR COMPARTMENT

SUBJECT: WATERLEAKS - COWL AREA AND DOOR WEATHERSTRIPS - APPLY SEALER
MODELS/YEARS: 1991-92 CUSTOM CRUISER
CONDITION: Water leaks in cowl areas and door weatherstrips.
CAUSES:
------
COWL AREAS; May be due to:
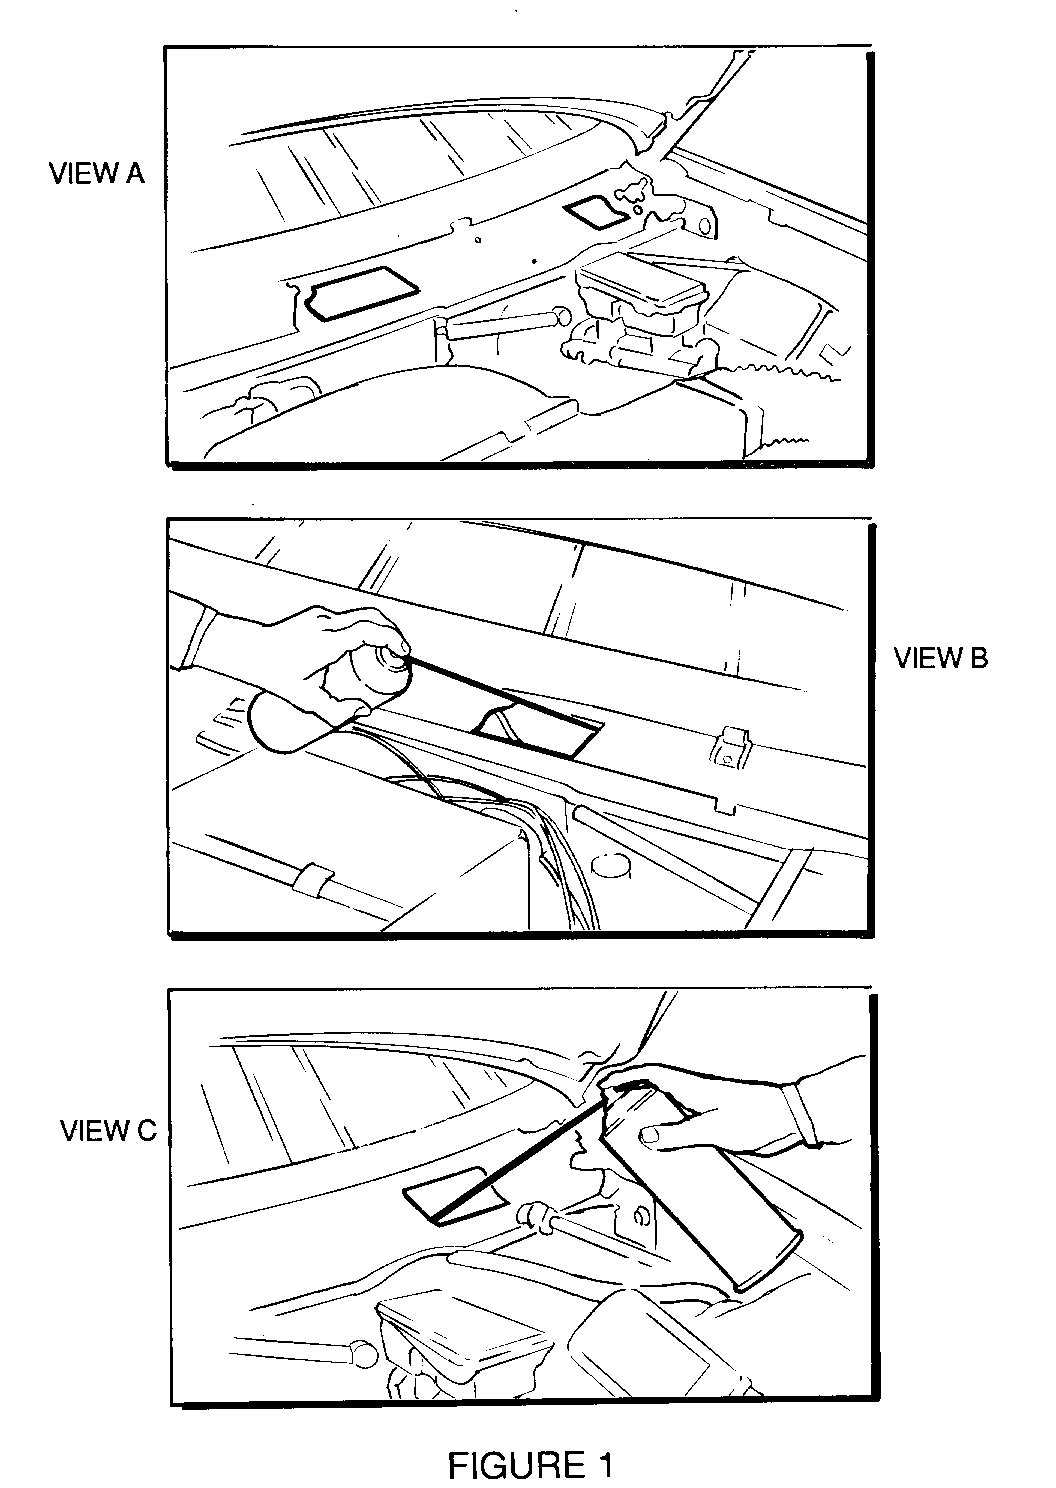
o Unsealed left side cowl seam inside of the cowl plenum creating water paths over grommets and brake booster holes (See Figure 1),
OR
o Gaps or voids in the seam sealing between the cowl and front body hinge pillar seams.
DOOR WEATHERSTRIPS; May be due to:
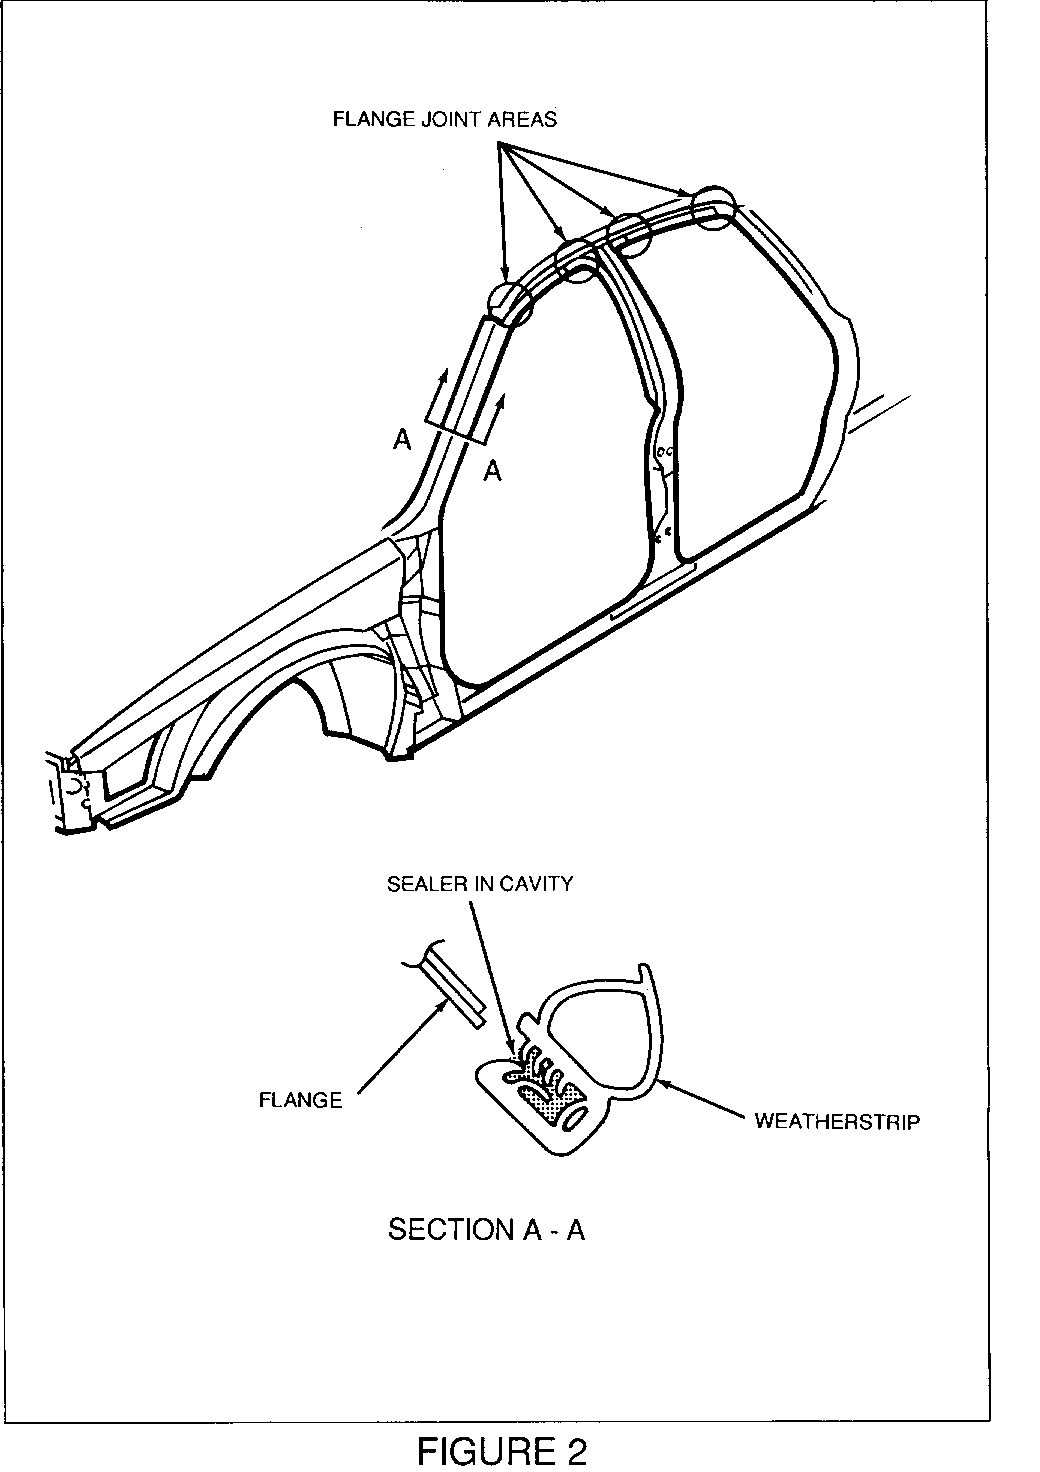
o Lack of sealer in the mounting portion of the weatherstrip, especially at the flange joint areas (See Figure 2).
CORRECTION: Follow the procedures for each of the areas as required.
MATERIALS REQUIRED: FOR COWL WATER LEAKS ----------------------------------------
o For cowl plenum seam leaks; use *Kent SL-C (P/N 50265).
o Another method would be to make an applicator from the following products to pump sealer onto seam area within cowl.
o *3M P/N 08994 Applicator, P/N 08633 Flow Grade Resealant and a short length of rubber hose, OR;
o Kent P/N 90010 Applicator, P/N 10240 Rubber Sealer and stock P/N KA-E Extension Tube
For cowl/hinge pillar leaks; Use GM P/N 12345743, 3M P/N 08648 (or equivalent) Body Seam Sealers
*We believe these sources and their equipment to be reliable. There may be additional manufacturers of such equipment. General Motors does not endorse, indicate any preference for or assume any responsibility for the products or equipment from these firms or for any such items which may be available from other sources.
PROCEDURE FOR COWL PLENUM SEAM (See Figure 1)
1. Open and raise the hood to the full open position.
2. Remove the left wiper arm and blade.
3. Remove the left side cowl grille (See Figure 1, View A).
4. Using the material and equipment specified, apply sealer to the seam areas through the rectangular holes in the cowl as shown in Figure 1, Views B and C.
Apply this sealer for the full length of the cowl seam from the center line of the vehicle to the left edge of the cowl plenum.
5. Allow the sealing material to dry for 15 minutes before applying second coat.
Note: Allow sealer to dry completely before water testing.
6. Reinstall the left cowl grille and wiper components.
7. Torque wiper arm attachment to 23 N-m (17 1b. ft.).
PROCEDURE FOR COWL/HINGE PILLAR SEAM (no illustration) ------------------------------------------------------
1. Position vehicle on hoist.
2. Open and raise hood to full open position and disconnect battery.
3. Disconnect all component attachments to the inner fender liner on the affected side of the vehicle.
4. Raise vehicle on hoist, and remove wheel and tire on the affected side of the vehicle.
5. Remove front fender wheelhouse liner to gain access to the front body hinge pillar seams.
6. Apply Body Seam Sealer to the seams.
7. Reinstall the wheelhouse liner.
8. Lower the vehicle and reinstall the components attached to the liner.
9. Reconnect the battery, lower the hood and remove vehicle from hoist.
WARRANTY INFORMATION: Use current Labor Time Guide.
MATERIALS REQUIRED: FOR DOOR WEATHERSTRIP SEALING -------------------------------------------------
o Use sealer such as 3M P/N's 08302 or 08405, *Dominion/American Sure Seal P/N LSC, Kent P/N 10500 or equivalent.
Important: DO NOT USE BLACK type sealers that remain soft, or "uncured" for sealing door opening weatherstrips to flanges.
Repair weatherstrips and flanges by (See Figure 2).
1. Removing the windshield pillar and center pillar garnish moldings.
2. Partially remove the weatherstrip from the upper flange areas by grasping with hand and pulling. The portion of the weatherstrip on the rocker flange may be left in place.
3. If gaps at the flange joints exist (Indicated on Figure 2), apply sealer to fill the gaps at the joints.
4. Apply a continuous bead of sealer to the upper length of the weatherstrip cavity, from the front corner of the rocker area to the rear corner of the rocker area (See Figure 2, Section A-A).
5. Reinstall weatherstrip to the flange.
6. Reinstall the windshield and center pillar garnish moldings.
WARRANTY INFORMATION:
Labor Operations Labor Time ---------------- ---------- Front Right T3345 0.7 hour Front Left T3346 0.7 hour
Rear Right T3347 0.6 hour Rear Left T3348 0.6 hour


General Motors bulletins are intended for use by professional technicians, not a "do-it-yourselfer". They are written to inform those technicians of conditions that may occur on some vehicles, or to provide information that could assist in the proper service of a vehicle. Properly trained technicians have the equipment, tools, safety instructions and know-how to do a job properly and safely. If a condition is described, do not assume that the bulletin applies to your vehicle, or that your vehicle will have that condition. See a General Motors dealer servicing your brand of General Motors vehicle for information on whether your vehicle may benefit from the information.
