WIND NOISE CORRECTION IMPROVED DIAG. PROC.

SUBJECT WINDNOISE CORRECTION IMPROVED DIAGNOSTIC PROCEDURE
MODEL/YEARS 1992 EIGHTY EIGHT 1991-92 NINETY EIGHT
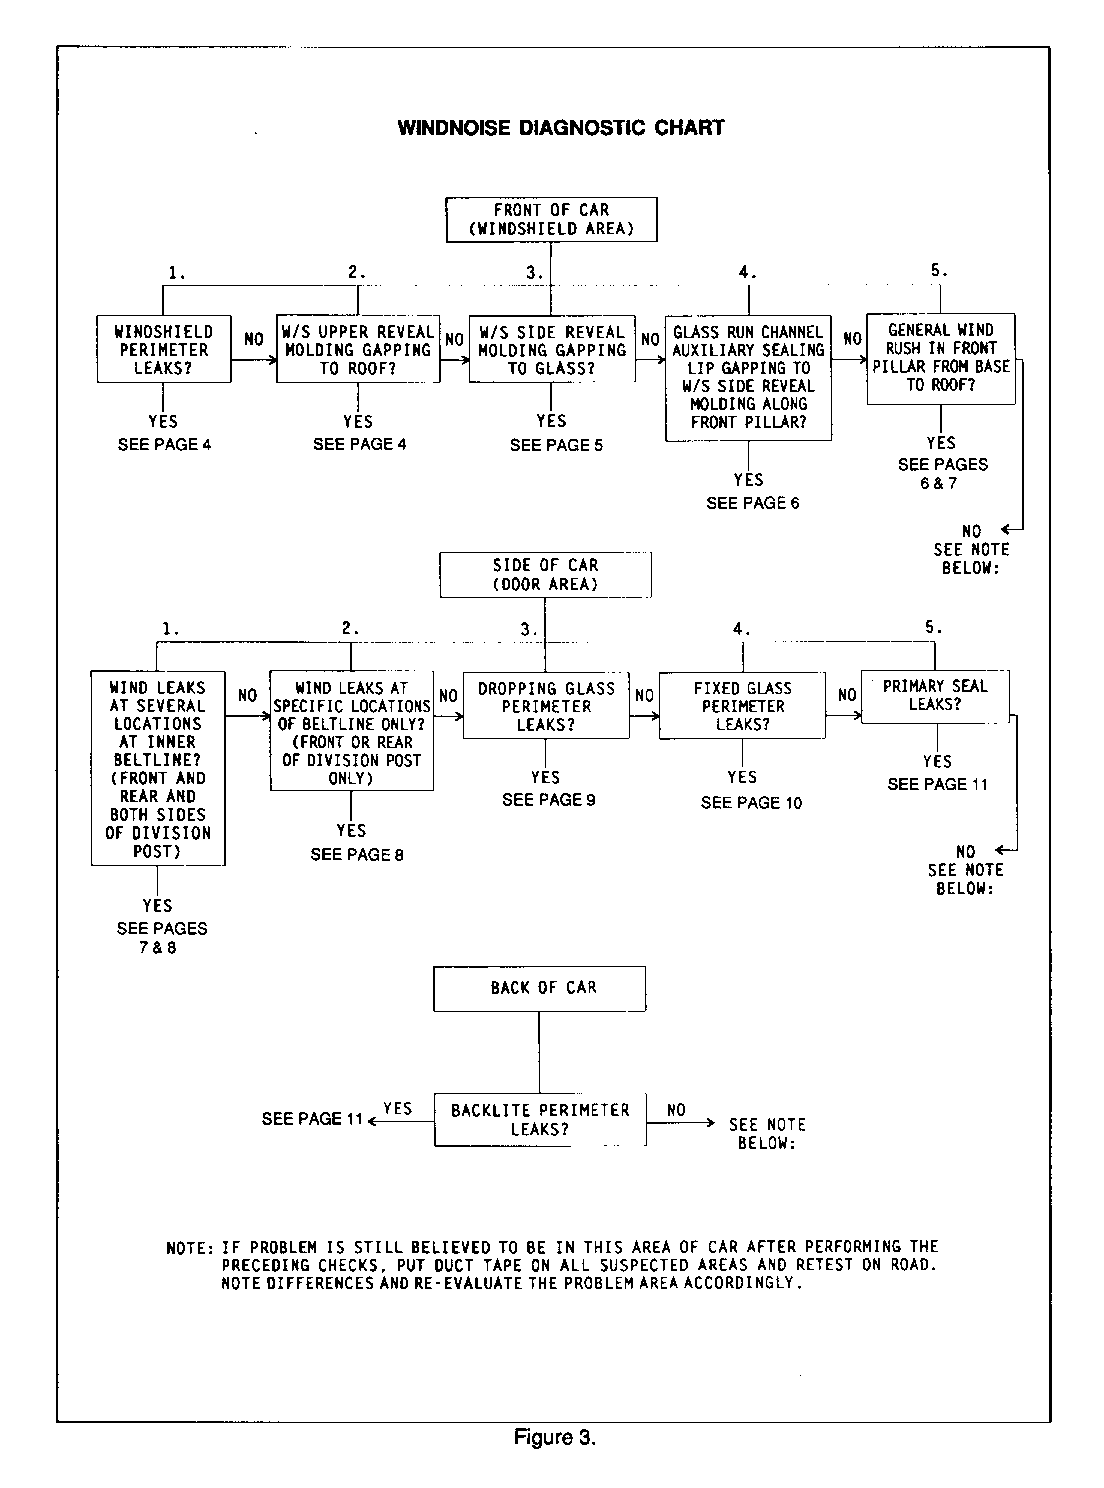
This bulletin is intended to help diagnose and repair windnoise conditions in various areas of the 1992 Eighty Eights and 1991-92 Ninety Eights. After completing the general diagnosis section of this bulletin, the chart provided will direct the technician to the problem area. All charts are treated as add conditions to the Road Test and Diagnose Labor Operation.
The basic aerodynamic shape of the subject vehicles together with specific windnoise related changes (wrap-around windshield, flush side glass, quiet o/s mirror, etc.) have made this vehicle significantly quieter for windnoise than its predecessors. When problems related to parts fit or function do occur however, their impact will be much more noticeable against the quieter background noise level. This service bulletin is intended to properly diagnose the problem and remedy the situation in the most efficient manner possible.
Note: The information is presented in a ranked order based on a combination of particular locations being sensitive to windnoise and/or the likelihood of occurrence at that location.
Diagnosis should not be limited to input from the customer due to the complexity of pinpointing the noise source. The preferred technique is a two-step approach of test driving the vehicle, followed-up with visual inspections of specific locations. The drive inspection should be used primarily to localize wind rushes to a general body position (i.e., front or rear, left side or right side) and to identify specific leak pathways. Once this information is obtained, a visual inspection can be used to pinpoint the problem source.
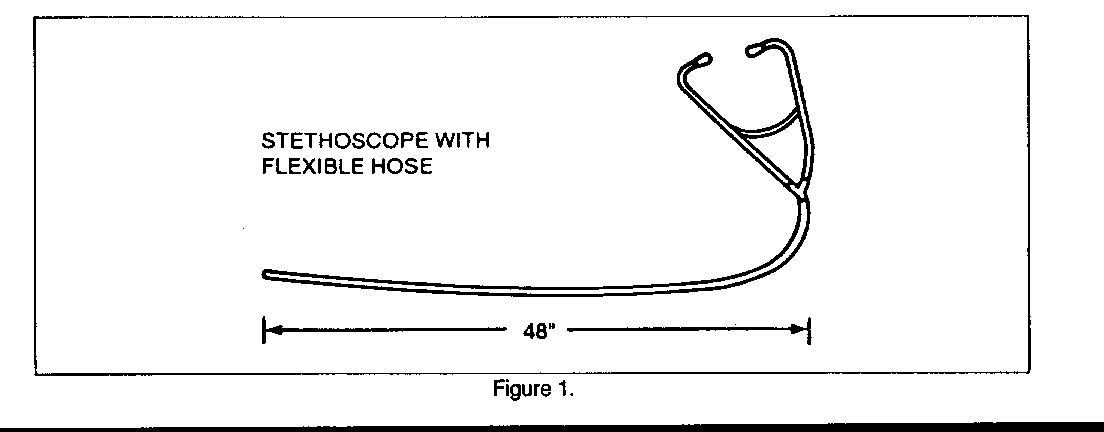
Following is the recommended method for test driving and inspecting the complaint vehicle. Note that this method requires two people (to properly check all locations); a stethoscope (Figure 1) with 48" of flexible hose attached; and a roll of 2" wide duct tape. The car should be evaluated at speeds of 50 mph or higher (observe local speed limits), using smooth, hard road surfaces and with outside wind conditions as calm as is feasibly possible. Note that under high, gusty wind conditions, the occupant's perception of windnoise will be adversely affected on all vehicles.
Note Concerning Flow Through Ventilation: The air exiting the rear door lock pillar baffle can be felt coming out the gap between the door and the lock pillar. It is possible the air movement can also be heard. This system can move approximately 300 CFM, so the volume of air felt is considerable.
TEST DRIVE EVALUATION
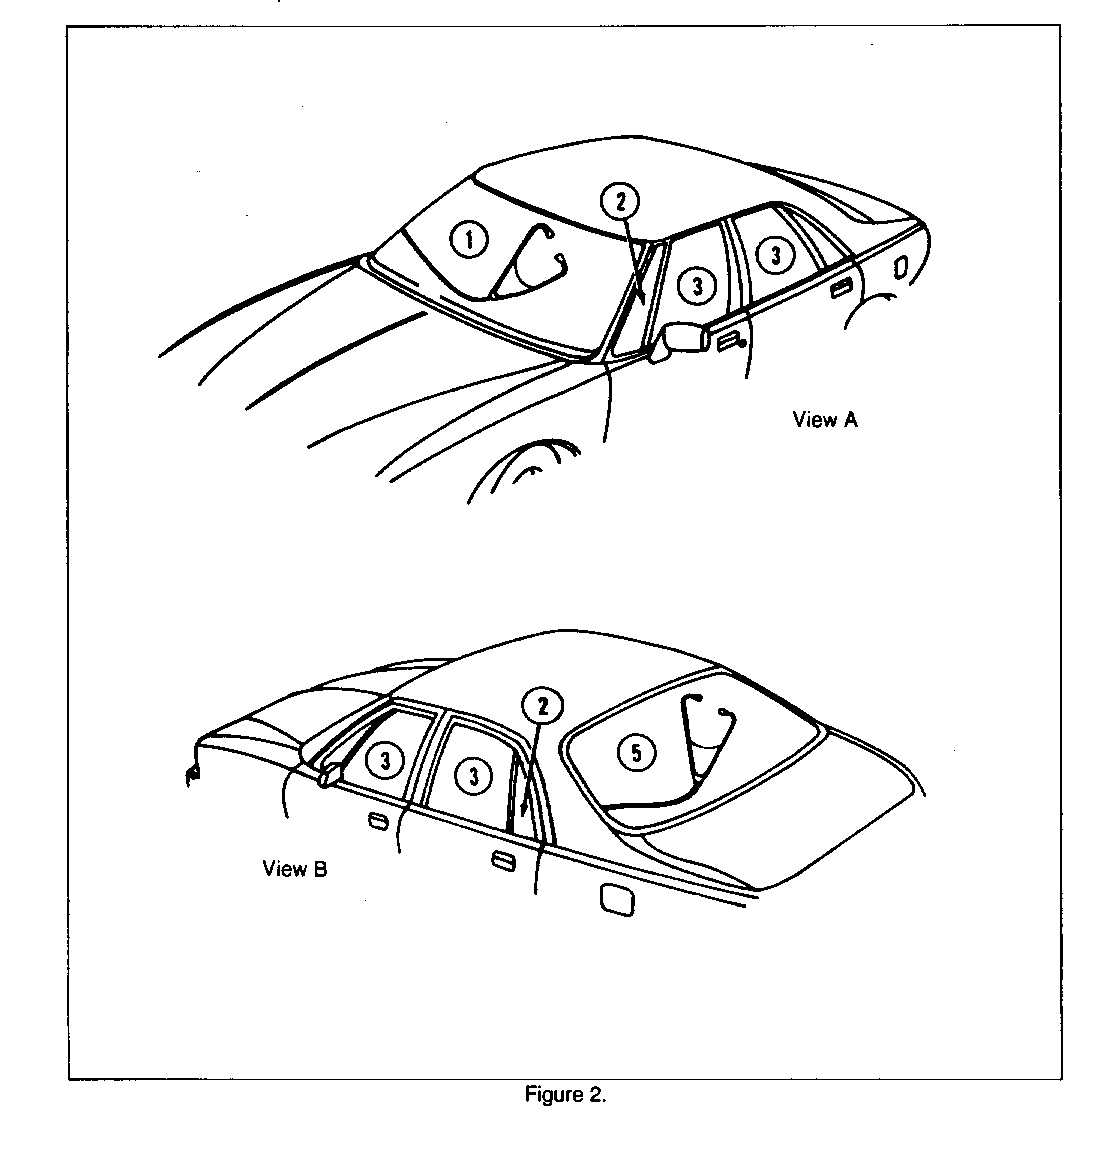
Attempt to define the general location of the windnoise source with the unaided ear and determine if the noise is of a loud, generalized background nature (wind rush) and/or a specific, localized nature (wind leak). Using a stethoscope, check: (1) perimeter of windshield (Figure 2, View A); (2) perimeter of glass; (3) perimeter of dropping glass (all doors) (Figure 2, Views A & B); (4) primary door seals from front belt up around to rear belt; and (5) perimeter of backlite (Figure 2, View B). Record problem areas and relative intensity level. Return to the service area and refer to diagnostic tree on the following page.
Note: Sound levels at the ends of door inner belt weather seal, the dropping glass at the top of the center pillar and the windshield along the front pillar are generally higher than other locations when heard through the stethoscope. It is a judgment call as to whether the levels are significantly higher than normal and require corrections.
WINDSHIELD PERIMETER LEAK
A suspected leak in the windshield urethane seal should be confirmed in the shop using one of the several static test methods. An ultrasonic tester such as Kent-Moore J26419 or Snap-On AC6600 is preferred, but any method, that can pinpoint the exact leak location, will save valuable time.
Repair Method:
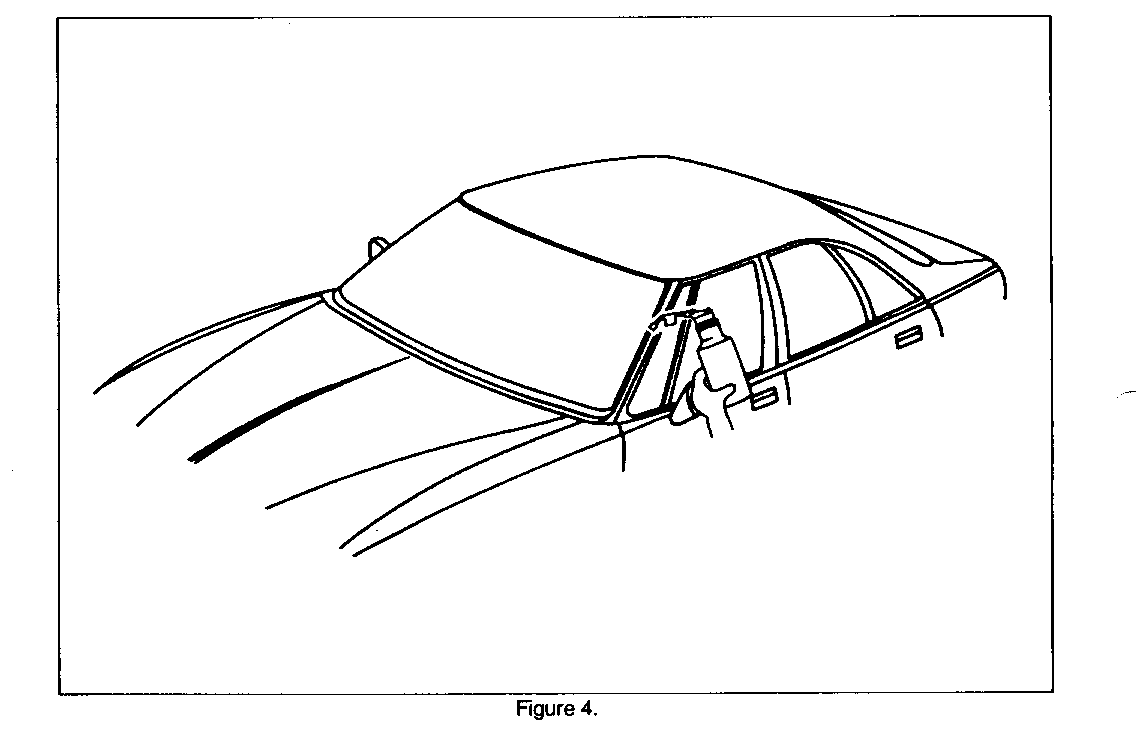
The recommended procedure for repairing the leak path is to remove the moldings as necessary and flood the leak path with urethane sealant. (See Figure 4 for example). Cover the area surrounding the leak sufficiently to avoid creating a new leak path between the leak and the newly applied sealant. Give the new sealant sufficient time to cure as to avoid blowing a new hole through the sealant.
WINDSHIELD UPPER REVEAL MOLDING GAPPING
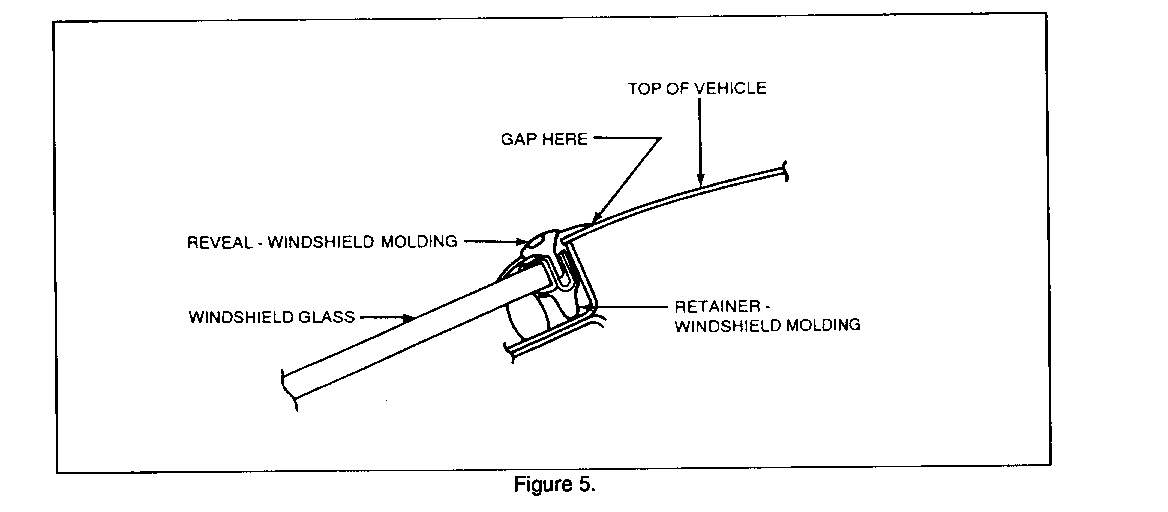
High levels of windshield rush can be pinpointed to the upper reveal molding through a simple inspection. If any level of gapping is evident between the rear sealing lip and the roof, a wind rush condition will exist (See Figure 5 on the next page). To confirm the extent of the problem, completely cover the entire molding from front pillar to front pillar with 2" duct tape and road test. The result on a problem car will be a much lower background wind rush level.
Repair Method:
Minor gaps can be closed using any sealing material that will bond to the sealing lip and the roof's painted surface, without damaging either surface. Clear, double-sided adhesive tape such as Scotch ATG Adhesive Transfer Tape, Number 969, Part 06493 or equivalent works well. Do not use quick set super glue, as it will react with both the polyvinyl chloride (PVC) sealing lip and the body paint and cause more serious repairs.
If the gapping condition is extreme, replace the upper reveal molding. Road test to assure the condition is repaired.
WINDSHIELD SIDE REVEAL MOLDING GAPPING TO WINDSHIELD
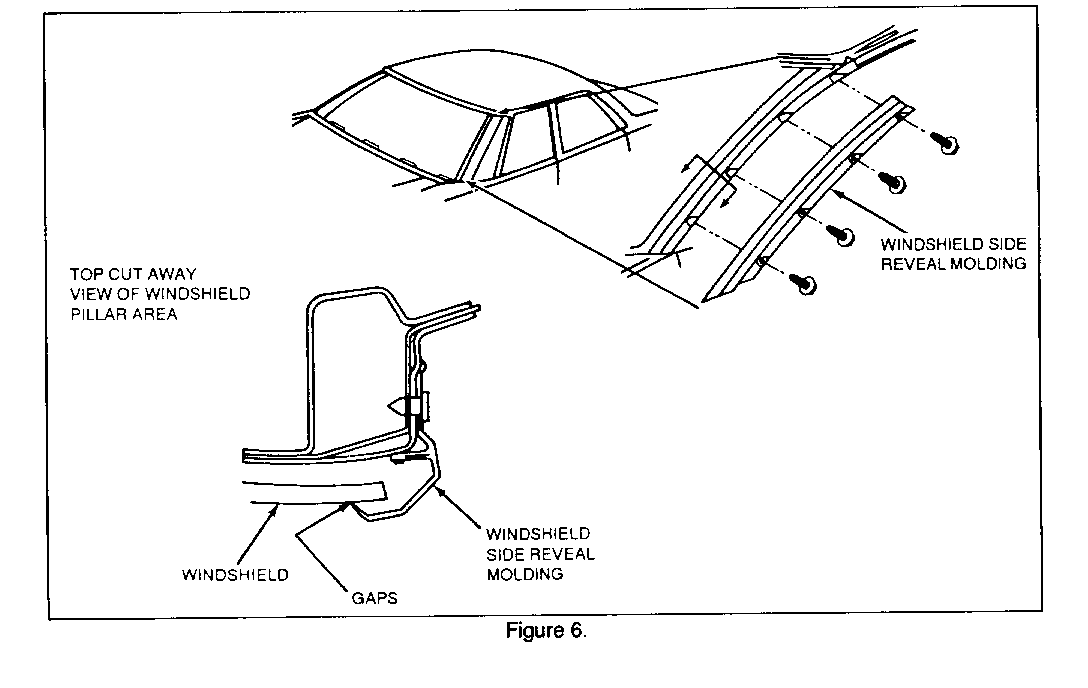
Moderate levels of windshield rush can be pinpointed to the side reveal molding through a simple inspection. If any level of gapping between the soft glass side lip and the glass is evident, a wind rush condition will exist (See Figure 6 below).
Repair Method:
The production part should be removed and carefully hand formed to close the gap between the molding and the windshield. Reinstall the part and inspect for a gapping condition. Repeat process until all gapping is removed. Use care not to over bend the part in any one location and cause an appearance problem. Road test to assure the condition is repaired.
GLASS RUN CHANNEL GAPPING TO WINDSHIELD SIDE REVEAL MOLDING
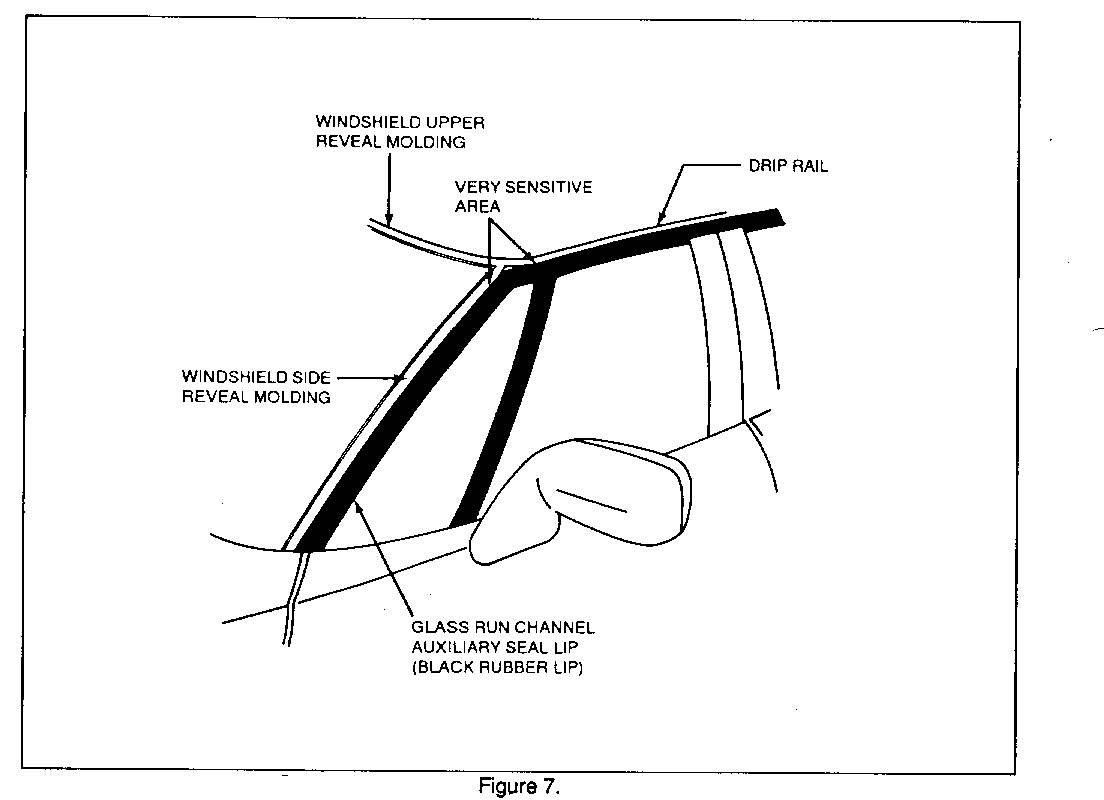
Moderate levels of wind rush can be detected when the auxiliary sealing lip of the glass run channel is gapping along the front windshield pillar. The condition is most sensitive to gaps at the very top of the pillar. In the joint between the windshield side reveal molding, windshield upper reveal molding and roof drip rail (See Figure 7 below).
Repair Method:
The simplest method of repair is to carefully pull the adhesive sealing tape that holds the glass run channel to the door frame loose from the door. Reposition the glass run channel in a way that pulls the auxiliary lip further into the door opening. It will be necessary to apply a length of double face tape such as 3M Part No. 06382 Scotch-Mount, or equivalent, to properly re-attach the run channel to the door frame. in some cases where the condition cannot be corrected by the simple adjustment, the door fit itself will have to be adjusted to correct the condition. Road test to assure the condition is repaired.
GENERAL RUSH IN FRONT PILLAR FROM BASE TO ROOF
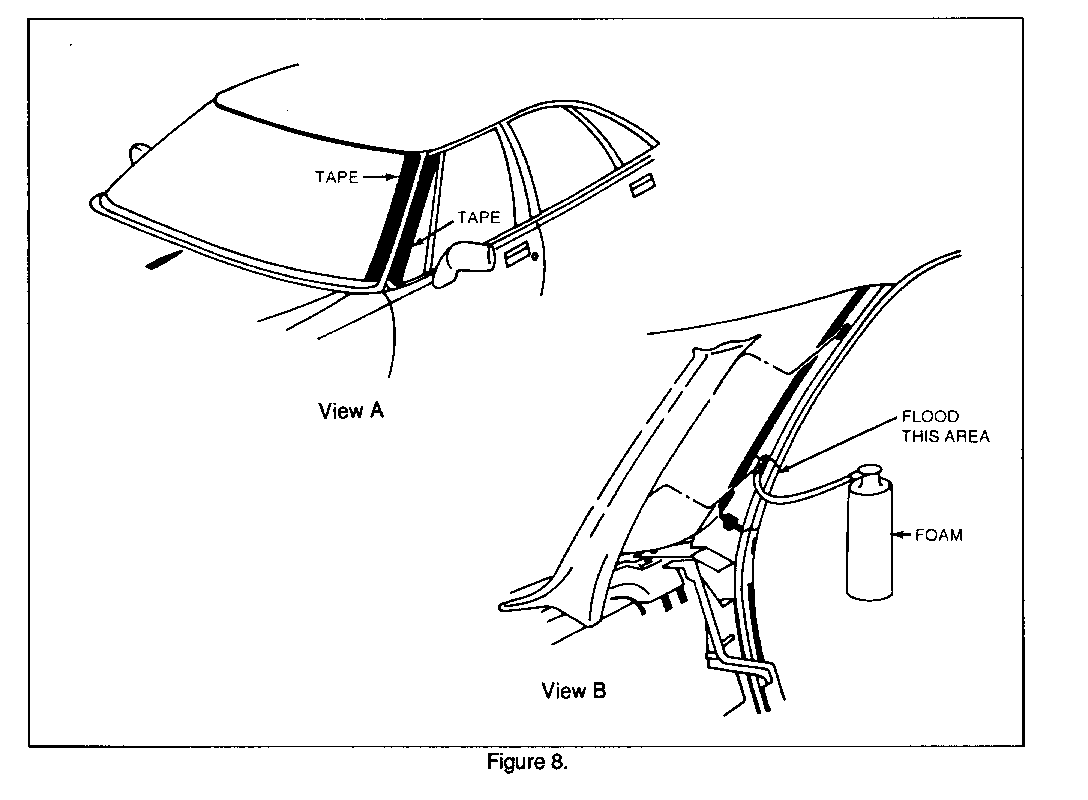
A high level of wind rush in the front pillar, that cannot be associated with windshield perimeter leak, windshield side reveal molding gapping to windshield, or glass run channel gapping to windshield side re- veal molding, may be internal to the pillar itself. The pillar has an expandable foam plug in its base and may not be completely sealed. Noise from this source will be fairly uniform when checked all along the inside of the windshield during the road test. Before repair is started, cover the windshield side reveal molding and its mating surface on the windshield and the door glass run channel with duct tape (See Figure 8, View A) and road test again. If there is no improvement, proceed with the repair method as described on the next page. If the taping improves the condition, re-evaluate for the windshield conditions noted earlier in this paragraph.
Repair Method:
Remove the front pillar garnish molding to expose the pillar. Using a double-expanded polyurethane foam (available from a building supply outlet), fill the lower one quarter of the pillar through the bottom slotted hole (See Figure 8, View B). Use caution not to allow the foam to come in contact with other parts and not to overfill the pillar. The foam will more than double its volume during the curing process.
Note: First, squirt a small amount of foam into a wastebasket to get an idea of how fast it comes out of the can and to make sure the foam expands properly.
Place a piece of tape over the slot until the foam cures. After the foam has cured, remove the tape and reinstall the garnish molding. Road test to assure the condition is repaired.
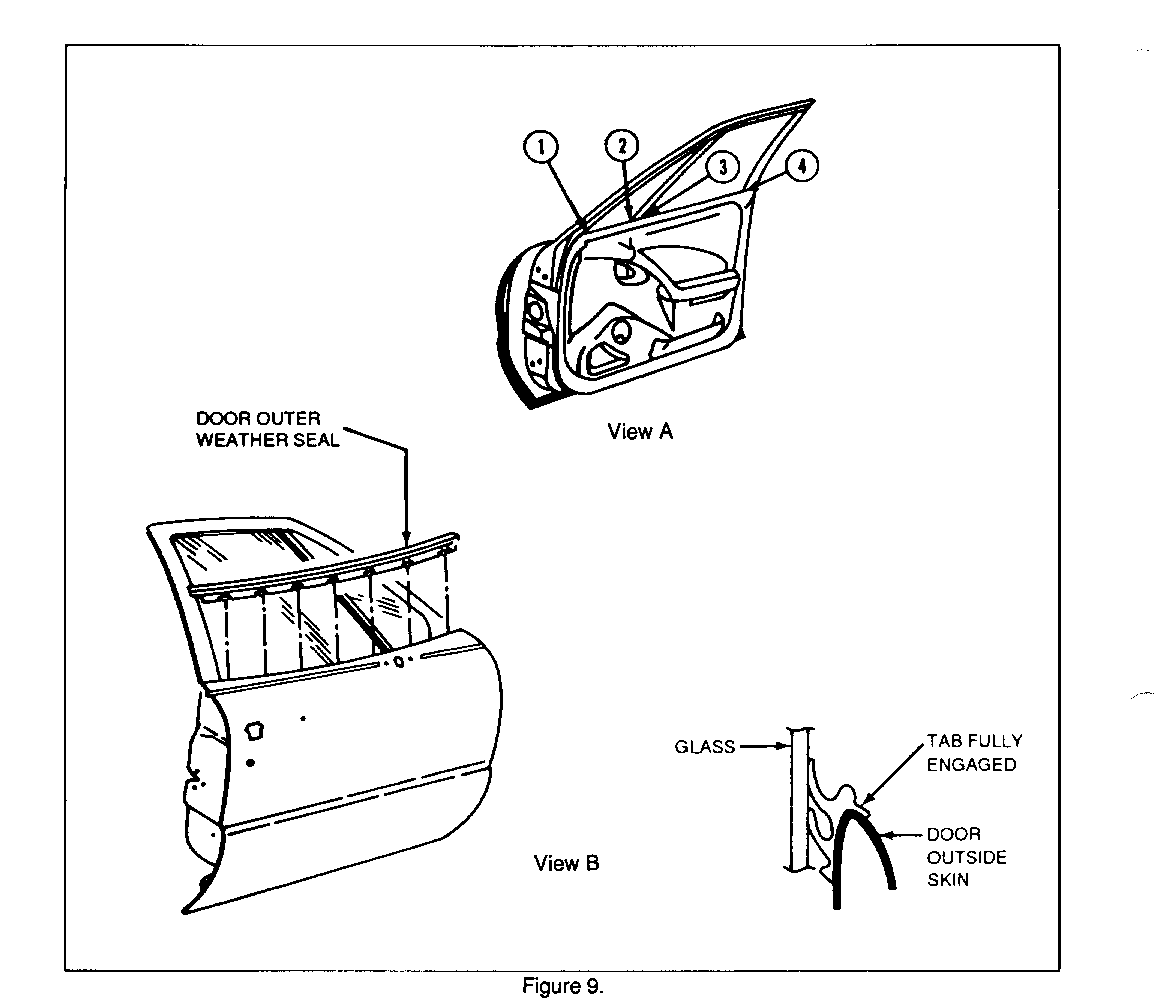
INNER DOOR BELTLINE LEAKS AT SEVERAL LOCATIONS Strong wind leaks of relatively the same intensity heard at location 1, 2, 3, and 4 in Figure 9, View A on the next page, are usually associated with an improperly fitting door outer weather seal. A quick visual inspection will confirm the problem. Any gapping that occurs between the weather seal sealing lip and the door surface can cause excessive wind noise.
Repair Method:
Remove complete weather seal assembly, using care not to damage paint surface. Inspect clip tangs and reposition any tangs bent during initial installation and/or removal. Reinstall weather seal by aligning the rear edge of sealing strip to the rear edge of door and engaging (7) clips into slots on door panel. This is done easiest by inserting the front clip first and working rearward. Again, use caution not to dam- age painted surface. The weather seal is fully seated when outer sealing lip is fully compressed on door surface as shown on the next page (Figure 9, View B). Road test to assure the condition is repaired.
INNER DOOR BELTLINE LEAKS AT SPECIFIC LOCATIONS ONLY
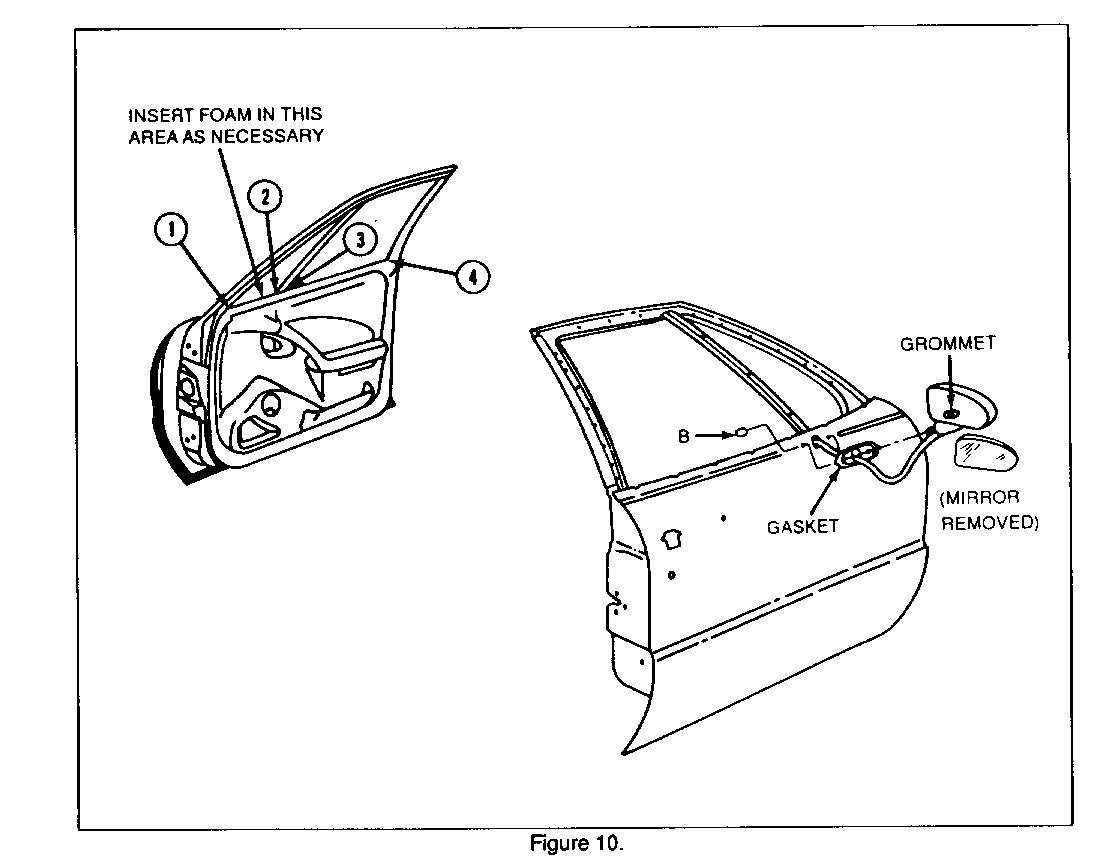
Strong wind leaks heard at a specific location only on the inner belt can generally be associated with missing or misplaced foam patches at locations 1 or 4 in the Figure 10 on the next page or a problem with the outside mirror if the noise is intense at locations 2 and 3. Problems with the mirror can be confirmed by inspecting the mirror for correct positioning of the mirror grommet and the correct installation of the mirror mounting gasket.
Repair Method:
Locations 1 or 4: The correction to noise at these locations is to carefully stuff small patches of soft foam in the openings between the inner belt weather seal lip, the door garnish moldings and the interior trim pad. Do not put foam between the lip and the dropping glass on the rear of the front doors or the front of the rear doors, as it will simply tear away when the glass is dropped.
Locations 2 and 3: If inspection identifies that the grommet or the base gasket is incorrectly installed, correct the problem and road test for improvement. If the mirror does not turn up a problem source, reevaluate the outer belt weather seal for gap to the door surface. Correct as outlined in "INNER DOOR BELTLINE LEAKS AT SEVERAL LOCATIONS".
DROPPING GLASS PERIMETER LEAKS
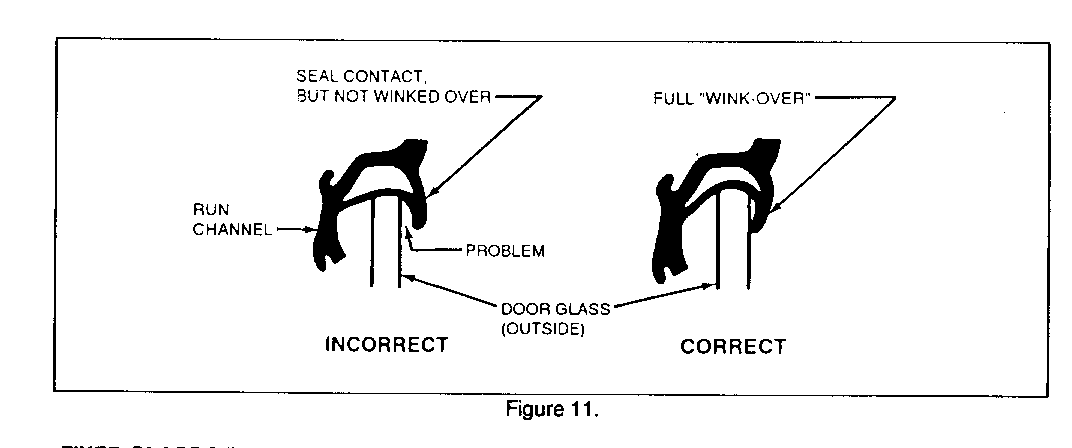
Dropping glass perimeter leaks not corrected by using the repair methods described earlier in inner door beltline leaks will generally be associated with a weak engagement of the glass into the glass run channel sealing sections. A visual inspection of the problem area should check for such things as local discrepancies in the glass edge or glass run channel sealing lips; exposed edges of glass that do not penetrate into glass run channel; uneven 'wink-over' of the outer sealing lip along the top edge and down the vent glass division post; and a gap between the outer sealing lip and glass on the vertical leg (rear of front door only). See Figure 11.
Repair Method:
First, identify if the problem is a very local leak caused by a part discrepancy in either the glass or the glass run channel. Often hard spots on the glass run channel can be worked out without removing or replacing parts. Glass irregularities can likewise be minimized by adjusting the glass to improve the fit in the problem area. If simple finesse techniques do not work, then replace parts as required. If the problem is identified as lack of penetration/wink-over at the top of the door and/or along the vent glass division post (front door only) or applique (rear door only); then readjust the glass to optimize penetration/wink-over. Generally this means moving the glass up and rearward in the sash on the front door and up and forward in the sash on the rear door. Cycle the glass several times (with the engine running) to evaluate improvement of the glass position and road test again.
If the problem is along the rear vertical leg of the front door and gapping between glass and the outer sealing lip is evident, refer to Dealer Technical Bulletin 92-T-65 for repair.
FIXED GLASS PERIMETER LEAKS (VENT GLASS)
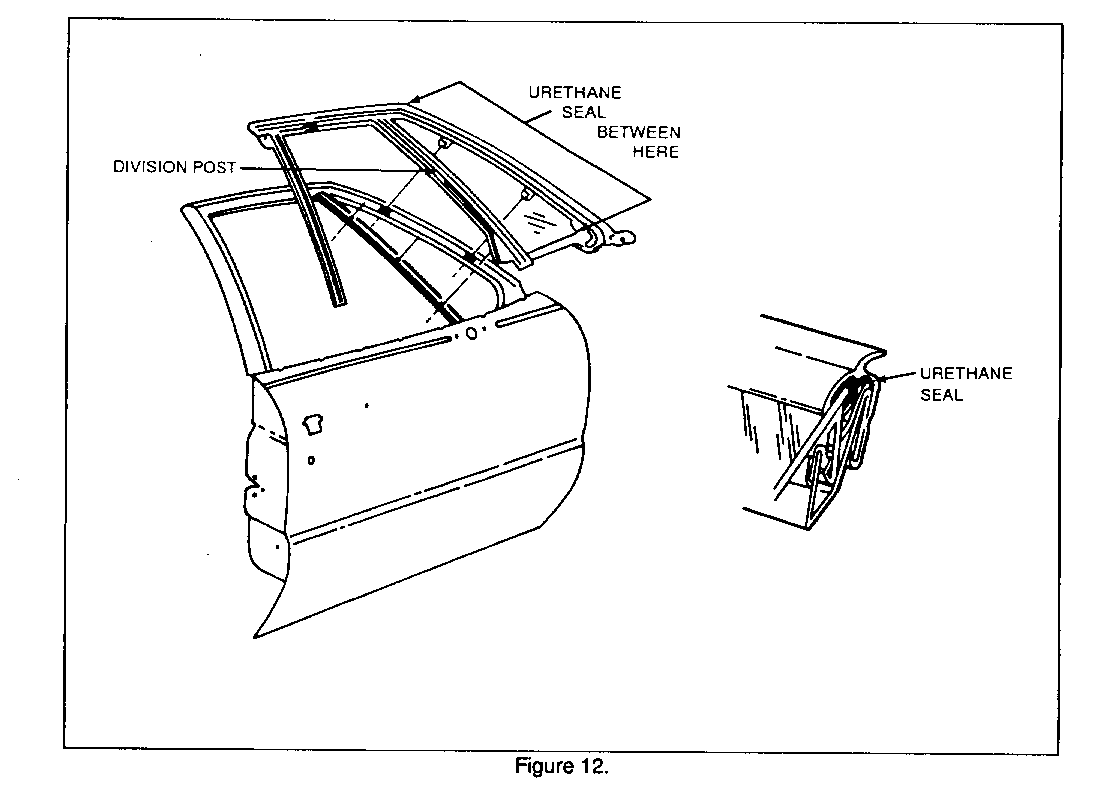
A urethane seal extends from the top of the division post down to the belt, excluding the division post itself. See Figure 12. Leaks may sometimes occur in the urethane seal, particularly at the top of the division post. The result is a high frequency wind leak that is easily heard with the stethoscope.
Repair Method:
Pack small amounts of a thumb grade type sealing material or a suitable equivalent between the glass surface and the door garnish molding insufficiently to close out the leak pathway in the urethane seal. Road test and repeat if necessary.
DOOR PRIMARY SEAL LEAKS
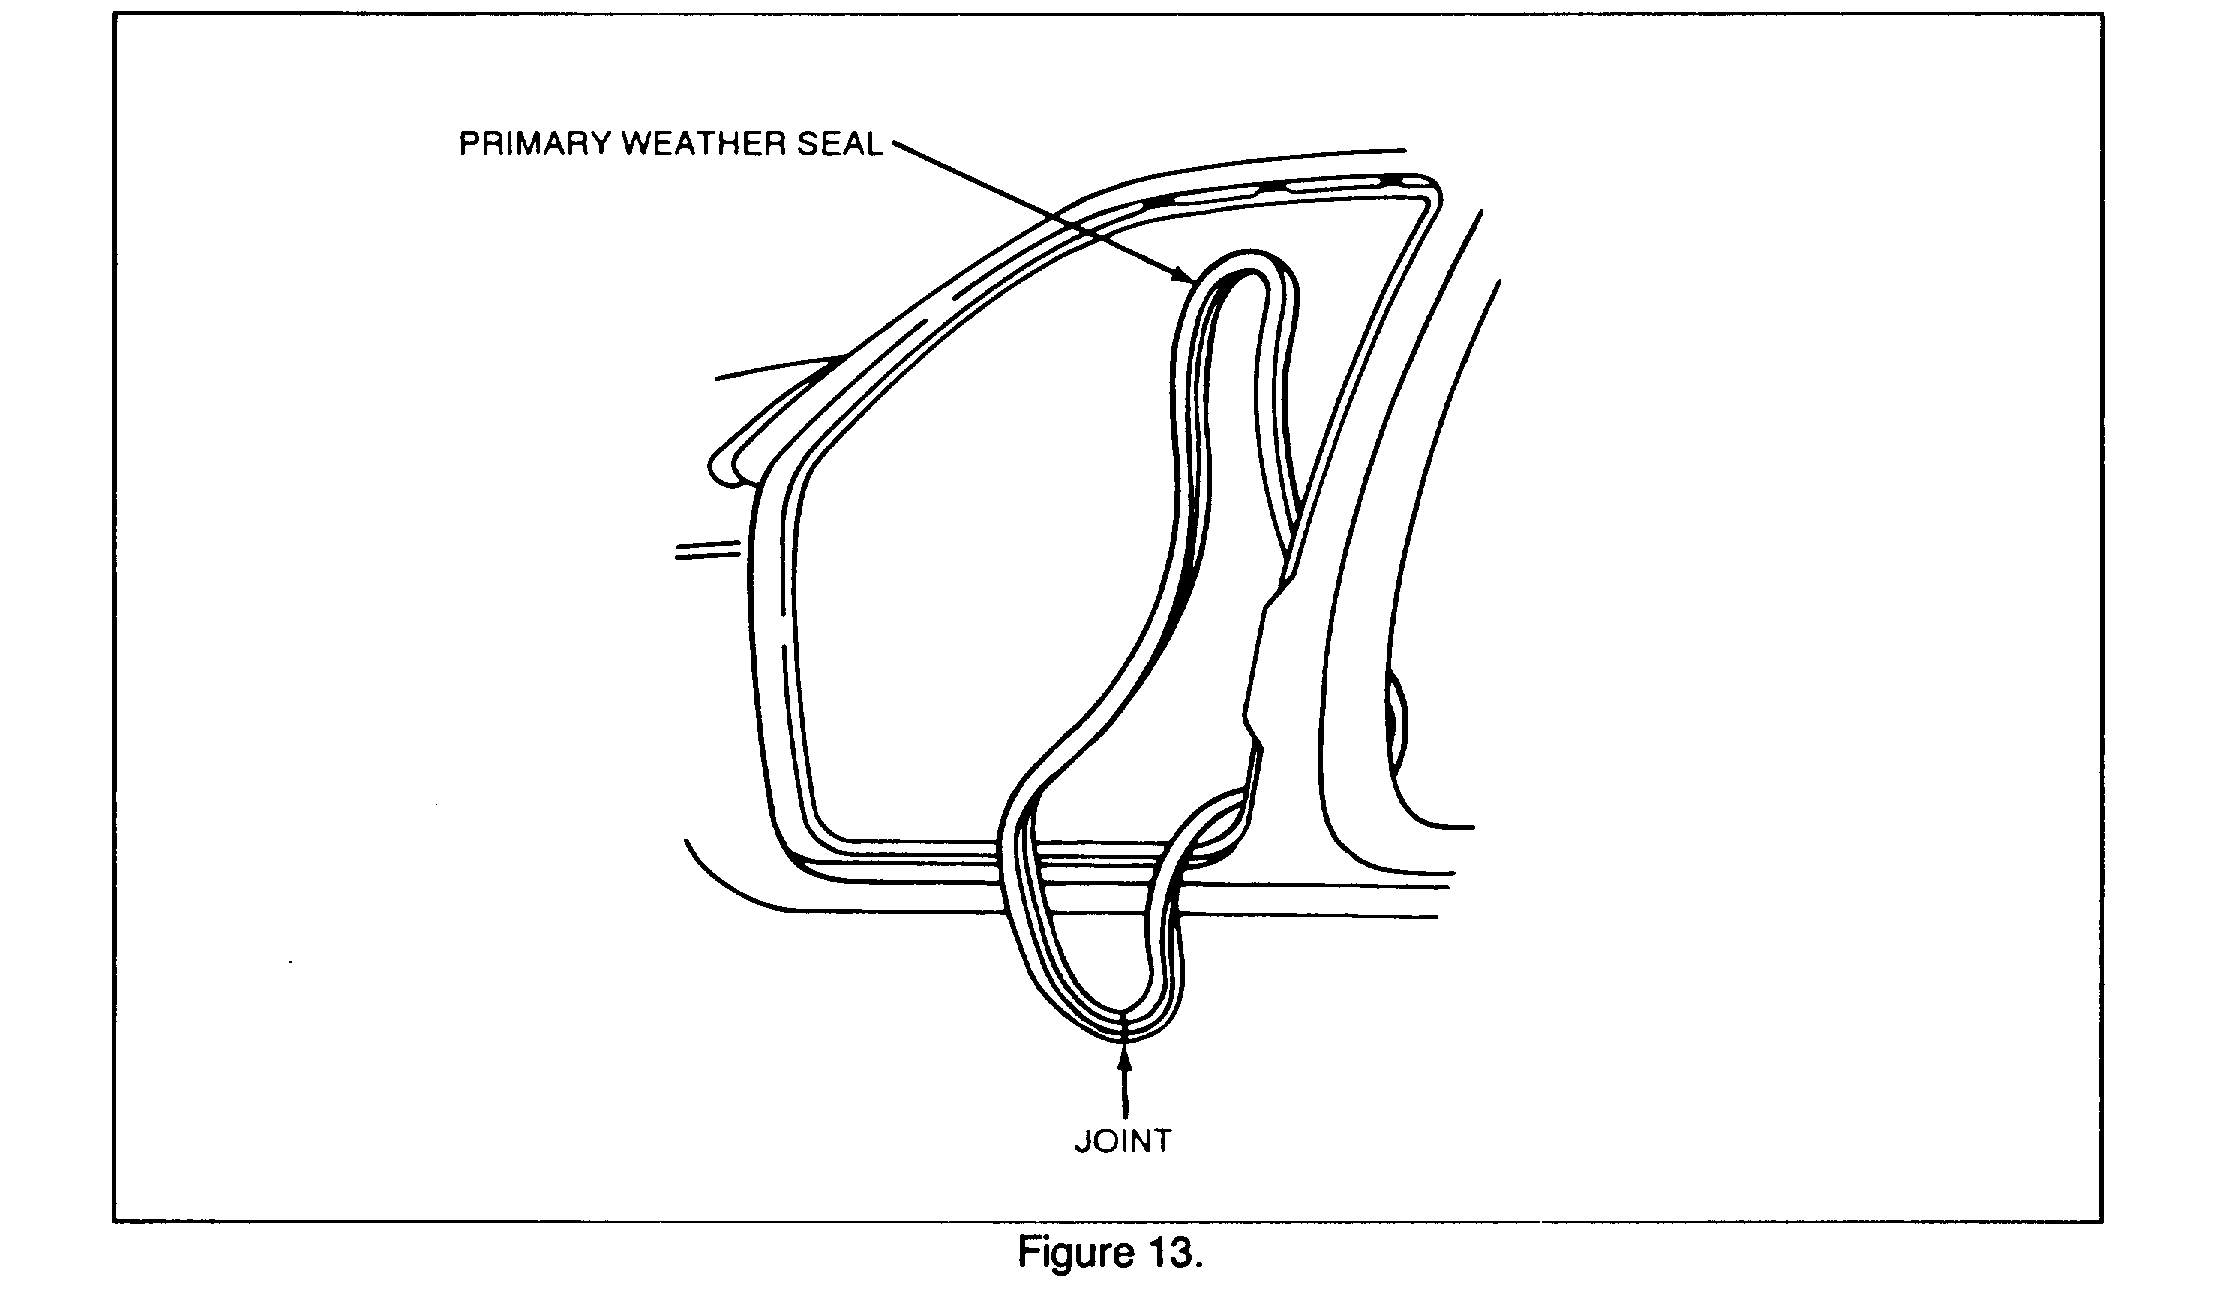
Door-to-body primary seal leaks may occur generally for one of two reasons. Either the seal is not seated correctly to the body flange and does not follow the door sealing surface or the door itself is out away from the body such that there is not sufficient contact with the seal.
Repair Method:
With the door closed, inspect for seal contact with the door. If the problem is improper seal contact due to misalignment with the door surface, pull the entire seal off the body flange and reinstall as follows: Position the joint in the center of the rocker and install on flange. working forward toward hinge pillar: Continue around door opening using care to seat the weatherseal securely onto the flange, particularly in the corners. When the seal is completely installed, go back over the entire length and make sure no material has pulled off the flange. If the leak source is determined to be a result of too much gap between the door and body; door adjustments will be required to close up the gap. Reinspect and road test after corrections are made.
BACKGLASS PERIMETER LEAKS
A suspected leak in the backglass urethane seal should be confirmed using one of several static test methods. An ultrasonic tester such as J 26419 or Snap-On AC6600 is preferred, but any method that can pinpoint the exact leak location will save time.
Repair Method:
The recommended method for repairing the leak is to flood the leak area with a urethane sealant. Cover the area surrounding the leak sufficiently to avoid creating a new leak path between the leak and the newly applied sealant. Give the sealant sufficient time to cure to avoid blowing a new hole through the sealant.
We believe the non-GM sources of equipment and materials mentioned in this bulletin to be reliable. There may be additional manufacturers of such materials and equipment. General Motors does not endorse, indicate any preference for or assume any responsibility for the products or equipment from these firms or for any such items which may be available from other sources.
WARRANTY INFORMATION:
Labor Operation No.: T5303 Labor Time: 1.1 Hours o Road Test and Diagnose Windnoise (Including 2nd person Assistance and Tape Suspect Areas) o Select the Appropriate Add condition from the list below for the repair(s) made
Add to Repair: "WINDSHIELD PERIMETER LEAK" 0.5 "WINDSHIELD UPPER REVEAL MOLDING" 0.3 "WINDSHIELD SIDE REVEAL MOLDING GAPPING TO WINDSHIELD" One side 0.2 Both sides 0.3 "GLASS RUN CHANNEL GAPPING TO WINDSHIELD SIDE REVEAL MOLDING" Adjust Run Channel only One side 0.3 Both sides 0.6 Adjust Run Channel and Door Position One 0.5 Both 1.0 "GENERAL RUSH IN FRONT PILLAR FROM BASE TO ROOF" One side 0.2 Both sides 0.3 "INNER DOOR BELTLINE LEAKS AT SEVERAL LOCATIONS" One door 0.1 Both doors 0.2 "INNER DOOR BELTLINE LEAKS AT SPECIFIC LOCATIONS ONLY" To insert foam only One door 0.1 Add each additional door 0.1 To correct mirror patch One door 0.6 Both doors 1.2 "DROPPING GLASS PERIMETER LEAKS" One front door 0.5 Both front doors 1.0 One rear door 0.4 Both rear doors 0.8 "FIXED GLASS PERIMETER LEAKS (VENT GLASS)" One door 0.1 Both doors 0.2 "DOOR PRIMARY SEAL LEAKS" To adjust primary weatherseal One 0.3 Each additional 0.3 To adjust primary weatherseal and door position One 0.5 Each additional 0.5 "BACKGLASS PERIMETER LEAKS" 0.2
Trouble Code: 92
General Motors bulletins are intended for use by professional technicians, not a "do-it-yourselfer". They are written to inform those technicians of conditions that may occur on some vehicles, or to provide information that could assist in the proper service of a vehicle. Properly trained technicians have the equipment, tools, safety instructions and know-how to do a job properly and safely. If a condition is described, do not assume that the bulletin applies to your vehicle, or that your vehicle will have that condition. See a General Motors dealer servicing your brand of General Motors vehicle for information on whether your vehicle may benefit from the information.
