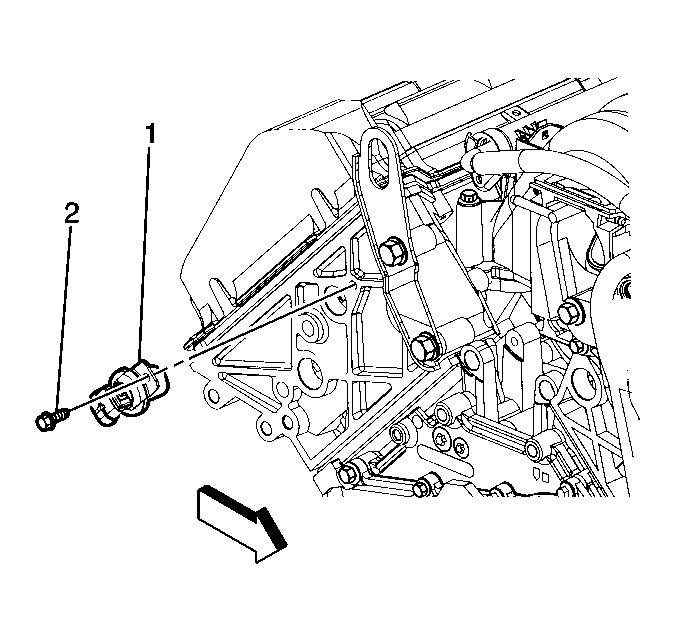
Removal Procedure
- Remove the 2 Coolant Recovery tank mounting nuts.
- Lift the Coolant Recovery tank to gain access to the CMP sensor.
- Disconnect the CMP sensor electrical connector.
- Remove the CMP sensor mounting bolt (2).
- Remove the CMP sensor (1) from the cylinder head.

| - | Remove the sensor by pulling on the sensor connector. Do not pry on the bracket. |
| - | Do not rotate (twist) the sensor or damage the mounting bracket (if the sensor is being reused). |
Installation Procedure
Important: When replacing the CMP sensor (new or reinstallation of the original
sensor), use the following recommended procedures:
• Make sure that the CMP sensor bore is completely free of any foreign
material (old O-ring, dirt, burrs, etc.). • Make sure that the flange on the CMP sensor bore is not damaged. • Clean all mounting surfaces before re-installing components. • Inspect the CMP sensor and replace if any of the following conditions
are present: - The bracket is damaged. - The face of the sensor (bottom of brass housing) exhibits any
damage. - Never install a sensor that has been dropped. • Lubricate the O-ring on the sensor prior to installing the sensor
(use Amojell or clean engine oil). • Check all connectors for damaged terminals.
- Install and fully seat the CMP sensor (1) into the cylinder head.
- Install the CMP sensor mounting bolt (2).
- Connect the CMP sensor electrical connector.
- Lower the Coolant Recovery tank onto the mounting studs.
- Install the 2 Coolant Recovery tank mounting nuts.

Notice: Use the correct fastener in the correct location. Replacement fasteners must be the correct part number for that application. Fasteners requiring replacement or fasteners requiring the use of thread locking compound or sealant are identified in the service procedure. Do not use paints, lubricants, or corrosion inhibitors on fasteners or fastener joint surfaces unless specified. These coatings affect fastener torque and joint clamping force and may damage the fastener. Use the correct tightening sequence and specifications when installing fasteners in order to avoid damage to parts and systems.
Tighten
Tighten the mounting bolt to 9N·m (80 Lb. in.)
Tighten
Tighten the mounting nuts to 1N·m (9 Lb. in.)
