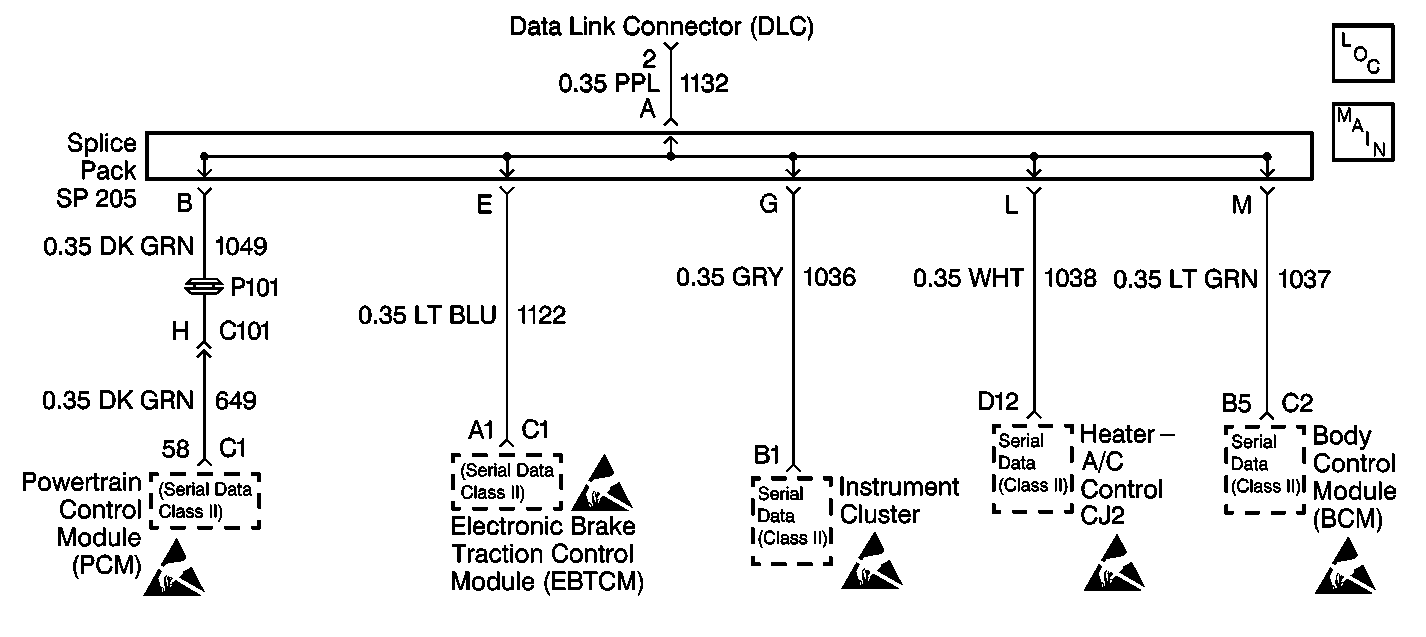
Circuit Description
Class 2 control modules receive a state of health message from the instrument cluster through the Class 2 serial data link.
Conditions for Setting the DTC
Class 2 control modules do not receive a state of health message from the instrument cluster.
Action Taken When the DTC Sets
- Class 2 control modules store DTC U1096 in memory.
- The SERVICE VEHICLE SOON indicator lamp turns on.
Conditions for Clearing the DTC
| • | DTC U1096 will clear as a current DTC U1096 and will set as a history DTC U1096 when the class 2 control modules detect a state of health message from the instrument cluster. |
| • | Using a scan tool. |
Diagnostic Aids
| • | The following conditions may cause an intermittent malfunction to occur: |
| • | An intermittent open or short to ground in circuit 1036 or 1037. |
| • | Poor connections at the instrument cluster. |
| • | An intermittent open in the Splice Pack SP205. |
| • | The Body Control Module (BCM) may store DTC U1096 if certain diagnostics are performed between the instrument cluster and the Data Link Connector (DLC). |
| • | DTC P1626 will set in the Powertrain Control Module (PCM) when the ignition switch is on with the Body Control Module (BCM) disconnected. When BCM diagnostics and repairs are completed, refer to Engine Controls for additional information on PCM related DTCs. |
Test Description
The numbers below refer to the step numbers on the diagnostic table.
-
This step checks for an open in the Splice Pack SP205.
-
This step checks for a short to ground in circuit 1036.
-
This step checks for a short to B+ in circuit 1036.
-
This step checks for an open in circuit 1036.
Step | Action | Value(s) | Yes | No | ||||
|---|---|---|---|---|---|---|---|---|
Is the resistance measured within the specified range? | Less than 2ohms | |||||||
Is the resistance measured same as the specified value? | ∞ | |||||||
Is the voltage measured within the specified range? | Less than 2V | |||||||
Is the resistance measured within the specified range? | Less than 5ohms | |||||||
5 |
Does the scan tool communicate with the instrument cluster? | -- | ||||||
6 | Replace the Splice Pack SP205. Is the repair complete? | -- | -- | |||||
7 | Repair short to ground in circuit 1036. Is the repair complete? | -- | -- | |||||
8 | Repair short to B+ in circuit 1036. Is the repair complete? | -- | -- | |||||
9 | Repair poor connection or open in circuit 1036. Is the repair complete? | -- | -- | |||||
10 |
Is the action complete? | -- | -- | |||||
11 |
Is the action complete? | -- | System OK | -- |
