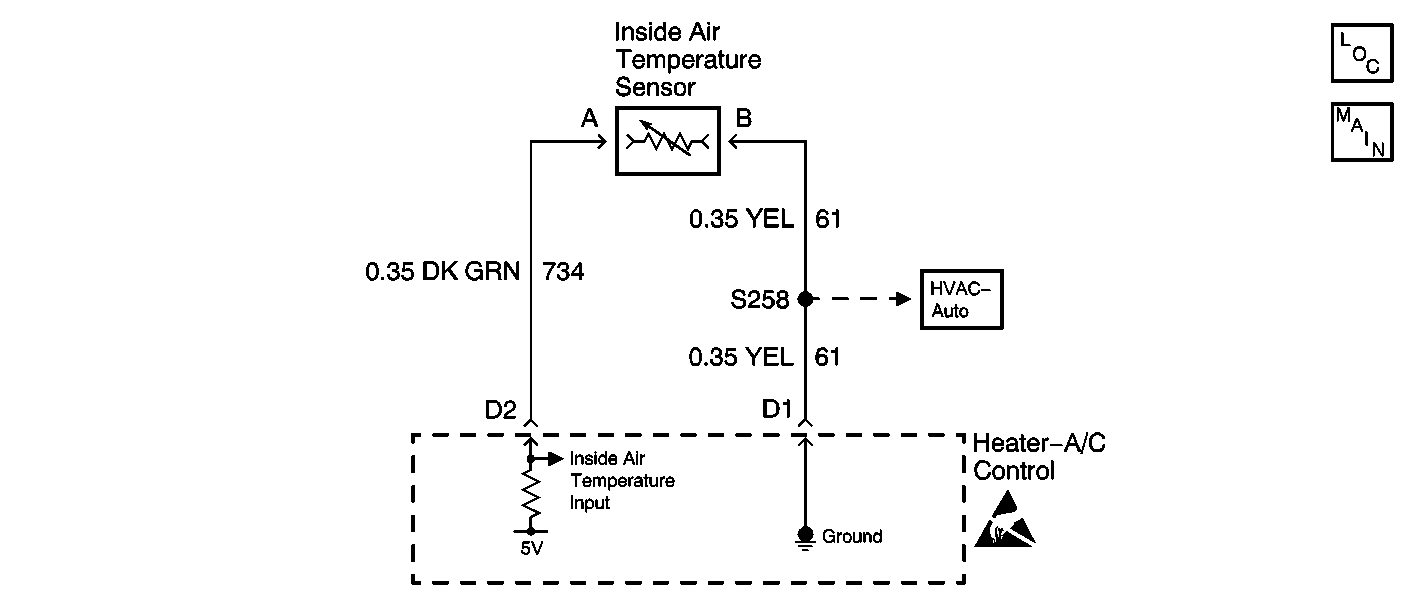
Circuit Description
The heater-A/C control determines the inside air temperature through an input from the inside air temperature sensor. The heater-A/C control receives a voltage signal from the inside air temperature sensor through circuit 734 (DK GRN). The inside air temperature sensor is grounded by the heater-A/C control through circuit 61 (YEL).
The internal resistance of the inside air temperature sensor decreases as the temperature increases. The difference between the ambient outside air temperature sensor measurement and the inside air temperature sensor measurement is used by the heater-A/C control in order to determine whether the incoming air should be cooled or warmed, and to what degree, in order to bring the inside air temperature to the selected temperature as quickly as possible.
Conditions for Setting the DTC
The heater-A/C control performs a check on the operation of the inside air temperature sensor and detects an open in circuit 734 (DK GRN).
Action Taken When the DTC Sets
| • | The heater-A/C control stores DTC B0338 in memory. |
| • | The heater-A/C control uses 24°C (75°F) as a substitute for the inside air temperature reading , allowing the A/C system to continue operation. |
Conditions for Clearing the DTC
| • | An open in circuit 734 (DK GRN) is no longer present. |
| • | Under all fault conditions, the ignition switch must be cycled from ON to OFF and back to ON before this DTC can change from current to history. |
| • | A history DTC clears after 100 drive cycles if a short to ground in circuit 734 (DK GRN) is no longer present. |
| • | Using a scan tool |
Diagnostic Aids
The following conditions may cause this DTC to set:
| • | A poor connection or open in circuit 734 (DK GRN) |
| • | A poor connection or open in circuit 61 (YEL) |
| • | A faulty inside air temperature sensor |
| • | A faulty heater-A/C control |
Test Description
The number(s) below refer to the step number(s) on the diagnostic table.
-
This step checks for proper voltage value at the inside air temperature sensor.
-
This step determines whether circuit 61 (YEL) or circuit 734 (DK GRN) is open.
-
This step checks for an open in circuit 61 (YEL).
-
This step checks for an open in circuit 734 (DK GRN).
Step | Action | Value(s) | Yes | No |
|---|---|---|---|---|
1 | Did you perform the heater-A/C control diagnostic system check? | -- | Go to Step 2 | Go to Diagnostic System Check |
Is the measured voltage within the specified range? | 4.5-5.5V | Go to Step 6 | Go to Step 3 | |
Use a DMM to measure the voltage between the inside air temperature sensor harness connector terminal A and ground. Is the measured voltage within the specified range? | 4.5-5.5V | Go to Step 4 | Go to Step 5 | |
Is the measured resistance less than the specified value? | 2ohms | Go to Step 8 | Go to Step 7 | |
Is the measured resistance less than the specified value? | 2ohms | Go to Step 8 | Go to Step 9 | |
6 |
Is the repair complete? | -- | Go to Step 10 | -- |
7 | Locate and repair a poor connection or an open in circuit 61 (YEL). Refer to Circuit Testing and Wiring Repairs in Wiring Systems. Is the repair complete? | -- | Go to Step 10 | -- |
8 |
Is the repair complete? | -- | Go to Step 10 | -- |
9 | Locate and repair a poor connection or an open in circuit 734 (DK GRN). Refer to Circuit Testing and Wiring Repairs in Wiring Systems. Is the repair complete? | -- | Go to Step 10 | -- |
10 | Verify the operation of the system. Does the system operate properly? | -- | System OK | Go to Diagnostic System Check |
