For time and/or mileage intervals of scheduled maintenance items, refer to Maintenance Schedule .
The following text and illustrations describe the details of the required scheduled maintenance services.
For information on the proper fluids and lubricants to use, refer to Fluid and Lubricant Recommendations .
Engine Oil and Filter Change
For the engine oil and filter changing procedure, refer to Engine Oil and Oil Filter Replacement
For information on the correct engine oil quality and viscosity, refer to the following.
Engine Oil Quality
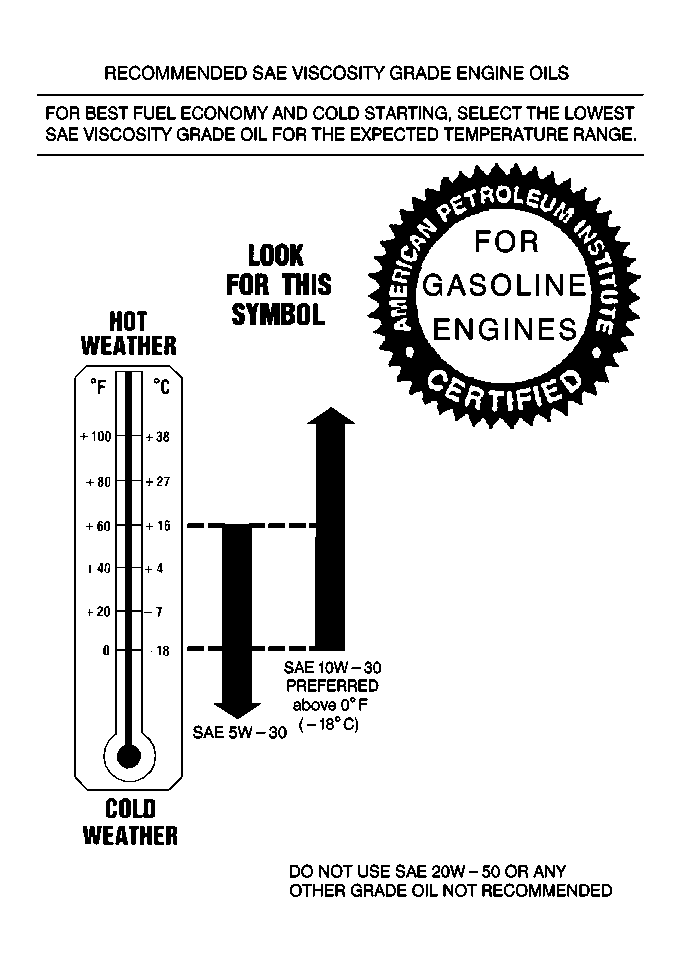
Oils of the proper quality for the vehicle can be identified by looking for the STARBURST symbol. The STARBURST symbol indicates that the oil has been certified by the American Petroleum Institute (API), and is preferred for use in gasoline engines.

Engine Oil Viscosity
Notice: Using oils of any viscosity other than those recommended could result in engine damage. When choosing an oil, consider the range of temperatures the vehicle will be operated in before the next oil change. Then, select the recommended oil viscosity.
The recommended oil viscosity for all vehicles when the temperature is above 0°F (-18°C) is SAE 10W-30.
Engine oil viscosity (thickness) has an effect on the fuel economy and the cold-weather operation (starting and oil flow). Lower viscosity engine oils can provide better fuel economy and cold-weather performance. However, higher temperature weather condition require higher viscosity engine oils for satisfactory lubrication. When the temperature will be very cold and never above 60°F °C), SAE 5W-30 should be used in all models. SAE 20W-50 or oils of other viscosity rating or quality designations are NOT recommended for use in any vehicles at any time.
Chassis Lubrication
Notice: Do not lubricate the parking brake cables. Lubrication destroys the plastic coating on the cable.
Lubricate transaxle shift linkage. Lubricate the parking brake guides, underbody contact points and linkage.
Lubricating Joints that have Grease Fittings
Important: Wipe off all dirt from the grease fitting before lubricating the joint. Ball joints should not be lubricated unless their temperature is -12°C (10°F) or higher. During cold weather, the ball joint should be allowed to warm up as necessary before being lubricated. Use a low-pressure grease gun on all joints to prevent seal damage.
Apply grease slowly to the lower ball joints and the tie rod ends while watching the grease seal. Apply grease until grease is seen bleeding from the seal. If the seal expands but no grease is seen, do not apply any more grease and allow time for the grease to bleed from the seal.
Tire and Wheel Inspection and Rotation
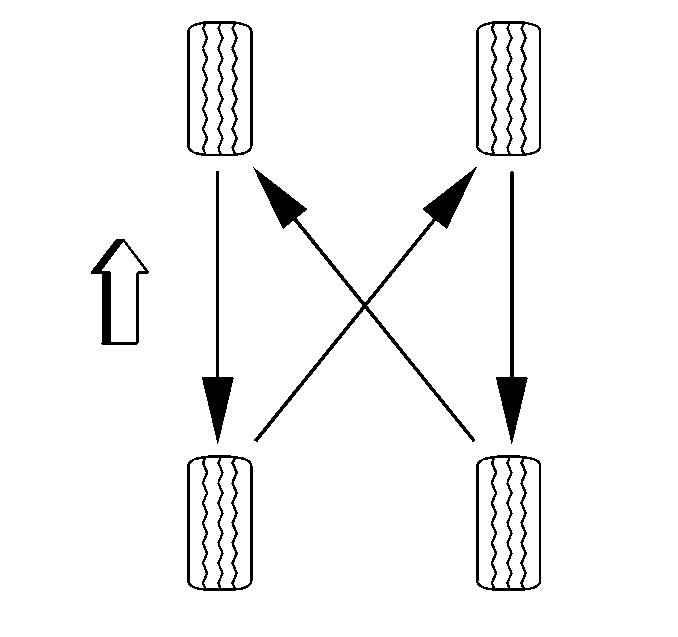
Check the tires for abnormal wear or damage. Rotate the tires to equalize the wear and obtain maximum tire life. If irregular or premature wear exists, refer to Abnormal or Excessive Tire Wear in Suspension.

Accessory Drive Belt Inspection
Inspect the accessory drive belts for the following:
| • | Cracks |
| • | Fraying |
| • | Wear |
| • | Proper tension |
Replace as needed. (Belts can have many small cracks in individual ribs without affecting the performance.) Refer to Drive Belt Replacement in Engine Mechanical.
Transmission Service
Automatic Transmission
Change both the fluid and the filter according to the maintenance schedule intervals. For maintenance schedule information, refer to Maintenance Schedule .
For the fluid and filter changing procedure, refer to Transaxle.
Spark Plug Replacement
Replace the spark plugs according to the maintenance schedule intervals with the correct type. For maintenance schedule information, refer to Maintenance Schedule .
For information on the correct type of spark plug, Refer to Maintenance Items
For the spark plug replacement procedure, Refer to Engine Controls.
Spark Plug Wire Inspection
Clean the spark plug wires and inspect for burns, cracks or other damage. Check the wire boot fit at the coils and at the spark plugs. Replace wires as needed. Refer to Engine Controls.
Air Cleaner Filter Replacement
Replace the air cleaner filter according to the maintenance schedule intervals with the correct type. For maintenance schedule information, refer to Maintenance Schedule .
For information on the correct type of air cleaner filter, Refer to Maintenance Items .
For the air cleaner filter replacement procedure, refer to Engine Controls.
Fuel Tanks, Cap and Lines Inspection
Inspect the following components for damage or leaks:
| • | The fuel tanks |
| • | The cap |
| • | The lines |
| • | The fuel rails |
| • | The injection assemblies |
Inspect the fuel cap gasket for an even filler neck imprint and any damage. Replace parts as needed. Periodic replacement of the fuel filter is not required. For fuel system diagnosis information, refer to Engine Controls.
