A/C COMPRESSOR MOAN NOISE RPL.A/C COMP. CLUTCH DRIVER

SUBJECT: A/C COMPRESSOR MOAN NOISE (REPLACE A/C COMPRESSOR CLUTCH DRIVER)
VEHICLES AFFECTED: 1990-93 "C,E,K" MODELS
THIS BULLETIN SUPERSEDES AND REPLACES CORPORATE BULLETIN REFERENCE NUMBER 111401.** THIS BULLETIN IS BEING REVISED TO ADD THE 1992-1993 MODEL YEARS.
Some 1990-1993 Cadillac DeVilles, Fleetwoods, Eldorados, and Sevilles may exhibit a whine or moan noise which is evident only at certain engine speed ranges (1400-2100 rpm) with the A/C compressor engaged. This compressor moan noise is more pronounced when operating at maximum cooling demand (high ambient temperatures and humidity). This noise may be a torsional shaft noise which is being transmitted through the vehicle during compressor operation.
All lines and hoses should be checked to verify that they are not grounded to the structure, all brackets should be properly positioned, and all bolts should be confirmed to be at the proper torque. If condition still exists, repair by replacing the A/C compressor clutch driver with a damped service clutch driver and new "soft" shaft key assembly kit contained in P/N 2724583.
SERVICE PROCEDURE:
This procedure can be done on vehicle and without the need for refrigerant recovery and recharge. Detail description and illustrations for removing and replacing this clutch driver may be found in Section 1 D2 "Compressor Clutch Plate and Hub Assembly" of the Service Information Manual.
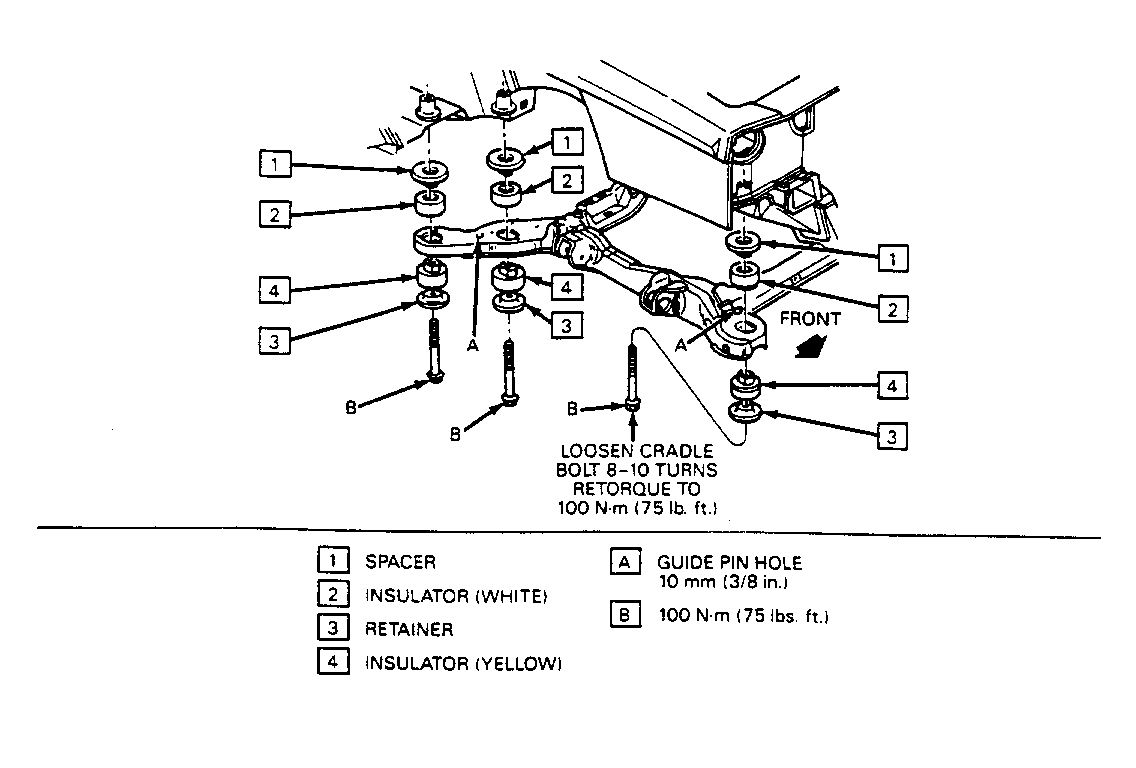
1. Loosen right front engine mounting cradle bolt 8-10 turns (DeVilles and Fleetwoods only).
2. Remove wheel well splash shield.
3. Remove shaft nut using shaft nut socket J-33022.
4. Remove clutch plate and hub assembly using clutch plate remover-installer J-33013-B.
5. Remove shaft key and discard.
6. Install new shaft key into the hub key groove. Allow the key to project approximately 3.2mm (1/8") out of the key way.
IMPORTANT: New clutch key provided with the kit must be used. Use of old key may damage new clutch driver.
7. Be sure frictional surface of the clutch plate and the clutch rotor are clean before installing the clutch plate and hub assembly.
8. Align shaft key with the shaft key way and place the clutch plate and hub assembly onto the compressor shaft.
9. Install clutch plate and hub assembly using clutch plate remover-installer J-33013-B.
10. Set air gap between frictional surfaces of the clutch plate and pulley rotor to .63mm (.025').
11. Assemble and tighten shaft nut to 17 N.m (12 lbs. ft.).
12. Replace wheel well splash shield.
13. Tighten right front cradle bolt to torque specification of 100 N.m (75 lbs. ft.). (DeVilles and Fleetwoods only). Refer to Figure 1.
IMPORTANT: Failure to complete step 14 could result in a slipping condition in the new clutch.
14. With control head temperature set at 60, engine running, engage the compressor 50 times by alternating between "econ" and "auto". This operation will ensure proper break in of the clutch driver and the pulley and eliminate possible clutch slippage during extended A/C compressor operation.
WARRANTY INFORMATION:
For vehicles repaired under warranty use:
Labour Time: 0.9 hour.
** BULLETIN REFERENCES: Corporate Ref. 111401
General Motors of Canada 91-1-135
Cadillac Division T-91-85

General Motors bulletins are intended for use by professional technicians, not a "do-it-yourselfer". They are written to inform those technicians of conditions that may occur on some vehicles, or to provide information that could assist in the proper service of a vehicle. Properly trained technicians have the equipment, tools, safety instructions and know-how to do a job properly and safely. If a condition is described, do not assume that the bulletin applies to your vehicle, or that your vehicle will have that condition. See a General Motors dealer servicing your brand of General Motors vehicle for information on whether your vehicle may benefit from the information.
