Dimensions - Body C100/Long Body
| Table 1: | Front Compartment Dimensions |
| Table 2: | Body Dimensions (Long Body) |
| Table 3: | Underbody Dimensions |
Three Dimensional Distance -- X, Y, Z
This universal measuring system is capable of simultaneously dimensioning the length, width, and height of a datum plane. Three dimensional distances are used for both underbody and upperbody measuring.
X = Fore and aft measurements along the center line of the vehicle. An O plane is located forward of the master gage hole at the front of the vehicle. All measurements are made from this plane toward the rear of the vehicle.
Y = Cross car dimensions. Positive values are measured from the center of the vehicle to the right side of the vehicle. Negative values are measured from the center of the vehicle to the left side. When values are not listed separately to change the side of the vehicle, you need only to change the Y dimensions to the opposite value, + or -, from what is listed.
Z = Vertical measurement from the datum plane below the rocker panel lower flange edge (O plane).
All dimensions are symmetrical, unless otherwise noted.
In order to properly repair the spaceframe, restore the vehicle to the XYZ dimensions, as originally built. Relational (linear) dimensions are for reference only. Use relational dimensions for diagnosis or inspection only. Relational dimensions are not as accurate as XYZ dimensions and measuring systems.
The gage holes shown are the actual fixture locations that are used to build the vehicle.
Front Compartment
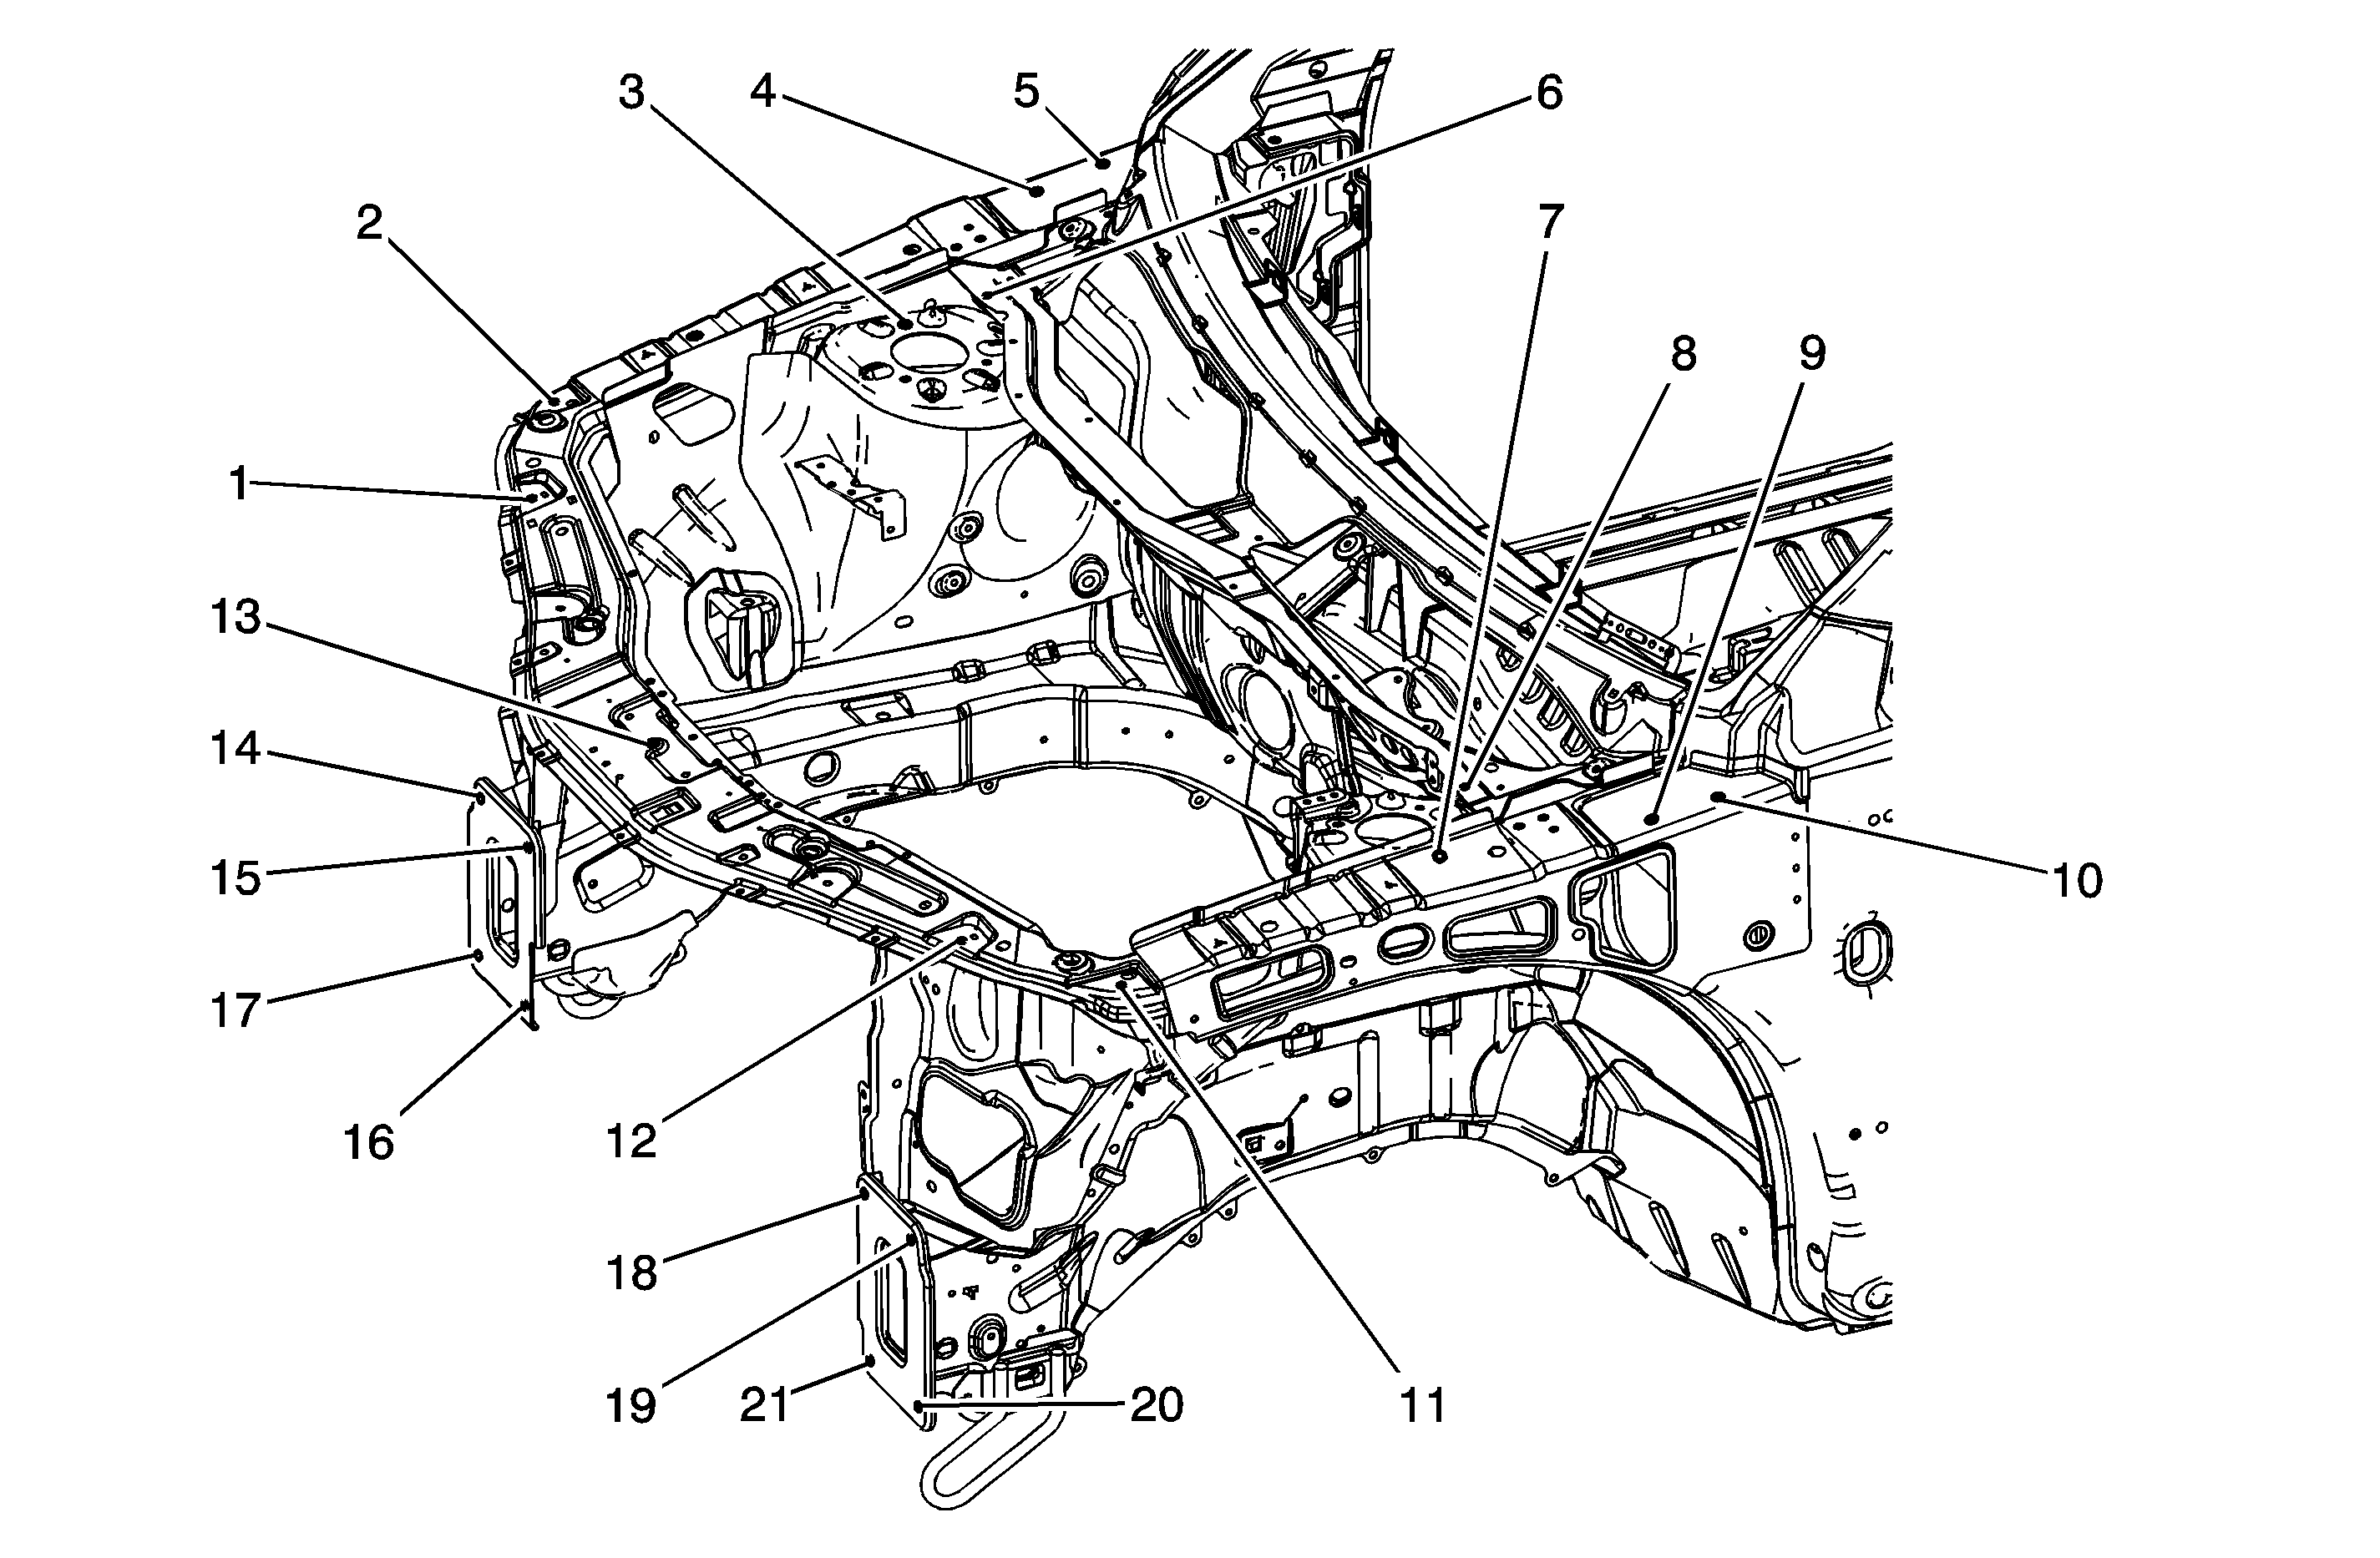
Location | Description | Length = x | Width = y | Height = z | Point to Point |
|---|---|---|---|---|---|
1 | Hole | 1187 | 540 | 904 | x |
2 | Hole | 1299 | 713 | 9080 | x |
3 | Strut Attachment Hole | 1698 | 648 | 934 | x |
4 | Hood Hinge Hole | 1919 | 760 | 987 | x |
5 | Hood Hinge Hole | 2003 | 773 | 996 | x |
6 | Air Inlet Grille Attachment Hole | 1776 | 600 | 977 | x |
7 | Hole | 1698 | 648 | 934 | x |
8 | Air Inlet Grille Attachment Hole | 1776 | 600 | 977 | x |
9 | Hood Hinge Hole | 1919 | 760 | 987 | x |
10 | Hood Hinge Hole | 2003 | 773 | 996 | x |
11 | Hole | 1299 | 713 | 908 | x |
12 | Hole | 1187 | 540 | 904 | x |
13 | Hood Striker Attachment Hole | 1071 | 0 | 903 | x |
14 | Impact Bar Attachment Hole | 1122 | 540 | 533 | x |
15 | Impact Bar Attachment Hole | 1122 | 423 | 531 | x |
16 | Impact Bar Attachment Hole | 1122 | 434 | 320 | x |
17 | Impact Bar Attachment Hole | 1122 | 554 | 324 | x |
18 | Impact Bar Attachment Hole | 1122 | 423 | 531 | x |
19 | Impact Bar Attachment Hole | 1122 | 540 | 533 | x |
20 | Impact Bar Attachment Hole | 1122 | 554 | 324 | x |
21 | Impact Bar Attachment Hole | 1122 | 534 | 320 | x |
14 to 19 | x | x | x | x | 1080 |
15 to 18 | x | x | x | x | 846 |
2 to 11 | x | x | x | x | 1426 |
4 to 11 | x | x | x | x | 1600 |
2 to 9 | x | x | x | x | 1600 |
16 to 21 | x | x | x | x | 868 |
All dimensions are measured from a zero line, a center line, and a common datum. All dimensions are symmetrical unless otherwise specified. | |||||
Body Side
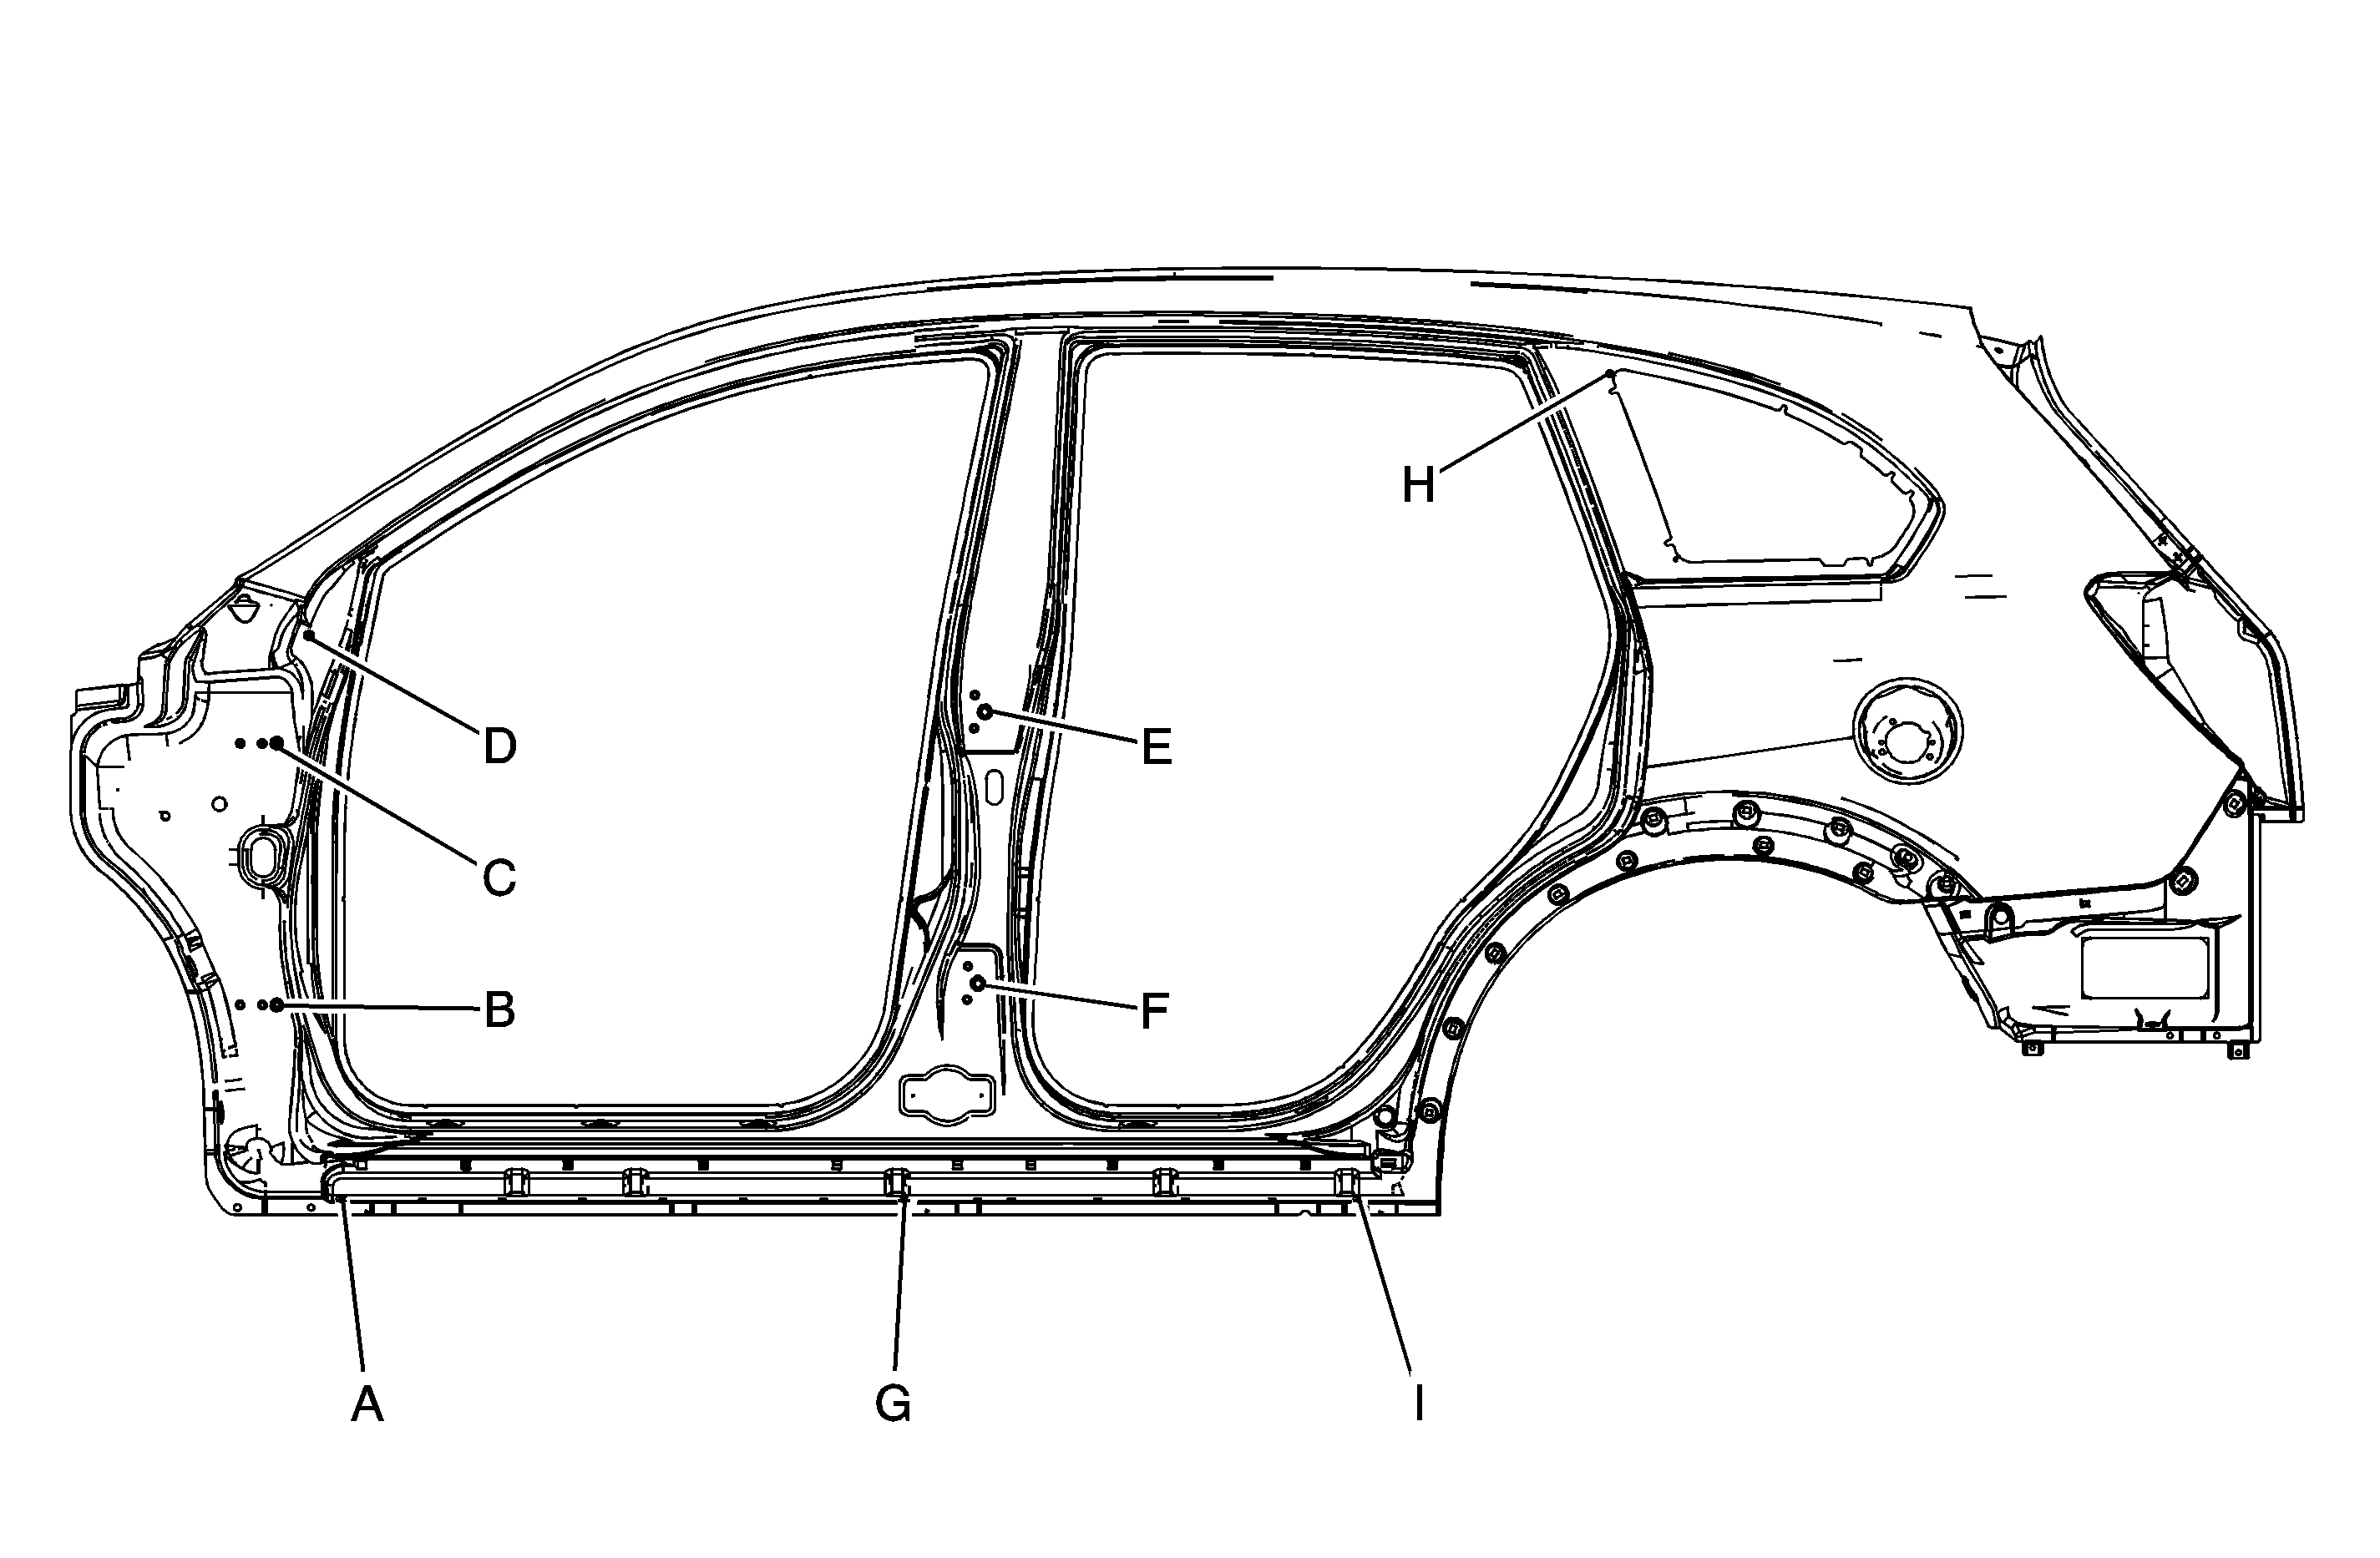
Location | Length |
|---|---|
A-G | 840 mm |
A-I | 1520 mm |
B-F | 1049 mm |
B-E | 1145 mm |
B-C | 392 mm |
C-E | 1059 mm |
C-F | 1108 mm |
D-H | 1956 mm |
E-F | 407 mm |
F-H | 1323 mm |
Underbody
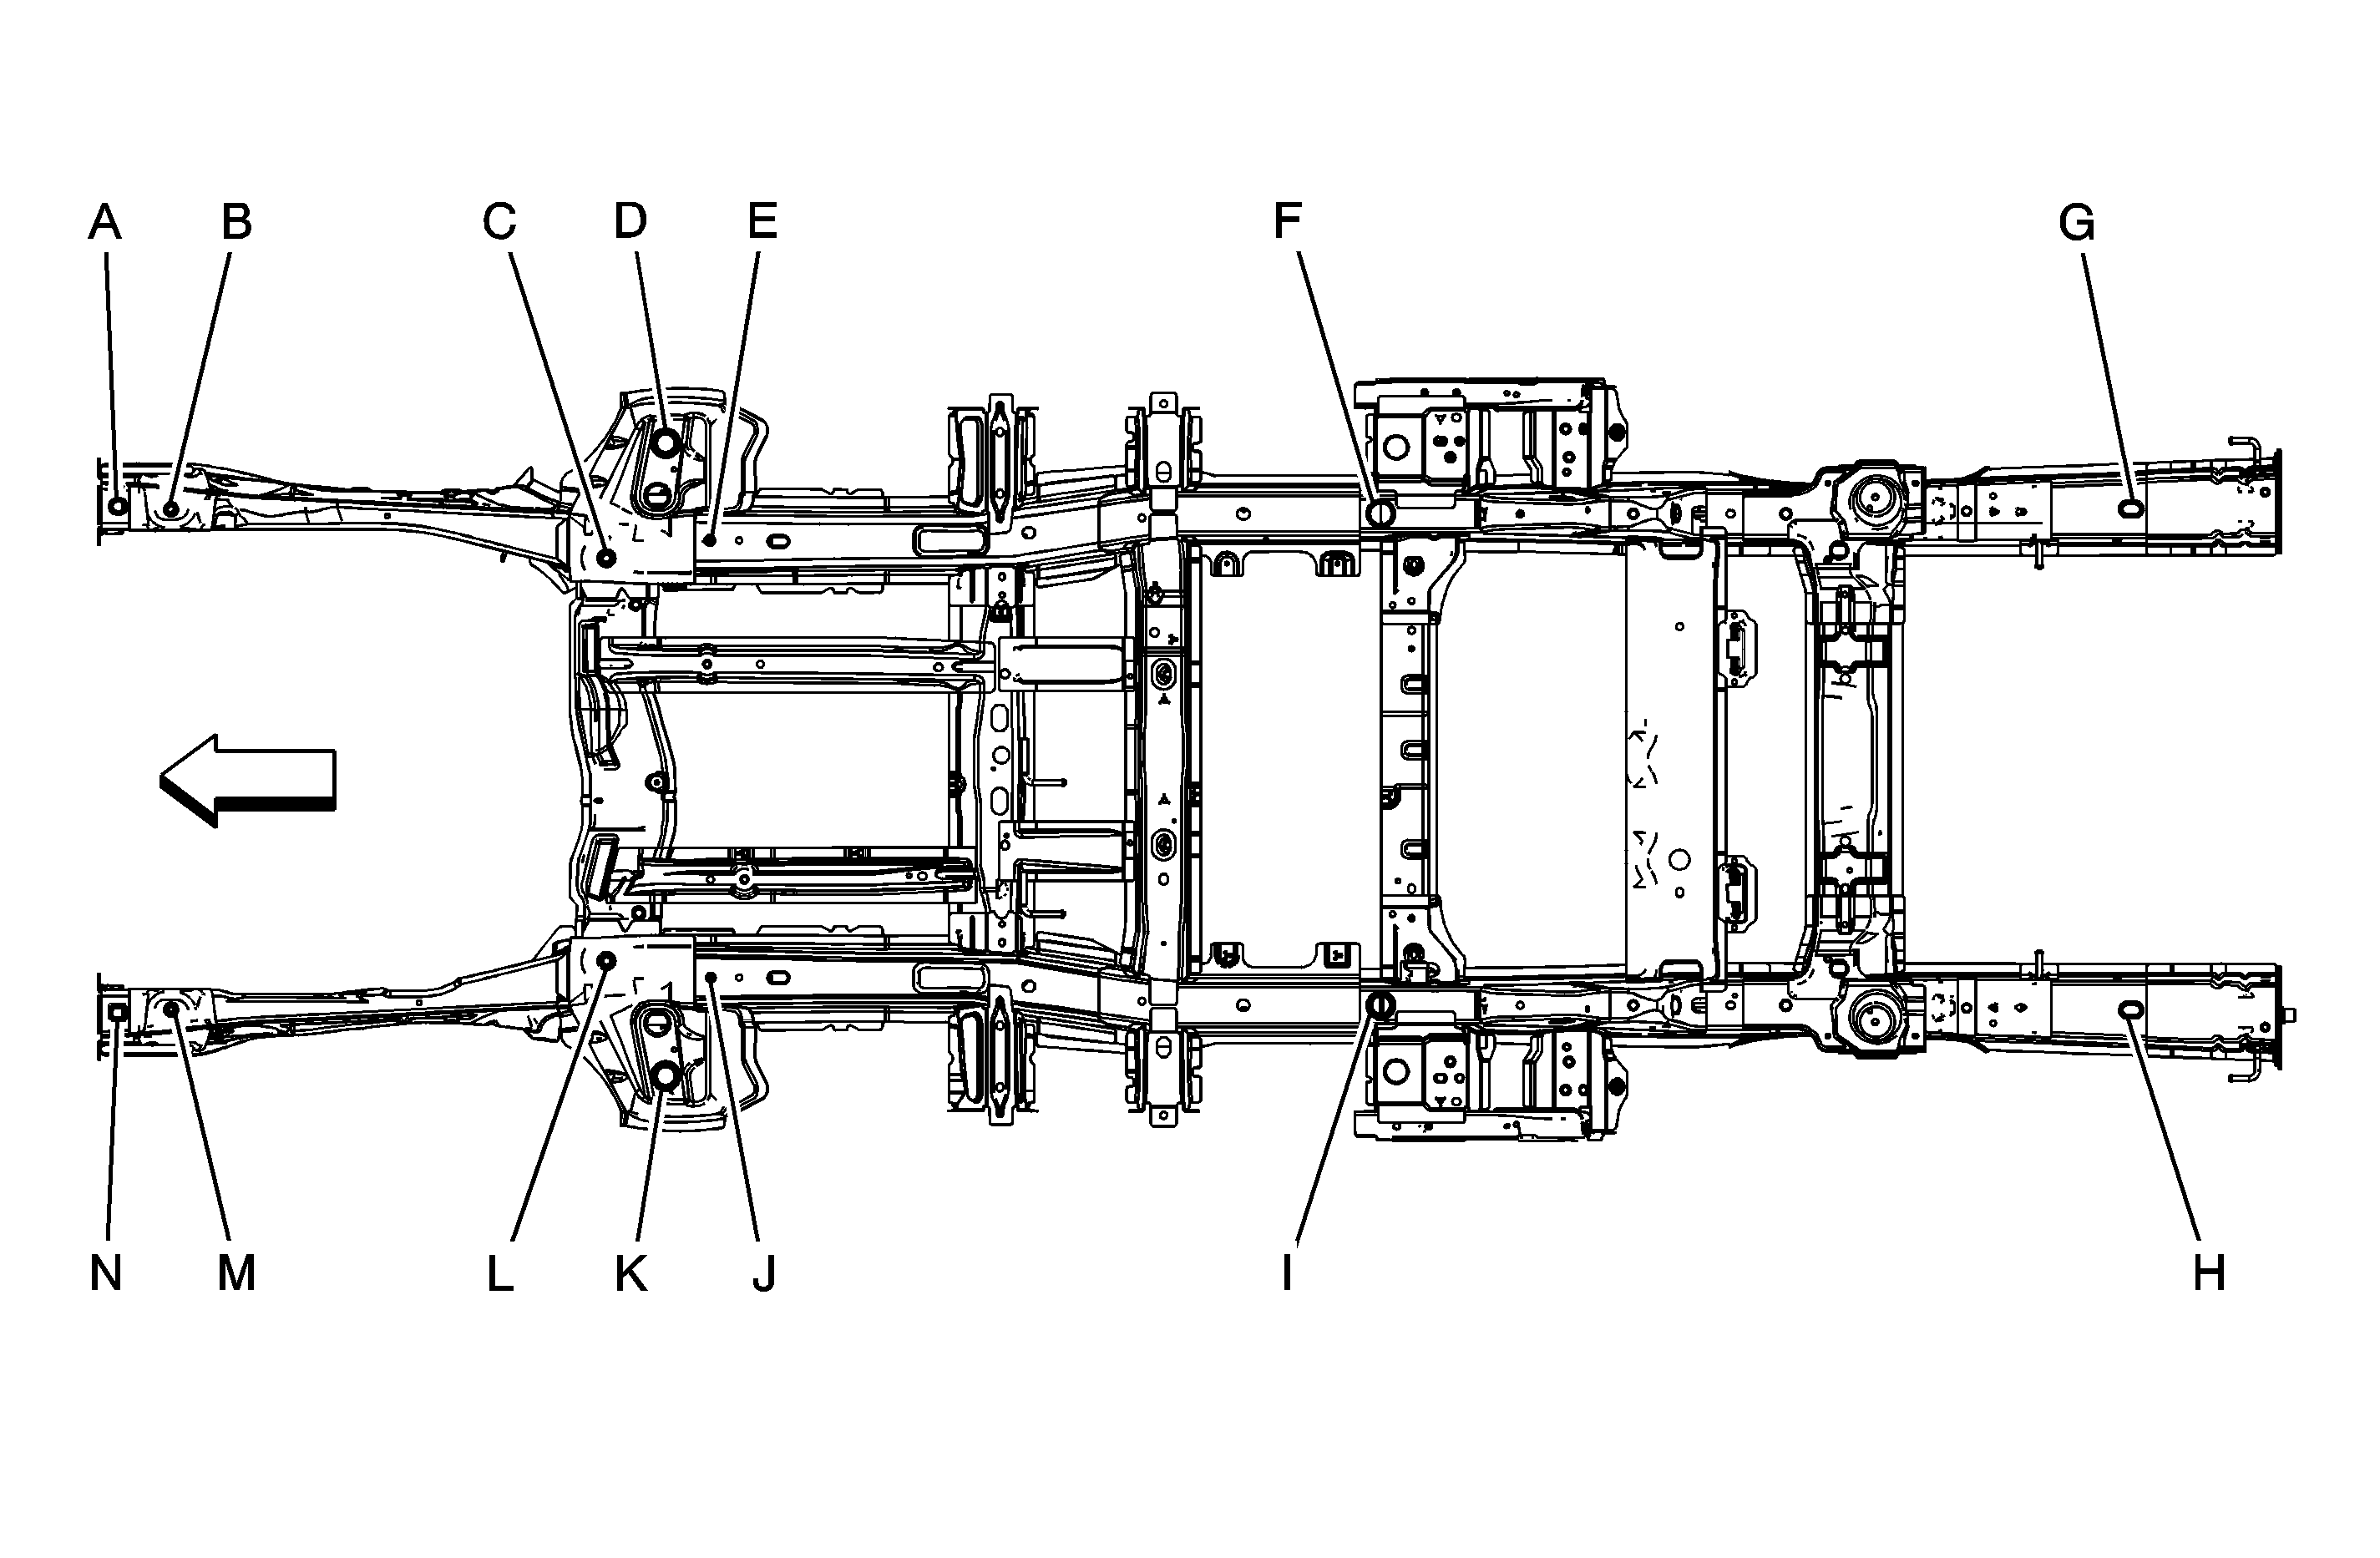
Location | Description | Length = x | Width = y | Height = z | Point to Point |
|---|---|---|---|---|---|
A | Hole | 1162 | 480 | 341 | x |
B | Hole | 1261 | 474 | 287 | x |
C | Hole | 2081 | 382 | 230 | x |
D | Hole | 2192 | 600 | 193 | x |
F | Hole | 3538 | 466 | 206 | x |
G | Hole | 4955 | 475 | 404 | x |
H | Hole | 4955 | 475 | 404 | x |
I | Hole | 3538 | 466 | 206 | x |
J | Hole | 2275 | 415 | 197 | x |
K | Hole | 2192 | 600 | 193 | x |
L | Hole | 2081 | 382 | 230 | x |
M | Hole | 1261 | 474 | 287 | x |
N | Hole | 1162 | 480 | 341 | x |
A to G | x | x | x | x | 3794 mm |
A to E | x | x | x | x | 1124 mm |
A to J | x | x | x | x | 1435 mm |
B to L | x | x | x | x | 1187 mm |
C to N | x | x | x | x | 1266 mm |
D to F | x | x | x | x | 1353 mm |
D to I | x | x | x | x | 1717 mm |
E to I | x | x | x | x | 1540 mm |
E to N | x | x | x | x | 1126 mm |
F to G | x | x | x | x | 1431 mm |
F to J | x | x | x | x | 1540 mm |
F to K | x | x | x | x | 1717 mm |
F to H | x | x | x | x | 1712 mm |
G to I | x | x | x | x | 1712 mm |
H to I | x | x | x | x | 1431 mm |
H to N | x | x | x | x | 3794 mm |
I to K | x | x | x | x | 1353 mm |
I to N | x | x | x | x | 1124 mm |
Dimensions - Body C105/Short Body
| Table 1: | Front Compartment Dimensions |
| Table 2: | Body Dimensions (Short Body) |
| Table 3: | Underbody Dimensions |
Three Dimensional Distance -- X, Y, Z
This universal measuring system is capable of simultaneously dimensioning the length, width, and height of a datum plane. Three dimensional distances are used for both underbody and upperbody measuring.
X = Fore and aft measurements along the center line of the vehicle. An O plane is located forward of the master gage hole at the front of the vehicle. All measurements are made from this plane toward the rear of the vehicle.
Y = Cross car dimensions. Positive values are measured from the center of the vehicle to the right side of the vehicle. Negative values are measured from the center of the vehicle to the left side. When values are not listed separately to change the side of the vehicle, you need only to change the Y dimensions to the opposite value, + or -, from what is listed.
Z = Vertical measurement from the datum plane below the rocker panel lower flange edge (O plane).
All dimensions are symmetrical, unless otherwise noted.
In order to properly repair the spaceframe, restore the vehicle to the XYZ dimensions, as originally built. Relational (linear) dimensions are for reference only. Use relational dimensions for diagnosis or inspection only. Relational dimensions are not as accurate as XYZ dimensions and measuring systems.
The gage holes shown are the actual fixture locations that are used to build the vehicle.
Front Compartment

Location | Description | Length = x | Width = y | Height = z | Point to Point |
|---|---|---|---|---|---|
1 | Hole | 1170 | 488 | 904 | x |
2 | Hole | 1299 | 713 | 912 | x |
3 | Strut Attachment Hole | 1698 | 648 | 934 | x |
4 | Hood Hinge Hole | 1919 | 760 | 987 | x |
5 | Hood Hinge Hole | 2003 | 773 | 996 | x |
6 | Air Inlet Grille Attachment Hole | 1776 | 600 | 977 | x |
7 | Hole | 1698 | 648 | 934 | x |
8 | Air Inlet Grille Attachment Hole | 1776 | 600 | 977 | x |
9 | Hood Hinge Hole | 1919 | 760 | 987 | x |
10 | Hood Hinge Hole | 2003 | 773 | 996 | x |
11 | Hole | 1299 | 713 | 912 | x |
12 | Hole | 1170 | 488 | 904 | x |
13 | Hood Striker Attachment Hole | 1071 | 0 | 903 | x |
14 | Impact Bar Attachment Hole | 1122 | 540 | 533 | x |
15 | Impact Bar Attachment Hole | 1122 | 423 | 531 | x |
16 | Impact Bar Attachment Hole | 1122 | 434 | 320 | x |
17 | Impact Bar Attachment Hole | 1122 | 554 | 324 | x |
18 | Impact Bar Attachment Hole | 1122 | 423 | 531 | x |
19 | Impact Bar Attachment Hole | 1122 | 540 | 533 | x |
20 | Impact Bar Attachment Hole | 1122 | 554 | 324 | x |
21 | Impact Bar Attachment Hole | 1122 | 534 | 320 | x |
14 to 19 | x | x | x | x | 1080 |
15 to 18 | x | x | x | x | 846 |
2 to 11 | x | x | x | x | 1426 |
4 to 11 | x | x | x | x | 1600 |
2 to 9 | x | x | x | x | 1600 |
16 to 21 | x | x | x | x | 868 |
All dimensions are measured from a zero line, a center line, and a common datum. All dimensions are symmetrical unless otherwise specified. | |||||
Body Side

Location | Length |
|---|---|
A-G | 840 mm |
A-I | 1520 mm |
B-F | 1049 mm |
B-E | 1145 mm |
B-C | 392 mm |
C-E | 1059 mm |
C-F | 1108 mm |
D-H | 1992 mm |
E-F | 407 mm |
F-H | 1331 mm |
Underbody

Location | Description | Length = x | Width = y | Height = z | Point to Point |
|---|---|---|---|---|---|
A | Hole | 1162 | 480 | 341 | x |
B | Hole | 1261 | 474 | 287 | x |
C | Hole | 2081 | 382 | 230 | x |
D | Hole | 2192 | 600 | 193 | x |
F | Hole | 3538 | 466 | 206 | x |
G | Hole | 4950 | 475 | 404 | x |
H | Hole | 4950 | 475 | 404 | x |
I | Hole | 3538 | 466 | 206 | x |
J | Hole | 2275 | 415 | 197 | x |
K | Hole | 2192 | 600 | 193 | x |
L | Hole | 2081 | 382 | 230 | x |
M | Hole | 1261 | 474 | 287 | x |
N | Hole | 1162 | 480 | 341 | x |
A to G | x | x | x | x | 3789 mm |
A to E | x | x | x | x | 1124 mm |
A to J | x | x | x | x | 1435 mm |
B to j | x | x | x | x | 1187 mm |
C to N | x | x | x | x | 1266 mm |
D to F | x | x | x | x | 1353 mm |
D to I | x | x | x | x | 1717 mm |
E to I | x | x | x | x | 1540 mm |
E to N | x | x | x | x | 1126 mm |
F to G | x | x | x | x | 1426 mm |
F to J | x | x | x | x | 1540 mm |
F to K | x | x | x | x | 1717 mm |
F to H | x | x | x | x | 1708 mm |
G to I | x | x | x | x | 1708 mm |
H to I | x | x | x | x | 1426 mm |
H to N | x | x | x | x | 3789 mm |
I to K | x | x | x | x | 1353 mm |
J to N | x | x | x | x | 1124 mm |
