GM Service Manual Online
For 1990-2009 cars only

Air Conditioning Evaporator Hose Assembly Replacement LBW/A28NET
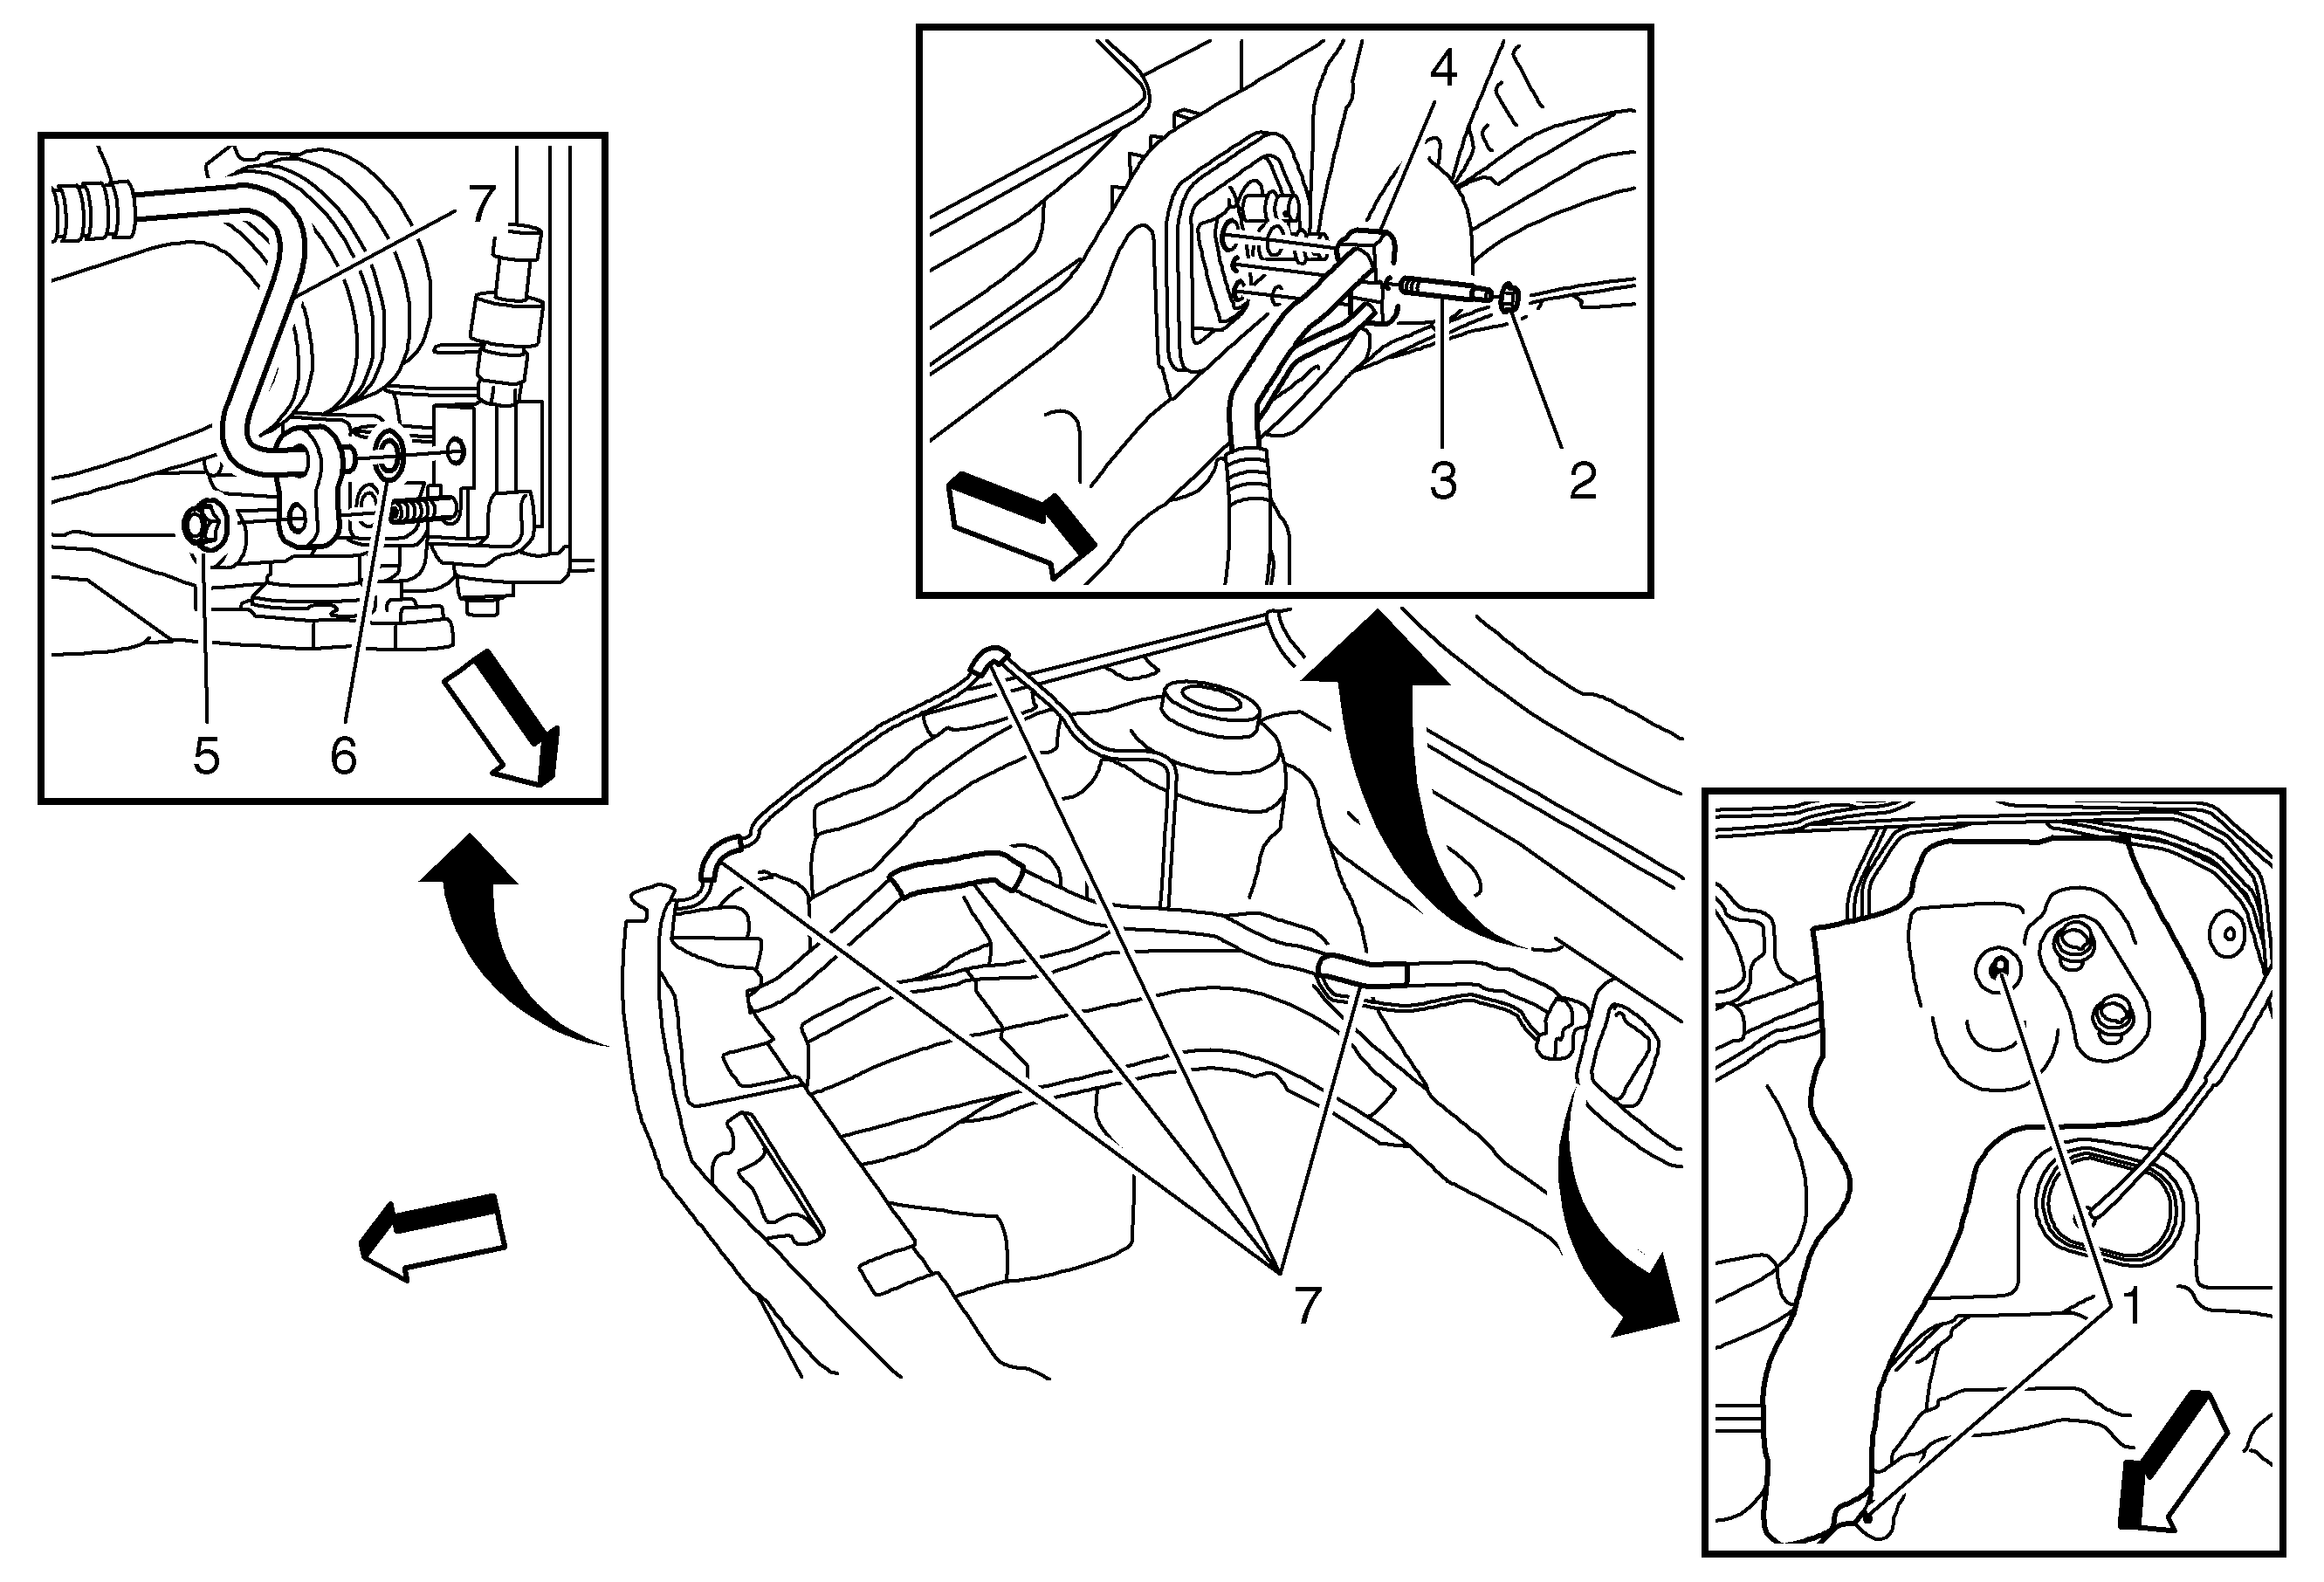

Object Number: 2020271  Size: SH

Callout

Component Name

Preliminary Procedures

  1. Recover the refrigerant. Refer to Refrigerant Recovery and Recharging.
  2. Remove the front bumper fascia assembly. Refer to Front Bumper Fascia Replacement.
  3. Remove the Fuel Injector Sight Shield. Refer to Fuel Injector Sight Shield Replacement.
  4. Remove the Headlamp - Right Side. Refer to Headlamp Replacement.
  5. Remove the Engine Mount. Refer to Engine Mount Bracket Replacement - Right Side.
  6. Remove the A/C Compressor and Condenser Hose from the A/C Evaporator Hose. Refer to Air Conditioning Compressor and Condenser Hose Replacement.

1

AC Evaporator Thermal Expansion Valve Heat and Brake Pipe Shield Fastener (Qty: 2)

Procedure

  1. Remove the A/C TXV heat and brake pipe shield.
  2. Release the brake pipes.

2

A/C Evaporator Hose Fastener

Caution: Refer to Fastener Caution in the Preface section.

Tighten
20 N·m (15 lb ft)

3

A/C Evaporator Hose Stud Bolt

Tighten
15 N·m (11 lb in)

4

A/C Evaporator Hose Assembly

Procedure

  1. Remove the A/C Evaporator hose from the thermal expansion valve (TXV).
  2. Remove and discard sealing washer. Refer to Sealing Washer Replacement.

5

A/C Evaporator Hose Fastener

Procedure

Remove the A/C Evaporator Hose from the A/C Condenser and cap hose.

Tighten
20 N·m (15 lb ft)

6

Sealing Washer

Procedure

Remove and discard sealing washer. Refer to Sealing Washer Replacement.

7

Air Conditioning Evaporator Hose Assembly

Procedure

  1. Release the A/C Evaporator Hose from the attaching clips.
  2. When the installation is postponed, close the off lines and connections.

Air Conditioning Evaporator Hose Assembly Replacement LDE/A16XER, 2H0/A18XER
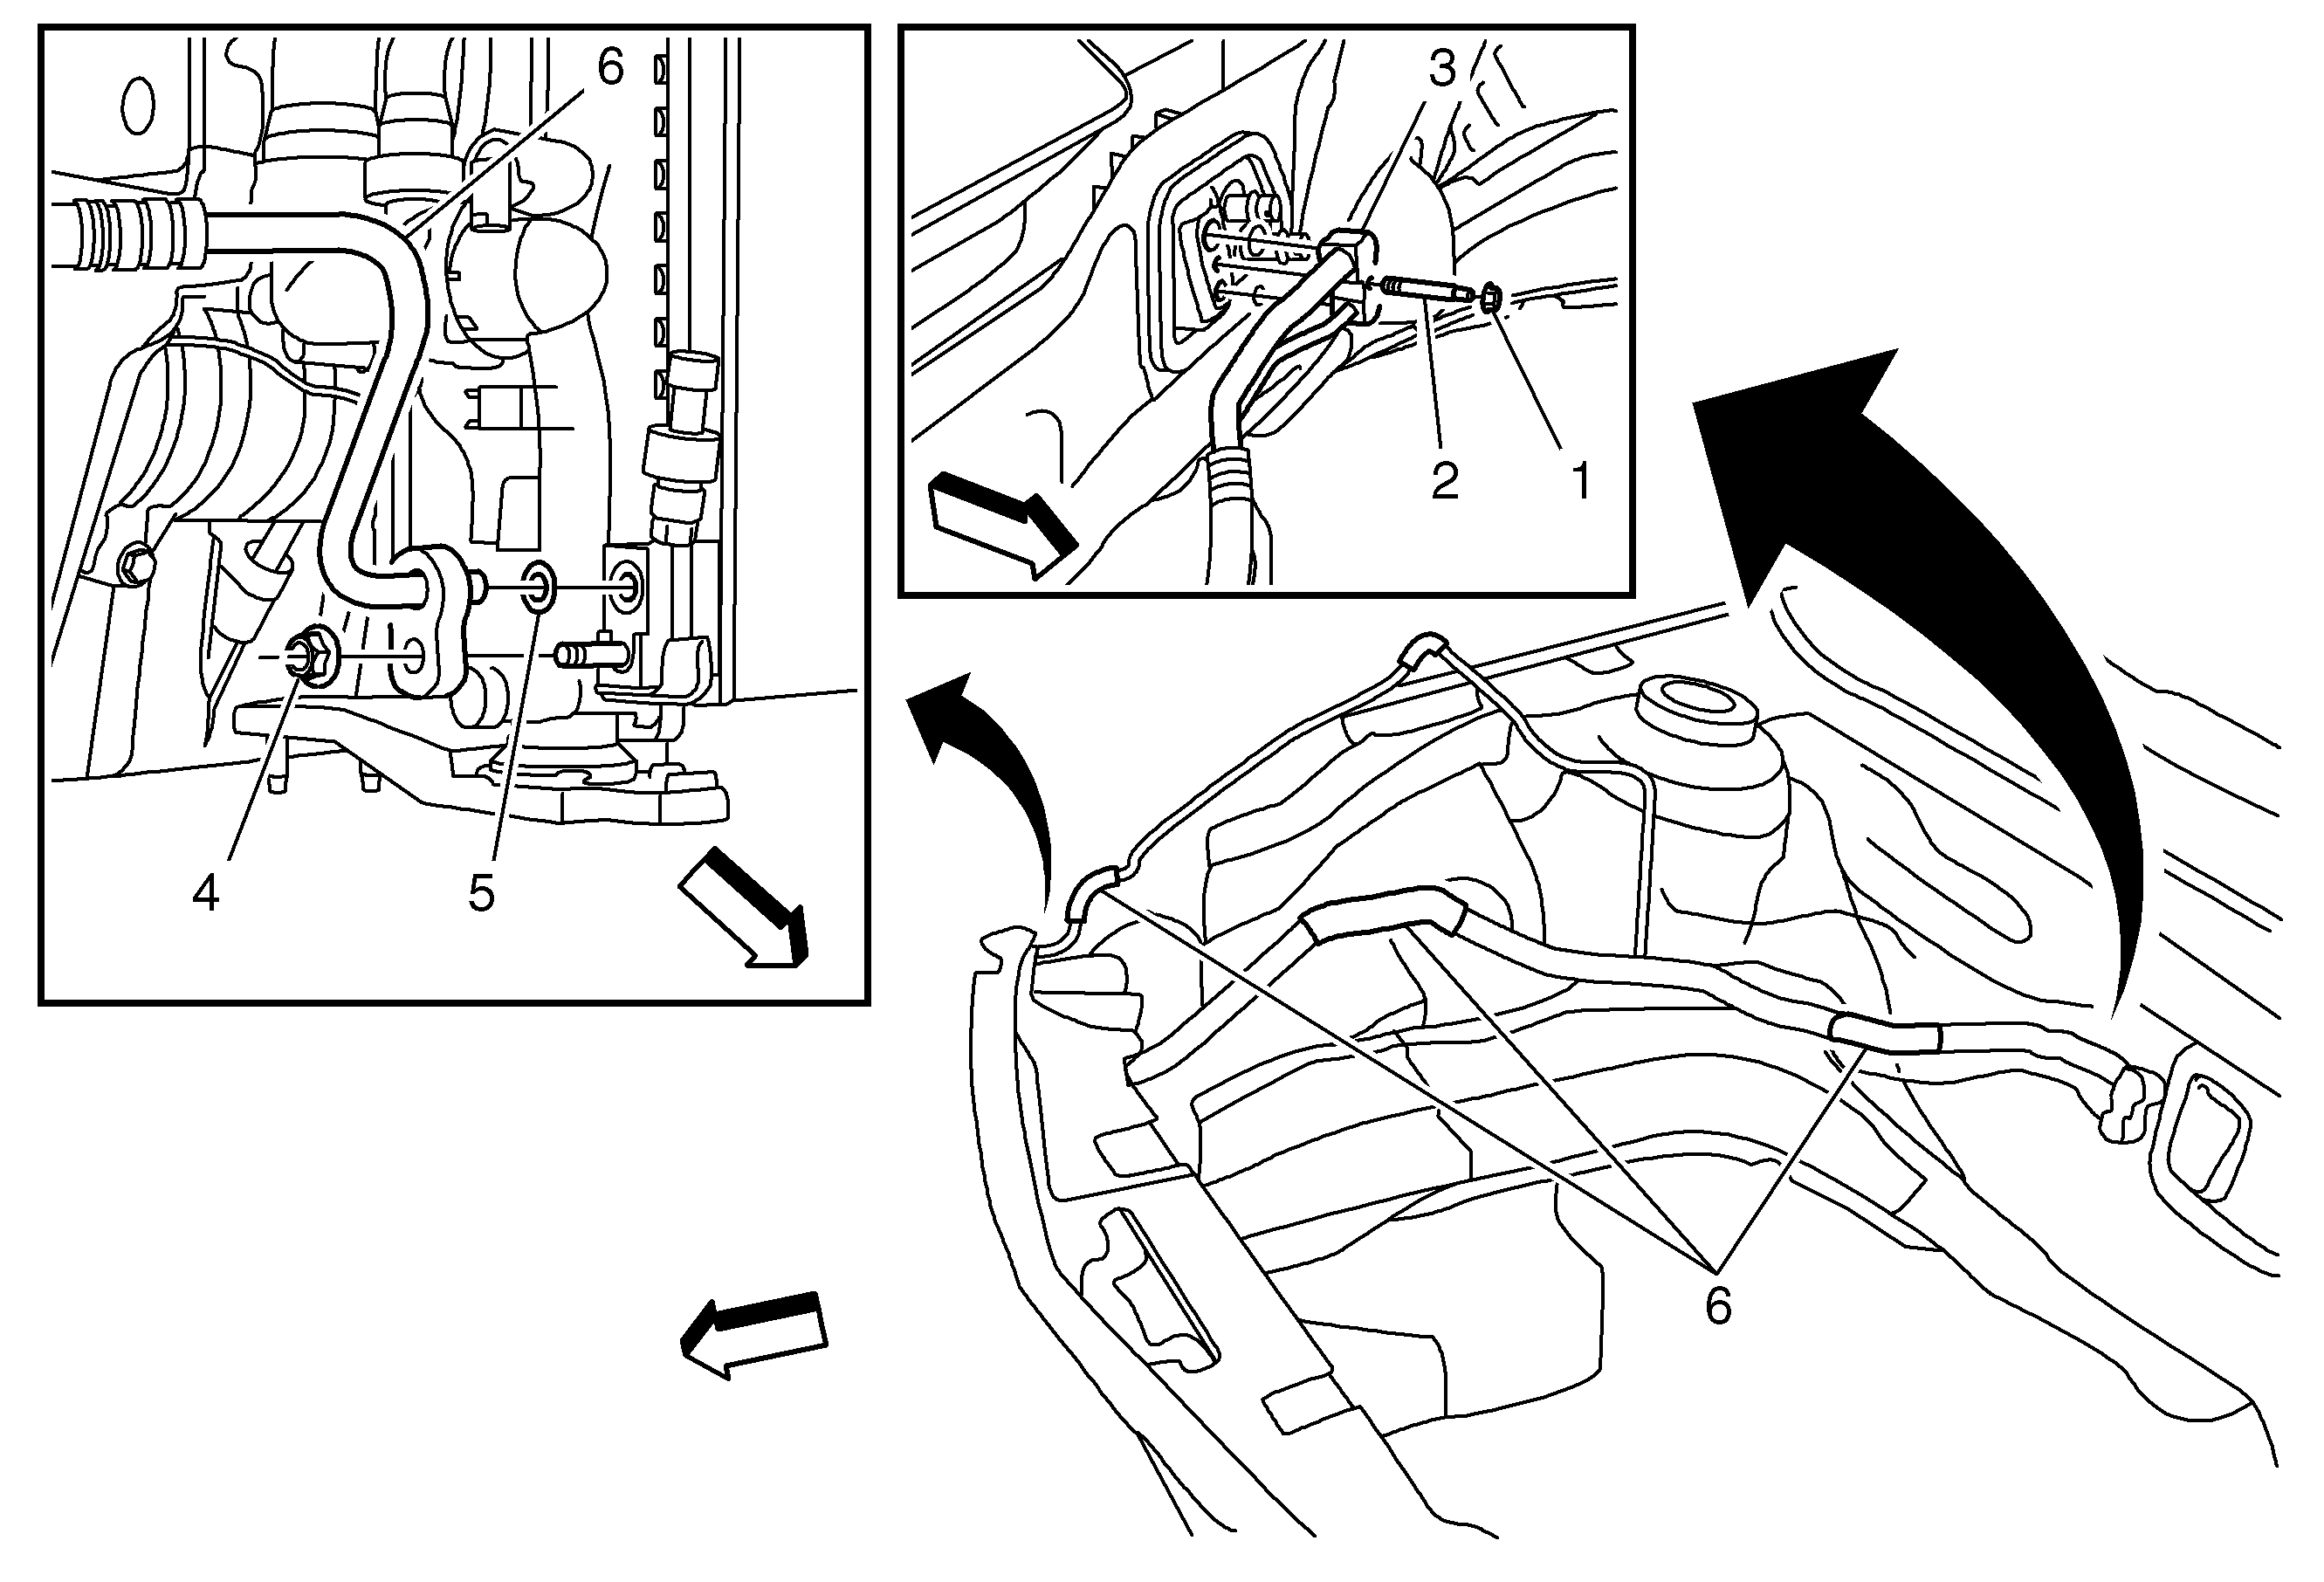

Object Number: 2020273  Size: MF

Callout

Component Name

Preliminary Procedures

  1. Recover the refrigerant. Refer to Refrigerant Recovery and Recharging.
  2. Remove the front bumper fascia assembly. Refer to Front Bumper Fascia Replacement.
  3. Remove the Headlamp-Right Side. Refer to Headlamp Replacement.
  4. Remove the Engine Mount. Refer to Engine Mount Replacement - Right Side.
  5. Remove the A/C Compressor and Condenser Hose from the A/C Evaporator Hose. Refer to Air Conditioning Compressor and Condenser Hose Replacement.

1

A/C Evaporator Hose Fastener

Caution: Refer to Fastener Caution in the Preface section.

Tighten
20 N·m (15 lb ft)

2

A/C Evaporator Hose Stud Bolt

Tighten
15 N·m (11 lb in)

3

A/C Evaporator Hose Assembly

Procedure

  1. Remove the A/C Evaporator hose from the thermal expansion valve (TXV).
  2. Remove and discard sealing washer. Refer to Sealing Washer Replacement.

4

A/C Evaporator Hose Fastener

Procedure

Remove the A/C Evaporator Hose from the A/C Condenser and cap hose.

Tighten
20 N·m (15 lb ft)

5

Sealing Washer

Procedure

Remove and discard sealing washer. Refer to Sealing Washer Replacement.

6

Air Conditioning Evaporator Hose Assembly

Procedure

  1. Release the A/C Evaporator Hose from the attaching clips.
  2. When the installation is postponed, close the off lines and connections.

Air Conditioning Evaporator Hose Assembly Replacement LDK/A20NHT
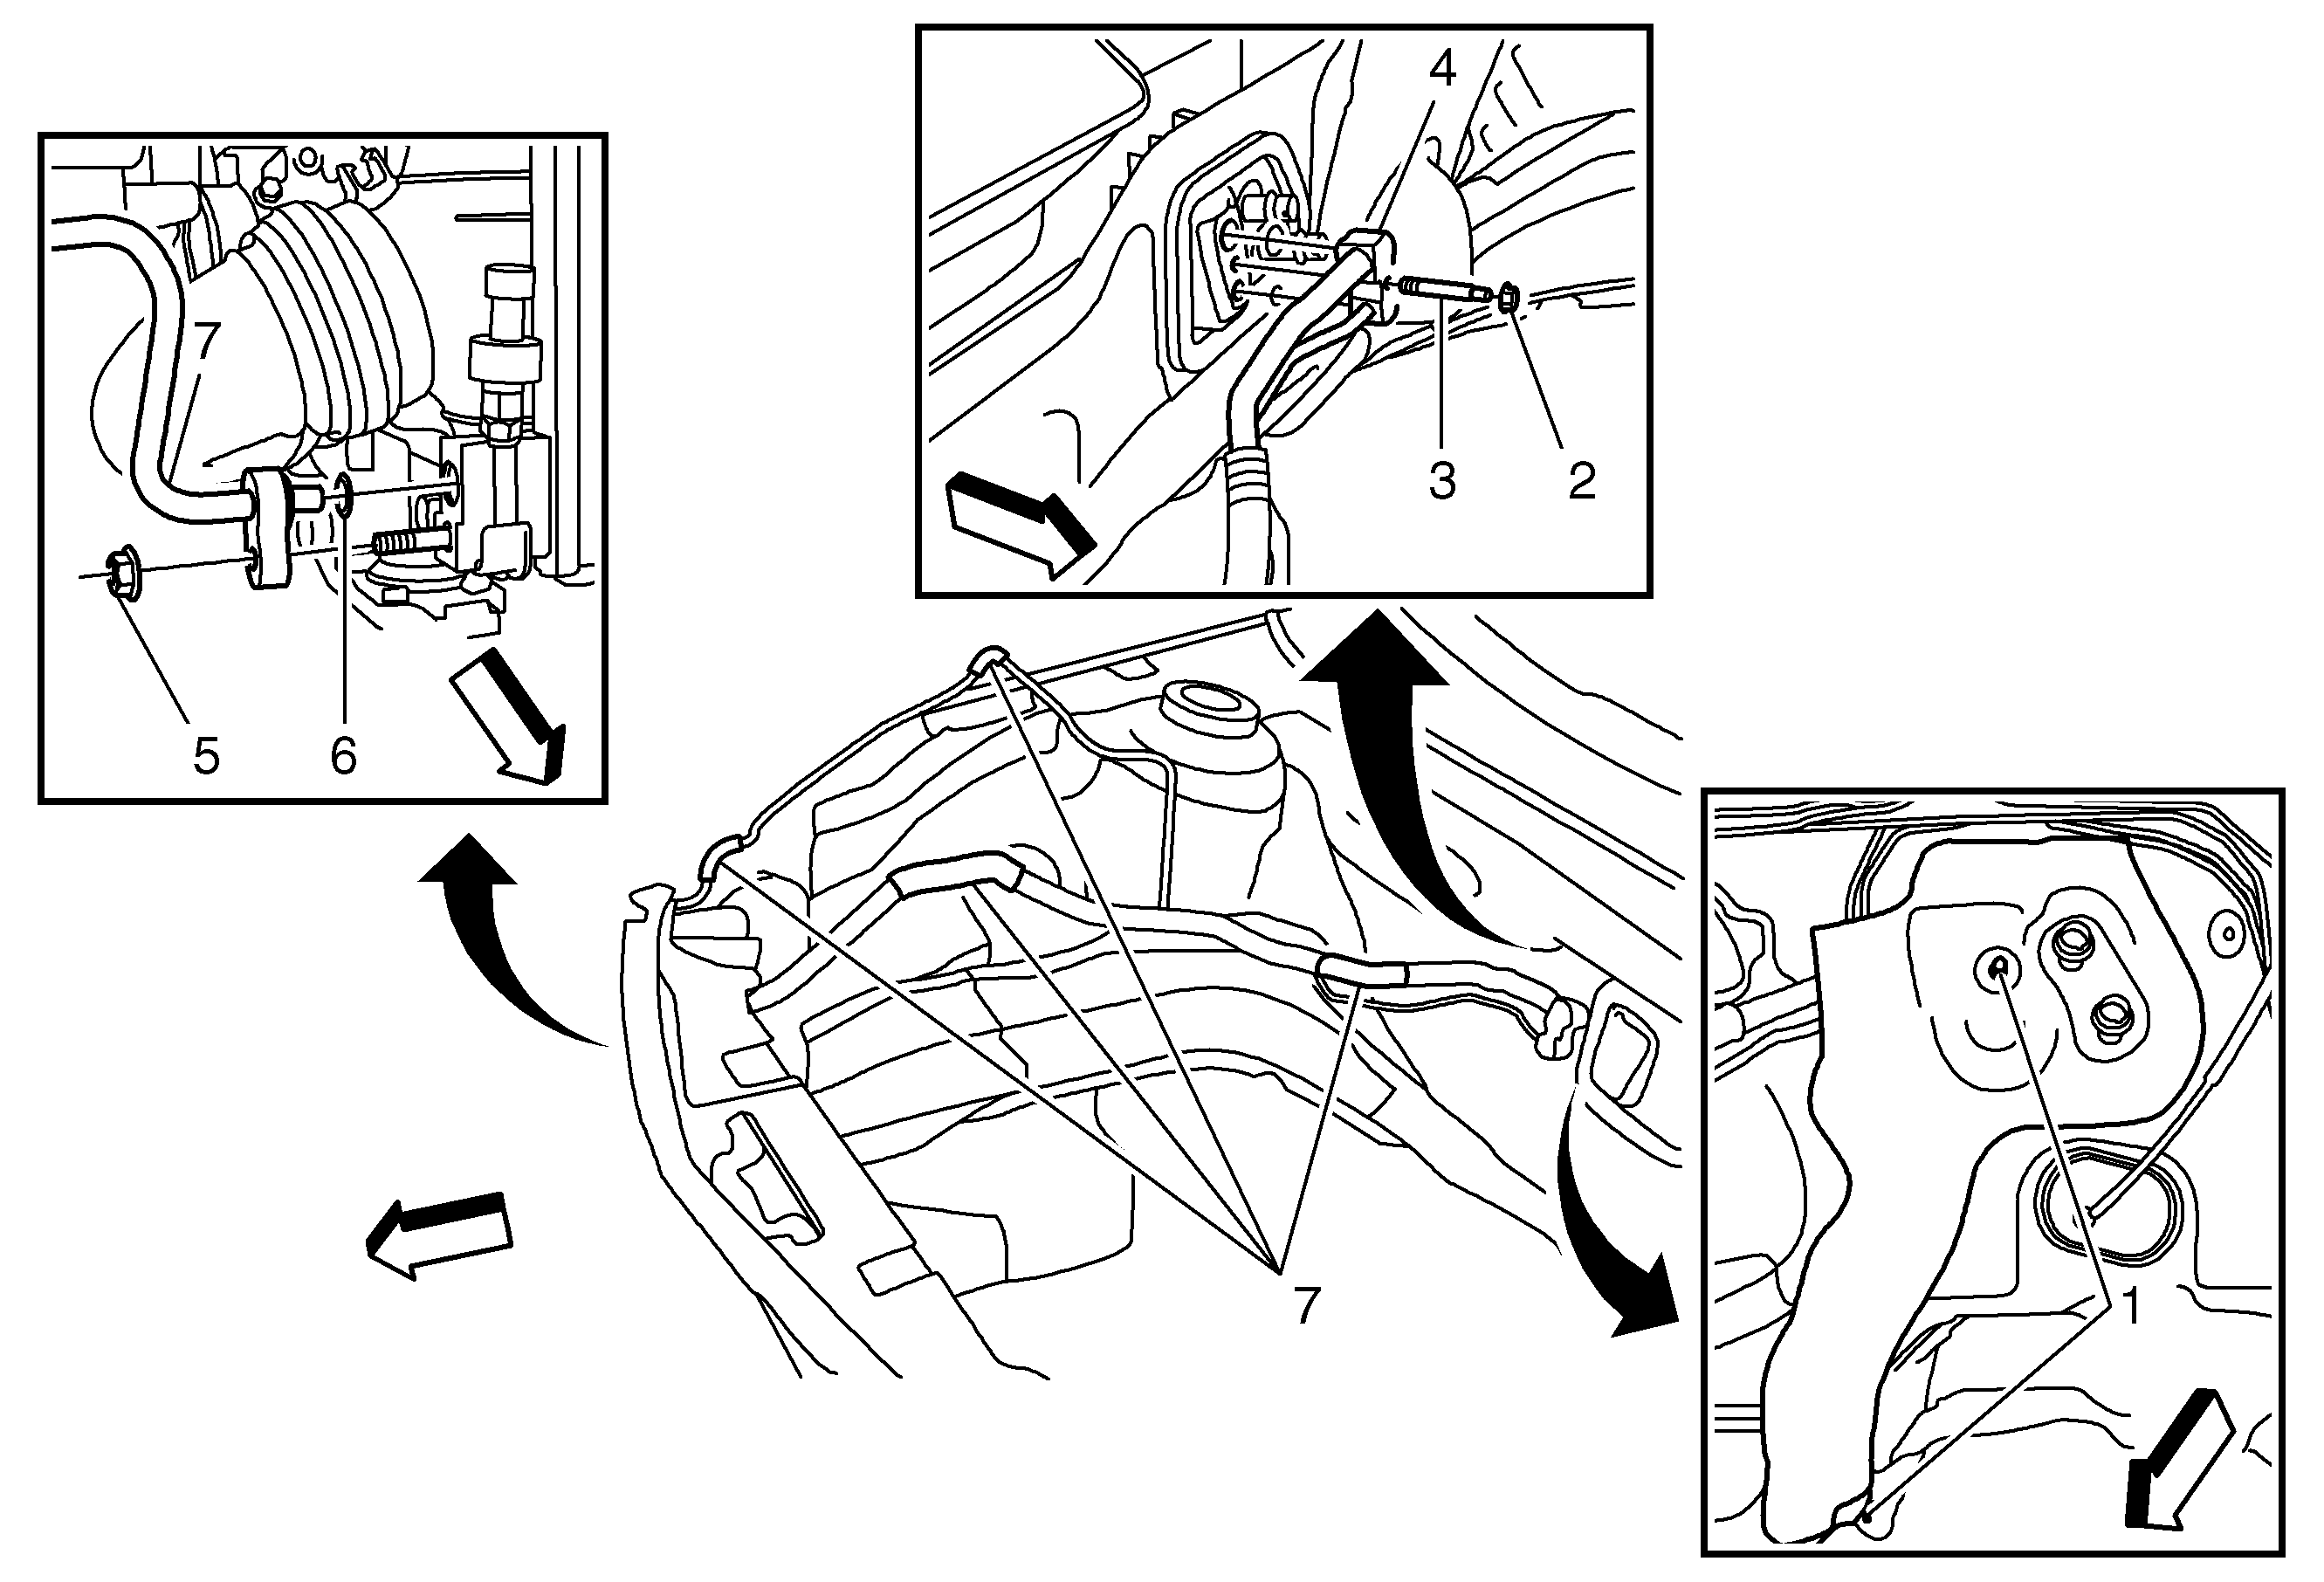

Object Number: 2020270  Size: SH

Callout

Component Name

Preliminary Procedures

  1. Recover the refrigerant. Refer to Refrigerant Recovery and Recharging.
  2. Remove the front bumper fascia assembly. Refer to Front Bumper Fascia Replacement.
  3. Remove the Headlamp-Right Side. Refer to Headlamp Replacement.
  4. Remove the Engine Mount. Refer to Engine Mount Replacement - Right Side.
  5. Remove the A/C Compressor and Condenser Hose from the A/C Evaporator Hose. Refer to Air Conditioning Compressor and Condenser Hose Replacement.

1

AC Evaporator Thermal Expansion Valve Heat and Brake Pipe Shield Fastener (Qty: 2)

Procedure

  1. Remove the A/C TXV heat and brake pipe shield.
  2. Release the brake pipes.

2

A/C Evaporator Hose Fastener

Caution: Refer to Fastener Caution in the Preface section.

Tighten
20 N·m (15 lb ft)

3

A/C Evaporator Hose Stud Bolt

Tighten
15 N·m (11 lb in)

4

A/C Evaporator Hose Assembly

Procedure

  1. Remove the A/C Evaporator hose from the thermal expansion valve (TXV).
  2. Remove and discard sealing washer. Refer to Sealing Washer Replacement.

5

A/C Evaporator Hose Fastener

Procedure

Remove the A/C Evaporator Hose from the A/C Condenser and cap hose.

Tighten
20 N·m (15 lb ft)

5

Sealing Washer

Procedure

Remove and discard sealing washer. Refer to Sealing Washer Replacement.

6

Air Conditioning Evaporator Hose Assembly

Procedure

  1. Release the A/C Evaporator Hose from the attaching clips.
  2. When the installation is postponed, close the off lines and connections.

Air Conditioning Evaporator Hose Assembly Replacement Diesel


Object Number: 2018651  Size: SH

Callout

Component Name

Preliminary Procedures

  1. Recover the refrigerant. Refer to Refrigerant Recovery and Recharging
  2. Remove the air cleaner assembly. Refer to Air Cleaner Assembly Replacement
  3. Remove the air cleaner outlet duct. Refer to Air Cleaner Outlet Duct Replacement.
  4. Remove the right side engine mount. Refer to Engine Mount Replacement - Right Side
  5. Remove the front fascia. Refer to Front Bumper Fascia Replacement
  6. Remove the right headlamp. Refer to Headlamp Replacement.

1

Air Conditioning Evaporator Hose Clip

2

Air Conditioning Evaporator Hose fastener (Qty: 2)

Note: Cap all A/C components immediately to prevent system contamination.

Caution: Refer to Fastener Caution in the Preface section.

Tighten
20 N·m(15 lb in)

3

Air Conditioning Evaporator Hose Sealing Washer (Qty: 3)

Use new sealing washer. Refer to Sealing Washer Replacement

4

Air Conditioning Evaporator Hose Assembly