Anti-Corrosion Treatment and Repair Base
Warning: When applying sound deadeners, or anti-corrosion materials due care and preventative measures must be exercised to prevent any material from being sprayed into door and quarter panel mechanisms such as door locks, window run channels, window regulators and seat belt retractors, as well as any moving or rotating mechanical or suspension parts on the underbody, particularly the parking brake cable. After material application, be sure that all body drain holes are open. Improper application may increase chance of corrosion damage or limit the operation of moving parts, resulting in personal injury.
Any procedure that disturbs these special treatments, such as panel replacement or collision damage repair operations, may leave the metal unprotected and result in corrosion. Proper recoating of these surfaces with service-type anti-corrosion material is essential.
After repair and/or replacement parts are installed, all accessible bare metal surfaces must be treated with metal conditioner and reprimed. Refer to the GM Approved Refinish Materials book which identifies the paint systems you may use.
The latest revision of the GM Approved Refinish Materials booklet is located on the Goodwrench website at www.gmgoodwrench.com.
Anti-corrosion compounds are light-bodied materials designed to penetrate between metal-to-metal surfaces, such as pinch-weld joints, hem flanges, and integral panel attaching points where metal surfaces are difficult to coat with conventional undercoating materials, and are inaccessible for painting. The materials that are suitable for interior and exterior are listed in the chart below. Conventional undercoating is recommended in order to coat large areas, such as replacement door and quarter outer panels, floor pan sections, lids, hoods, fenders, etc. During undercoating operations, care should be taken to prevent the material from being sprayed into door and quarter panel hardware mechanisms, such as door locks, window run channels, window regulators, and seat belt retractors. On the underbody, the material should not be applied to any moving or rotating part, energy absorbing bumper components, or shock absorbers. After undercoating, ensure that all body drain holes are open.
Interior Protectant
The following products are available from GM Dealer Equipment. For technical information, call 187-Permatex (1-877-376-2839):
Permatex Part Number | Description |
|---|---|
310-JDI-UCA1 | Permatex Canister and Wand Assembly |
310-81881 | Permatex Amber Rust Proofing (24 oz) (Qty of 12) |
310-81882 | Permatex Amber Rust Proofing (1 gal) |
Exterior Protectants
The following product is available from *ECP, Inc. Contact them at 1-800-323-3521 or www.ecpinc.net.
Part Number | Description |
|---|---|
178660 | Nox Rust X-121B (12 cans per case) |
The following products are available from your local *3M® distributor, or call 1-800-521-8180, ext. 779-5165.
3M® Part Number | Description |
|---|---|
08804 | Water-Based Undercoat |
08801 | No Clean-Up Applicator Gun |
05917 | Weld-Thru Coating |
08891 | Rust Fighter-I |
The following product is available from *Transtar Autobody Technologies. Contact the company at 1-800-824-2843 or www.tat-co.com
Part Number | Description |
|---|---|
4353 | Weld-Through Primer |
*We believe these sources and their products to be reliable. There may be additional manufacturers of such material. General Motors does not endorse, indicate any preference for, or assume any responsibility for the products from these firms, or for any such items which may be available from other sources.
These sealers are intended to prevent water and dust from entering the vehicle and also are anti-corrosion barriers. Sealers are applied to such areas as rear compartment lid hem flanges, wheelhouse, quarter outer, floor, cowl, roof, and various other panel to panel attaching points. The originally sealed joints are obvious and any damage to these sealed locations should be corrected by resealing. Attaching points of new replacement panels should be resealed. Replacement lids and doors will also require sealing in the hem flange areas.
Flanged joints, overlap joints, and seams should be sealed using a quality sealer of medium-bodied consistency. The sealer used must retain its flexible characteristics after curing and be paintable.
Open joints which require bridging of the sealer in order to close a gap should be sealed using a heavy-bodied caulking material. Follow the label directions for the material selected.
Color application may be required in order to restore repaired areas such as hood, fenders, doors, quarters, lid, roof, engine compartment, underbody, and inner panels to original appearance. When this is necessary, conventional refinishing preparation, undercoat buildup, and color application techniques should be followed.
Deadener materials, spray-on type, are used on various metal panels in order to provide corrosion resistance and joint sealing. They control the general noise level inside the passenger area of the vehicle. When deadeners are disturbed because of damage, are removed during repair operations, or a new replacement panel is installed, the deadener material must be replaced by a service equivalent material. The application pattern and location of deadener materials can be determined by observing the original production installation.
Cleaning of the interior and underbody panel surfaces is necessary when original galvanized or other anti-corrosion materials have been burned off during welding or heating operations. Removal of the residue from burning will require additional care in such areas as interior surfaces of box-type construction and when configurations of the metal panels limit access to interior surfaces.
Anti-Corrosion Treatment and Repair Corrosion Protection
General
The high demands with regard to process reliability, functionality, environment mean that high demands are also made in the area of the corrosion protection of the vehicles. A distinction must be made between the measures taken in production and the corrosion protection undertaken when repairing the body, for example, if damaged or involved in an accident.
Our customer expects that his motor vehicle receives this high quality corrosion protection as a new vehicle. Similar expectations are also to be found regarding the protective effect within the scope of body repair work.
During the development of new vehicles, the use of structural adhesives which can be resistance spot-welded and have a high level of corrosion protection is gaining in importance. Service has implemented these new processes in body repair operations within an economically viable framework.
You will find more detailed information about the newly developed repair systems in our publications.
| • | VT-41 Reliable and economical body repairs |
| • | VT-52 New Method of Body Repairs |
| • | VT-54 New Adhesive Systems |
| • | VT 60 New Working Methods |
Corrosion Protection on Sheet Metal and Aluminium Parts for Service
Cataphoretic Dip-Coating
All parts requiring body repair are provided with a high quality cataphoretic dip-coat (CDC) on the exterior and interior. This CDC is already provided at the paint shop. Where service parts have to be repaired because of transport damage, areas previously rubbed down must be insulated using a primer.
Bonding of Folded Edges with Adhesive/Sealing Folded Edges
On the majority of bonnets, doors and tailgates, the folded-in flanges of the external panelling are attached to the frame with adhesive. The edges of the flanges are also sealed.
Corrosion Protection Measures - Typical Production Cycle
Typical cycle plan, corrosion protection stages.
Note: The illustrations below clarify the individual stages of the process in vehicle production.
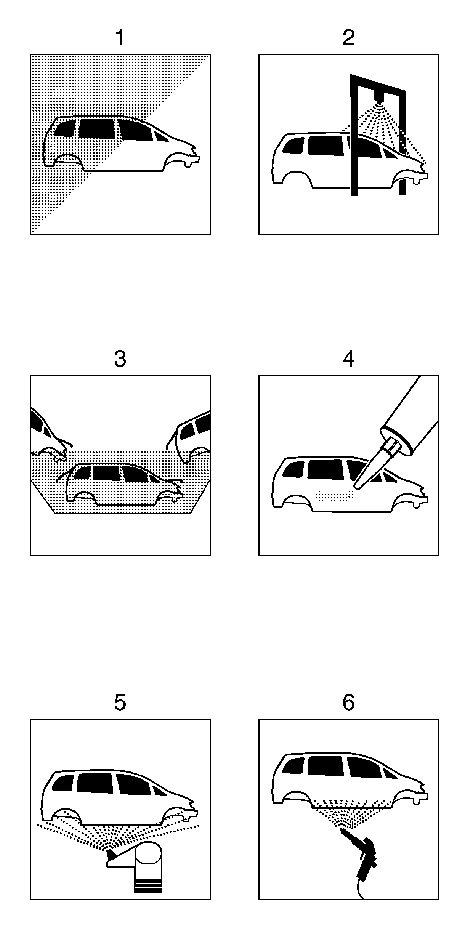
1 | Body-in-white |
2 | Spray/dip-phosphating |
3 | Cataphoretic electro-dip-priming (CDC) |
4 | Seam sealant |
5 | PVC underbody protection |
6 | PVC chipping protection |
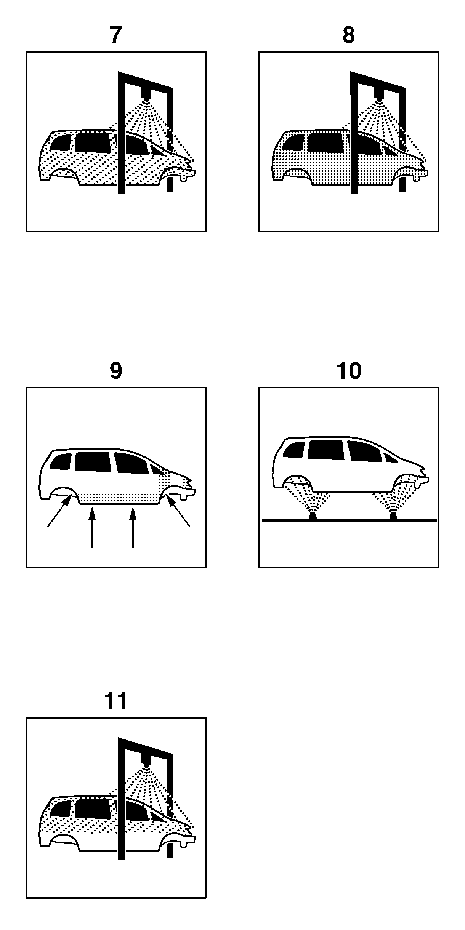
7 | Solid color primer |
8 | Top coat |
9 | Cavity protection wax |
10 | Underbody protection wax |
11 | Protective wax for transportation |
Corrosion Protection Measures - Body Repairs
General
The sections below show a number of the different labour operations with illustrations, views of body sections to provide a better understanding. The sequence is arbitrary. The operations are to be used in accordance with the descriptions in TIS 2000.
Sealing Seams When Undertaking Body Repairs
The sealing operations on the body are shown below as a sectional drawing.
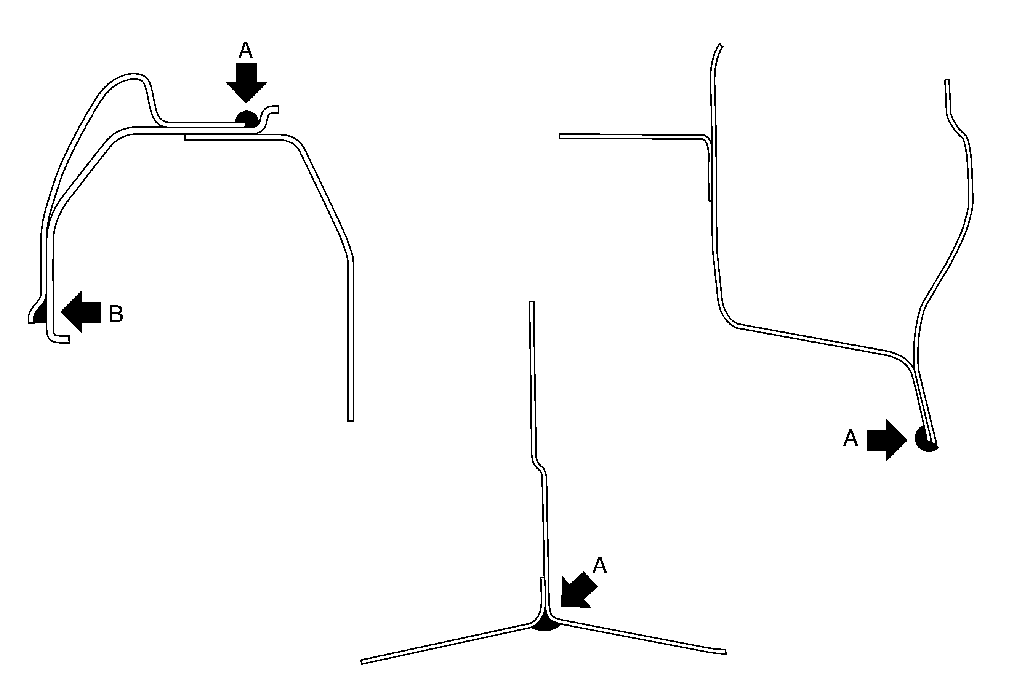
A | Seal cut edges of the flanges |
B | Fill fillet |
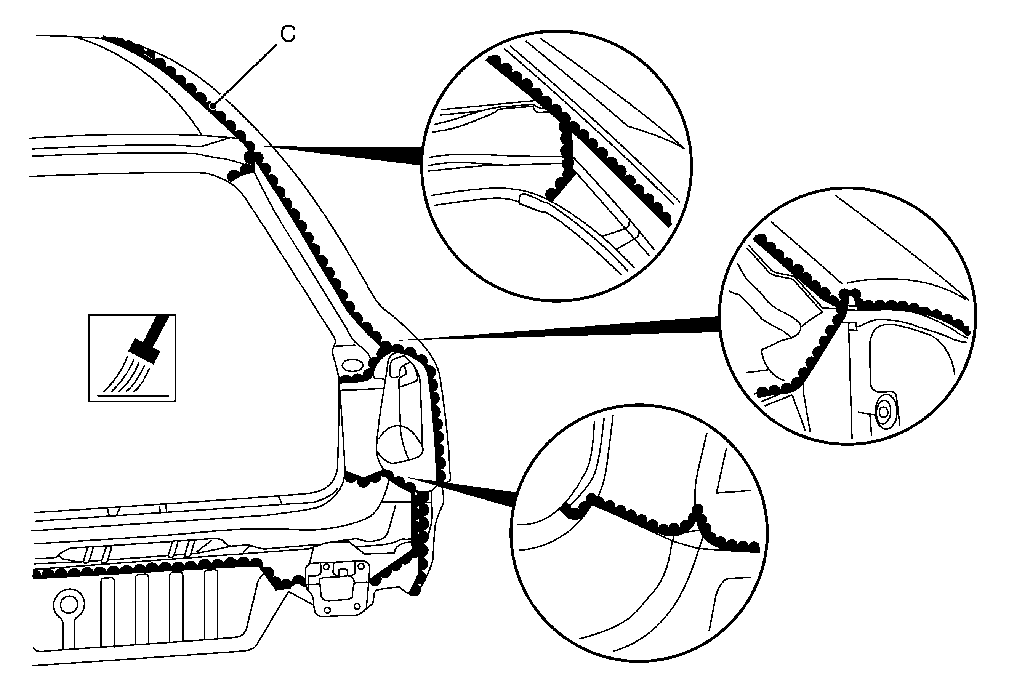
C | Smooth sealed seams in the visible area with a flat brush |
Note: Always apply seam sealant to clean, primed or painted base surfaces. Application to bright sheet metal components leads to significant loss of adhesion and qualitative defects in durability.
Chipping Protection When Undertaking Body Repairs
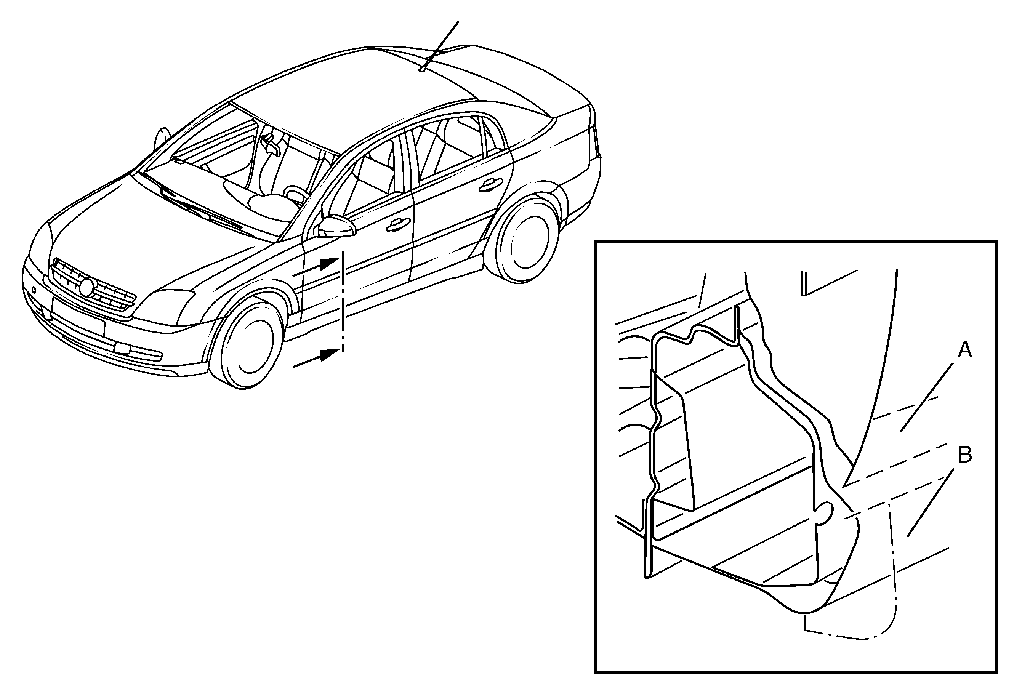
The illustration shows the standard PVC protection in the area of the sills and doors.
A. | Area of door sills |
B. | Area of doors, wings, rear quarter panels |
The standard PVC protection must be replaced after dents have been removed or components have been welded in. The areas provided with standard PVC protection are generally on the body.
| • | Areas in the wheel housing (front, rear of vehicle). |
| • | Areas in the door sill, lower area of the doors, wings, rear quarter panels. |
| • | Areas on the vehicle floor, exterior. |
| • | Areas of the frame side member. |
Note: Substitute materials should be processed which do not trigger any phenomena caused by dissolving if in contact with the standard PVC protection. As a matter of principle, the substitute materials must be applied to clean, primed base surfaces. Heat standard PVC protection with a hot air blower and remove with a spatula. Do not use any thinners with a high solvent content for washing off.
Underbody Protection When Undertaking Body Repairs
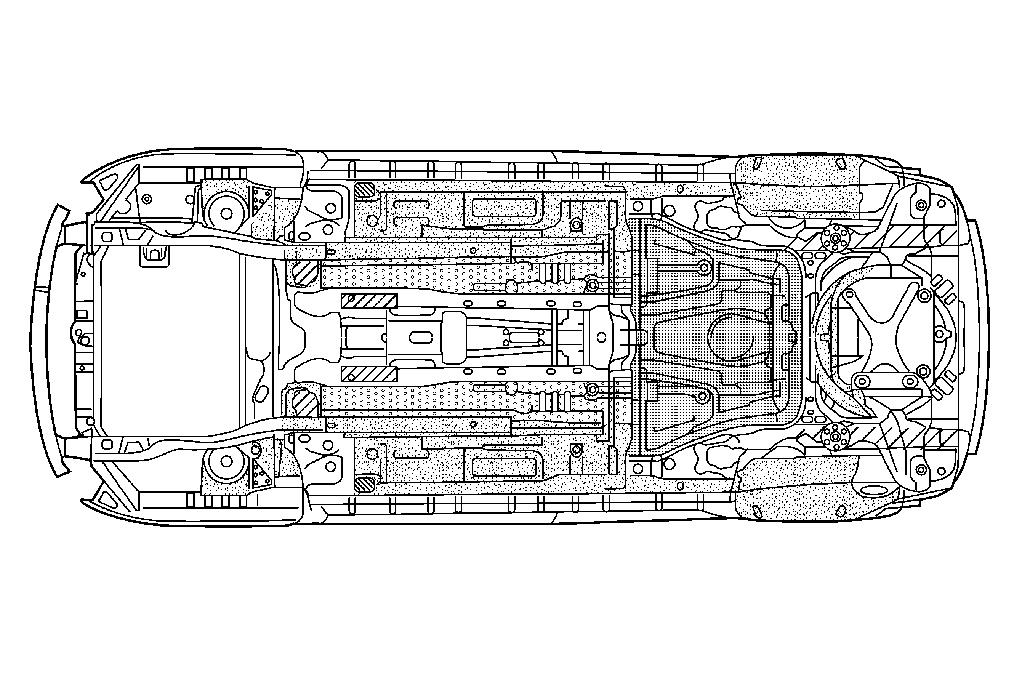
Underbody protection material is used for repairs or maintenance in most cases. When undertaking body repairs, seam sealant which can be sprayed on is preferable.
Advantage:
Universal use, can be painted over if necessary.
Note: Underbody protection materials must be applied to clean, primed or painted base surfaces. The products are less suited to painting over.
Underbody Protection Wax
The catalytic converter and exhaust system areas are not coated.
Cavity Protection When Undertaking Body Repairs
It is not possible to dispense with subsequent treatment with wax in areas which have been welded or brazed because corrosion protection with paint materials is not possible here.
Areas for subsequent treatment are:
- Frame side member
- Doors
- Door pillars
- Sill areas
- Floor/rear end panel
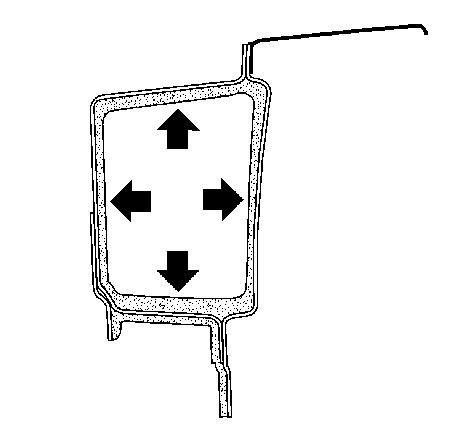
Illustration shows body section with the cavity treatment, using the frame side member as an example.
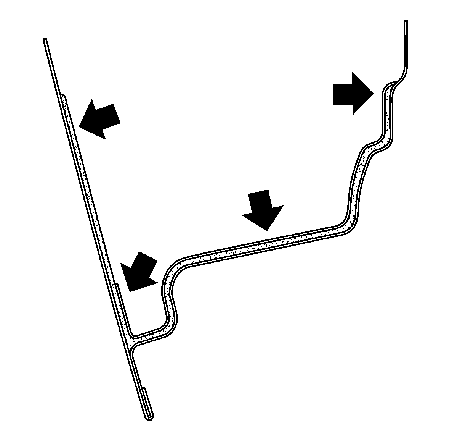
Illustration shows body section with the cavity treatment, using the door as an example.
Bonding the Folded Edge with Adhesive when Undertaking Body Repairs
When replacing the outer panelling on doors and tailgate components, the folded edge is bonded using the 2-component adhesive, part no. 93 160 535, catalogue no. 15 05 000.
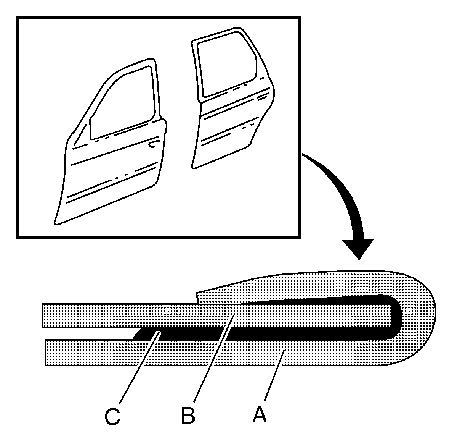
A. | Exterior panelling |
B. | Frame |
C. | Adhesive |
Note: The adhesive is most frequently used in one operation to seal the folded joint edges.
Body Protection Materials When Undertaking Body Repairs
For technical process reasons, Aftersales has a separate, harmonised range of materials for adjustment to the corrosion protection materials used in production which meet the high demands if used correctly.
The products in our range have a high quality, long life and are compatible with the materials in our range used in final paint repairs, for further processing of the repaired areas. All the materials used for seam sealing and as protection from chippings can be painted over. Painting over can already be undertaken whilst the sealant materials are still wet.
Product | Part No. | Catalogue Number | Quantity | Purpose |
|---|---|---|---|---|
Chipping protection spray | 09 121 538 | 15 00 367 | 500 ml | Protective coating, body, exterior |
Spray-on seam sealan | 90 543 279 | 15 03 176 | 300 ml | Protective coating, universal, Technical Information TI-C-32 02/1997, telescopic gun MKM-950 |
Seam sealant | 09 200 244 | 15 06 802 | 310 ml | Joints, folded seams |
Sealing compound | 90 093 639 | 15 04 520 | 310 ml | Folded edges |
Body sealing compound | 90 273 919 | 15 04 521 | 310 ml | Sealing covers, plugs |
Underbody protection spray | 09 121 545 | 15 00 368 | 500 ml | Repair material |
Underbody protection - can | 09 163 309 | 15 00 371 | 1 litre | Repair material |
Underbody protection wax | 09 163 308 | 15 00 370 | 1 litre | Repair material |
Cavity spray wax | 09 196 462 | 15 06 801 | 1 litre | |
Corrosion adhesive/sealing system | 93 160 535 | 15 05 000 | 200 ml | Spot-weldable structural adhesive |
Body Sealing Plug and Cover
In addition to the conventional components, plugs with an integrated hot-melt adhesive are mainly used as an annular seam.
Removal of a sealing plug with adhesive:
| • | Heat the body area around the plug evenly until the adhesive is soft. |
| • | Unclip the plug with a screwdriver. |
Installation of a new sealing plug with hot-melt adhesive
| • | Warm body area (hot air blower) |
| • | Insert plug. During this the hot-melt adhesive will run and form a seal immediately. |
Installation of a new sealing plug without hot-melt adhesive:
Install plug with adhesive sealing compound cold (part no. 93 160 951. catalogue no. 15 03 303).
Paint Repair - TIS 2000, Issue KTA-2207/4
