Caution: Departure from these conditions or the procedure below could result
in: (1) serious personal injury (particularly to eyes) or property damage
from such causes as battery explosion, battery acid or electrical burns; and/or
(2) damage to the electronic components of either vehicle. Never expose any
battery to open flame or electric spark-batteries generate a gas which is
flammable and explosive. Remove rings, watches and other jewelry. Wear approved
eye protection. Do not allow battery fluid to contact eyes, skin, fabrics
or painted surfaces-battery fluid is a corrosive acid. Flush any contacted
area with water immediately and thoroughly. Be careful that metal tools or
jumper cables do not contact the positive battery terminal (or metal in contact
with it) or any other metal on the vehicle-a short circuit will occur.
Notice: When jump starting a vehicle with charging equipment, be sure the equipment
used is 12 V and negative ground. Do not use 24 V charging equipment.
Using such equipment can cause serious damage to the electrical system or
electronic parts.
Important: Inspect the built-in battery hydrometer of the discharged battery.
If the hydrometer is clear or light yellow, do not attempt to jump start
the vehicle or charge the vehicle battery. Refer to
Battery Hydrometer Displays Yellow Dot
.
Important: Do NOT allow the vehicles to make contact with each other.
- Position the booster battery/system in order to allow the booster battery/system
cables to reach the discharged battery.
- Perform the following steps on BOTH vehicles (if applicable).
| 2.1. | Shift the transmission into PARK. |
| 2.2. | Apply the parking brake. |
| 2.4. | Turn all of the vehicle accessories (electrical loads) OFF except
the hazard flashers if they are needed. |
| 2.5. | Turn the ignition OFF. |
Important: Some vehicles have a battery remote positive stud. ALWAYS use the battery
remote positive stud in order to give or receive a jump start.
Important: Use ONLY jumper cables that are in good operating condition and do not
have loose or missing cable insulation.
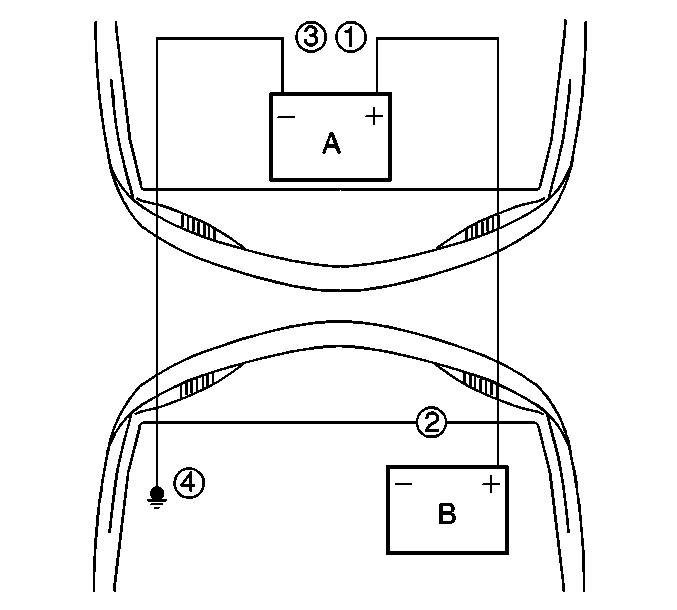
- Attach the POSITIVE (+/RED) booster cable (1) to the positive stud of
the BOOSTER battery (A).
- Attach the opposite end of the POSITIVE (+/RED) booster cable
(2) to the positive stud of the DISCHARGED battery (B).
- Attach the GROUND (-/BLACK) booster cable (3) to the negative
terminal of the booster battery (A).
Caution: Do not connect a jumper cable directly to the negative terminal of a
discharged battery to prevent sparking and possible explosion of battery gases.
- Attach the opposite end of the GROUND (-/BLACK) booster cable
(4) to a HEAVY METAL engine ground (such as the engine lift hook bracket).
Keep the booster cables away from the accessory drive belt, the drive belt
pulleys, the cooling fans, the exhaust pipes or any other parts that move
or get hot when the engine starts.
- Start the engine of the vehicle that is providing the boost. Raise
the engine speed (RPM) to approximately 1500 RPM.
- Attempt to start the engine of the vehicle with the discharged
battery. If the engine does not crank or cranks too slowly, perform the following
steps:
| 8.1. | Turn the ignition OFF. |
| 8.2. | Allow the booster vehicle engine to run at approximately 1500
RPM for five minutes. |
| 8.3. | Attempt to start the engine of the vehicle with the discharged
battery. |
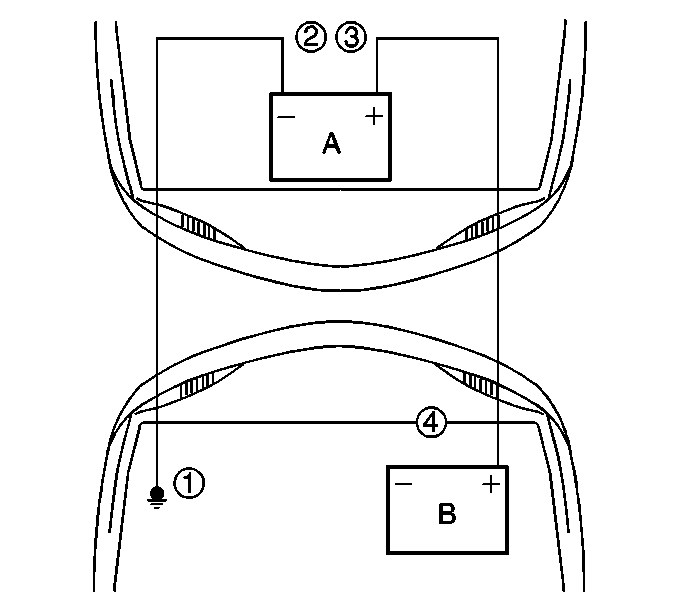
- Remove the GROUND (-/BLACK)
booster cable (1) from the heavy metal engine ground (such as the engine lift
hook bracket).
- Remove the opposite end of the GROUND (-/BLACK) booster
cable (2) from the negative terminal of the booster battery (A).
- Remove the POSITIVE (+/RED) booster cable (3) from the positive
stud of the BOOSTER battery (A).
- Remove the opposite end of the POSITIVE (+/RED) booster cable
(4) from the positive stud of the DISCHARGED battery (B).
