OIL LEAK DETECTION VIA BLACK LIGHT PROCESS

VEHICLES AFFECTED All 1984 Vehicles Equipped With 2.5L L-4 Engines
To assist in black light diagnosis of oil leaks, all 2.5L 4-cylinder engines produced by Pontiac for the 1984 model year have dye added to the engine oil during production.
Black Light Process Check
This method uses a flourescent dye added to the engine oil. 30 cc (1 oz.) of dye should be circulated in the engine oil for a minimum of five (5) minutes. In some cases it may be necessary to drive the car before the dye will show. Ideal situation is to install dye in the customer's vehicle a few days before the scheduled repair. Prior to the black light inspection of the engine, the dipstick should be held under the black light to assure that the dye has mixed thoroughly with the engine oil. Oil with dye additive will be a bright yellow when exposed to a black light. Oil without dye additive will show a light purple in colour. It is not necessary to clean the engine prior to inspection. The difference between oil leaking with the dye additive versus old oil is quite evident.
External Air Pressure
An adapter with an air fitting can be made to fit into PCV hole of the rocker arm cover or dipstick hole. This can be attached to an air supply that is regulated at 14 to 20 kPa (2 to 3 psi). Extreme caution should be used to assure that air pressure does not exceed 20 kPa (3 psi). Leaks could be created if air pressure exceeds 20 kPa (3 psi). The air cleaner pipe to rocker arm cover hole must be plugged. With air being forced into the crankcase, the oil will be pushed to the source of the oil leak, where it can be detected with the black light. If a black light is not being used, sometimes spraying the suspected area with soapy water will confirm the leak. Test can be performed with or without the engine running.
Internal Pressure
This can be accomplished by making the PCV valve inactive and blocking off the air cleaner inlet to the RAC hole. By running an engine in a closed system, crankcase pressure will build up and force oil to the source. This method can build up extreme pressure and should be monitored by periodically removing the dipstick to the crankcase pressure.
Component Removal
To properly detect an oil leak at the rear of an engine, it is necessary to remove the transmission. This process, in conjunction with black light, will eliminate all guess work in regards to rear oil leaks.
NOTE: When analyzing an engine with the black light and fluorescent dye method, the following variables can sometimes occur. The technician using the black light should be aware of the following:
Short run times will not always allow dye to surface at suspected oil leak area. Recommendation: Pressurize engine.
Extended run times can sometimes spread dye over a large area, which may cause actual leak detection to become most difficult. Recommendation: Clean and pressurize engine.
Recommended Sealer Usage On Oil Leaks
GMS type A (GE 1673) GM Part Number 993082 -or- 3M T-3 Silicone (Part Number 08660) -or- equivalent.
NOTE: Primer is not required with the use of the above sealers.
It is imperative to adhere to the following steps in order to correct oil leaks by use of RTV'S.
1. Clean metal surfaces free of oil, grease, corrosion, etc.
CAUTION:
Do not use gasoline or other petroleum base solvents as they can leave a residue preventing adhesion of the sealant to the metal surfaces.
To clean surface to be sealed, use 993119 brake cleaner or equivalent.
2. Apply sealant bead to one of the bonding surfaces. Totally circle all bolt holes.
3. Inspect bead for uniformity, air pocket voids, thin areas, or skips. On sealant tube, cut tube extension to approximately 3mm (1/8 of an inch) opening. Apply to one of the bonding surfaces.
4. Assemble sealing surfaces immediately in order to prevent drying of the sealant (3 minutes maximum). Do not allow RTV to skin over.
5. Torque to specification. Be careful not to over torque.
6. Allow sealant to dry for 15 minutes prior to checking engine for oil leaks.
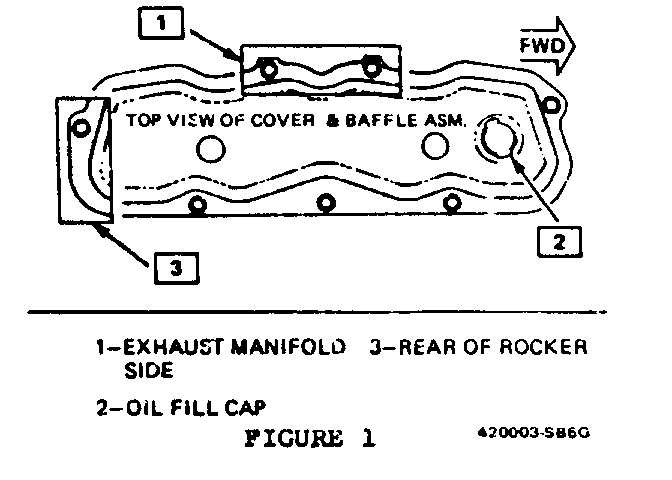
POSSIBLE OIL LEAK AREAS 2.5L L-4 --------------------------------- Rocker Cover (See Figure 1) --------------------------- 1. Rear and exhaust side of rocker cover.
2. Clean sealing surfaces on valve cover and cylinder head. Use degreaser to dry surfaces.
3. Apply a continuous 5 mm (3/16 of an inch) diameter bead of RTV sealant (Part Number 992708 or equivalent) around cylinder head sealant surface inboard at bolt holes.
NOTE: Keep sealant out of the bolt holes to prevent damage to the cylinder head. The use of gaskets may not be successful in correcting oil leaks around rocker arm covers, therefore the use of the RTV listed in this bulletin is recommended over gasket replacement.
Oil Fill Cap (See Figure 1)
1. To correct this condition, lightly tap on oil fill cap to seal cap to rocker cover.
NOTE: If attempted rocker cover sealing procedures outlined above are unsuccessful, replace rocker arm cover with Part Number 10030209,
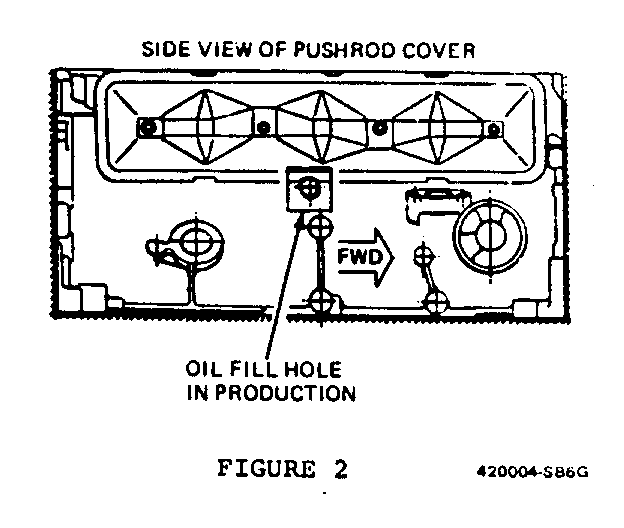
Side View of Engine Block (See Figure 2)
1. The area near the oil sending unit may indicate an oil leak. This can result from oil run-off during production of the engine and installation of the oil sending unit. In order to verify an oil leak, it may be necessary to spray the area with degreaser and retest. This applies only to new car deliveries.
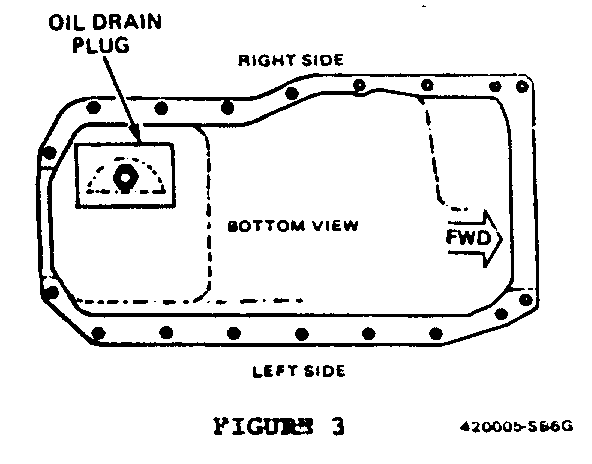
Oil Drain Plug (See Figure 3)
1. It may be necessary to remove oil drain plug and insert a nylon washer on drain plug to correct repeat cases of oil leaks at drain plug.
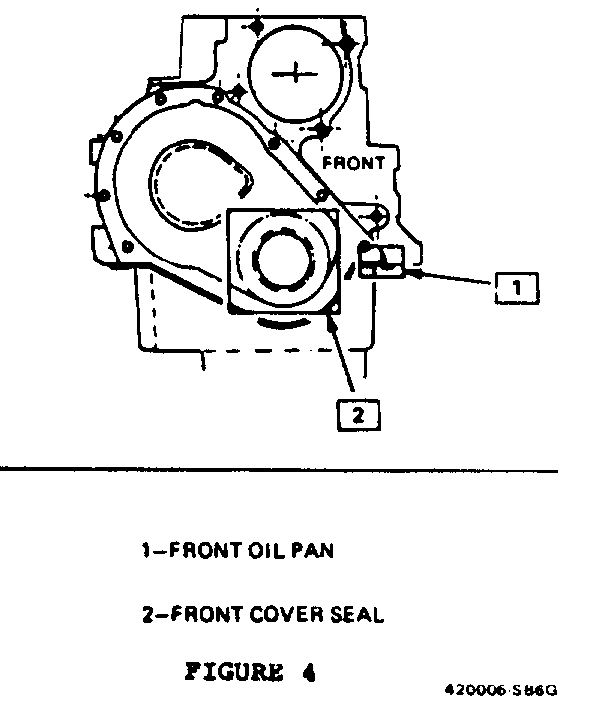
Front Timing Cover Crankshaft Seal (See Figure 4)
1. Install using tool J-23042. Lip must be toward rear of engine.
2. Lubricate balancer and seal lip with engine oil. Install hub on crankshaft, bottom out against crankshaft gear. Install drive belt - tension to specification.
Oil Pan Front Seal to Front Cover (See Figure 4)
1. Apply a 10 mm (3/8 of an inch) wide by 5 mm (3/16 of an inch) bead of RTV to joint at oil pan and timing cover.
2. Apply a 6 mm (1/4 of an inch) wide by 3 mm (1/8 of an inch) thich bead of RTV sealer to timing cover at timing cover to block mating surfaces.
3. Install centre tool J-23042 in timing cover oil seal.
4. Install timing cover to block, partially tighten two oil pan to cover screws.
5. Install remaining cover to block screws.
6. Torque to 10 N.m (90 lb. in.).
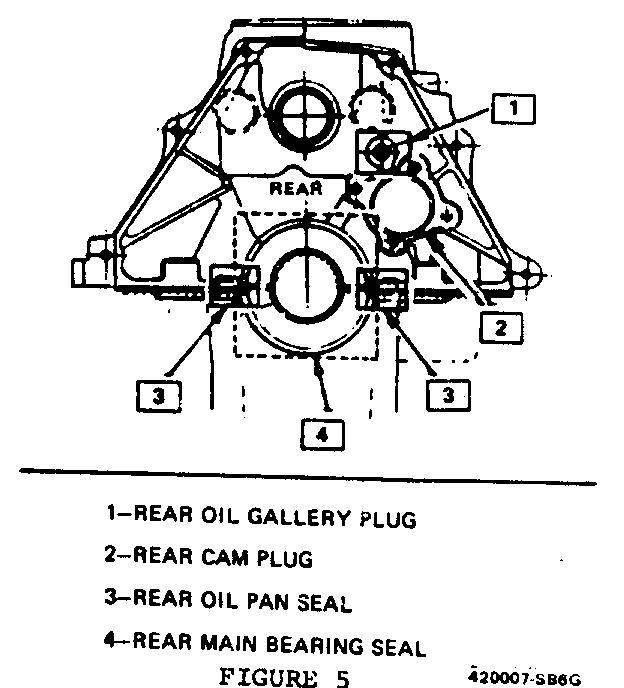
Rear Oil Galley Plug (See Figure 5)
1. Remove plug and reseal with RTV.
Oil Pan and Rear Oil Pan Seal (See Figure 5)
1. Apply a 10 mm (3/8 of an inch) wide by 5 mm (3/16 of an inch) thick bead of RTV sealer to rear of oil pan.
2. Apply a 5 mm (3/16 of an inch) wide by 3 mm (1/8 of an inch) thich bead of RTV jealer at rear corners of oil pan.
3. Apply a 5 mm (3/16 of an inch) wide by 3 mm (1/8 of an inch) thick bead of RTV to rear of engine block assembly.
4. Groove in main bearing cap must be filled flush to 3 mm (1/8 of an inch) above surface with RTV.
Rear Main Bearing Seal (Figure 5)
The rear main bearing oil seal is a one piece unit and can be replaced without removal of oil pan or crankshaft.
To properly diagnose rear main seal oil leaks, remove the transmission. Start engine and using black light J-28428-B, shine at rear of block. Allow engine to run for several minutes while completing this procedure.
To install new rear main bearing seal:
1. Clean block and crankshaft to seal mating surfaces.
2. Soak the seal in clean engine oil for at least 5 minutes.
3. Press evenly into place with finger pressure only.
4. Install flywheel to 60 N.m (44 lb. ft.).
5. Reinstall transaxle.
NOTE: Do not apply sealer to the rear main bearing seal. This may prevent proper seating of the seal to the recess in the block.
For detailed procedures on sealing 2.5L engines, refer to section 6-A in the Service Manual.
Rear Cam Plug (See Figure 5)
1. Repair using GMS type A (GE 1673) GM Part Number 993082 or 3MT-3 silicone (Part number 08660) or equivalent.
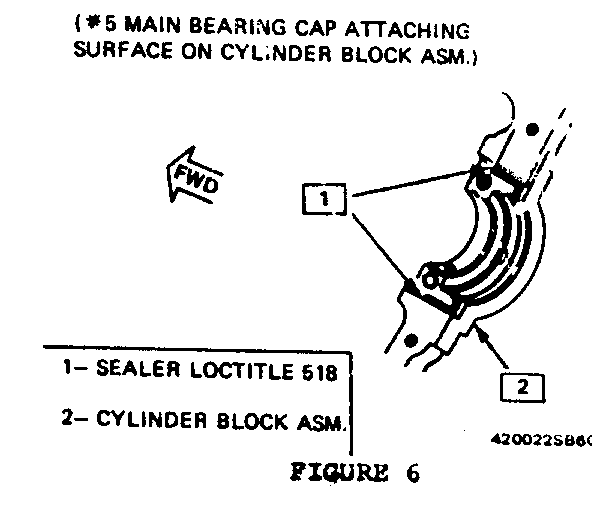
Main Bearing Cap Attaching Surface On Cylinder Block Asm. (See Figure 6)
1. Apply 6 mm (1/4 of an inch) wide by 3mm (1/8 of an inch) thick across parting line of rear main bearing as shown in Figure. Use Loctite 518 or equivalent sealer. Sealing surfaces which receive sealant must be free of oil and foreign material.
General Motors bulletins are intended for use by professional technicians, not a "do-it-yourselfer". They are written to inform those technicians of conditions that may occur on some vehicles, or to provide information that could assist in the proper service of a vehicle. Properly trained technicians have the equipment, tools, safety instructions and know-how to do a job properly and safely. If a condition is described, do not assume that the bulletin applies to your vehicle, or that your vehicle will have that condition. See a General Motors dealer servicing your brand of General Motors vehicle for information on whether your vehicle may benefit from the information.
