SERVICE MANUAL UPDATE STEERING WHEEL CONTROLS

VEHICLES AFFECTED: 1989 PONTIAC BONNEVILLE, 6000, AND GRAND PRIX
The attached Service Manual information for Sections 3F and 8A were not available when the 1989 Pontiac Bonneville Service Manual was shipped to dealerships.
Items of special concern are use of steering wheel removal tool J 1859-03 and bulb replacement. The removal tool bolts must be installed to not more than 5 full turns to prevent damage to the steering wheel control components in the column. Bulb replacement can be done only at Delco repair shops. The vehicle can still be driven, and the horns are not affected by control button assembly removal.
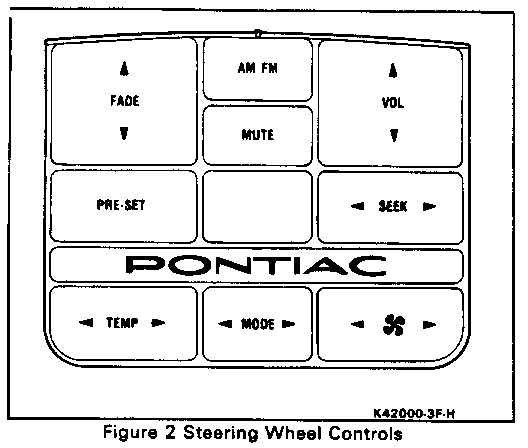
Although the 6000 and Grand Prix models have several different functions (see Figure 2) on their control button assemblies, service procedures for the Bonneville assembly are still applicable.
RADIO
COMPONENT LOCATION
Item
Amplifier Assembly Line Diagnostic Link (ALDL) Connector Fuse Block Horn Switch HTR A/C and Radio Control Interface Module Steering Wheel Pad Switch And Electronics Module Turn Signal Cancel Cam Assembly Tum Signal Switch C200 (60 cavities) C203 (30 cavities C206 (48 cavities) C310 (7 cavities) C311 (10 cavities) C330 (10 cavities) C361 (8 cavities) G200 G201 S200 S204 S207 S209 S213 S214 S215 S217 S218 S219 S222 S223 S224 S228 S237 S238 S243 S245 S249 S255 S287 S293 S294 S297 S298
S310 S311 S314
Description Figure Connector ----------- ------ --------- Under RH front seat 201-20-A 202-11 Below LH side I/P, left of steering column 201-6-A 202-13
Mounted n LH side of I/P behind trim panel 201-8-A Top of steering column, in steering wheel 201-8-A Inside steering column, near base 201-7-B
In steering wheel 201-7-A
Underside of steering column, at slip rings 201-7-A Top of steering column, below steering wheel 201-7-C Behind center of I/P 201-11-B 202-1 Behind center of I/P 201-11-B 202-3 Behind I/P, left of steering column 201-9-A 202-3 At LH front door sill 201-16-A 202-7 Below LH front door sill 201-16-A 202-7 Below RH front door sill 201- 6-A 202-8 Under rear of center console 201-10-A 202-8 Behind I/P, at LH shroud 201-8-C Behind I/P, at RH shroud 201-14-A Composite harness, at LH shroud 201-12-D Composite harness, at LH shroud 201-12-D Composite harness, at RH rear door sill 201-12-D Composite harness, at RH rear door sill 201-12-D I/P harness, behind LH side of I/P 201-6-A I/P harness, behind center of I/P 201-6-A Composite harness, near top LH side of I/P 201-8-A I/P harness, behind LH side of I/P 201-6-A Composite harness, behind top RH side of I/P 201-14-A Composite harness, under RH front seat 201-20-A Composite harness, under RH front seat 201-20-A Composite harness, under passenger's seat 201-20-A Composite harness, at RH shroud 201-14-A Composite harness, at RH shroud 201-14-A Composite harness, at RH shroud 201-14-A Composite harness, at upper LH shroud 201-8-C Composite harness, behind center of I/P 201-11-B Composite harness, at upper LH shroud 201-8-C Composite harness, at RH shroud 201-14-A
I/P harness, behind center of I/P 201-6-A Composite harness. behind LH side of I/P 201-9-A I/P harness, behind center of I/P 201-6-A I/P harness, behind RH side of I/P 201-6-A I/P harness, behind center of I/P 201-6-A I/P harness, behind RH side of I/P 201-6-A
Console harness, under rear of center console 201-10-A Console hamess, under rear of center console 201-10-A Composite harness, under passenger's seat 201-20-A
TROUBLESHOOTING HINTS
1. Check Fuse 11.
2. Check Fuse 4.
3. Check Fuse 14 by operating the Park Lights.
4. Check that the Antenna connector and the Antenna Coaxial Cable are properly connected.
5. Adjusting the Radio controls will change the operation of the sound system. Consult the Delco Sound Service Guide for information regarding the operation of these controls.
6. Before troubleshooting a suspect Speaker, check all connections to that Speaker.
7. For proper noise diagnosis. take the car out-side where signals are strong. Close the hood, and keep away from metal buildings or sources of radio interference.
8. Ignition noise on FM may indicate a defective Ignition System.
9. Coated screws or bolts can cause a poor ground condition. Scrape ground screw clean of any paint or varnish.
Go to System Diagnosis for diagnostic tests.
For removal and replacement procedures see Section 8C.
If CAMS diagnostic equipment is available, it may be used to diagnose Radio System components of the Serial Data Line.
SYSTEM DIAGNOSIS
Refer to the vehicle owner's manual for radio system operation.
Select a symptom from the Symptom Table and follow the diagnosis given.
RADIO
SYMPTOM TABLE
SYMPTOM FOR DIAGNOSIS ------- -------------- Radio/Clock/ Radio display forms incomplete Send the Radio to an Cassette numbers or letters authorized AC-Delco Player/ Radio plays, but one or more of repair station Compact the Radio controls do not operate Disc Player/ Radio functions operate correctly by Equalizer the Cassette Player, or Compact Disc Player, or Equalizer does not work properly Not all or no functions operate from the Radio, but all operate from the Steering Wheel Pad Switch And Electronics Module Radio. Heater and A/C Controls and Do Test K Steering Wheel Controls (if equipped) do not operate Radio/Clock/ Some functions do not work from d Send the Radio to all Cassette both the Steering Wheel Pa authorized AC-Delco Player/ Switch And Electronics Module and repair station Compact the Radio, but other functions do Do Test B Disc Player/ Radio display scans past all radio Equalizer frequencies when in Seek or Scan modes. Hiss is present over most radio stations Radio noise is excessive Do Test C
Time or radio display does not Do Test D appear when the Ignition Switch is turned to RUN or ACCY Power Antenna does not extend See Power Antenna with the Radio ON (Section 8A-151) Speakers One or more speakers do not operate, Do Test E both subwoofers cannot be heard when amplifier is on Both subwoofers lack bass response, Do Test F other speakers operate correctly Both subwoofers are operational, but Do Test G their volume cannot be controlled by adjusting the gain control switch Radio Radio display does not dim or goes Do Test A Illumination blank with the Headlights or Park Lights ON Radio face or buttons do not light up with the Headlights or Park Lights ON
Steering Only some functions operate from Send the Steering Wheel the Steering Wheel Pad Wheel Pad Switch Controls Switch And Electronics Module, And Electronics but all operate from the Radio Module to an and Heater and A/C Controls authorized AC-Delco repair station Steering Wheel Pad Switch Do Test H does not come on wih the Headlights or Park lights ON
Steering Wheel Controls do not Do Test I operate at some steering wheel positions, or Steering Wheel Pad Switch And Electronics Module panel lights flicker as steering wheel is turned None of the Steering Do Test J Wheel Controls operate
A: RADIO DISPLAY DOES NOT DIM OR GOES BLANK WITH THE HEADLIGHTS OR PARK LIGHTS ON; RADIO FACE OR BUTTONS DO NOT LIGHT UP WITH THE HEADLIGHTS OR PARK LIGHTS ON
(May be caused by open dimming circuits)
1. Disconnect Radio connector C1. Turn Park Lights ON and adjust Panel Lights to full brightness.
2. Measure voltage between pin 6 (BRN) of connector C1 and ground.
If battery voltage is present, go to Step 3; otherwise, repair BRN (9) wire.
3. Measure voltage between pin 7 (GRY) of connector Cl and ground.
If battery voltage is present. go to Step 4: otherwise, repair GRY (8) wire.
4. Send the Radio to an authorized AC-Delco repair station.
B: RADIO DISPLAY SCANS PAST ALL RADIO FREQUENCIES WHEN IN SEEK OR SCAN MODES; HISS IS PRESENT OVER MOST RADIO STATIONS
(May be caused by a faulty antenna connection, antenna coaxial cable, Antenna or Radio)
Ignition Switch in RUN or ACCY Check the Antenna Coaxial Cable at the Radio and Antenna. They should be clean and tight Connect a known good Antenna and Antenna Coaxial Cable at the Radio connector
Does the Radio now operate? | |---------------------------------------| | | YES NO | | | | | | - Reconnect the original Antenna Send the Radio to an authorized Coaxial Cable at the Radio AC-Delco repair station - Connect a known good Antenna, using the original Antenna Coaxial Cable Does the Radio now operate? | |-------------------------------------| | | YES NO | | | | | | - Replace the Antenna Replace the Antenna Coaxial Cable
C: NOISE DIAGNOSIS
Unplug the Antenna at the back of the Radio.
If the noise persists, it is coming in the Radio wiring. Refer to the chart for a possible cause and repair action.
If noise disappears, see symptom 8 in chart.
NOISE DIAGNOSIS TEST
SYMPTOM POSSIBLE CAUSE REPAIR ACTION ------- -------------- -------------
1. Harsh poppiin noise that Ignition noise Perform the steps under changes with engine rpm Ignition Noise, page 150-14
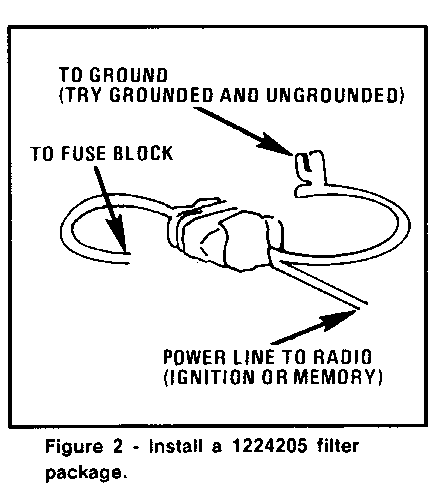
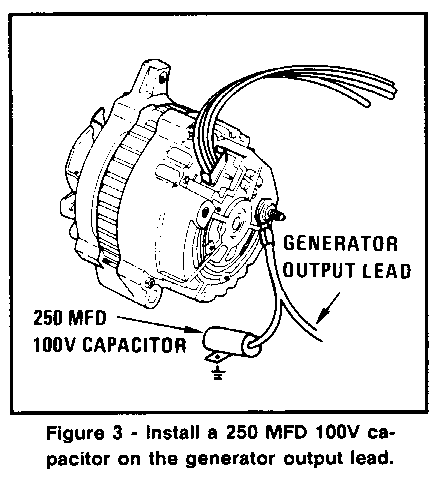
2. High whine (like a siren) Generator noise Add filter package that changes with engine 1224205 to power rpm and/or memory lead to the Radio By-pass the Generator output with a 250 MFD 100 v capacitor (See Fig. 3, page 150-14) Install a braided ground strap on the Radio (See Fig. 1 page 150-14) Run a direct wire from the Battery (+) to the Generator Repair or replace Generator 3. Noise occurs only when Condition in that Install filter package an accessory is on accessory 1224205 in the power lead (s) to that accessory (See Fig.2, page 150-14) Install a .5 MFD by-pass capacitor at the power lead to that accessory Consult Delco Sound Service Guide
4. All stations weak, noisy Defective Antenna or Do Test B (bohl AM and FM) lead-in wire
5. (AM only) weak,noisy Defective Antenna or Do Test B lead-in wire or AM alignment 6. (FM only) weak, noisy FM alignment Send the Radio to an authorized AC-Delco repair station 7. Noise present with ECM or Digital See the Delco Sound engine not running Cluster Service Guide
8. Noise stops when Antenna noise Replace the defective Antenna is unplugged Antenna with a good from back of Radio Antenna. If noise disappears, repair or replace the defective Antenna. Check Antenna ground, Coaxial Cable braid, and grounds at connectors. If noise persists with replace- ment Antenna, the problem must be repair- ed at the source of noise (Generator, Ignition System, accessory, etec.). See the Delco Sound Service Guide for noise "sniffing" procedures.
For more detailed noise repair procedures consult the Delco Sound Service Guide. Service procedures are given for:
Accessory noises
CB Antennas and noise
Computer noise
Shielding of wiring and components
Locating vehicle noise
IGNITION NOISE
Try the following in the given order:
1. Check for loose or defective spark plug wire.
2. Check for defective spark plug.
3. Move all wiring away from HEI and spark plug wires.
4. Reroute spark plug wires lying against anything that could possibly transmit noise to the Radio (car wiring or sensor leads that travel into the passenger compartment).
5. Check the engine to ground connection. Install a braided ground strap if necessary.
D: TIME OR RADIO DISPLAY DOES NOT APPEAR WHEN THE IGNITION SWITCH IS TURNED TO RUN OR ACCY
(May be caused by an open ignition wire, battery wire, or an inoperative Radio)
Ignition Switcn in RUN or ACCY Measure voltage at Radio connector C1 terminal 9 (YEL)
Is battery voltage present? | |------------------------------------------| | | YES NO | | | | | | - Measure voltage at Radio connector Check Fuse 4 and YEL (43) C1 terminal 10 (ORN) wire for an open Is battery voltage present? | |------------------------------------------| | | YES NO | | | | | | - Is there a good ground at Radio Check Fuse 11 and ORN (40) wire connector C1 terminal 5 (BLK)? for an open | |------------------------------------------| | | YES NO | | | | | | - Send the Radio to an authorized Check BLK (150) wire for an open AC-Delco repair station
E: ONE OR MORE SPEAKERS DO NOT OPERATE; BOTH SUB WOOFERS CANNOT BE HEARD WHEN AMPLIFIER IS ON
(May be caused by a faulty speaker, Radio, Amplifier (if equipped), Gain Control Switch (if equipped) or bad wire(s))
Note: Do not leave 1.5 volt battery connected for more than one second. Prolonged connection could damage speaker
Disconnect suspect speaker connector and connect a known good 1.5 volt battery across the speaker terminals (if suspect speaker is a rear speaker, see schematic for terminal identification)
Does the speaker pop? | |------------------------------------------| | | YES NO | | | | | | - Is suspect speaker a subwoofer? Replace the speaker | |------------------------------------------| | | YES NO | | | | | | Are both sub woofers inoperative? - Turn Radio ON (high volume) and | tune to a strong signal | - Set balance and/or fade toward | the suspect speaker | - Measure AC voltage at the Radio | output to the suspect speaker | | Does the meter reading vary | above 3 volts ? |------------------| | | | | | | | YES NO | | | |-------------| | | | | | | | | | Repair the open in YES NO | | | | | | | | | | page 150-18 the suspect speaker - Repair the open Continued on in the wire(s) page 150-17 between the Radio and the suspect speaker
Continued from page 150-16
- Disconnect suspect speaker - Measure the resistance to ground at termi- nals A and B of the suspect speaker.
Is the resistance less than 20 ohms? | |-----------------------------------| | | YES NO | | | | | | Does the sound system have an Send Radio to an authorized Amplifier? AC-Delco repair station | |-----------------------------------| | | YES NO | | | | | | - Disconnect the Amplifier connector Repair the shorted wires - Repeat the above measurement at the speaker terminal where the resistance to ground was less than 20 ohms.
Is the resistance less than 20 ohms? | |------------------------------------| | | YES NO | | | | | | - Repair the shorted wires Send the Amplifier to an authorized AC Delco repair station
Continued From page 150-16
- Disconnect the Amplifier connector
- Radio ON - Measure voltage at connector terminal 13 (PNK) Is battery voltage present? | |-------------------------------------------| | | YES NO | | | | | | - Measure voltage between connector - Check the PNK (143) wire for terminals 13 (PNK) and 14 (BLK) an open or short to ground.
Is battery voltage present? Is the PNK (143) wire OK? | | | | |-----------------------| |---------------| | | | | YES NO YES NO | | | | | | | | | | | | -Reconnect the -Repair/replace - Send the Radio to -Repair/replace Amplifier connector the BLK(150) an authorized as necessary -Gain Control wire as necessary AC Delco repair Switch connected station -Radio ON -Measure voltage at Gain Control Switch connector terminal A (LT GRN/BLK) Are approximately 8 volts present? | |--------------------------| | | YES NO | | | | | | | | Continued on - Check the LT GRN/BLK (1002) page 150-19 wire for an open or short to ground.
Is the LT GRN/BLK (1002) wire OK? | |---------------------------------| | | YES NO | | | | | | | | - Send the Amplifier to an authorized - Repair/replace as AC-Delco repair station necessary
Continued from page 150-18
- Measure voltage between Gain Control Switch terminal F (PNK) and ground.
Is battery voltage present? | |-----------------------------------------------| | | Yes NO | | | | | | - Measure voltage between terminal F (PNK) and - Repair/replace wire terminal D (BLK) of the Gain Control Switch. PNK (143)
Is battery voltage present? | |----------------------------------------------| | | YES NO | | | | | | - Turn Gain Control Switch ON -Repair/replace the - Measure voltage between terminal 3 (GRY/WHT) BLK (150) wire of the Amplifier connector and ground.
Is battery voltage present? | |-----------------------------| | | YES NO | | | | | | Continued on Is the GRY/WHT (1245) wire between the Am- page 150-20 plifier and the Gain Control Switch OK? | |----------------------------| | | YES NO | | | | | | Replace the Gain Control Switch Repair/replace the GRY/WHT (1245) wire
Continued from page 150-19
- Disconnect the Amplifier connector - Measure resistance between terminal 9 (DK GRN/ WHT) of the Amplifier connector and ground
Is there continuity to ground? | |---------------------------------| | | NO YES | | | | | | - Reconnect the Amplifier connector - Disconnect the Gain Control - Radio ON (high volume) tuned to Switch a strong station - Repeat the above measurement - Measure AC voltage between terminals 12 (DK BLU/WHT) and 15 (BLK/LT GRN) Is there continuity to ground? of Amplifier connector. |------------------| | | Does the meter reading vary above 3 volts? NO YES | | | |--------------------| | | | | Replace the Gain Repair/replace YES NO Control Switch the DK | | GRN/WHT (1001) | | wire | | - Repair the open -Check the DK BLU/WHT in the DK BLU/WHT (1243) and BLK/LT GRN (1243) and/or or short to ground (1242) BLK/LT GRN(1242) wires for an open wires Are the DK BLU/WHT (1243) and the BLK/LT GRN (1242) wires OK? | |--------------------------------| | | NO YES | | | | | | Repair/replace the Send the Amplifier to an wires as necessary authorized AC Delco repair station
F: BOTH SUB WOOFERS LACK BASS RESPONSE, OTHER SPEAKERS OPERATE CORRECTLY
(May be caused by a faulty Amplifier or a bad wire)
- Disconnect Amplifier connector - Turn Radio ON (high volume) and tune to a strong signal - Set balance and/or fade so that all speakers are operational (except sub woofers) - Measure the AC voltage between terminals 1 (LT GRN) and 2 (DK GRN) of the Amplifier connector
Does the meter reading vary above 3 volts? | |-----------------------------------------------| | | YES NO | | | | | | - Measure the AC voltage - Repair/replace LT GRN (200) between terminals 4 (TAN) and/or DK GRN (117) wires and 5 (GRY) of the Amplifier connector
Does the meter reading vary above 3 volts? | |-----------------------------------------------| | | YES NO | | | | | | - Measure the AC voltage - Repair/replace TAN (201) between terminals 10 (BRN) and/or GRY (118) wires and 11 (YEL) of the Amplitier connector
Does the meter reading vary above 3 volts? | |-----------------------------------------------| | | YES NO | | | | | | - Measure the AC voltage - Repair/replace BRN (199) between terminals 7 and/or YEL (116) wires (DK BLU) and 8 (LT BLU) of the Amplifier connector
Does the meter reading vary above 3 volts? | |-----------------------------------------------| | | YES NO | | | | - Send Amplifier to an authorized - Repair/replace DK BLU (46) AC Delco repair station and/or LT BLU (115) wires
G: BOTH SUB WOOFERS ARE OPERATIONAL BUT THEIR VOLUME CANNOT BE CONTROLLED BY ADJUSTING THE GAIN CONTROL SWITCH (May be caused by a faulty Amplifier, Gain Control Switch, or a bad wire)
- Turn Radio ON (high volume) and tune to a strong signal - Turn Gain Control Switch ON and adjust it between MIN and MAX - Measure voltage between terminal B (DK GRN/WHT) of the Gain Control Switch connector (connected) and ground
Does the voltage vary between 4 and 8 volts as the Gain Control Switch is adjusted from MIN to MAX? | |--------------------------------------------| | | YES NO | | | | - Measure voltage between - Measure voltage between terminals terminal 9 (DK GRN/WHT) A (LT GRN/BLK) and D (BLK) of the Amplifier connector of the Gain Control Switch (connected) and ground
Does the voltage vary between Is 8 volts measured? 4 and 8 volts as the Gain | Control Switch is adjusted | from MIN to MAX? | | |-----------------| |--------------------| | | | | | | YES NO YES NO | | | | | | | | | | | | - Send the Amplifier - Repair the - Replace the - Repair the open To an authorized open in the Gain Control in the BLK AC-Delco repair DK GRN/WHY Switch (150) wire station (1001) wire
H: STEERING WHEEL PAD SWITCH AND ELECTRONICS MODULE ILLUMINATION DOES NOT COME ON WITH THE HEADLIGHTS OR PARK LIGHTS ON
(May be caused by faulty Steering Wheel Pad Switch And Electronics Module, burnt out bulbs, open dimming circuit, or misalignment of components)
- Headlights or Park Lights ON - Panel Lights set to maximum brightness - Measure voltage at connector C206 terminal A2
Are 8 volts or more measured? | |-------------------------------------------------| | | YES NO | | | | | | - Remove the Steering Wheel Pad - Repair the open Switch And Electronics Module GRY (8) Wire (Reter to Section 3B4 for removal procedures) - Connect the Horn Tower Test Adapter J37608 between the Steering Wheel Pad Switch And Electronics Module and the Turn Signal Cancel Cam Assembly - Headlights or Park Lights ON - Panel Lights set to maximum brightness - Measure voltage between the GROUND and ILLUM probe cavities at the Switch Cluster section of the J37608 Test Adapter
Is battery voltage present?
YES NO
- Check/replace the Steering - Check wiring between C206 and Turn Signal Wheel Pad Switch And Cancel Cam Assembly. Remove the Turn Electronics Module Signal Cancel Cam Assembly. Inspect the Illumination bulbs Slip Rings on the Turn Signal Cancel Cam Assembly and the spring loaded contacts on the Turn Signal Switch. Replace as necessary. Incorrect or missing lubricant on the Cam can cause premature failure. Take care to keep lubricant or any foreign mateial away from the LEDs and receptors as it will hinder or prevent proper operation. See Parts and Illustrations Catalogue for required special lubricant.
1: STEERING WHEEL CONTROLS DO NOT OPERATE AT SOME STEERING WHEEL POSITIONS, OR STEERING WHEEL PAD SWITCH AND ELECTRONICS MODULE PANEL LIGHTS FLICKER AS WHEEL IS TURNED
(May be caused by faulty Turn Signal Cancel Cam Assembly, Turn Signal Switch, or dirty or misaligned components)
- Remove the Steering Wheel Pad Switch And Electronics Module (Refer to Section 3B4 for removal procedures) - Connect the Horn Tower Test Adapter J37608 between the Steering Wheel Pad Switch And Electronics Module and the Turn Signal Cancel Cam Assembly - Engine running - Headlights or Park Lights ON - Panel Lights at maximum brightness - Measure voltage at the J37608 Switch Cluster probe cavities while slowly turning the Steering Wheel (Vottage must not vary as wheel is turned)
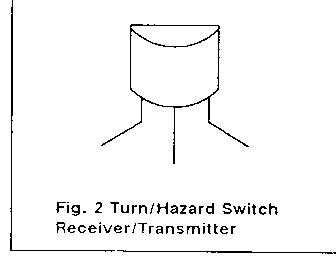
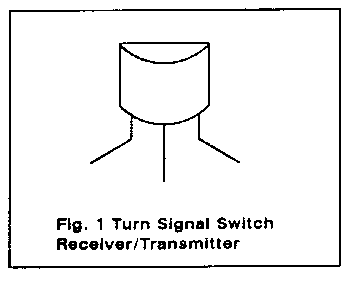
ILLUM and GROUND BATTERY VOLTAGE DATA OUT and GROUND BATTERY VOLTAGE Are the measurements listed above OK? | |---------------------------------------------| | | YES NO | | | | | | - Remove the Turn Signal Cancel - Remove the Turn Signal Cancel Cam Cam Assembly Assembly. Inspect the slip rings - Ignition Switch in ACCY or RUN on the Turn Signal Cancel Cam - Cover one of the Turn Signal Assembly and the spring loaded Switch Receiver/Transmitters contacts on the Turn Signal with black electrical tape Switch. Replace as necessary. (see Fig. 2) Incorrect or missing lubricant - Aim an incandescent light on the Cam can cause premature at the Turn Signal Switch Light failure. Take care to keep Receiver/Transmitter (a lubricant or any foreign material flashlight will do) away from the receiver/transmitter - Measure voltage at ALDL as it will hinder or prevent pro- connector terminal "J" per operation. See Parts and Illustrations Catalogue for required special lubricant. Is the measurement approximately 1 volt or less? | |--------------------------------------------| | | YES NO | | | | | | - Repeat the above instructions - Repalce the Turn Signal Switch with the opposite Turn Signal Switch Receiver/ Transmitter covered
Is the measurement approximately 1 volt or less? | |--------------------------------------------| | | YES NO | | | | - Replace the Turn Signal - Replace the Turn Signal Switch Cancel Cam Assembly
J: STEERING WHEEL CONTROLS DO NOT OPERATE BUT RADIO AND HEATER AND A/C CONTROLS ARE OK
(May be caused by faulty HTR-A/C And Radio Control Interface Module, Turn Signal Switch, Turn Signal Cancel Cam Assembly, Steering Wheel Pad Switch And Electronics Module, or an open circuit.)
- Connect bi-directional scan tool at ALDL Connector - Ignition Switch in ACCY or RUN - Perform component identification using scan tool
Does scan tool show Radio is present? | |-----------------------------------------------| | | NO YES | | | | | | - Check DK GRN (835) wire for an open - Does scan tool show that Steering between Radio and ALDL Connector Wheel Controls are present? | Is this wire OK? | | | |------------------------| |-----------------| | | | | NO YES YES NO | | | | | | | | | | | | - Repair wire - Send Radio to an - Replace the - Follow instruc- as necessary authorized AC Steering Wheel tions given on Delco repair Pad Switch and Page 150-27, station Electronics following Fig 1 Module
J: STEERING WHEEL CONTROLS DO NOT OPERATE BUT RADIO AND HEATER AND A/C CONTROLS ARE OK
(Continued from Page 150-25)
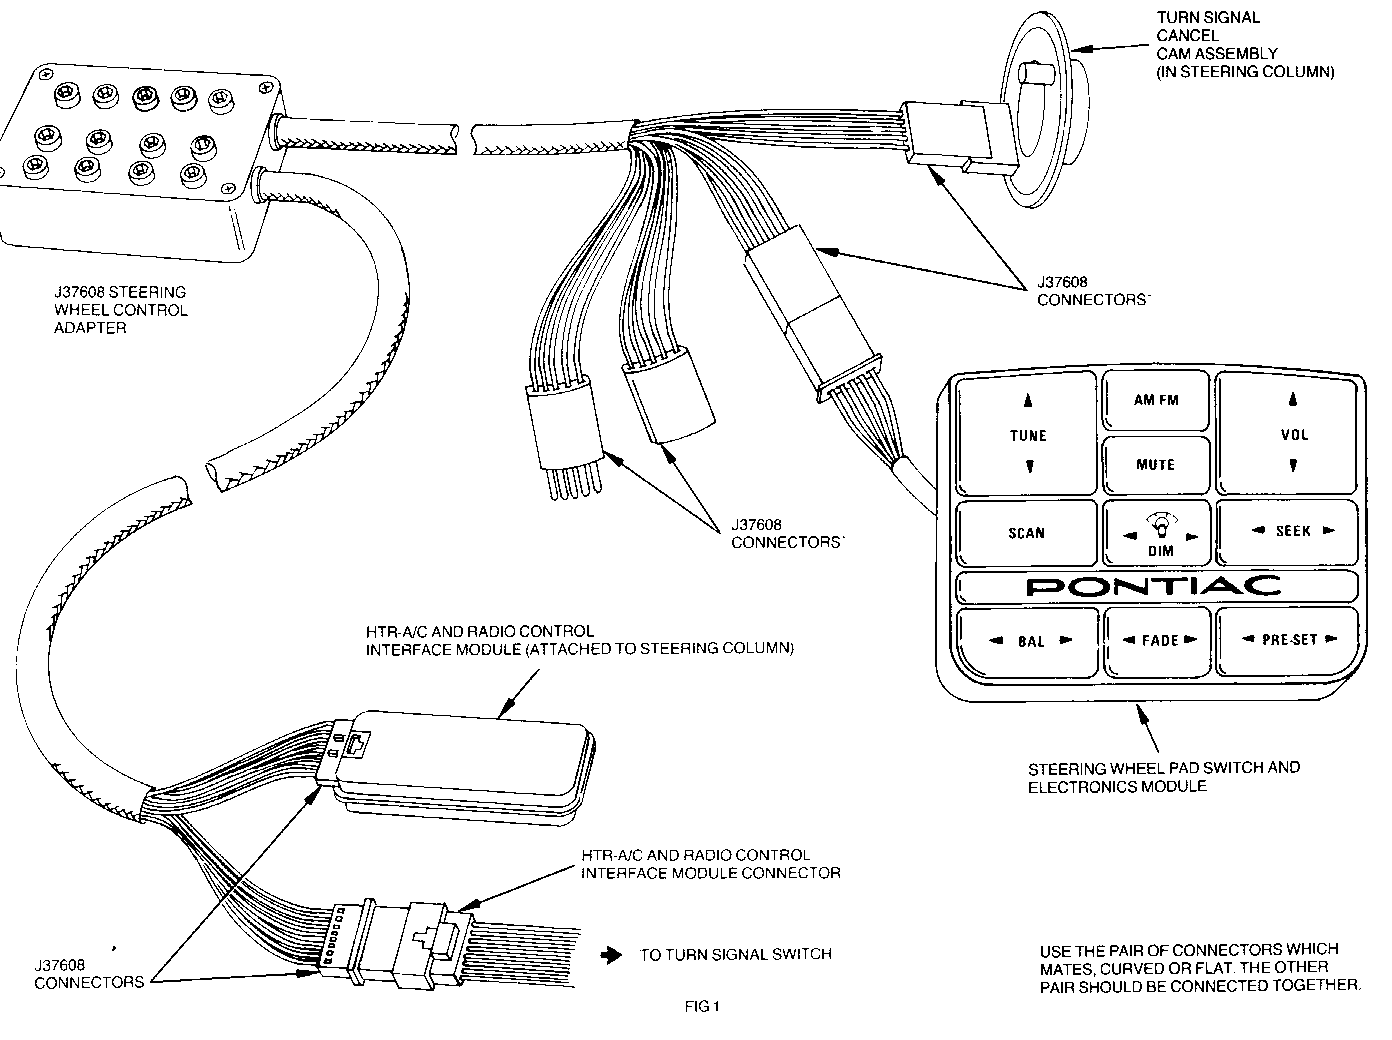
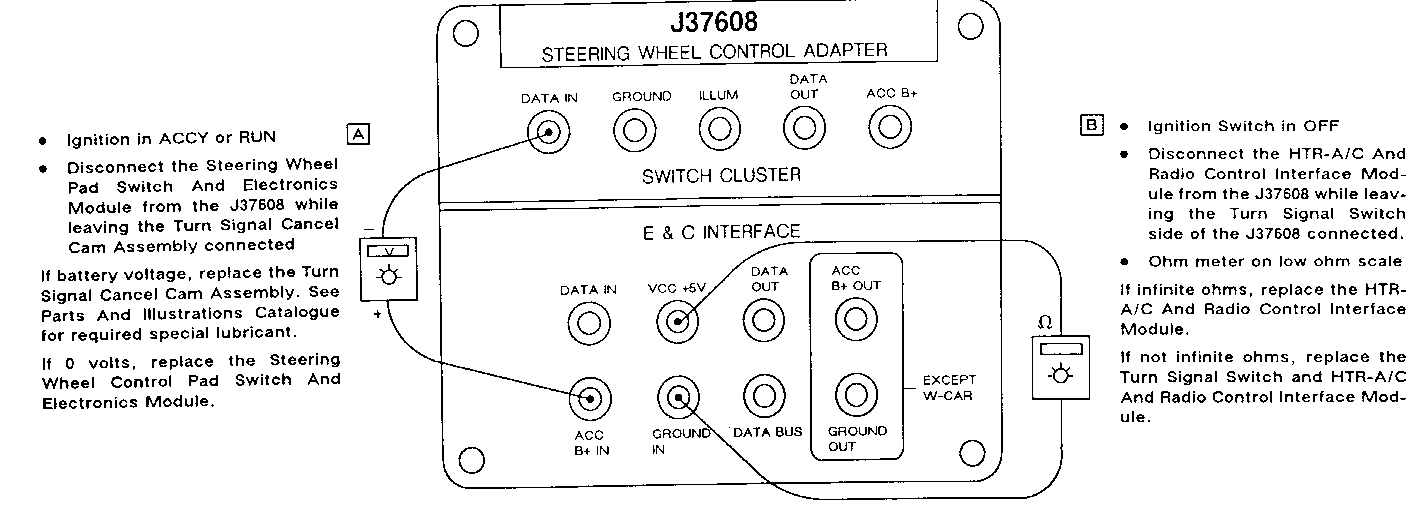
- J37608 steering Wheel Control Adapter connected (see FIG 1)
- Ignition Switch in RUN
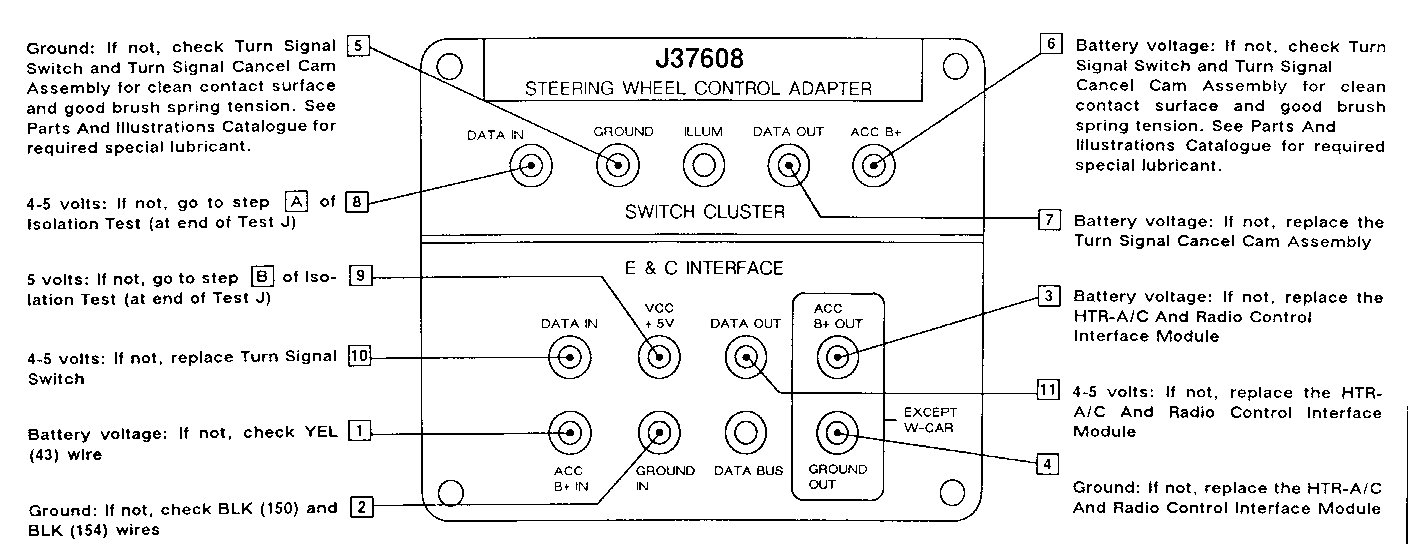
- Measure voltage at terminal probe cavities in numerical order (1,2,3, etc.)
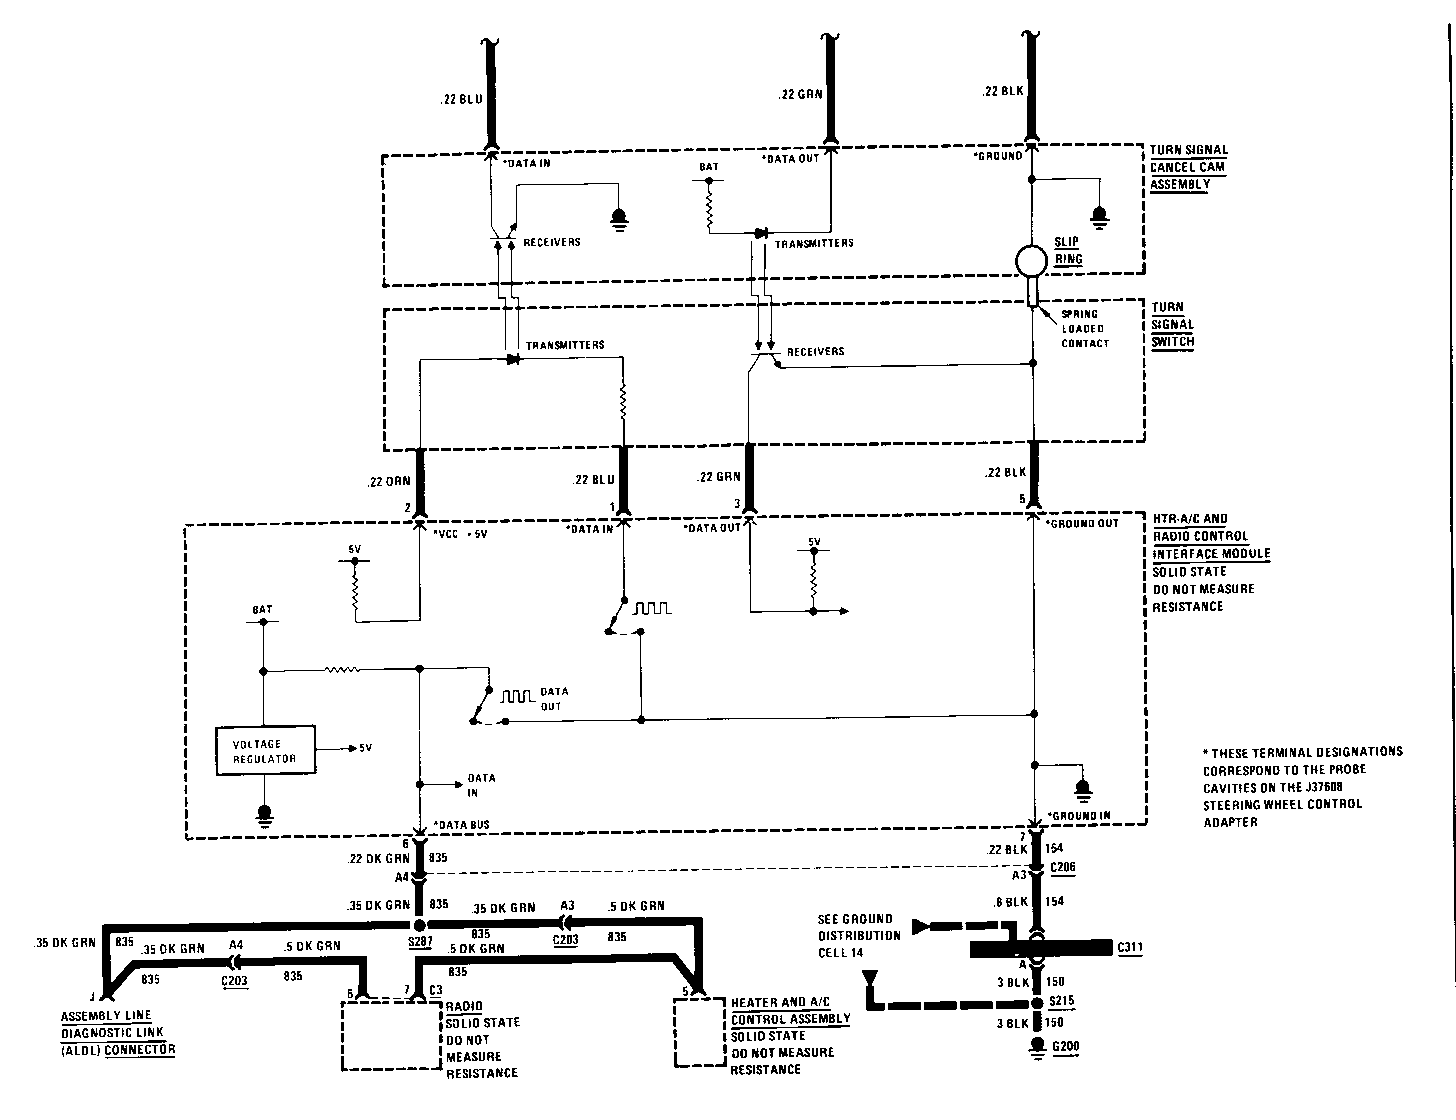
- J37608 probe terminals agree with schematic labels. For example, "DATA IN" on the Switch Cluster side ot J37608 is the same as "DATA IN" on the Turn Signal Cancel Cam Assembly on the schematic.
Test Explanation: Steps 1,2,5 and 6 verify that corresponding power or ground circuits are OK
Steps3 and 4 verify power or ground circuits in the HTR-A/C And Radio Control interface Module
Step 7 verifies Turn Signal Cancel Cam Assembly internal continuity by checking for voltage
Step 8 verifies Steering Wheel Pad Switch And Electronics Module "DATA IN" continuity
Step 9 verifies HTR-A/C And Radio Control Interface Module Voltage regulation circuit
Step 10 verifies Turn Signal Switch transmitter internal continuity by checking for voltage
Step 11 verifies HTR-A/C And Radio Control interface Module "DATA IN" circuit continuity
J: STEERING WHEEL CONTROLS DO NOT OPERATE BUT RADIO AND HEATER AND A/C CONTROLS ARE OK
(Continued from previous page)
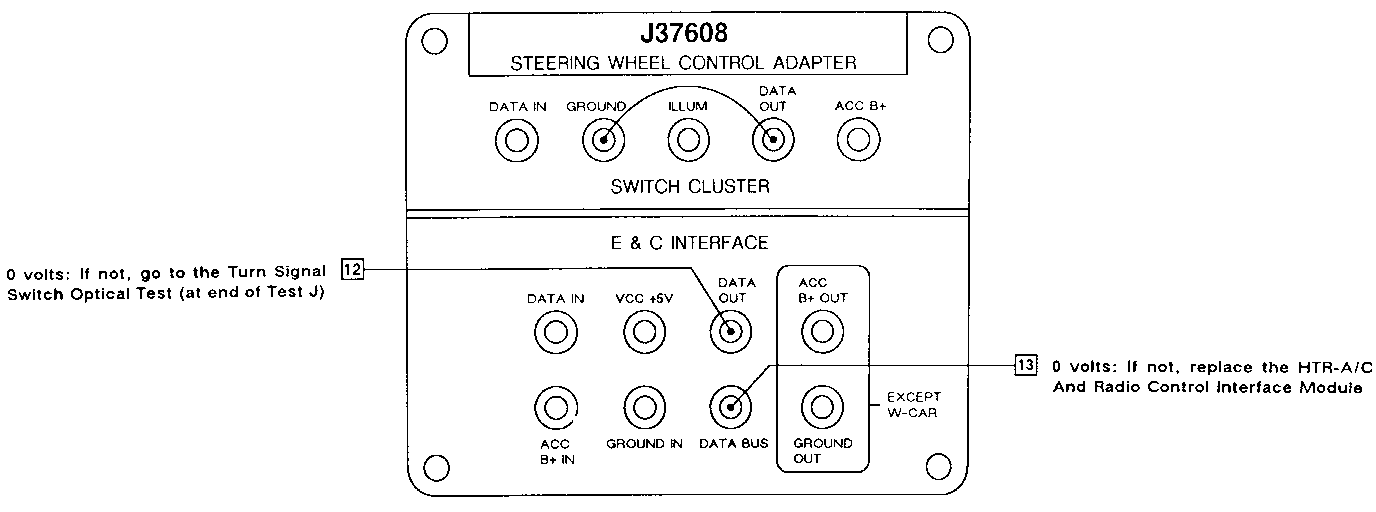
- Jumper J37608 Switch Ciuster terminals "DATA OUT" and "GROUND" as Shown - Measure in numericai order
Test Explanation: The jumper simulates a ground signal from the Steering Wheel Pad Switch And Electronics Module. If the Turn Signal Cancel Cam Assembly transmitters and Turn Signal Switch receivers are operating, a ground signal will be transmitted through the optical slip ring and will be measured at the J37608 E & C interface probe cavity "DATA OUT". If the HTR-A/C And Radio Control Interface Module is OK, the ground signal will be sent through the HTR-A/C And Radio Control Interface Module and will appear at the J37 608 E & C Interface "DATA BUS" cavity.
J: STEERING WHEEL CONTROLS DO NOT OPERATE BUT RADIO AND HEATER AND A/C CONTROLS
(Continued from previous page)
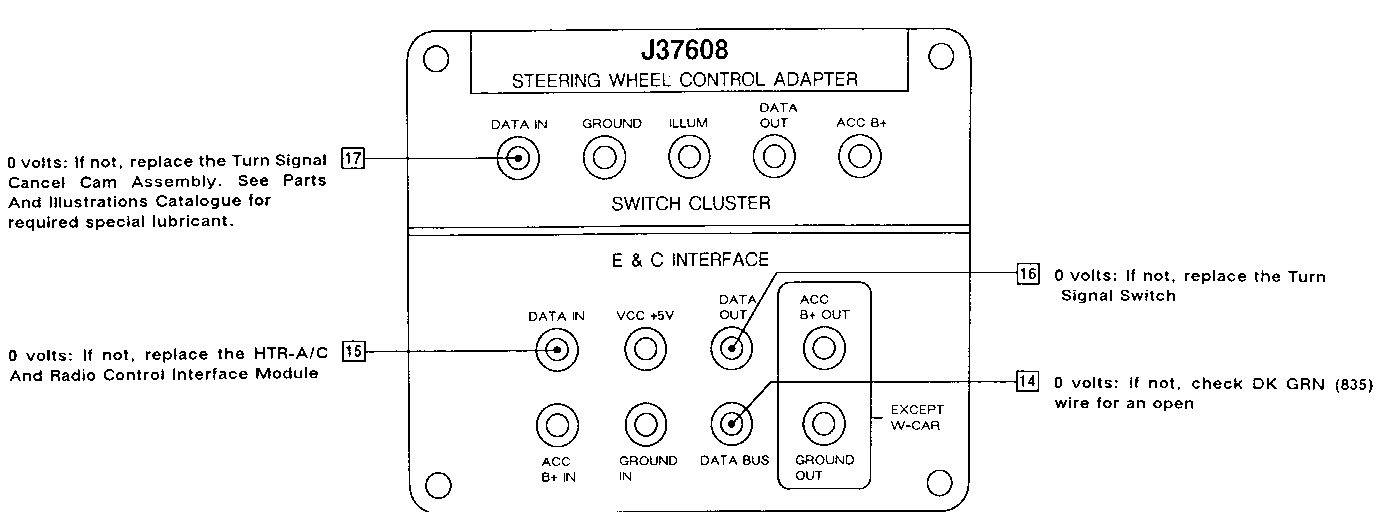
- Disconnect jumper from the previous step - Jumper ALDL terminal J (DK GRN) to ground - Measure in numerical order
If all checks are OK, replace the Steering Wheel Pad Switch And Electronics Module
Test Explanation: The jumper at ALDL terminal J simulates a data signal from the Radio. If the DK GRN (835) wire is OK, a ground signal will appear at the J37608 "DATA BUS" terminal. If the HTR-A/C And Radio Control Intertace Module is OK, a ground signal will appear at the J37608 E & C Intertace " DATA IN" cavity. If the Turn Signal Switch transmitters are operating, the ground signal will appear at the E & C Interface "DATA OUT" cavity. If the Turn Signal Cancel Cam Assembly receivers are OK, the ground signal will appear at the Switch Cluster "DATA IN" cavity. If all signals are good, Steering Wheel Pad Switch And Electronics Module must be at fault.
J: STEERING WHEEL CONTROLS DO NOT OPERATE BUT RADIO AND HEATER AND A/C CONTROLS ARE OK
(continued from previous page)
ISOLATION TEST - Perform only the step referenced
Test Explanations: Step A is checking for a short to ground in the Turn Signal Cancel Cam Assembly. If battery voltage appears, the Turn Signal Cancel Cam is shorted to ground. If zero volts are measured, the Steering Wheel Controls are either shorted to ground or open. Step B is checking for a short to ground in the Turn Signal Switch. If resistance measurement is not infinite, the Turn Signal Switch is shorted and the HTR-A/C And Radio Control Interface Module is also defective. if resistanctse is infinite, the HTR-A/C And Radio Control interface Module 5 volt regulated supply is not operating.
J: STEERING WHEEL CONTROLS DO NOT OPERATE BUT RADIO AND HEATER AND A/C CONTROLS ARE OK
(Continued from provious page)
TURN SIGNAL SWITCH OPTICAL TEST
- Remove the Turn Signal Cancel Cam Assembly - Ignition Switch in ACCY or RUN - Cover one of the Turn Signal Switch Receiver/Transmitters with black electrical tape - Aim an incandescent light at the Turn Signal Switch Light Receiver/Transmitter (a flashlight will do) - Measure voltage at ALDL Connector terminal J (DK GRN)
Is the measurement approximately 1 volt or less? | |-----------------------------------| | | YES NO | | | | | | - Repeat the above instructions with the - Replace the Turn opposite Turn Signal Switch Receiver/ Signal Switch Transmitter covered
Is the measurement approximately 1 volt or less? | |------------------------------------| | | YES NO | | | | | | - Replace the Turn - Replace the Turn Signal Cancel Cam Signal Switch Assembly. See Parts And Illustrations Catalogue for required special lubricant.
K: RADIO, HEATER AND A/C AND STEERING WHEEL CONTROLS DO NOT OPERATE
(May be caused by a short to power or ground in a component or 835 data line)
- Ignition Switch in ACCY or RUN - Measure voltage to ground at ALDL terminal J (DK GRN)
Are 9-12 volts measured? | |---------------------------------------------| | | NO YES | | | | | | If vehicle is not equipped with If vehicle is not equipped with Steering Wheel Controls, skip Steering Wheel Controls, skip to to the "NO" path the "NO" path
- Disconnect HTR-A/C and - Disconnect HTR A/C and Radio Radio Control Interface Control Interface Module connector Module connector Do the Radio controls operate? - Attempt to operate the | radio from radio controls | | Does Radio respond? | | | |----------------| |--------------------------| | | | | NO YES YES NO | | | | | | | | | | | | - Disconnect - Reconnect the - Replace the - Disconnect Heater Heater And HTR-A/C And HTR-A/C And And A/C A/C Control Radio Control Radio Control Control Assembly Interface Interface Assembly connector connector Module connector Module - Attempt to Do the Radio operate - Disconnect the controls now operate? the Radio Steering Wheel | from Radio Pad Switch and | controls Electronics Module | connector | Does Radio | respond? Does the Radio | | operate from | | Radio controls? | | | | |------------| |------------| | -----------| | | | | | | NO YES NO YES NO YES | | | | | | | | | | | | Continued - Send the | | | | on page Heater And | - Send the Steer- Continued -Send the 150-33 A/C Control | ing Wheel Pad on page Heater Assembly to Continued Switch And 150-33 And A/C an authorized on page Electronics Control AC-Delco 150-34 Module to an Assembly repair station authorized to an AC-Delco authorized repair station AC-Delco repair station
Continued from page 150-32
- Disconnect Radio connector C3 - Disconnect Radio connector C3 - Measure voltage at ALDL terminal - Measure resistance between Radio J (DK GRN) connector C3 terminal 7 (DK GRN) Is 0 volts measured? and ground | Is infinite resistance measured? | | | | |------------------| |--------------| | | | | | | | | | | NO YES NO YES | | | | | | | | - Repair DK GRN - Send Radio - Check DK GRN - Send Radio to (835) wire for to an (835) wire for an authorized AC a short to authorized a short to Delco repair ground AC Delco repair battery station station
Continued from page 150-32
- Remove the Turn Signal Cancel Cam Assembly - Cover the Turn Signal Switch Transmitter/Receivers
Does the Radio now operate? | |---------------------------------------------| | | NO YES | | | - Replace the Turn Signal | Cancel Cam Assembly. | See Parts And Illustrations | Catalogue for required | special lubricants. | | | | - Connect the J37608 steering wheel test adapter between the Steering Wheel Pad Switch And Electronics Module and Turn Signal Cancel Cam Assembly and between the HTR-A/C And Radio Control Interface Module connector with the HTR-A/C And Radio Control Interface Module disconnected - Ignition Switch in ACCY or RUN - Measure voltage between J37608 Switch Cluster probe cavity "ACC B+" and E & C interface probe cavity "DATA OUT"
Is battery voltage present? | |-----------------------------------------| | | NO YES | | | | | | Continued in next column - Replace the Turn Signal Switch. See Parts And illustrations Catalogue for required special lubricant.
Continued from previous column
- J37608 connected as above - Measure voltage between J37608 Switch Cluster probe cavity "ACC B+" and E & C Interface cavity "DATA IN"
Is battery voltage present? | | | -------------------------------------------| | | | | NO YES | | | | | | - Replace the HTR-A/C - Replace the Turn Signal And Radio Control Switch. See Parts And Intertace Module Illustrations Catalogue for required speciai lubricant.
CIRCUIT OPERATION
RADIO
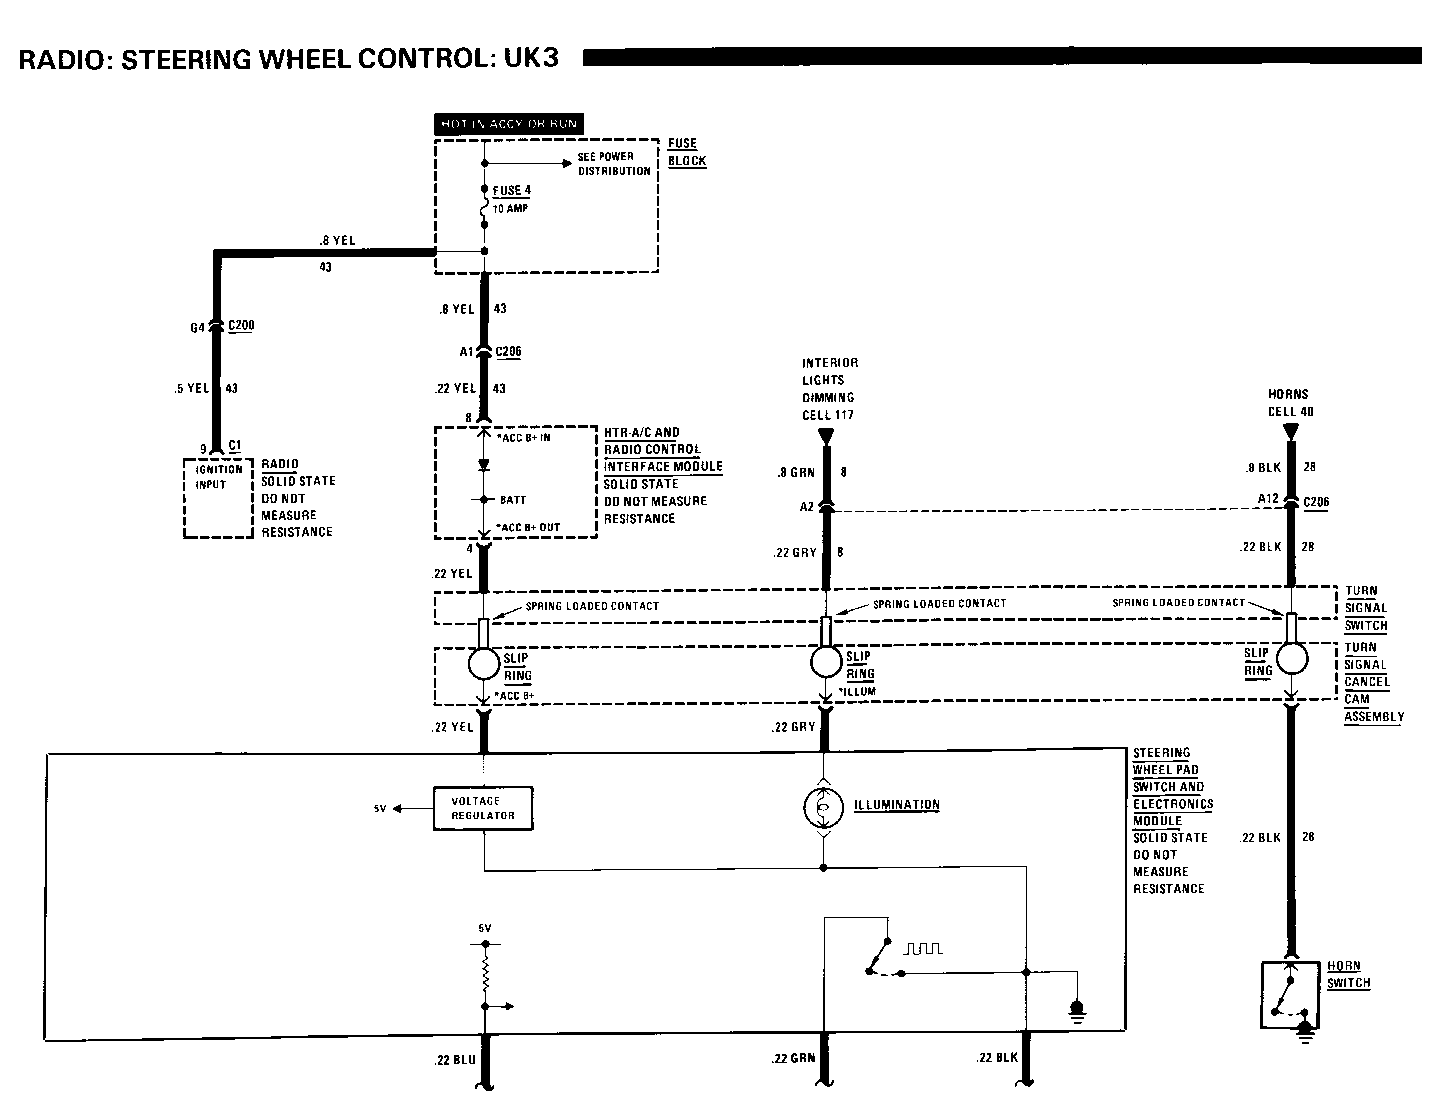
The Radio receives voltage through four paths: 1) Fuse 4 to the On-Off Switch from the YEL wire; 2) Fuse 11 and the ORN wire which keeps the solid state clock, date, and Radio station memory circuits alive when the Ignition Switch is turned OFF; 3) an Instrument Panel lamp voltage controlled by Panel/Interior Light Control for the Radio Panel Light (GRY wire); and 4) a Digital Dim Signal to dim the Radio Station numbers at night. This signal comes from the Head/Park Light Switch.
The Radio On-Off Switch also switches battery voltage to the PNK wire to operate the Power Antenna. The PPL/YEL (724) circuit sends dimming information to the Heater And A/C Control Assembly.
The Steering Wheel Controls System consists of several components. They include the following:
Steering Wheel Control Head Turn Signal Cancel Cam Assembly Turn Signal Switch HTR-A/C And Radio Control Interface Module Radio
STEERING WHEEL CONTROL HEAD
The Steering Wheel Control Head controls the radio by creating voltage pulses that correspond to different radio control functions. These signals are sent to the optical receiver/ transmitters in the Turn Signal Cancel Cam As- sembly. The Steering Wheel Control Head also receives data line signals via the Turn Signal Cancel Cam Assembly. The signals received by the Steering Wheel Control Head are used to determine when the data line is free of other signals so it may transmit.
The Steering Wheel Control Head receives power, illumination and ground via slip rings between the Turn Signal Switch and the Turn Signal Cancel Cam.
TURN SIGNAL CANCEL CAM ASSEMBLY
The Turn Signal Cancel Cam Assembly includes five solid state infrared transmitter/receiver units. These units, along with two identical optical units in the Turn Signal Switch, are used to send optical signals between the steering wheel and steering column. The optical units are arranged so they are always in sight of each other, thus forming an optical slip ring. The Turn Signal Cancel Cam incorporates circuitry which changes the signals from optical to electrical and vice-versa. The Turn Signal Cancel Cam Assembly receives power, ground and illumination power through 3 of its 4 slip rings from the Turn Signal Switch brush contacts. The horn signal is sent through the fourth slip ring.
TURN SIGNAL SWITCH
The Turn Signal Switch receives optical signals from the Turn Signal Cancel Cam Assembly and converts them to electrical signals that are sent to the HTR-A/C And Radio Control interface Module. It also receives electrical signals from the HTR-A/C And Radio Control Interface Module and converts them to the Turn Signal Cancel Cam Assembly. The Turn Signal Switch sends power, ground and illumination power to the Turn Signal Cancel Cam Assembly through its brush contacts.
HTR-A/C AND RADIO CONTROL INTERFACE MODULE ------------------------------------------ The HTR-A/C And Radio Control Interface Module receives electrical voltage pulses from the Turn Signal Switch and sends these signals to the Radio over the serial data line. It also receives signals from other devices over the serial data line and sends these signals to the Turn Signal Switch. The HTR-A/C And Radio Control Interface Module is used to shape the signal pulses, to separate the send and receive pulses, and to convert from a one to a two wire data line.
RADIO
The Radio receives instructions over the serial data line from the HTR-A/C And Radio Control Interface Module in the form of voltage pulses. The Radio then responds to these voltage pulses by adjusting its operation accordingly,
AMPLIFIER
The Amplifier is turned on when the Radio is ON and the Gain Control Switch is ON. supplying battery voltage to the Amplifier Mute Input.
The Amplifier's inputs are connected in parallel with the speakers. Its outputs drive one of the two coils in each of the Woofers. The same signal drives both speakers. Amplifier power level may be controlled by adjusting the Gain Control Switch.
STEERING WHEEL CONTROLS
NOTICE: When fasteners are removed, always reinstall them at the same location from which they were removed. If a fastener needs to be replaced, use the correct part number for that application. If the correct part number fastener is not available, a fastener of equal size and strength (or stronger) may be used. Fasteners that are not reused, and those requiring thread locking compound will be called out. The correct torque value must be used when installing fasteners that require it. If the above conditions are not followed, parts or system damage could result.
CONTENTS
CONTROLS SYSTEM COMPONENTS
Steering Wheel Controls System......................... 3F-1 Control Button Functions .............................. 3F-2
UNIT REPAIR
Control Buttons Assembly .............................. 3F-2 Bulb Service .......................................... 3F-2 Hom Pad .............................................. 3F-2 Steering Wheel......................................... 3F-2 Control Buttons........................................ 3F-3 Delay Relay and Interface Module....................... 3F-3
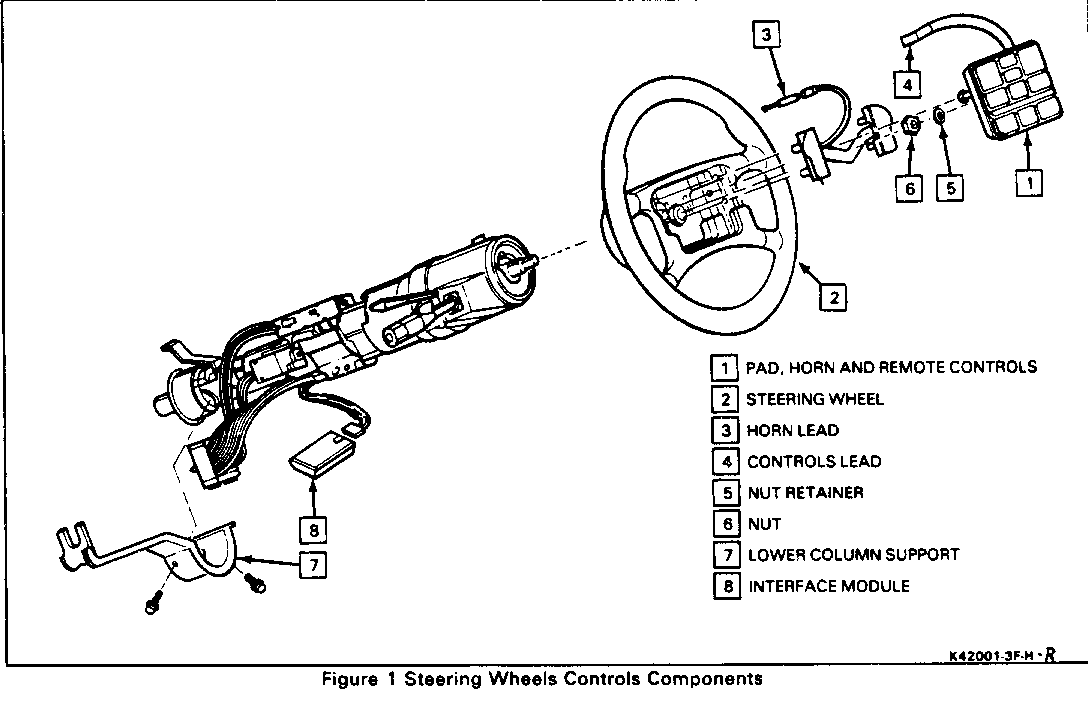
CONTROLS SYSTEM COMPONENTS
Figure I
The steering wheel remote control pad (1) is removed by carefully prying out the pad, and disconnecting the hom (3) and controls (4) leads. The delay relay (9) and interface module (8) convert and relay the control button signals to the proper function.
CONTROL BUTTON FUNCTIONS
Steering wheel control buttons allow remote control of the following functions (see Figure 2):
FAN -Changes heater/AC blower fan speeds.
TEMP -Changes temperature setting of heater/AC.
MODE -Changes heater/AC mode options: defog, bi-level, etc.
FADE -Changes speaker balance, front to rear.
MUTE -Turns sound off
AM/FM -Switches between AM and FM bands.
PRE-SET -Selects pre-set stations.
VOL -Volume control of radio and tape deck.
SEEK -Seeks the next station, either up or down the radio band.
DIAGNOSIS
Refer to page 8A-150 of this manual.
Refer to Section 9A-Radio System and Antennas for Steering Wheel Controls operation.
UNIT REPAIR
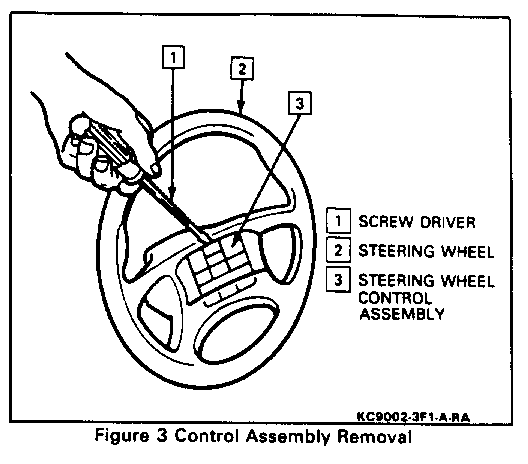
CONTROL BUTTON ASSEMBLY
Figure 3
Remove or Disconnect
1. Pry out control button assembly with thin bladed screwdriver along top edge of assembly.
2. Disconnect steering wheel control connector.
Install or Connect
1. Connect steering wheel control connector.
2. Push control button assembly into place.
CONTROL BUTTON ASSEMBLY BULBS
These bulbs are not replaceable at the dealership. For bulb replacement, send the control button assembly to a Delco repair shop.
HORN OPERATION
Horn operation is not affected by the steering wheel control system or removal of the control button assembly.
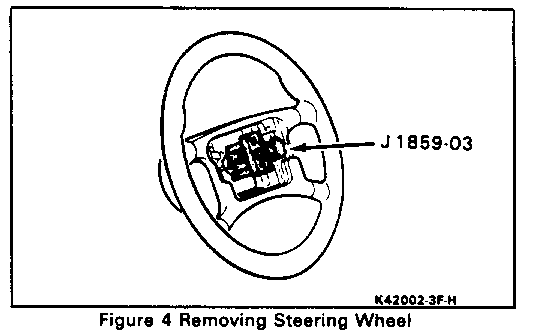
STEERING WHEEL
Figure 4
Tools required:
J1859-03 Steering Wheel Puller
Remove or Disconnect
1. Horn pad assembly (see preceding steps). 2. Retainer and nut. 3. Mark steering shaft and steering wheel to ensure proper alignment during reinstallation. 4. Steering wheel with J1859-03.
NOTICE: On cars equipped with steering wheel control option, do not install J1859-03 bolts beyond five full turns. Damage to electronic components under steering wheel may result if this procedure is not followed.
Install or Connect
1. Align mark on steering wheel with mark on shaft. 2. Nut to 41 N.m (30 lbs. ft.). 3. Retainer. 4. Horn pad assembly (see preceding steps).
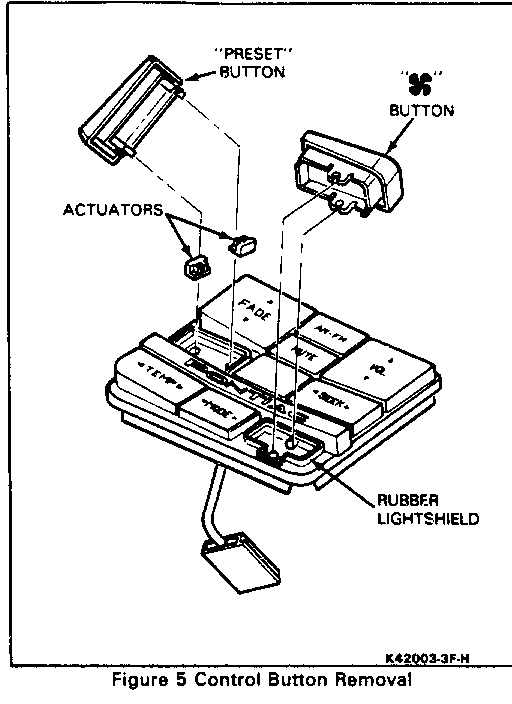
CONTROL BUTTONS
Figure 5 Remove or Disconnect
1. Control button assembly (see preceding steps).
2. Rocker Button(with arrows)
Pull up at edge with affow until button comes off pivot post.
3. Push Button
Pull up at edge carefully
When button comes out of actuators they may loosen. Check proper placement of actuators.
Install or Connect
1. Rocker Button(with arrows)
Properly position rocker button on pivot posts and press down until seated.
2. Push Button
Push button evenly on both sides until both sides of button are seated in actuator.
3. Make sure rubber lightshield is in place.
4. Control button assembly (see preceding steps).
General Motors bulletins are intended for use by professional technicians, not a "do-it-yourselfer". They are written to inform those technicians of conditions that may occur on some vehicles, or to provide information that could assist in the proper service of a vehicle. Properly trained technicians have the equipment, tools, safety instructions and know-how to do a job properly and safely. If a condition is described, do not assume that the bulletin applies to your vehicle, or that your vehicle will have that condition. See a General Motors dealer servicing your brand of General Motors vehicle for information on whether your vehicle may benefit from the information.
