Notice: Various transmission components require heating to 150°C (300°F)
for 30 minutes for proper installation. Overheating may damage
the components. Under-heating the components may cause hard installation,
which may damage the components.
Important: Certain transmission components require preheating to 150°C (300°F).
In order to preheat the components, use an electric oven. It is recommended
to purchase a roaster/oven style locally. The oven should have a temperature
setting thermostat.
- Preheat the following components for 30 minutes to 150°C
(300°F) in an electric oven:
| • | The mainshaft intermediate case bearing |
| • | The 2nd/3rd gear synchronizer hub |
| • | The 3rd speed gear bushing |
| • | The 4th gear thrust washer |
| • | The 4th speed gear bushing |
| • | The 4th/5th synchronizer hub |
| • | The mainshaft front bearing |
Caution: When handling parts that have been preheated for installation purposes,
always wear leather welding gloves with a minimum amount of handling time.
Failure to wear leather gloves may result in severe skin burns or personal
injury.
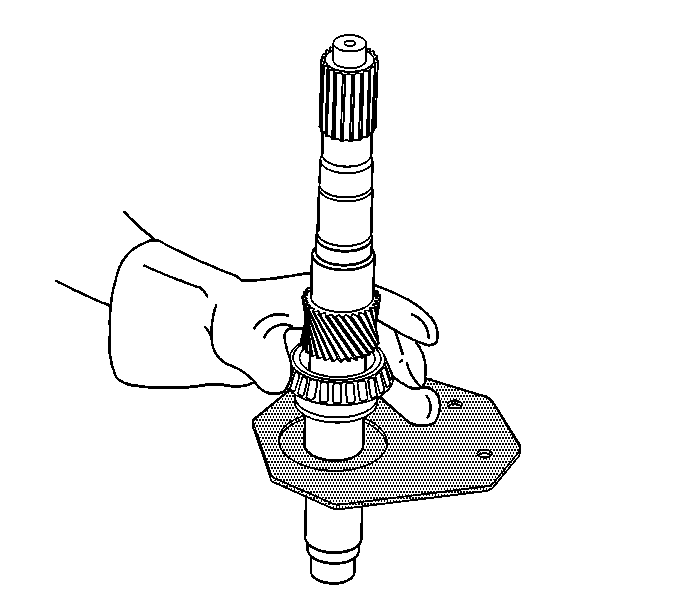
- Position the mainshaft with the output end up in the J 44725
.
- Wearing protective gloves, install the preheated mainshaft intermediate
case bearing on the mainshaft. Rotate the bearing while installing, in order
to seat it fully and squarely.
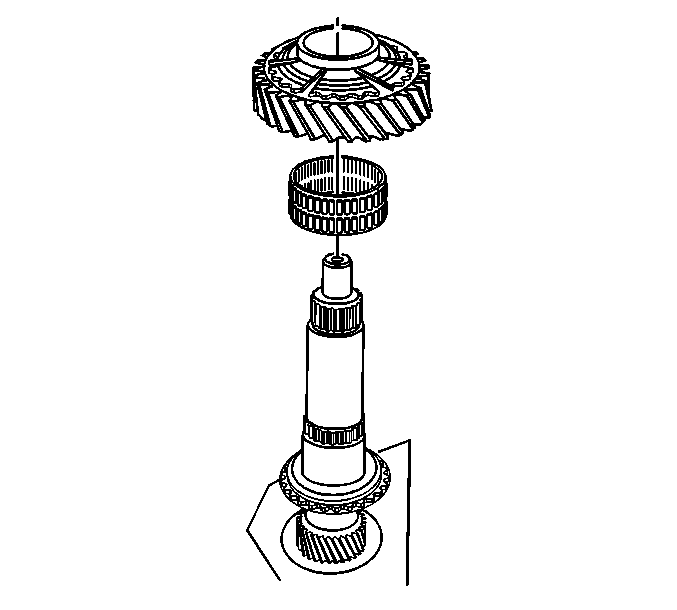
- Turn the mainshaft over
180 degrees in the J 44725
, with the input end facing up.
- Install the 2nd speed gear bearing on the mainshaft.
- Lightly lubricate the bearing with GM P/N 12378515
(Canadian P/N 88900701).
- Install the 2nd speed gear on the mainshaft.
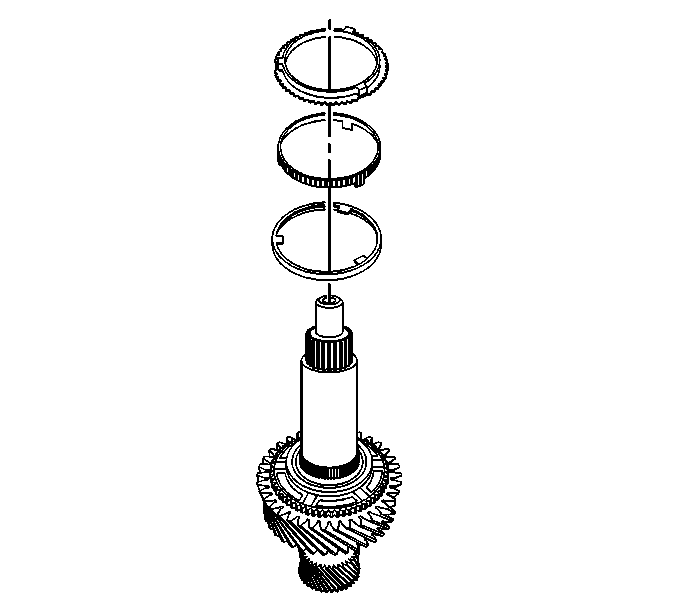
- Install the 2nd speed
gear synchronizer inner ring. Align the tabs on the ring with the slots in
the 2nd gear.
- Install the 2nd speed gear synchronizer middle ring. Align the
tabs in the 2nd gear.
- Install the 2nd speed gear synchronizer blocking ring.
- Ensure the 3 tabs of the synchronizer inner ring are aligned with
the synchronizer blocking ring tabs.
- Lightly lubricate the synchronizer components with GM P/N 12378515
(Canadian P/N 88900701).
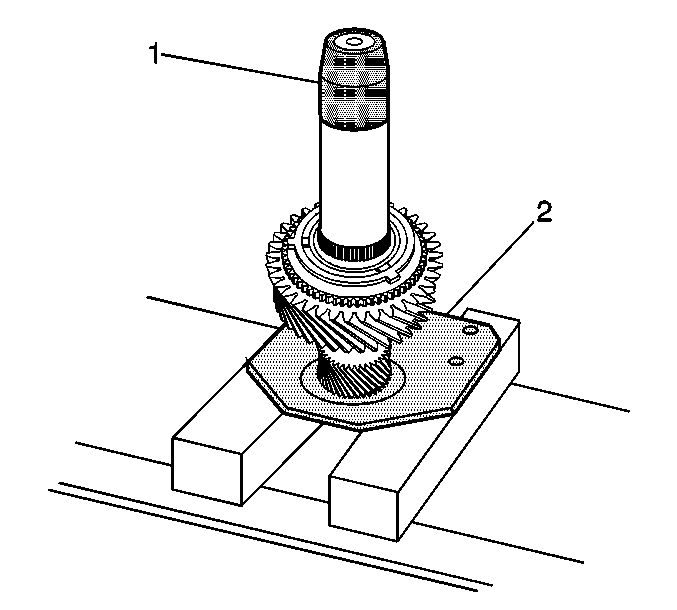
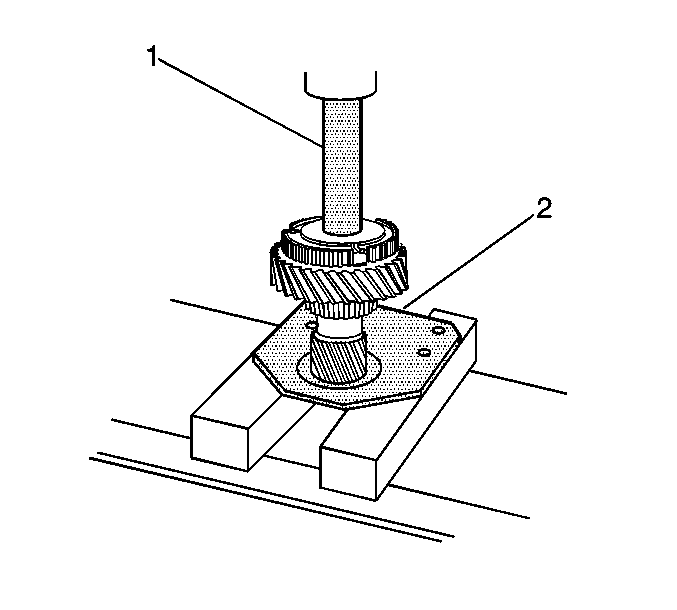
- Position the J 44725
(2) on a hydraulic press. The J 44725
will be used to assemble
the mainshaft while in a hydraulic press.
- Position the mainshaft on the J 44725
(2) with the input facing up.
- Position the J 44734
(1) on the end of the mainshaft. Using J 44734
will prevent the heated parts from getting
caught on the mainshaft during installation.
Caution: When handling parts that have been preheated for installation purposes,
always wear leather welding gloves with a minimum amount of handling time.
Failure to wear leather gloves may result in severe skin burns or personal
injury.
- Wearing protective gloves, install the preheated 2nd/3rd
gear synchronizer hub on the mainshaft. Position the hub with the part number
facing up.
- Align the tabs on the 2nd gear synchronizer rings with the slots
in 2nd/3rd gear synchronizer hub while installing the hub.
- Use the J 44735
(1)
and a hydraulic press to fully seat the 2nd/3rd gear synchronizer hub.
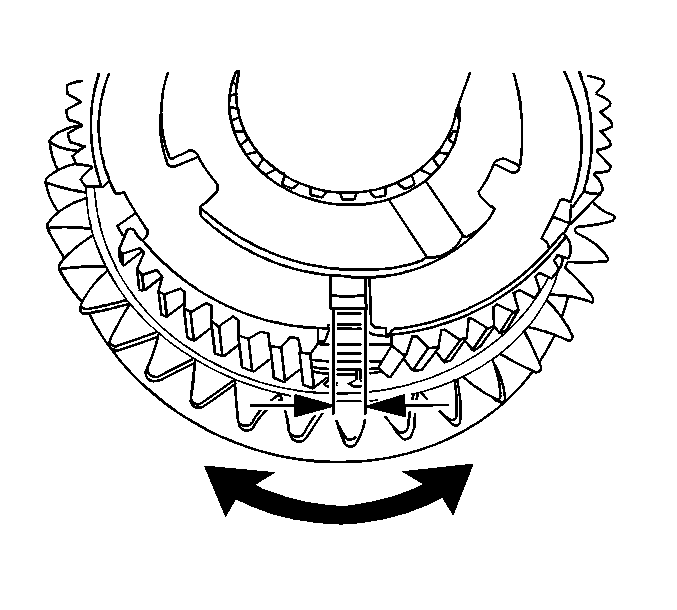
- Perform the following
in order to ensure the 2nd gear synchronizer rings are properly installed
in the 2nd/3rd gear synchronizer hub:
| 19.1. | Rotate the 2nd speed gear back and forth. |
| 19.2. | Looking through the slot in the hub, watch for movement of the
blocking ring. |
| 19.3. | The blocking ring should move approximately 2 mm (1/16 in). |
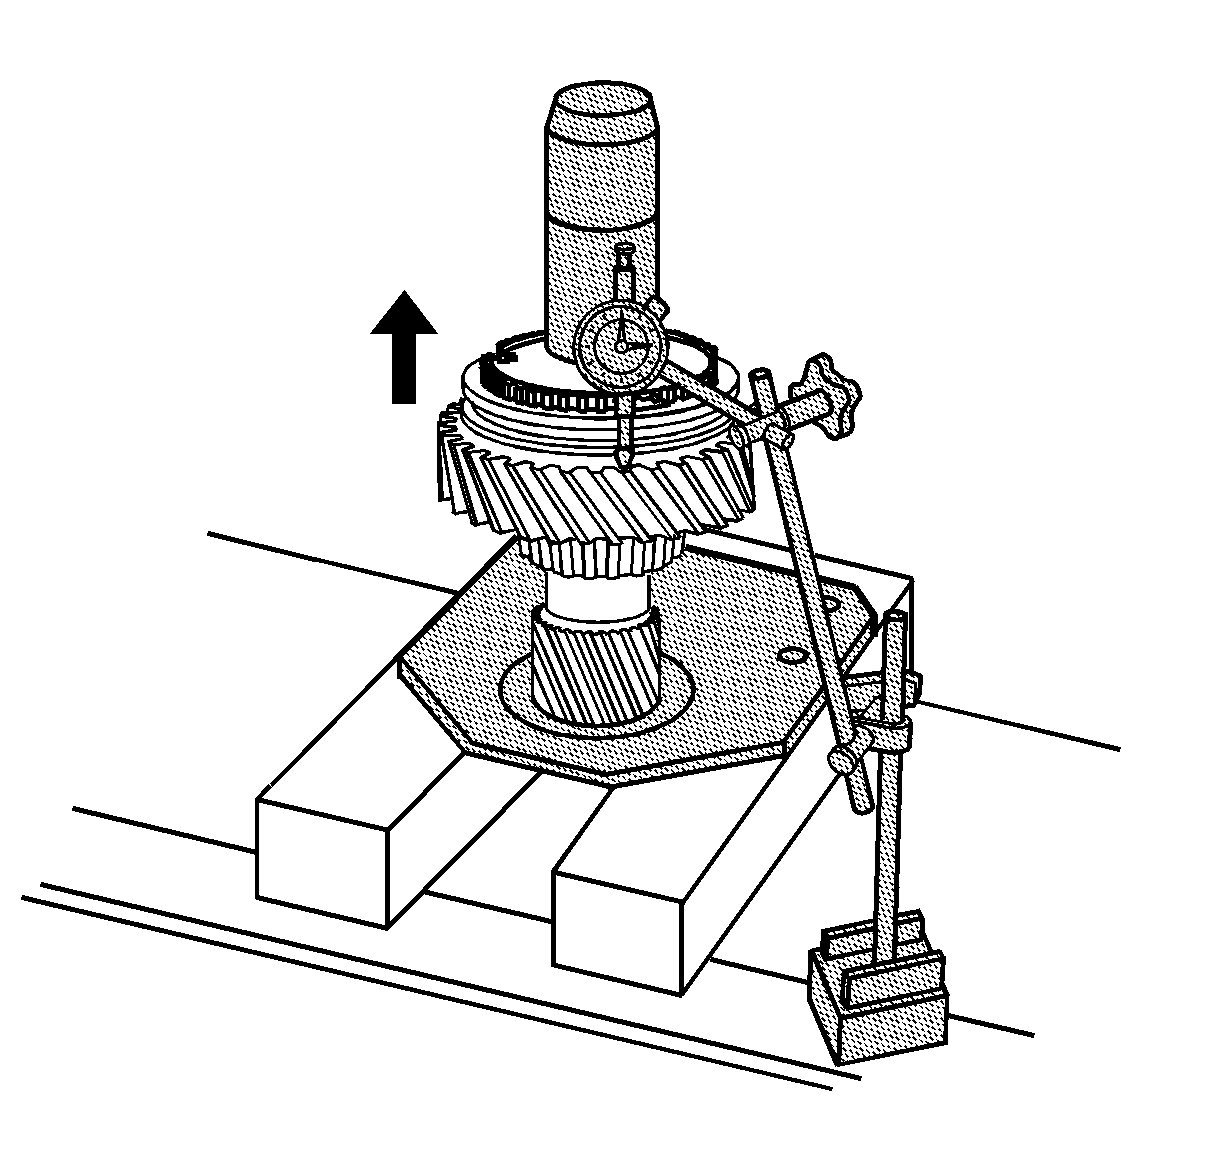
- Using the J 26900-12
or the J 29763
with the J 26900-13
, measure the 2nd gear axial clearance. Clearance should be 0.15-0.35 mm
(0.0059-0.0138 in).
| 20.3. | Lift up on the gear to measure the clearance. |
- If clearance is higher than the specification, inspect to ensure
the 2nd/3rd synchronizer hub is installed completely.
- If clearance is higher than the specification, inspect the 2nd
speed gear, mainshaft, or 2nd/3rd synchronizer hub for wear.
- If clearance is lower than the specification, inspect the 2nd
speed gear, mainshaft, or 2nd/3rd synchronizer hub for burrs.
- Repair or replace the damaged or worn component.
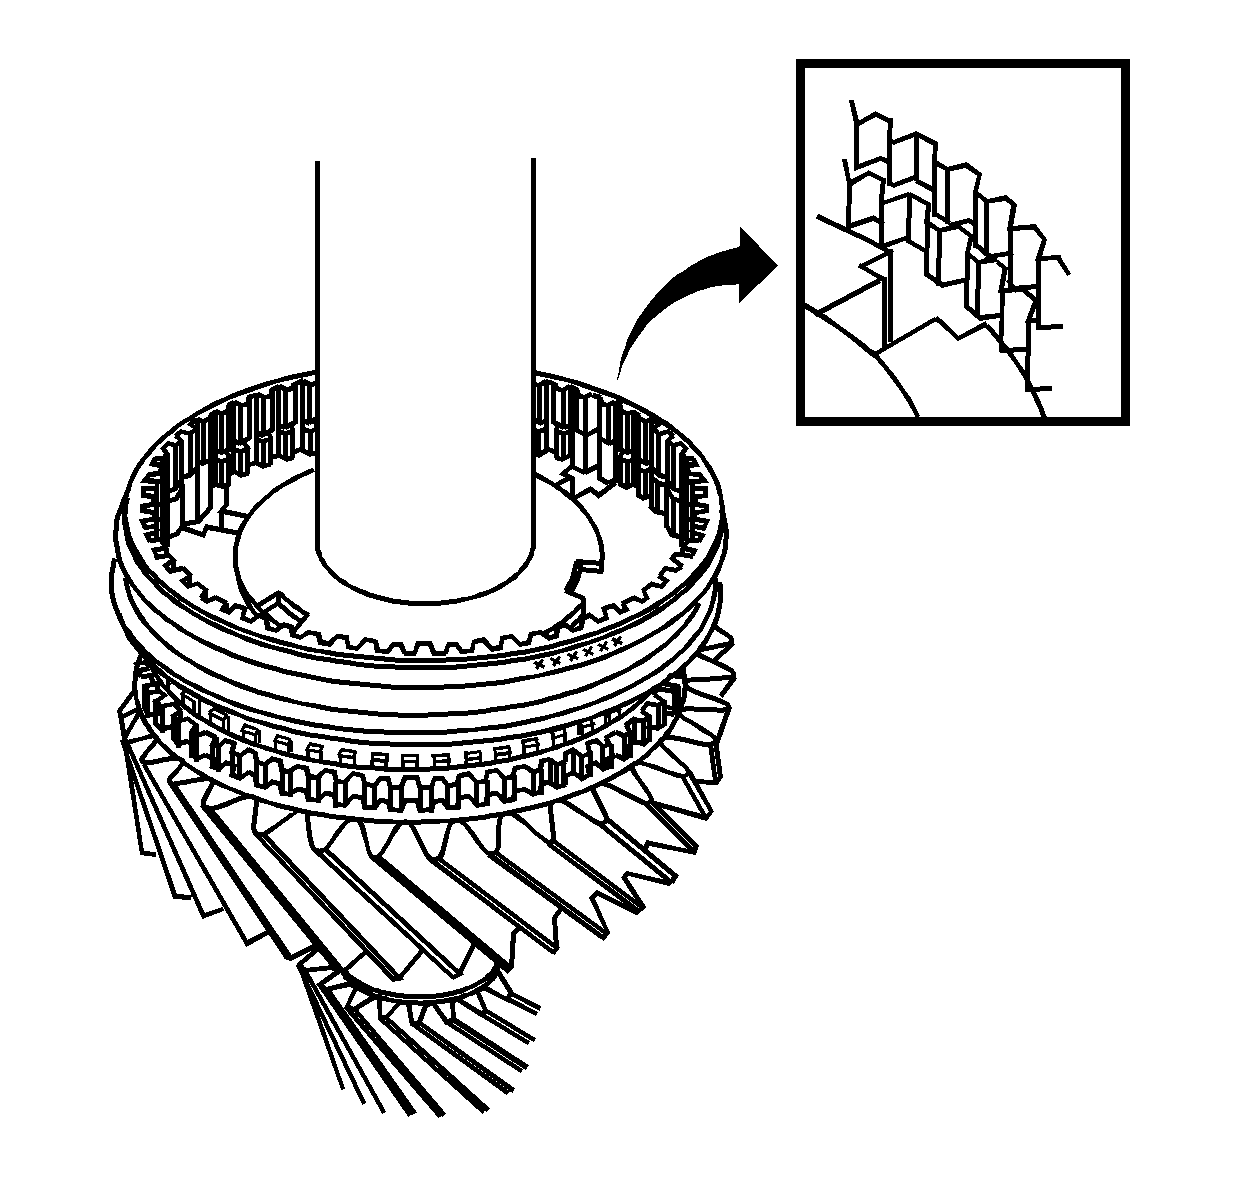
- Install the 2nd/3rd gear
synchronizer sleeve.
| • | Position the sleeve part number side up. |
| • | Align the flat areas, square teeth, on the sleeve with the slots
for the detent springs. |
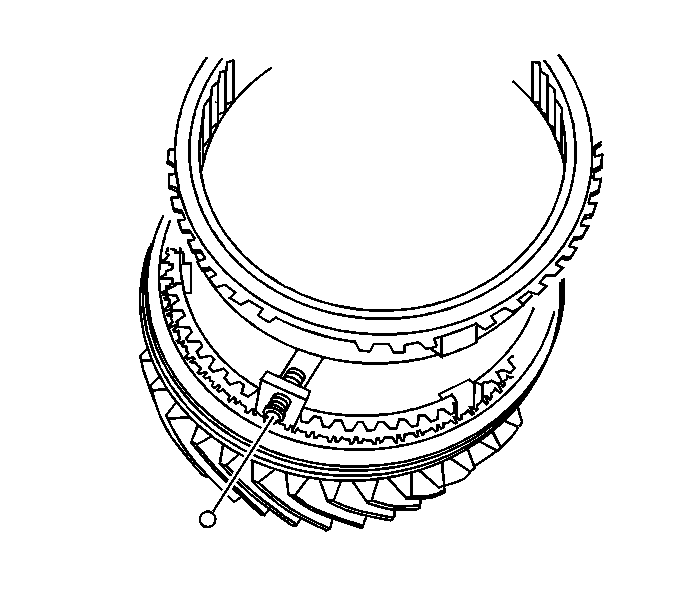
- Install the 2nd/3rd gear
detent springs, pressure pieces, and balls in the synchronizer hub.
The 2nd/3rd synchronizer springs are 19.7 mm (0.775 in)
long.
| 26.1. | Install all three springs and pressure pieces. |
| | Important: If the 3rd gear synchronizer blocking ring is not installed before moving
the sleeve to lock the balls in position, the springs will jump out of position.
|
| 26.3. | Install the 3rd gear synchronizer blocking ring to hold the balls and
sleeve in the neutral position. The tabs on the blocking ring align with
the slots in the hub without the detent pieces. |
| 26.4. | Pull up on the sleeve to lock the balls in position. |
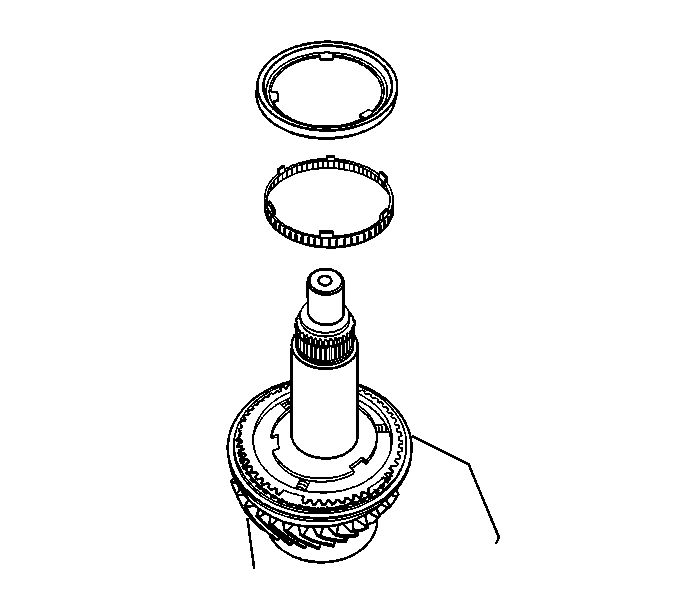
- Install the 3rd gear synchronizer
middle ring.
- Install the 3rd gear synchronizer inner ring.
- Align the 3 tabs of the inner ring with the synchronizer hub slots.
- Lightly lubricate the synchronizer components with GM P/N 12378515
(Canadian P/N 88900701).
Caution: When handling parts that have been preheated for installation purposes,
always wear leather welding gloves with a minimum amount of handling time.
Failure to wear leather gloves may result in severe skin burns or personal
injury.
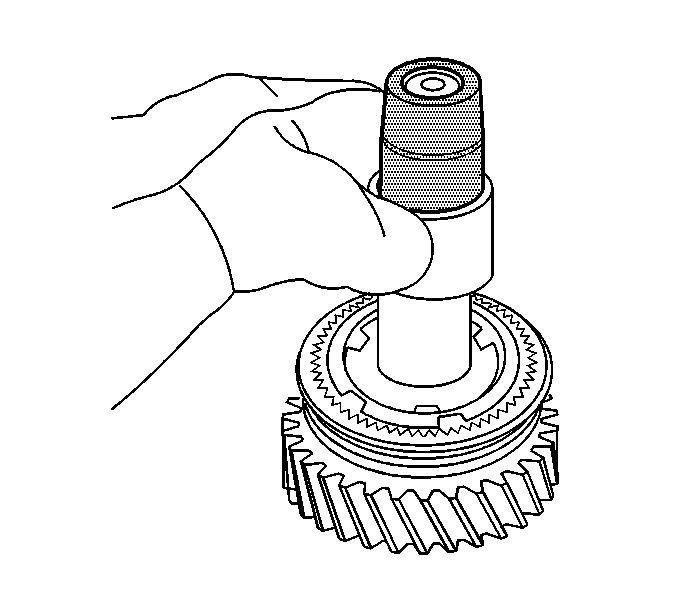
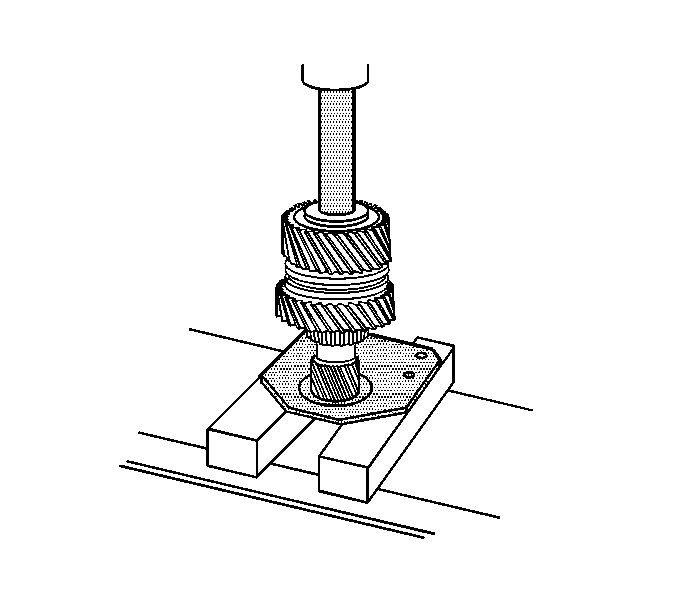
- Wearing protective gloves, install the preheated 3rd speed
gear bushing.
- Use the J 44735
and a hydraulic press to fully seat the bushing.
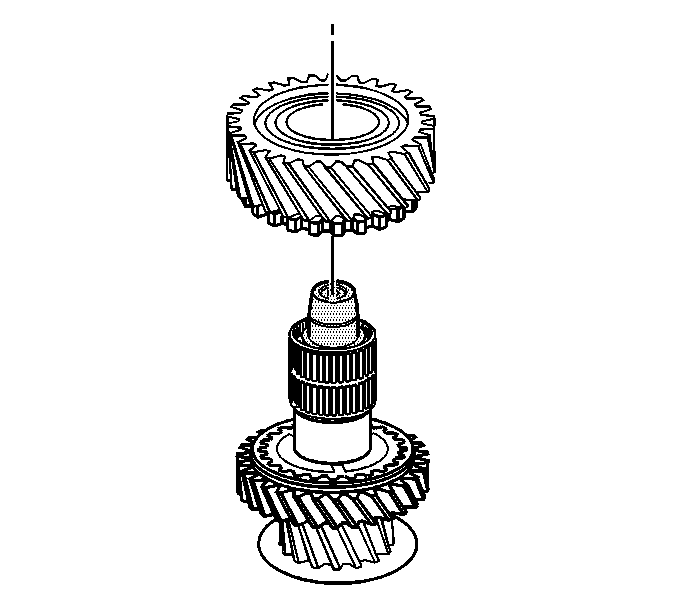
- Allow the 3rd speed gear
bushing to cool.
- Install the 3rd speed gear bearing on the mainshaft.
- Lightly lubricate the bearing with GM P/N 12378515
(Canadian P/N 88900701).
- Install the 3rd speed gear.
- Align the 3rd gear synchronizer middle ring tabs with the holes
in the 3rd speed gear.
Caution: When handling parts that have been preheated for installation purposes,
always wear leather welding gloves with a minimum amount of handling time.
Failure to wear leather gloves may result in severe skin burns or personal
injury.
- Wearing protective gloves, install the preheated 4th gear
thrust washer on the mainshaft.
- Using the J 44735
and a hydraulic press, fully seat the thrust washer.
- Allow the 4th gear thrust washer to cool.
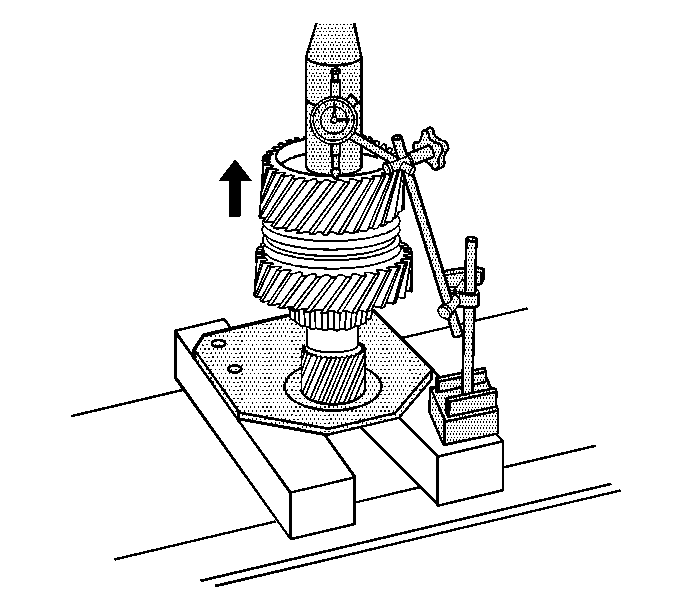
- Using the J 26900-12
or the J 29763
with the J 26900-13
, measure the 3rd gear axial clearance. Clearance should be 0.15-0.35 mm
(0.0059-0.0138 in).
| 41.3. | Lift up on the gear to measure the clearance. |
- If clearance is higher than the specification, inspect to ensure
the 4th gear thrust washer is installed completely.
- If clearance is higher than the specification, inspect the 3rd
speed gear, the 4th gear thrust washer, or 2nd/3rd synchronizer hub for wear.
- If clearance is lower than the specification, inspect the 3rd
speed gear, the 4th gear thrust washer, or 2nd/3rd synchronizer hub for burrs.
- Repair or replace the damaged or worn component.
Caution: When handling parts that have been preheated for installation purposes,
always wear leather welding gloves with a minimum amount of handling time.
Failure to wear leather gloves may result in severe skin burns or personal
injury.
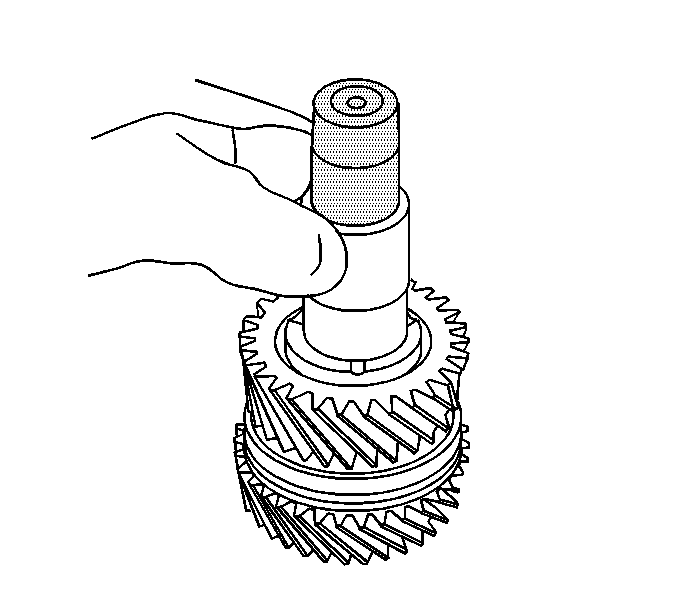
- Wearing protective gloves, install the preheated 4th speed
gear bushing on the mainshaft.
- Use the J 44735
and a hydraulic press to fully seat the bushing.
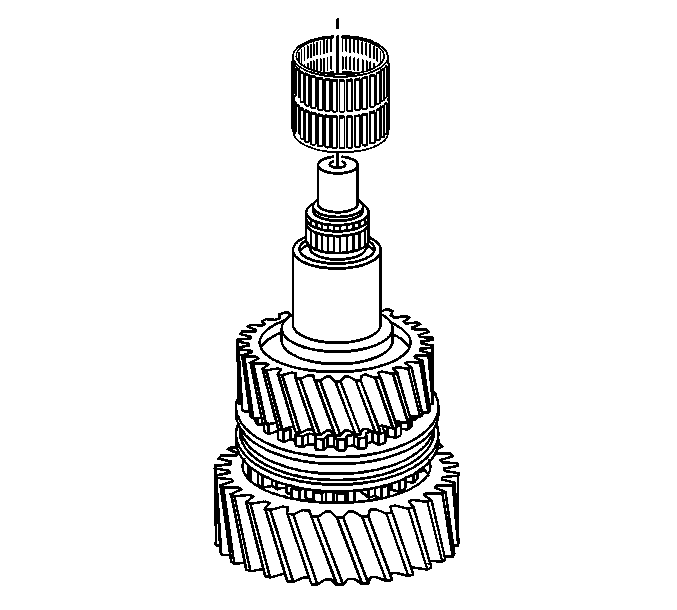
- Allow the 4th speed gear
bushing to cool.
- Install the 4th speed gear bearing.
- Lightly lubricate the bearing with GM P/N 12378515
(Canadian P/N 88900701).
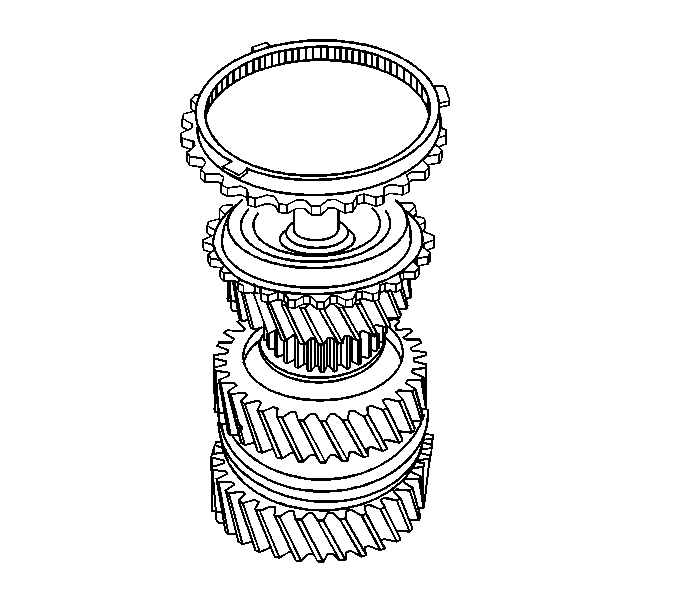
- Install the 4th speed
gear on the mainshaft.
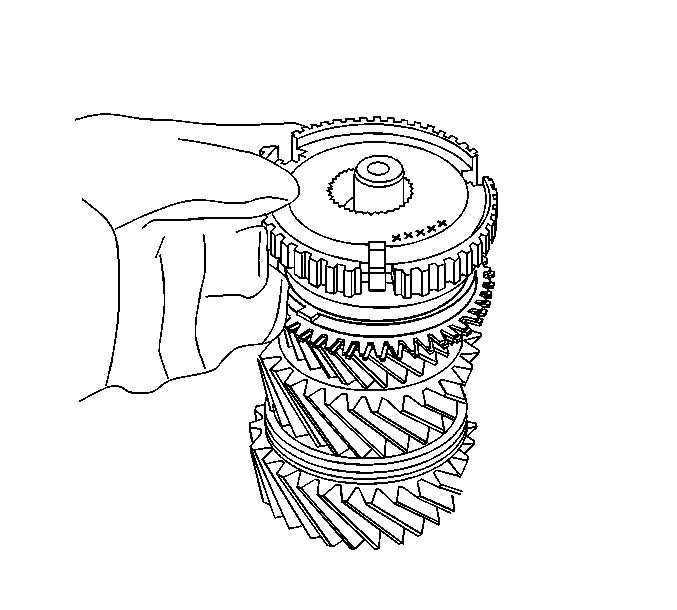
- Install the 4th speed gear synchronizer ring.
- Lightly lubricate the synchronizer components with GM P/N 12378515
(Canadian P/N 88900701).
Caution: When handling parts that have been preheated for installation purposes,
always wear leather welding gloves with a minimum amount of handling time.
Failure to wear leather gloves may result in severe skin burns or personal
injury.
- Wearing protective gloves, install the preheated 4th/5th
synchronizer hub on the mainshaft.
| • | Install the hub with the part number facing up. |
| • | Align the tabs on the synchronizer ring with the slots in the
hub. |
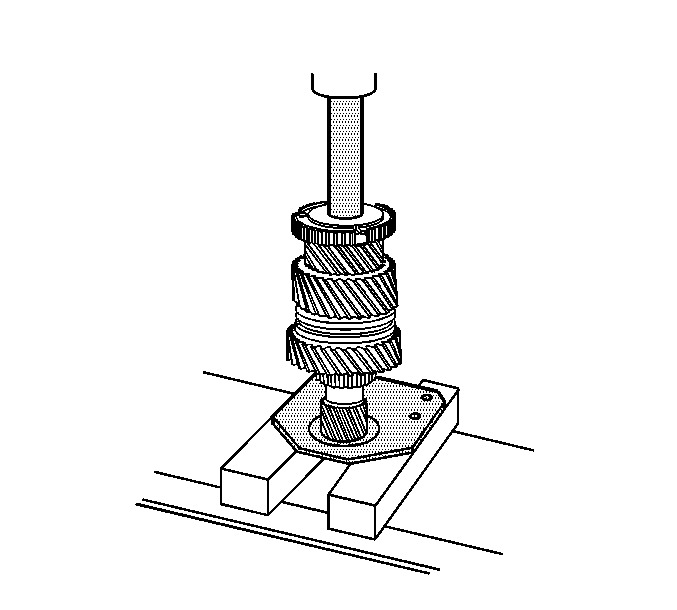
- Use the J 44735
and a hydraulic press to fully seat
the synchronizer hub.
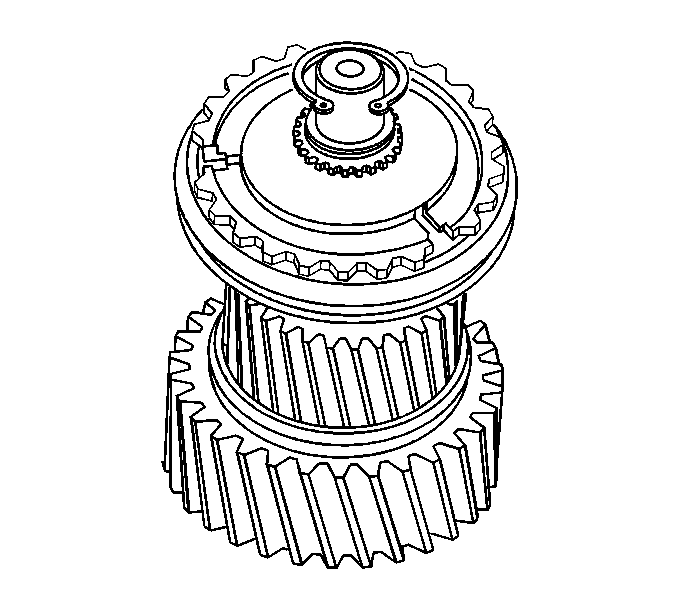
- Install the retaining
ring for the 4th/5th gear synchronizer hub.
| • | The retaining rings are different thicknesses. |
| • | Select a retaining ring that fills the groove. |
| • | Ensure the retaining ring is fully seated. |
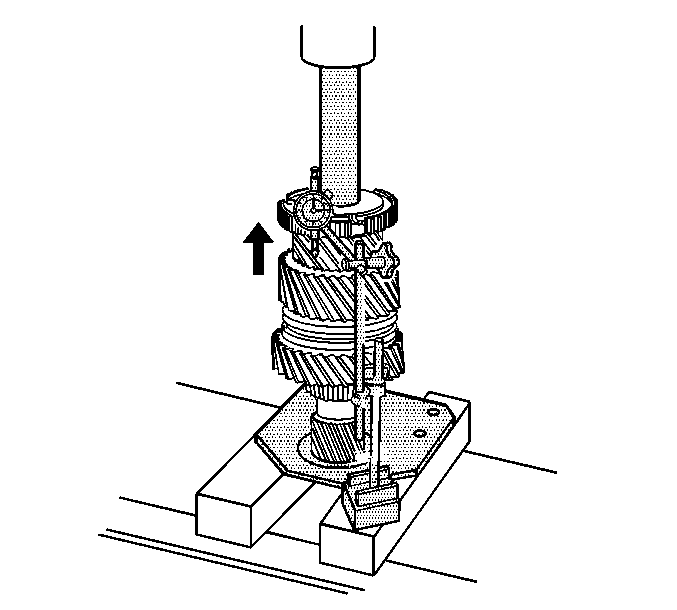
- Using the J 26900-12
or the J 29763
with the J 26900-13
, measure the 4th gear axial clearance. Clearance should be 0.15-0.35 mm
(0.0059-0.0138 in).
| 57.3. | Lift up on the gear to measure the clearance. |
- If clearance is higher than the specification, inspect to ensure
the 4th/5th gear synchronizer hub is installed completely.
- If clearance is higher than the specification, inspect the 4th
speed gear, the 4th gear thrust washer, or 4th/5th synchronizer hub for wear.
- If clearance is lower than the specification, inspect the 4th
speed gear, the 4th gear thrust washer, or 4th/5th synchronizer hub for burrs.
- Repair or replace the damaged or worn component.
Caution: When handling parts that have been preheated for installation purposes,
always wear leather welding gloves with a minimum amount of handling time.
Failure to wear leather gloves may result in severe skin burns or personal
injury.
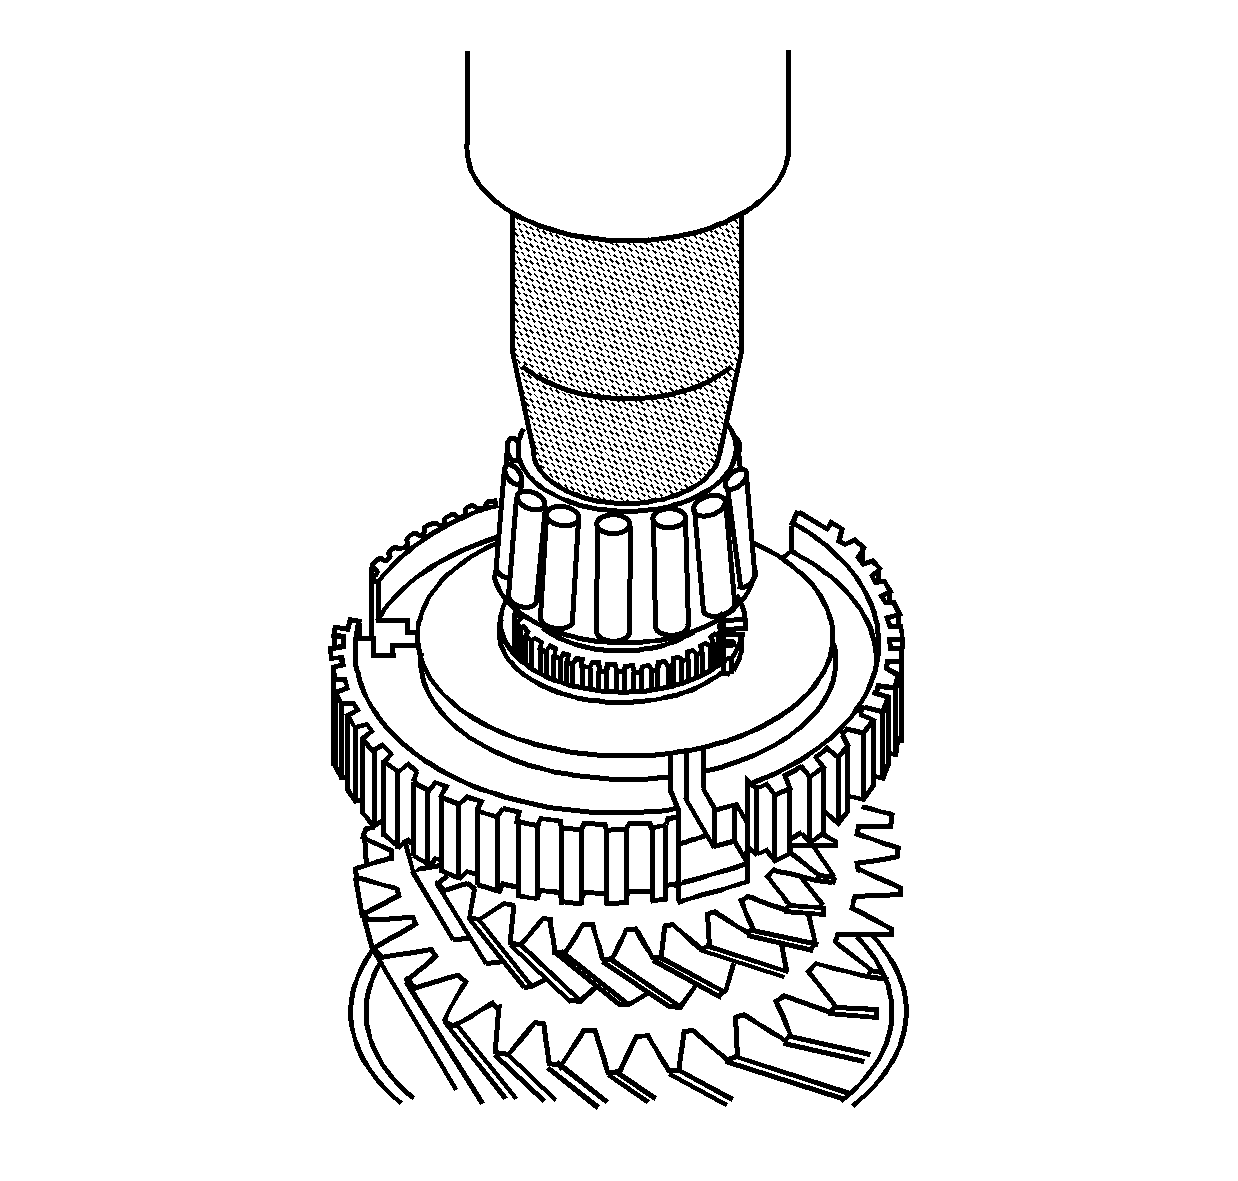
- Wearing protective gloves, install the preheated mainshaft
front bearing on the mainshaft using the J 44734
and hydraulic press.
| • | Turn the J 44734
over to use it to press on the bearing. |
| • | Do not use a hammer on the J 44734
. Damaging the J 44734
may prevent further use of the tool for transmission assembly. |
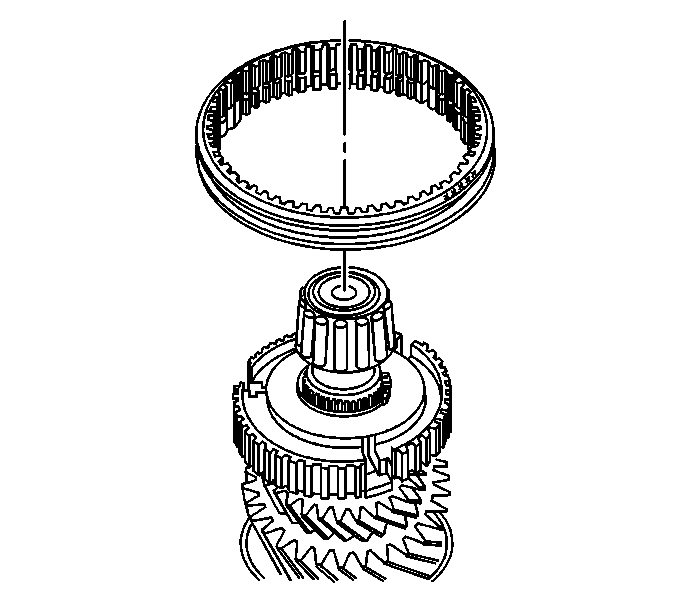
- Install the 4th/5th speed
gear synchronizer sleeve. Align the sleeve with the part number facing up.
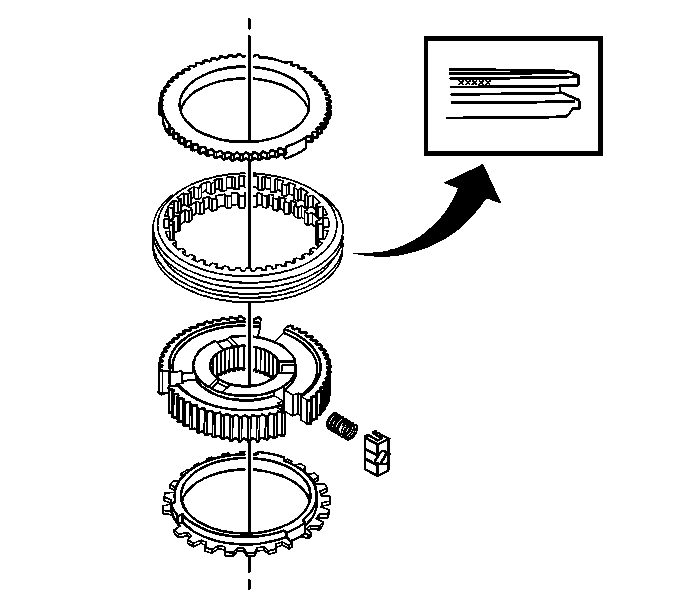
- Install the 4th/5th speed
gear detent springs, and pressure pieces in the synchronizer hub.
The 4th/5th synchronizer springs are 22.7 mm (0.893 inch)
long.
| 64.1. | Install all 3 springs and pressure pieces. |
| | Important: In order to prevent the springs and balls from jumping out of position,
install the 5th gear synchronizer blocking ring. Move the sleeve to lock
the sleeve in position.
|
| 64.2. | Install the 5th gear synchronizer ring to hold the pressure pieces and
the sleeve in position. |
| 64.3. | Pull up on the sleeve to lock the pressure pieces in the neutral
position. |
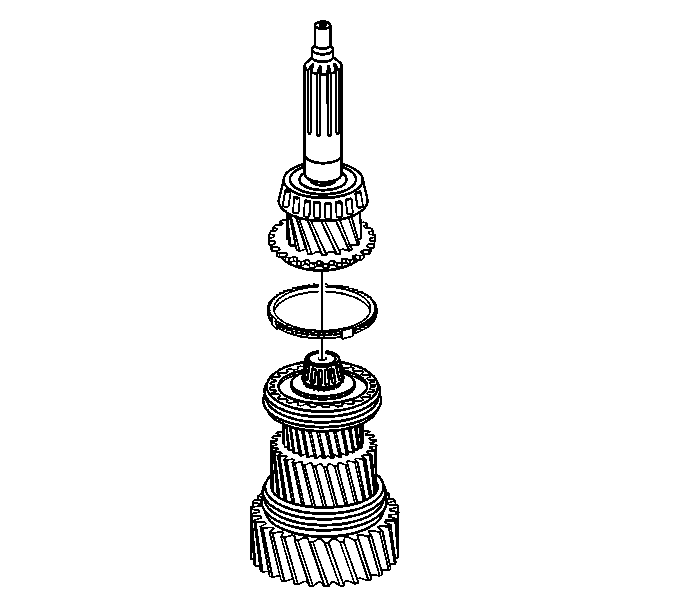
- Fill the input shaft front
mainshaft bearing race with J 36850
or equivalent.
- Install the input shaft.
- Move the 4th/5th synchronizer sleeve to the 5th gear position.
Locking the mainshaft to the input shaft prevents the synchronizer from
falling apart.


