CAMPAIGN: POWERMASTER BRAKE SYSTEM-FAULTY PRESSURE SWITCH

Subject: POWERMASTER BRAKE SYSTEM
Models: 1985 Buick Regal 3.8L Turbo (Engine VIN Code 9) and RPO LM9 Brakes 1986-1987 Buick Regal 3.8L Turbo (Engine VIN Code 7) 1986 LeSabre and Electra Estate Wagon 1986 Chevrolet Caprice Station Wagon 1986 Pontiac Safari Wagon 1986 Oldsmobile Custom Cruiser
TO: ALL AFFECTED DEALERS:
General Motors of Canada has determined that certain 1985, 1986 and 1987 Buick Regals, 1986 Buick LeSabre and Electra Estate Wagons, and 1986 Chevrolet Caprice, Pontiac Safari and Oldsmobile Custom Cruiser Station Wagons with Powermaster brake systems were built with combination valves and pressure switches which may become faulty. If left uncorrected, these vehicles may experience a "hard brake pedal" or "increased brake pedal travel." These conditions may be caused by a Cast Iron combination valve allowing air to enter the brake system or by a pressure switch on the Powermaster Brake Assembly leaking brake fluid.
To prevent either of the above conditions from occurring, vehicles will be inspected and those equipped with the Cast Iron combination valve will receive a new Brass combination valve. Also, pressure switches will be inspected and replaced, if necessary.
VEHICLES INVOLVED:
Involved are certain 1985, 1986 and 1987 Buick Regals, 1986 Buick LeSabre and Electra Estate Wagons, and 1986 Chevrolet Caprice, Pontiac Safari and Oldsmobile Custom Cruiser Station Wagons with Powermaster brake system built within the following VIN breakpoints:
Through and Year Model Plant From Including ---- ------------------------ ------- -------- ----------- 1985 Buick Regal Turbo Coupe Pontiac FP400004 FP427709 1986 Buick Regal Turbo Coupe Pontiac GP201039 GP459261 1986 Buick Estate Wagon Fairfax GX400001 GX418126 1987 Buick Regal Turbo Coupe Pontiac HP400001 HP465289 1986 Chevrolet "B" Wagon Fairfax GX100001 GX207019 1986 Pontiac "B" Wagon Fairfax GX200005 GX285088 1986 Oldsmobile "B" Wagon Detroit G9000002 G9021074
All affected vehicles have been identified by the VIN listing provided to involved dealers with this bulletin. Any dealer not receiving a listing was not shipped any of the affected vehicles.
DEALER CAMPAIGN RESPONSIBILITY:
Dealers are to perform this campaign on all involved vehicles at no charge to owners, regardless of kilometres traveled, age of vehicle, or ownership, from this time forward.
Whenever a vehicle subject to this campaign is taken into your new or used vehicle inventory, or it is in your dealership for service, you are to ensure the campaign correction has been made before selling or releasing the vehicle.
Owners of vehicles recently sold from your new vehicle inventory are to be contacted by the dealer, and arrangements made to make the required modification according to instructions contained in this bulletin.
CAMPAIGN PROCEDURE:
Refer to Section 4 of the Service Policies and Procedures Manual for the detailed procedure on handling Product Campaigns. Dealers are requested to complete the campaign on all transfers as soon as possible.
OWNER NOTIFICATION:
All owners of record at the time of campaign release are shown on the attached computer listing and have been notified by first class mail from General Motors. The listings provided are for campaign activity only and should not be used for any other purpose.
PARTS INFORMATION:
Parts required to complete this campaign should be ordered through regular channels, as follows:
Part Number Description Quantity/Vehicle ---------- ---------------------- ----------------- 25509419 Brass Combination Valve 1
18018141 Pressure Switch Kit 1 (Includes New O-Ring)
PARTS AND LABOUR CLAIM INFORMATION:
Credit for the campaign work performed will be paid upon receipt of a properly completed campaign claim card, RAPID terminal or DCS transmission in accordance with the following:
Repair Code Description Time Allowance ----------- ----------------------------- -------------- 1A Inspect Pressure - Pressure Switch .3 or Combination Valve - No Replacement Needed
2A Inspect Combo Valve & Pressure .5 Switch - Replace Pressure Switch Only 18018141
3A Inspect Combo Valve & Pressure 1.0 Switch - Replace Combo Valve Only 25509419
4A Inspect/Replace Combo Valve 1.3 & Pressure Switch 25509419 and 18018141
6A Owner Reimbursement for Prior Replacement of the Powermaster Brake Assembly Combination Valve and/or Pressure Switch
Time allowance includes 0.1 hour for dealer administrative detail associated with this campaign. Parts credit will be based on dealer net plus 30% to cover parts handling.
OWNER REIMBURSMENT
Claims for customer reimbursements for previously paid replacement of the Powermaster Brake Assembly, combination valve and/or pressure switch will be considered. Owners should present documentation which reasonably confirms the amount of unreimbursed repair expense, a description of the repair, the date of the repair, and the person or entity performing the repair.
Review the owner's documentation, and process under Repair Code 6A (authorization is required).
SERVICE PROCEDURE:
1. Open hood and inspect pressure switch. If the current pressure switch terminal body is GRAY, move on to Step 2. If the current switch terminal body is BLACK, place a fender cover on the left fender, then remove and replace pressure switch according to the procedure below and then move on to Step 2.
a. Depressurize Powermaster unit by turning ignition "OFF," then apply and release brake pedal a minimum of ten (10) times using approximately fifty (50) pounds of force on pedal to fully deplete the power assist.
NOTICE: Failure to fully depressurize Powermaster unit could result in brake fluid being sprayed on service personnel and could cause damage to painted surfaces.
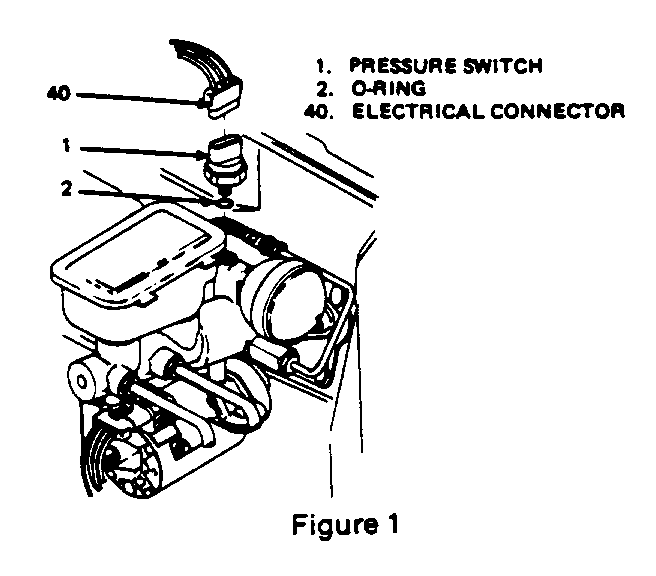
b. Disconnect 3-wire electrical connector (Fig. 1, 40) from pressure switch (Fig. 1, 1).
c. Remove old pressure switch (Fig. 1,1). Original O-Ring should be on old pressure switch. If not check powermaster unit for the loose O-Ring and remove it. Take care not to drip brake fluid on painted surfaces.
d. Obtain new Pressure Switch (P/N 18018141). The new pressure has an O-Ring already installed in a groove on it. A second O-Ring should be found loose in the box with the switch. Lubricate the second O-Ring (Figure 1, 2) with clean, fresh brake fluid (DOT #3) and install in a groove between the threads and the existing O-Ring on the new pressure switch.
The old pressure switch has only one O-Ring - DO NOT reuse the old O-Ring.
e. Install new pressure switch (Fig. 1, 1) and torque to 20-27 N.m (15-20 lb. ft.).
NOTICE: Torque values specified are for dry, unlubricated fasteners.
f. Reconnect 3-wire electrical connector (Fig. 1, 40) to pressure switch (Fig. 1, 1). Be sure electrical connector is securely seated.
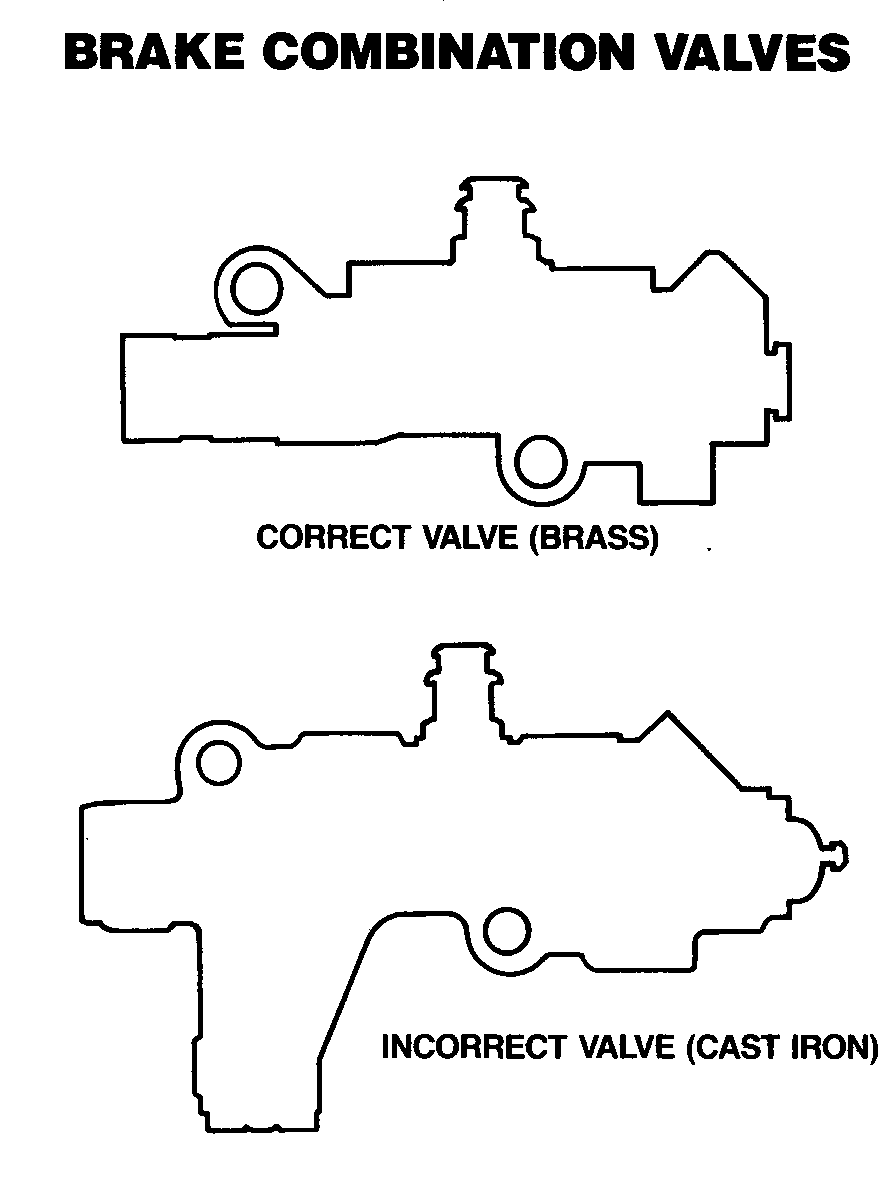
2. Locate combination valve (on frame rail below master cylinder). If the current combination valve is Cast Iron, the valve must be replaced with a Brass valve by following the procedure below. If the vehicle already has the Brass valve, the combination valve does not need to be replaced. Proceed to Step 3. Figure 2 illustrates the differences in the two valve types.
a. Remove the electrical wiring harness connector from the pressure differential switch by squeezing the eliptical-shaped plastic lock ring and pulling up. A pair of pliers may aid in removing the connector.
b. Disconnect hydraulic lines at combination valve. Plug lines to prevent loss of fluid and entrance of dirt.
c. Remove cast iron combination valve.
d. Install brass combination valve. Torque mounting bolts to 20 N.m (14 lb. ft.).
e. Remove plugs and connect hydraulic lines at combination valve. Torque hydraulic fittings to 24 N.m (18 lb. ft.).
f. Connect electrical wiring harness connector to pressure control differential switch.
g. Bleed entire brake system. Do not move vehicle until a firm brake pedal is obtained.
h. Check brake lines for leaks and proper clearances.
3. Install Campaign Identification Label.
INSTALLATION OF CAMPAIGN IDENTIFICATION LABEL
Clean surface of radiator upper mounting panel and apply a Campaign Identification Label. Make sure the correct campaign number is inserted on the label. This will indicate that the campaign has been completed.
Dear General Motors Customer:
General Motors of Canada has determined that certain 1985, 1986 and 1987 Buick Regals, 1986 Buick LeSabre and Electra Estate Wagons, and 1986 Chevrolet Caprice, Pontiac Safari and Oldsmobile Custom Cruiser Station Wagons with Powermaster brake systems were built with combination valves and pressure switches which may become faulty. If left uncorrected, these vehicles may experience a "hard brake pedal" or "increased brake pedal travel." These conditions may be caused by a cast iron combination valve allowing air to enter the brake system or by a pressure switch on the powermaster brake assembly leaking brake fluid.
To prevent either of the above conditions from occurring, vehicles will be inspected and those equipped with the potentially faulty combination valve will receive a new combination valve. Also, the pressure switch will be inspected and replaced, if necessary. This service will be completed for you at no charge.
Please contact your GM dealer as soon as possible to arrange a service date.
This letter identifies your vehicle. Presentation of this letter to your dealer will assist their Service personnel in completing the necessary correction to your vehicle in the shortest possible time.
Further assistance, if required, may be obtained from our Customer Assistance Centre, toll free, by calling 1-800-263-3777, or if you live in Quebec, 1-800-263-7854.
We are sorry to cause you this inconvenience; however, we have taken this action in the interest of your continued satisfaction with our products.


General Motors bulletins are intended for use by professional technicians, not a "do-it-yourselfer". They are written to inform those technicians of conditions that may occur on some vehicles, or to provide information that could assist in the proper service of a vehicle. Properly trained technicians have the equipment, tools, safety instructions and know-how to do a job properly and safely. If a condition is described, do not assume that the bulletin applies to your vehicle, or that your vehicle will have that condition. See a General Motors dealer servicing your brand of General Motors vehicle for information on whether your vehicle may benefit from the information.
