Side Door Opening Frame Replacement Outer A-Pillar
Removal Procedure

Important: The full body-side outer panel comes as a one-piece assembly and can be replaced at factory seams after removal of glass. Any one of these prodedures can be performed separately, or in any combination, dependent upon the extent of damage to the vehicle. Sectioning must take place in specified areas only. Left and right service parts are structurally identical but have varied service slot placement in mid rocker areas. Remove front and rear glass when sectioning A-pillar and quarter panel. Refer to Windshield Replacement and Rear Window Replacement .
- Visually inspect and restore as much of the damage as possible to factory specifications.
- Remove the fender.
- Remove the windshield.
- Remove the door.
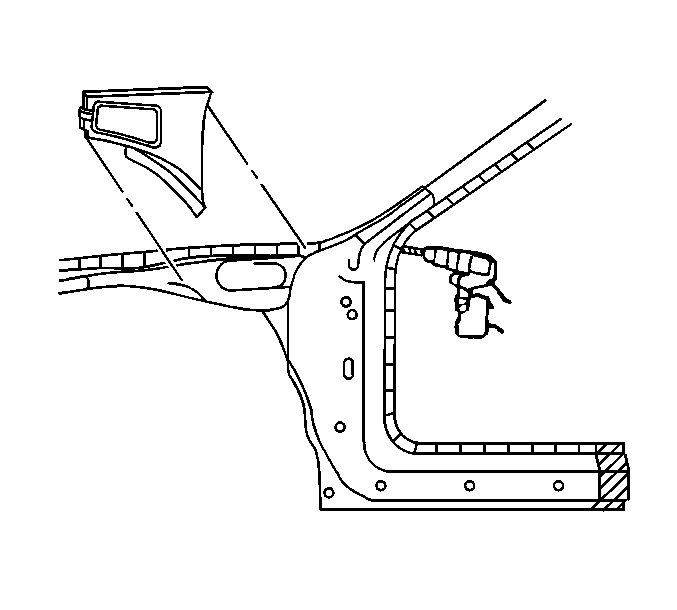
- Drill out factory the spot welds of the upper-outer rail.
- Remove the upper rail and save for reinstallation.
- Determine sectioning locations. Section in specified areas only.
- Mark locations and cut part through outer panel only.
- Note the number and location of the factory welds and drill them out.
- Remove the outer panel.
- Note the placement and number of foam baffles for new installation. If baffles are damaged, replacement service parts are available.
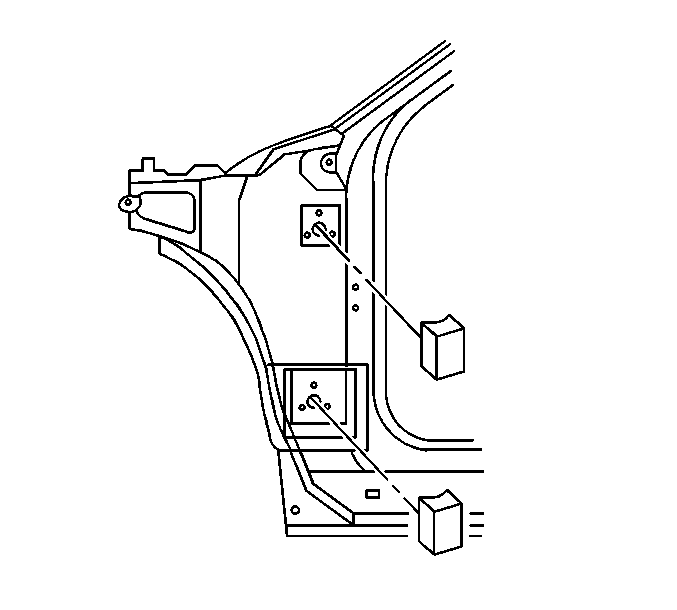
Important: Hinge pillar blocks must be replaced if damaged.
Installation Procedure
- Cut the service part in corresponding locations to fit original cut lines. Leave a gap of one and one half times the metal thickness of sectioning joint.
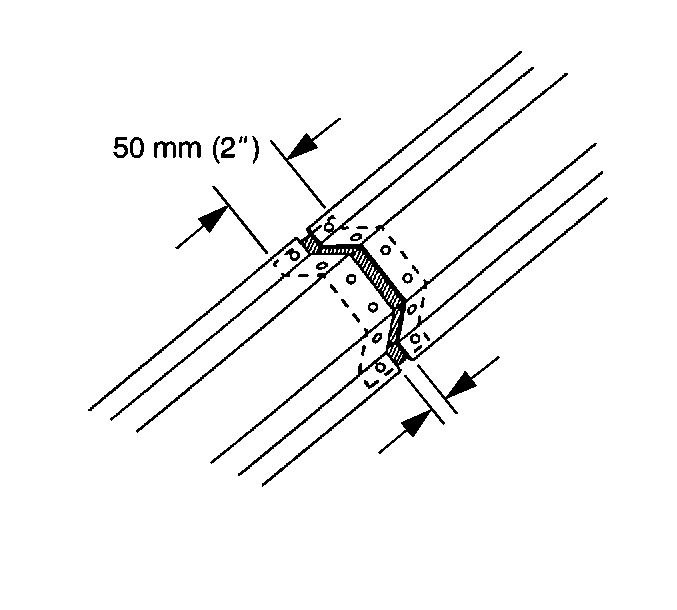
- Create a 100 mm (4 in) backing plate on the rocker panel from the unused portion of the service part.
- In windshield pillar area, create 50 mm (2 in) backing plate fro unused portion of service part. Remove flange from backing plates for proper fit behind sectioning joint.
- Drill 8 mm (5/16 in) plug weld holes in service part according to original locations as noted, and in original panel where parts overlap backing plate.
- Prepare all mating surfaces as necessary.
- Apply 3M Weld-Thru Coating P/N 05916 or equivalent to all mating surfaces.
- Weld backing plates to vehicle.
- Position service part on the vehicle.
- Clamp the part in place and check for proper fit.
- Plug weld accordingly.
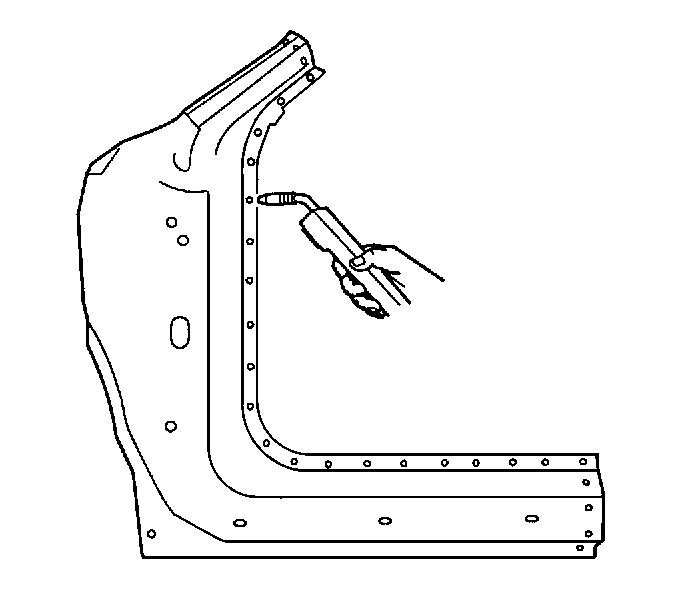
- Stitch weld along the entire sectioning joint. Make 25 mm (1 in) welds along the seam with 25 mm (1 in) gaps between.
- Complete the stitch weld in order to ensure the structural integrity of the vehicle.
- Install upper rail assembly.
- Grind welds as necessary along seams.
- Finish surface as necessary.
- Install insulating foam as necessary in areas noted from original baffle locations.
- Refinish as necessary.
Important: Replace hinge pillar blocks prior to welding outer panel.
Important: Prior to refinishing, refer to publication GM 4901M-D-2000 GM Approved Refinish Materials for recommended products. Do not combine paint systems. Refer to paint manufacturer's recommendations.
Side Door Opening Frame Replacement Inner A-Pillar
Removal Procedure
The full body-side inner panel comes as a one-piece assembly and can be replaced at factory seams after removal of outer panel, roof and glass. Any one of these procedures can be performed separately, or in any combination, dependent upon the extent of damage to the vehicle. Remove the front and rear glass when sectioning the A-pillar and the quarter panel. Refer to Windshield Replacement and Rear Window Replacement .
Important: Sectioning should be performed only in the recommeded areas. Failure to do so may compromise the structural integrity of the vehicle.
- Visually inspect and restore as much of the damage as possible to factory specifications.
- Remove the outer panel according to the specified directions in the removal process.
- Remove the following:
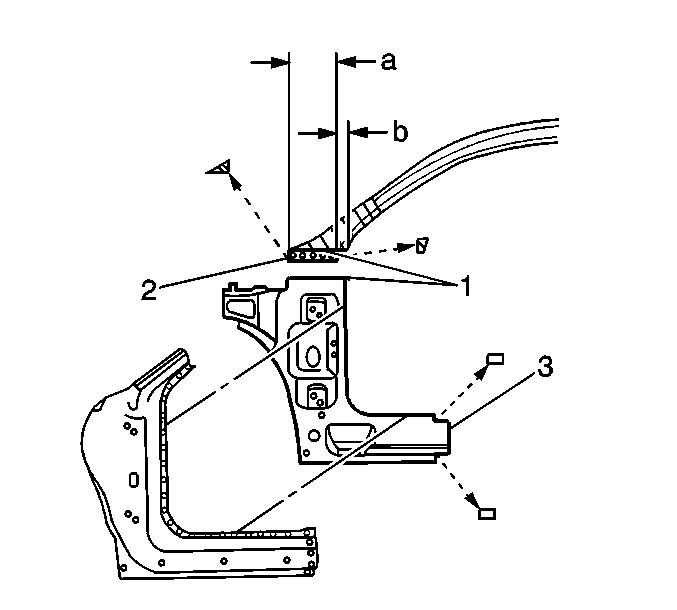
- Locate and follow the laser-weld line (1) across the A-pillar at lower windshield area.
- Measure down 50 mm (2 in) and scribe a line parallel to the laser-weld line (2). This is your cut location.
- Cut damaged part at cut location.
- At rocker panel, locate sectioning location (3).
- Scribe a line.
- Cut through one layer of metal only at the cut location.
- Drill out the factory spot welds.
- Remove the damaged panel.
| • | The dashboard |
| • | The instrument panel |
| • | The seat |
| • | All the necessary components to allow access to repair |
Important: Left and right service parts are structurally identical but have varied service slot placement in mid-rocker areas. On the right side rocker, section at rear of access hole on original panel. Overlap service part 50 mm (2 in) and use access holes as alignment guides.
Create Service Flange
- On windshiled pillar lower edge, measure forward 25 mm (1 in) (1) from door opening.
- Scribe a vertical line.
- Measure forward 190 mm (7 ½ in) from first scribed line and scribe a second vertical line (2).
- Cut along vertical markings to laser-weld line (1), to create a flange for welding service part.
- Cut along laser-weld, outboard of vertical cuts, and remove tabs. This creates a 50 mm (2 in) x 190 mm (10 7/8 in) tab (2) for attaching service part to A-pillar.
Preparation of Service Part
- Locate laser-weld at bottom of windshield pillar area of the service part. This will be the same laser-weld location as the on the original panel (1).
- Cut along laser-weld (1).
- Create a vertical line for sectioning rocker (3). Allow space for a 50 mm (2 in) overlap for welding.
- Notch upper and lower edges of service part to fit behind existing rocker panel, and remove tabs.
- Drill plug weld holes in locations noted from original panel.
Installation Procedure
- Drill plug weld holes in A-pillar flange, spaced 38 mm (1 ½ in) apart (2).
- Drill plug weld holes at rocker overlap.
- Prepare all mating surfaces as necessary.
- Apply 3M Weld-Thru Coating P/N 05916 or equivalent to all mating surfaces.
- Prime with 2-part catalyzed primer.
- Position part on vehicle and clamp in place. Check fit.
- Plug weld accordingly.
- Stitch weld at A-pillar (1), at rocker-inner (3), and at sectioning locations.
- Weld and grind the seams.
- Refinish as necessary.
- Install all related panels and components.
Important: Prior to refinishing, refer to publication GM 4901M-D-2000 GM Approved Refinish Materials for recommended products. Do not combine paint systems. Refer to paint manufacturer's recommendations.
