REVISED FRONT DISC BRAKES SERVICE MANUAL INFORMATION

1986 FIERO
When servicing the 1986 Fiero front brake calipers, use the information provided in the attached pages. Section 5B4, Disc Brake Caliper Assembly should be used in place of the information in Section 5Bl of the 1986 Fiero Service Manual. This new section provides complete service information for the 1986 Fiero front disc brakes.
SECTION 5B4 DISC BRAKE CALIPER ASSEMBLY 5349 SERIES CONTENTS
General Description 5B4-1 Shoe and Lining Assembly 5B4-2 On-Car Service 5B4-1 Unit Repair 5B4-2 Caliper Assembly 5B4-1 Caliper Overhaul 5B4-2
GENERAL DESCRIPTION
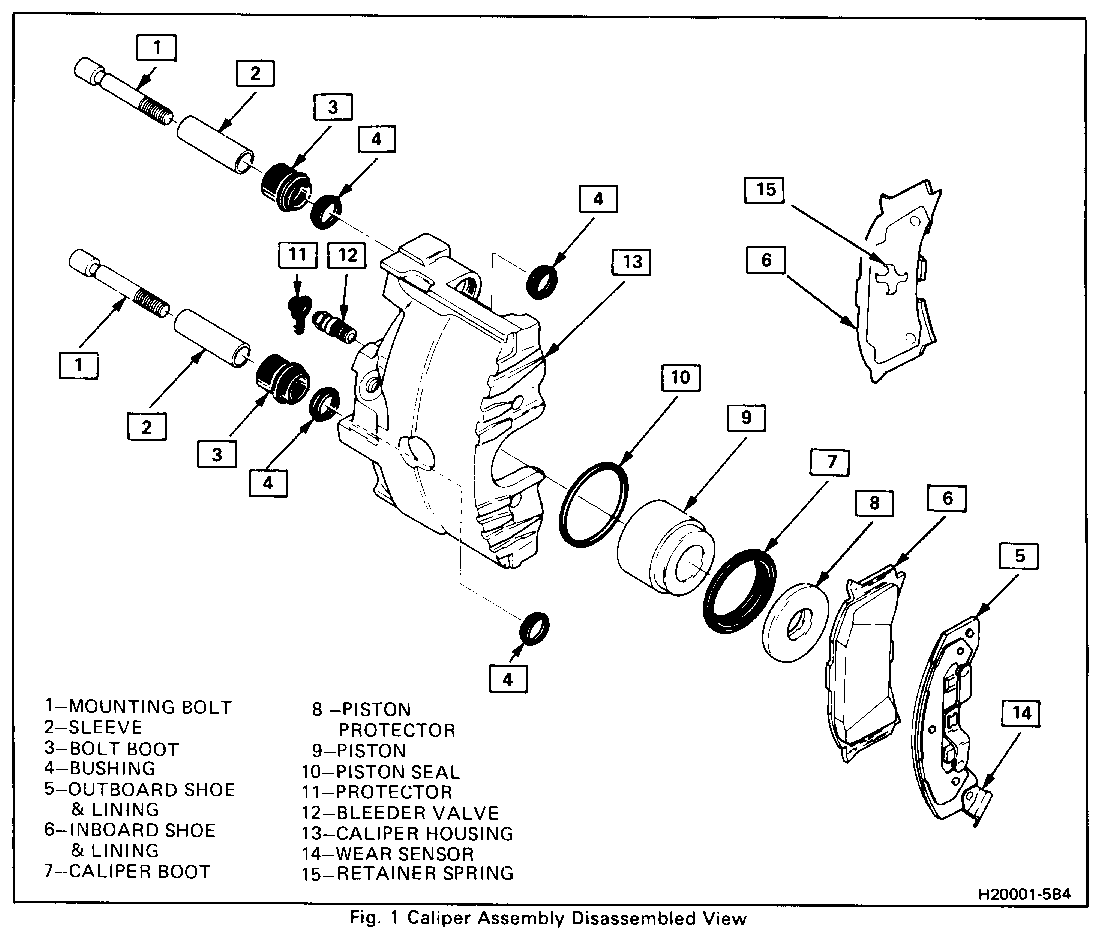
This caliper has a single bore and is mounted to the support bracket with two mounting bolts. Hydraulic pressure, created by applying force to the brake pedal, is converted by the caliper to a stopping force. This force acts equally against the piston and the bottom of the caliper bore to move the piston outward and to move (slide) the caliper inward resulting in a clamping action on the rotor. This clamping action forces the linings against the rotor, creating friction to stop the vehicle.
NOTICE: Replace all components included in repair kits used to service this caliper. Lubricate rubber parts with clean brake fluid to ease assembly. Do not use lubricated shop air on brake parts as damage to rubber components may result. If any hydraulic component is removed or disconnected, it may be necessary to bleed all or part of the brake system. Replace shoe and linings in axle sets only. The torque values specified are for dry, unlubricated fasteners. Perform service operations on a clean bench free from all mineral oil materials.
ON-CAR SERVICE
CALIPER ASSEMBLY
Figures 2 through 6
Remove or Disconnect
1. 2/3 of brake fluid from master cylinder assembly.
2. Raise car and sultable support.
Mark relationship of wheel to axle flange.
3. Wheel and tire.
Reinstall two inverted lug nuts to retain rotor.
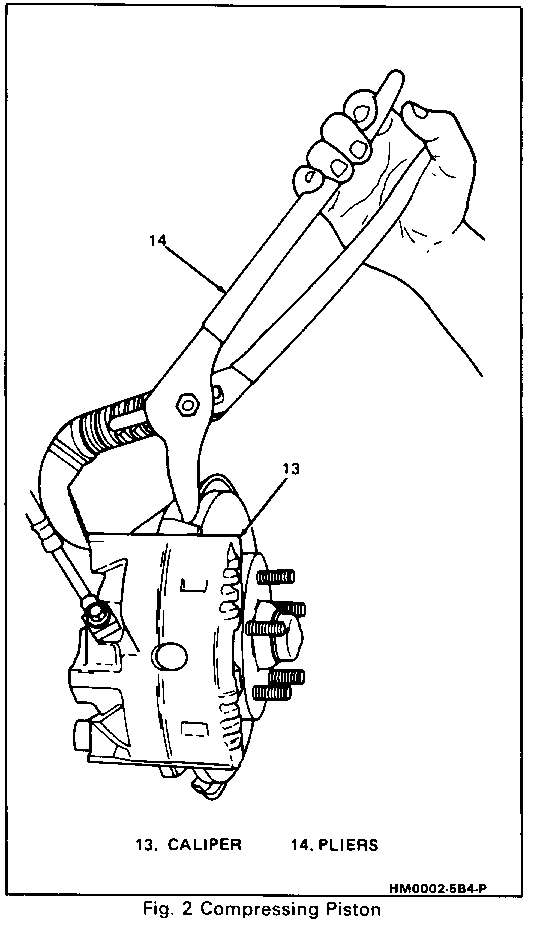
4. Bottom piston into caliper bore to provide clearance between linings and rotor (Figure 2).
Position 12-inch adjustable pliers (14) over caliper support bracket and the inboard caliper housing (Figure 2).
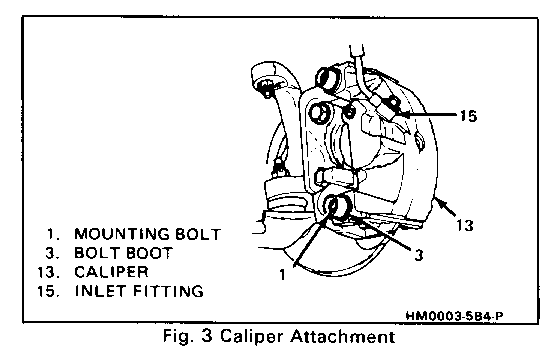
5. Bolt attaching inlet fitting (15), only if caliper is to be removed from vehicle for unit repair (overhaul). If only shoe and linings are being replaced, there is no need to disconnect inlet fitting (Figure 3).
Plug openings in caliper and pipe to prevent fluid loss and contamination.
6. Boots (3), mounting bolts (1), and sleeves (2) using No. 50 Torx wrench.
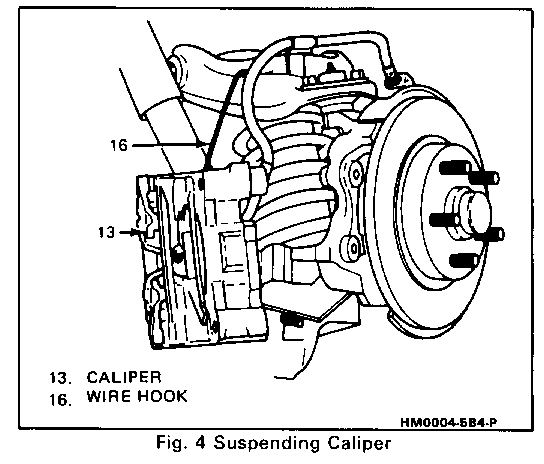
7. Caliper (13) from rotor and mounting bracket (17). If only shoe and linings are being replaced, suspend with a wire hook (16) from strut.
Inspect
Mounting bolts and sleeves for corrosion. If corrosion is found, use new parts, including bushings, when installing caliper. Do not attempt to polish away corrosion.
Important
See NOTICE on page 5-1.
Install or Connect
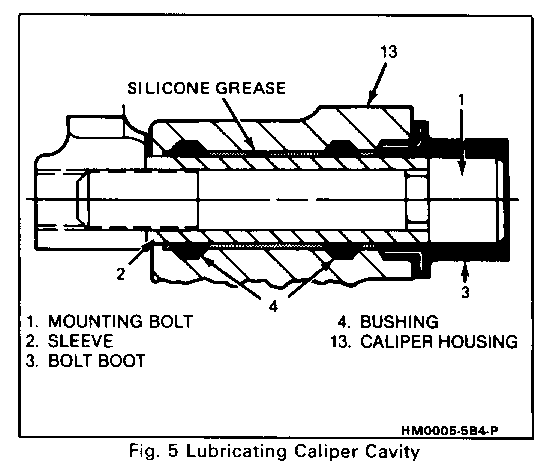
1. Liberally fill both cavities in housing (13) between bushings (4) with silicone grease. 2. Sleeves (2) in caliper (13). 3. Caliper (13) over rotor in mounting brcket (17). 4. Mounting bolts (1) to 28-47 N-m (21-35 lb.ft.). 5. Boots (3).
Make sure boots are mounted securely.
Measure
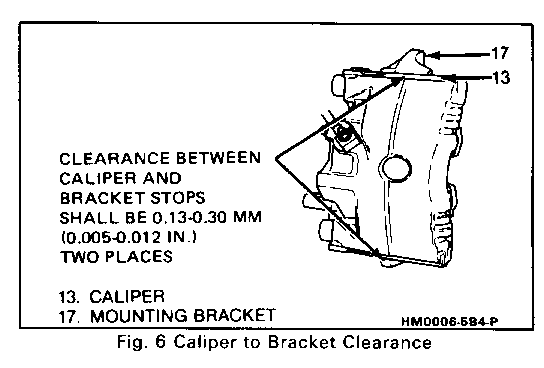
Figure 6
Clearance between caliper (13) and bracket (17) stops.
If necessary, remove caliper and file ends of bracket (17) stops to provide proper clearance (Figure 6).
6. Inlet fitting (15) with new washers, if removed, to 24-40 N.m (18-30 lb.ft.).
7. Wheels and tires, aligning previous marks.
Remove lug nuts securing rotor to hub. Lower car. Torque lug nuts. See WHEELS and TIRES.
8. Fill master cylinder to proper lever with clean brake fluid.
Bleed caliper if inlet fitting was removed. Recheck fluid level.
SHOE AND LINING ASSEMBLIES
Figures 7 through 10
Remove or Disconnect
1. Caliper as previously described.
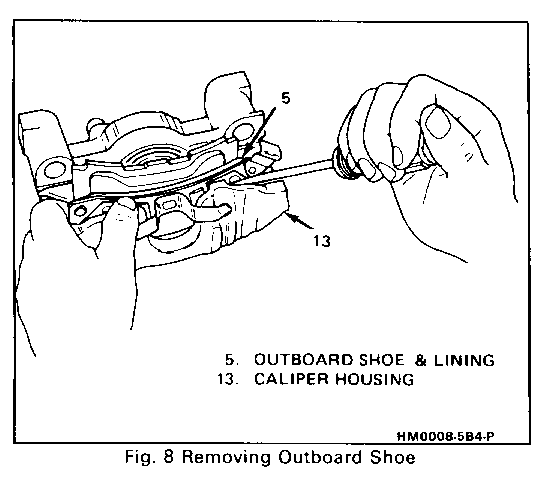
2. Outboard shoe and lining (5) (Figures 7 & 8).
Use screwdriver to disengage buttons on shoe from holes in caliper housing (13).
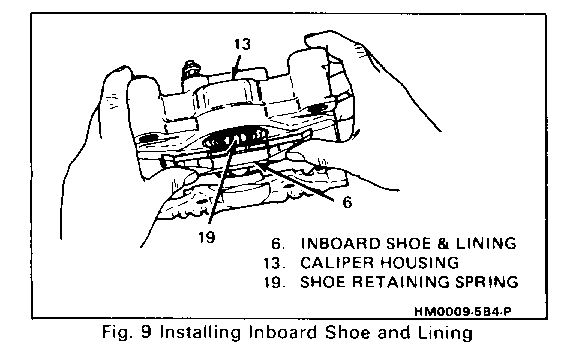
3. Inboard shoe and lining (6).
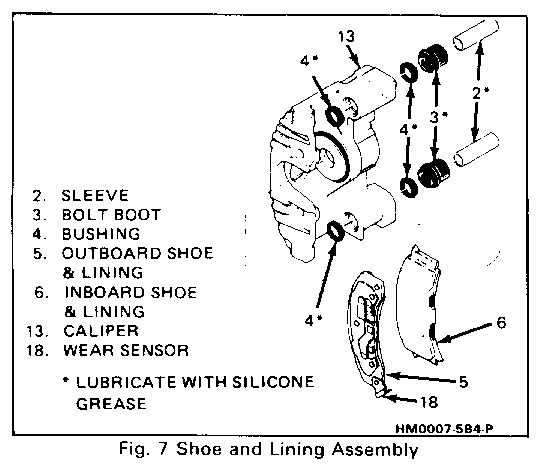
4. Bushings (4) from grooves in mounting bolt holes.
Install or Connect
1. Lubricated new bushings (4) in grooves in mounting bolt holes.
2. Inboard shoe and lining (6) by snapping retainer spring (19) into center hole of piston (9). Shoe retainer spring is already staked to the inboard shoe. Shoe must lay flat against piston with piston retracted in caliper housing (13) (Figure 9).
3. Outboard shoe and lining (5) with wear sensor (18) at leading edge of caliper during forward wheel rotation. Back of shoe must lay flat against caliper (Figure 10).
4. Caliper as previously described.
5. Apply approximately 778 N (175 lb.) force three times to brake pedal to seat linings.
UNIT REPAIR
CALIPER OVERHAUL
Tool Required:
J 29381 Boot Seal Installer
Disassemble
Figures 11 through 13
Remove or Disconnect
1. Caliper completely from vehicle as previously described.
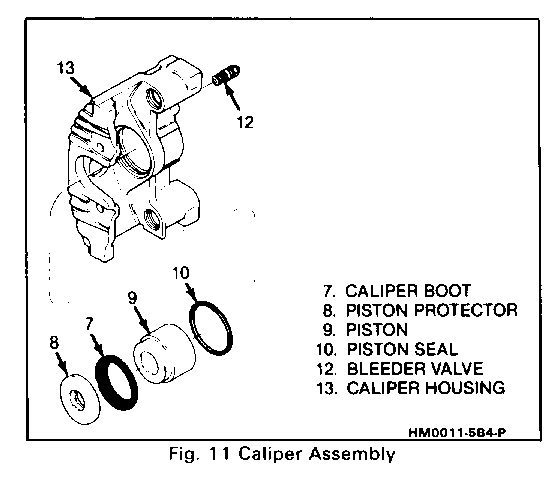
2. Piston (9) using compressed air into the caliper inlet hole (Figures 11 & 12).
CAUTION:
Do not place fingers in front of the piston in an attempt to catch or protect it when applying compressed air. This could result in serious injury.
Important
Use clean shop towels to pad the interior of the caliper (13) during removal.
Inspect
Piston (9) for: -- Scoring -- Nicks - - Corrosion - - Worn or damaged chrome plating
Replace piston if any of the above are found.
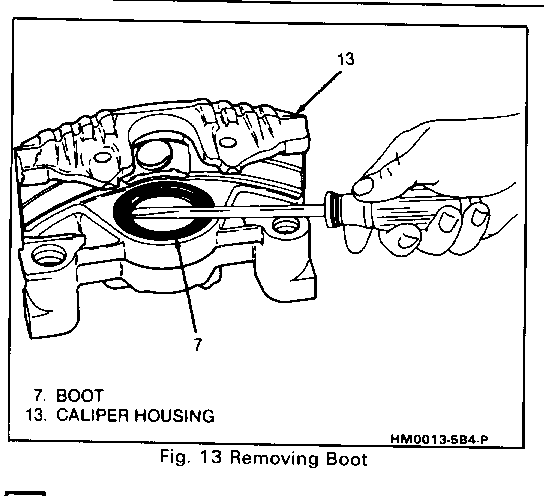
3. Boot (7), being careful not to scratch housing bore.
4. Piston seal (10) from groove in caliper (13) bore with a small wood or plastic tool. Do not use a metal tool since this may damage caliper bore or seal groove.
Inspect
Aluminum caliper bore and seal groove for: -- Scoring -- Nicks -- Corrosion -- Wear
Use crocus clotch to polish out light corrosion.
Replace caliper housing if corrosion in and around seal groove will not clean up with crocus cloth.
5. Protector (11) and bleeder valve (12) from caliper (13) (Figure 1).
Assemble
Figures 11, 14 and 15
Important
See NOTICE on page 5-1.
Clean
All parts in clean, denatured alcohol. Dry with unlubricated compressed air. Blow out all passages in housing (13) and bleeder valve (12).
Install or Connect
1. Bleeder valve (12) and protector (11) to 9-16 N.m (80-140 lb.in) (Figures 1 & 11).
2. Lubricated new piston seal (10) into caliper bore groove.
Make sure seal is not twisted.
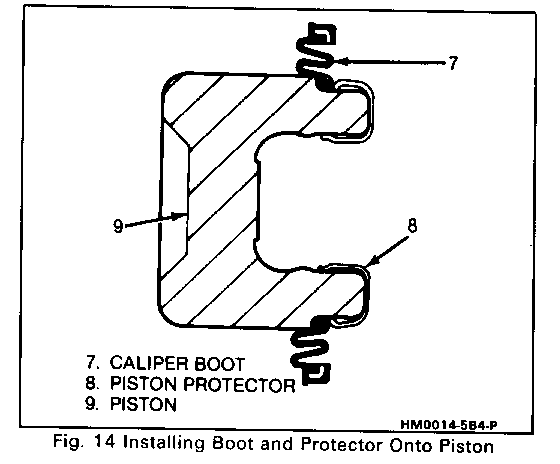
3. Lubricated boot (7) and protector (8) onto piston (9) (Figure 14).
4. Piston (9) with boot (7) and protector (8) into bore of caliper and push to bottom of bore.
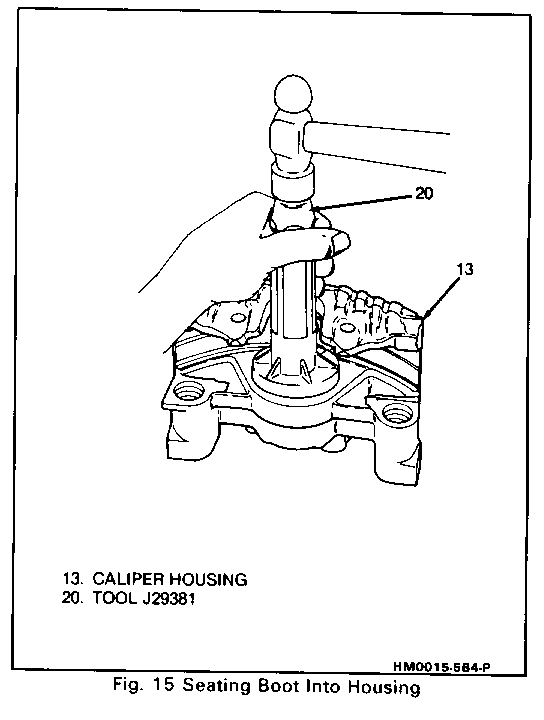
5. Seat boot (7) in caliper housing (13) counterbore using J 29381 (Figure 15).
6. Caliper as previously described.


General Motors bulletins are intended for use by professional technicians, not a "do-it-yourselfer". They are written to inform those technicians of conditions that may occur on some vehicles, or to provide information that could assist in the proper service of a vehicle. Properly trained technicians have the equipment, tools, safety instructions and know-how to do a job properly and safely. If a condition is described, do not assume that the bulletin applies to your vehicle, or that your vehicle will have that condition. See a General Motors dealer servicing your brand of General Motors vehicle for information on whether your vehicle may benefit from the information.
