1982 FIREBIRD REAR DISC BRAKE MOAN

A moaning noise may occur at low speeds and is usually started by light brake apply. It may sound like a moan, growl, or metallic resonation, like a grating wheel bearing. It does not represent any functional irreqularity. The noise may or may not go away with time or miles. The following steps should help cure the noise.
1. Inspect the entire caliper and brake assemblies for proper installation.
Insure that pads are properly seated on piston and tight on caliper: the ends of the single loop spring which retains the inboard shoe to piston must not become trapped between the shoe and piston.
Also, the extruded projection on the inboard shoe must seat in the "D" recess of the piston.
The outboard shoe tabs must be staked tight against the caliper.
Make sure all bushings are in proper position.
Park brake cable bracket must be tight to caliper, and the tab which bends out from the bracket must be punched tight against caliper.
Inspect for foam rubber pad inside the park cable return spring: foam must surround the cable, inside the spring.
2. Make sure the correct park brake handle assembly is used, and adjustment is correct. The disc brake handle assembly (identified from the drum brake assembly by a horizontal 1/8" hole immediately behind the plastic grip) must be used, and proper cable tension set. Excessive cable tension may aggravate the problem.
Parking Brake Adjustment
1. Lubricate parking brake cables at underbody rub points and at equalizer hooks. Check for free movement of all cables.
2. Pull parking brake hand lever exactly four ratchet clicks.
3. Raise rear wheels off floor.
4. Hold brake cable stud from turning and tighten equalizer nut until there is a slight drag on rear wheels.
5. Make sure caliper levers are against stops on caliper housing after tightening equalizer nut.
6. If levers are off stops, loosen cable until levers do return to stops.
7. Operate parking brake lever several times to check adjustment. After cable adjustment is performed, parking brake lever should travel 14 clicks.
8. Lower rear wheels. Lever must be on caliper stops after completion of adjustment. Back off park brake adjuster if necessary to keep levers on stops.
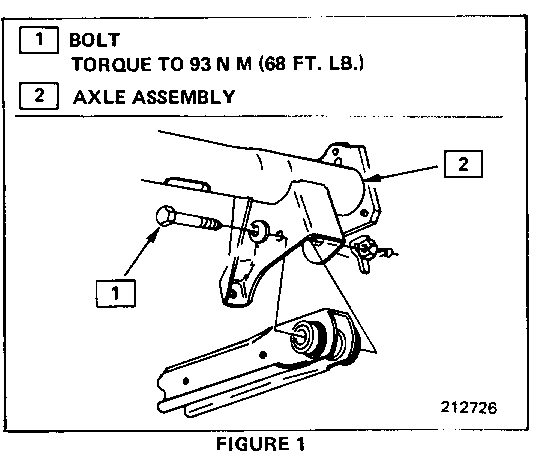
3. The clip and screw which secure the right and left rear pipes to the control arm bracket must not "pull" the pipe forward when tightened. Remove the screw, bend the pipe slightly to maintain a "free-floating" position by the clip, then retighten the screw. The pipe should not put any pressure on the caliper (see Figure 1).
A new designed clip, part number 723267, has been released for production and can be used in service by drilling a 7/32 inch hole one-half inch below existing hole. This clip allows the pipe to maintain a "free-floating" condition.
Also, make sure the axle brake pipes are not "forced" into position by the other retaining clips. Pipes should be similarly relieved of any stress by these clips.
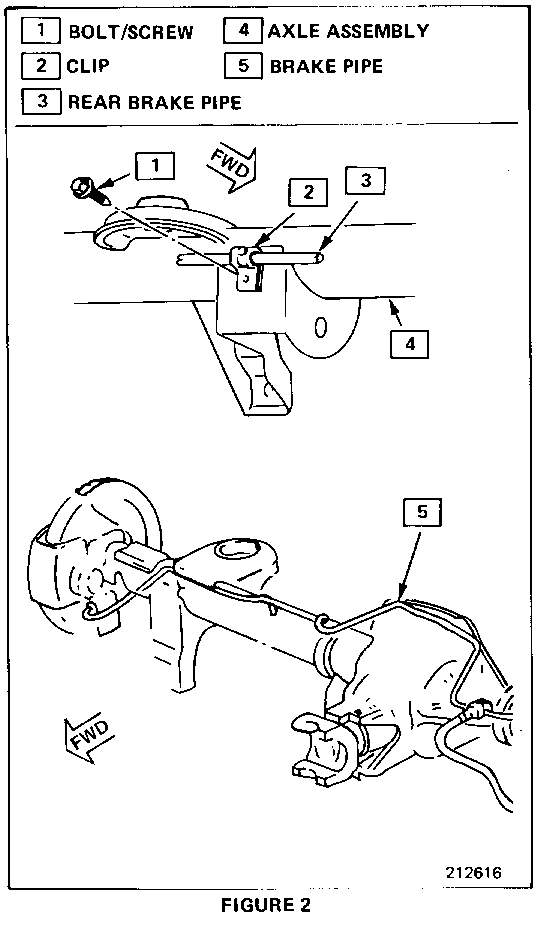
4. When servicing the calipers and pads, the pipe(s) must not be bent and then bent back when removing the caliper from the rotor. Disconnect the pipe from the caliper before removing caliper. When reconnecting the pipe, the pipe fitting must meet the caliper hole with no deflection. This procedure will require bleeding the brakes. It will be necessary to lower the rear of the rear lower control arm to remove the lower caliper mounting pin bolt (see Figure 2).
5. The braking surfaces of the rotor can be roughed up slightly by hand using 80 grit sandpaper to temporarily alleviate the noise. Care must be taken to insure that the dimensional characteristics of the rotor are not altered. A non-directional finish can be machined on the rotor with the proper brake lathe attachment.
6. The addition of a four (4) ounce wheel weight on the park brake lever (right side only) may alleviate the noise.


General Motors bulletins are intended for use by professional technicians, not a "do-it-yourselfer". They are written to inform those technicians of conditions that may occur on some vehicles, or to provide information that could assist in the proper service of a vehicle. Properly trained technicians have the equipment, tools, safety instructions and know-how to do a job properly and safely. If a condition is described, do not assume that the bulletin applies to your vehicle, or that your vehicle will have that condition. See a General Motors dealer servicing your brand of General Motors vehicle for information on whether your vehicle may benefit from the information.
