CAMPAIGN: SEAT BELT BUCKLES MAY NOT LATCH OR RELEASE

Models: 1984-90 Chevrolet Camaro and Pontiac Firebird
TO. ALL GENERAL MOTORS DEALERS
# THIS BULLETIN CANCELS AND SUPERSEDES CAMPAIGN BULLETIN 0A15 ISSUED JULY, 1990. THE DEFECT INVOLVED, PARTS INFORMATION, SERVICE PROCEDURE AND CLAIM INFORMATION SECTIONS HAVE BEEN REVISED. ADDITIONALLY, A SPECIAL TOOLS SECTION HAS BEEN ADDED. ALL COPIES OF THE ORIGINAL BULLETIN SHOULD BE DESTROYED. REVISED INFORMATION IS SHOWN IN BOLD TYPE AND DENOTED BY A # SIGN.
DEFECT INVOLVED:
General Motors of Canada has determined that a defect which relates to motor vehicle safety exists in some 1984-90 Chevrolet Camaro and Pontiac Firebird model vehicles. Some seat belt buckle assemblies in affected vehicles may not latch, or may not release, due to fracture of the red push button which can occur during seat belt connection or disconnection. These buckle malfunctions would prevent a person from using their seat belt system and the risk of injury to an unbelted person in an accident would be increased.
# To correct this condition, all involved vehicles will have the pushbutton assemblies replaced and have a protector shield added (except for certain 1989 and all 1990 vehicles which have revised lower cover ramps and as a result do not need protectors). Also, any buckle assemblies which are found not to function correctly, or which have fractured pushbuttons, will be replaced.
VEHICLES INVOLVED:
Involved are 1984-90 Chevrolet Camaro and Pontiac Firebird model vehicles built within the following VIN breakpoints:
CHEVROLET AND PONTIAC
YEAR MODEL PLANT FROM THROUGH
1984 F Van Nuys (L) SOP EOP 1984 F Norwood (N) SOP EOP 1985 F Van Nuys (L) SOP EOP 1985 F Norwood (N) SOP EOP 1986 F Van Nuys (L) SOP EOP 1986 F Norwood (N) SOP EOP 1987 F Van Nuys (L) SOP EOP 1987 F Norwood (N) SOP EOP 1988 F Van Nuys (L) SOP EOP 1989 F Van Nuys (L) SOP EOP 1990 F Van Nuys (L) SOP EOP
Involved vehicles have been identified by Vehicle Identification Number Computer Listings. Computer listings contain the complete Vehicle Identification Number, owner name and address data, and will be furnished to involved dealers as owner notifications (by model year) of this revised recall action begins. Owner name and address data furnished will enable dealers to follow-up with owners involved in this campaign.
DEALER CAMPAIGN RESPONSIBILITY:
Dealers are to perform this campaign on all involved vehicles at no charge to owners, regardless of kilometres traveled, age of vehicle, or ownership, from this time forward. Whenever a vehicle subject to this campaign is taken into your new or used vehicle inventory, or it is in your dealership for service, you are to ensure the campaign correction has been made before selling or releasing the vehicle.
Owners of vehicles recently sold from your new vehicle inventory are to be contacted by the dealer, and arrangements made to make the required modification according to instructions contained in this bulletin.
CAMPAIGN PROCEDURE:
Refer to Section 4 of the Service Policies and Procedures Manual for the detailed procedure on handling Product Campaigns. Dealers are requested to complete the campaign on all transfers as soon as possible.
OWNER NOTIFICATION:
Owners of record at the time of campaign release are shown on the attached computer listing and have been notified by first class mail from General Motors. The listings provided are for campaign activity only and should not be used for any other purpose. This second mailing to owners will be scheduled as parts become available.
PARTS INFORMATION:
Parts required to complete this campaign should be ordered through regular channels, as follows:
PART NUMBER DESCRIPTION QUANTITY/VEHICLE ----------- --------------- ----------------- 14097930 Push Button Kit 1
Each Kit Includes: 4 - Push Buttons 4 - Button Springs 4 - Protector Shields
For those vehicles which experience pushbutton fractures, dealers will need to order individual buckle assemblies as listed below. Note that 1984 vehicles with fractured brown or charcoal buckle assemblies must have all four (4) seat belt buckle assemblies replaced with black seat belt buckle assemblies due to colour availability.
DEALERS ARE TO RETURN ALL SERVICE INVENTORY OF PART NUMBERS 12507818 THROUGH 12507829 AND 12507997. PLEASE USE A SEPARATE GMP 83 AS A PACKING SLIP AND RETURN PREPAID TO YOUR SERVICING PDC. USE "SPECIAL RETURN" AS THE REASON FOR RETURN ON THE GMP 83.
Seat Belt Buckle Assemblies:
Determine proper buckle colour to order from the chart below:
Interior Colour Is: Replacement Part: --------------------- ----------------------------- 1984 VEHICLES Charcoal Black (Replace All Belts) Blue Dk. Royal Blue Tan Lt. Saddle Lt. Gray Lt.Sand Gray Brown Black (Replace All Belts)
1985-87 VEHICLES Black Black Tan Lt. Saddle Gray Med. Dk. Gray Red Dk. Carmine Brown Russet
1988-89 VEHICLES Black Black Tan Beachwood Gray Med. Dk. Gray Red Dk. Carmine
1990 VEHICLES Black Black Tan Beachwood Gray Med. Dk. Gray Red Flame Red
ORDERING SPECIFICATIONS
Model Quantity/ Part Number Description Years Vehicle ----------- ------------- ------- --------- *** BLACK ***
(For 1984 vehicles with brown or charcoal buckle assemblies in which a red pushbutton has fractured, all four (4) seat belt buckle assemblies must be replaced with black seat belt buckle assemblies.
12504429 Left Front Buckle Assm. 1984-90 As Required 12504428 Right Front Buckle Assm. 1984-90 As Required 12504424 Rear Buckle Assm. 1984-88 As Required 12504436 Rear Buckle Assm. 1989-90 As Required ---------------------------------------------------------------------------- *** MED. DARK GRAY ***
12504435 Left Front Buckle Assm. 1985-90 As Required 12504434 Right Front Buckle Assm. 1985-90 As Required 12504426 Rear Buckle Assm. 1985-88 As Required 12504439 Rear Buckle Assm. 1989-90 As Required ---------------------------------------------------------------------------- *** LT. SADDLE ***
12504417 Left Front Buckle Assm. 1984-87 As Required 12504416 Right Front Buckle Assm. 1984-87 As Required 12504421 Rear Buckle Assm. 1984-87 As Required ---------------------------------------------------------------------------- *** DK. CARMINE ***
12504415 Left Front Buckle Assm. 1985-89 As Required 12504414 Right Front Buckle Assm. 1985-89 As Required 12504425 Rear Buckle Assm. 1985-88 As Required 12504427 Rear Buckle Assm. 1989 As Required ---------------------------------------------------------------------------- Model Quantity/ Part Number Description Years Vehicle ----------- ------------ ----- -------- *** DK. ROYAL BLUE ***
12504407 Left Front Buckle Assm. 1984 As Required 12504406 Right Front Buckle Assm. 1984 As Required 12507476 Rear Buckle Assm. 1984 As Required ---------------------------------------------------------------------------- *** LT. SAND GRAY ***
12504409 Left Front Buckle Assm. 1984 As Required 12504408 Right Front Buckle Assm. 1984 As Required 12507477 Rear Buckle Assm. 1984 As Required ---------------------------------------------------------------------------- *** RUSSET ***
12504419 Left Front Buckle Assm. 1985-86 As Required 12504418 Right Front Buckle Assm. 1985-86 As Required 12504422 Rear Buckle Assm. 1985-86 As Required ---------------------------------------------------------------------------- *** BEACHWOOD ***
12504431 Left Front Buckle Assm. 1988-90 As Required 12504430 Right Front Buckle Assm. 1988-90 As Required 12504423 Rear Buckle Assm. 1988 As Required 12504437 Rear Buckle Assm. 1989-90 As Required ---------------------------------------------------------------------------- *** FLAME RED ***
12504433 Left Front Buckle Assm. 1990 As Required 12504432 Right Front Buckle Assm. 1990 As Required 12504438 Rear Buckle Assm. 1990 As Required
SPECIAL TOOL KIT AND INSTRUCTIONAL VIDEO
Each dealer will be shipped a Pushbutton Removal Tool Kit, J-38886, and an instructional video tape for this campaign. This package is being furnished at no charge to dealers and will be mailed out to dealers during the week of March 4, 1991. Each package will be identified with Campaign Number 0A15'A'.
Each J-38886 Kit will contain:
TOOL NUMBER QUANTITY/VEHICLE DESCRIPTION ----------- -------------- -------------------- J-38886-1 1 Pushbutton Removal Tool J-38886-2 1 Spring Installation Tool
Additional tools, if required, may be purchased by contacting the Kent-Moore Tool Company.
The instructional video tape included in this package demonstrates the service procedure described on the following pages. Mechanics should be certain to view this video tape before attempting to perform the service procedure.
PARTS AND LABOUR CLAIM INFORMATION:
Credit for the campaign work performed will be paid upon receipt of a properly completed campaign claim card or DCS transmission in accordance with the following:
Repair Code Description Time Allowance ----------- ---------------------------------- ------------- 2A Install Push Button Kit on 4 Buckles .4
3A Install Push Button Kit on 3 Buckles/ .5 Replace 1 Buckle
4A Install Push Button Kit on 2 Buckles/ .5 Replace 2 Buckles 5A Install Push Button Kit on 1 Buckle/ .5 Replace 3 Buckles 6A Replace all 4 buckles .5
T1605 Owner Reimbursement on previous repairs
Time allowance includes 0.1 hour for dealer administrative detail associated with this campaign. Parts credit will be based on dealer net plus 30% to cover parts handling.
REIMBURSEMENTS
Claims for customer reimbursements on previously paid repairs to correct a previous seat belt buckle condition will be considered. Owners should present documentation which reasonably confirms the amount of unreimbursed repair expense, a description of the repair, the date of the repair, and the person or entity performing the repair.
Review the owner's documentation, and process under Repair Code T1605 (authorization is required).
# SERVICE PROCEDURE: ----------------------- This procedure must be performed on all 4 buckle assemblies to complete the campaign.
1. Inspect all 4 buckle assemblies for the following:
* Improper Function - Fasten seat belt by inserting latchplate into buckle. Pull on belt webbing to insure proper latching. Release latch. Repeat five times for each buckle to insure proper operation.
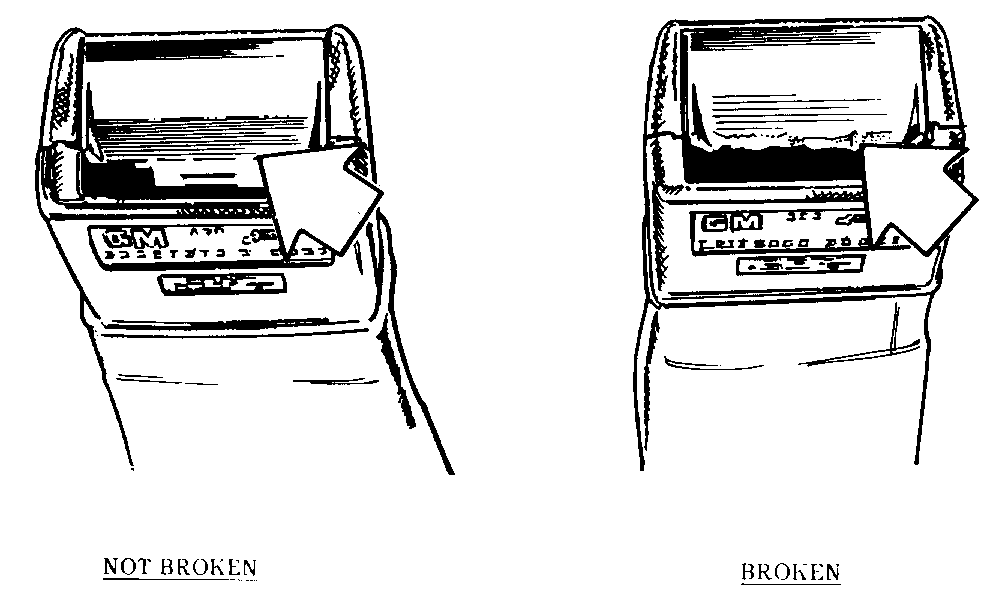
* Missing Or Fractured Red Pushbutton - Figure #1 below illustrates a typical fracture.
If the buckle does not function correctly, or if the red pushbutton is broken, replacement of that buckle is required - see Body Service Manual for procedure (seat belt section).
NOTE THAT ON 1984 VEHICLES WITH BROWN OR CHARCOAL BUCKLE ASSEMBLIES, IF A PUSHBUTTON DOES NOT FUNCTION PROPERLY, OR IT IS BROKEN, ALL OF THE BUCKLE ASSEMBLIES MUST BE REPLACED WITH BLACK BUCKLE ASSEMBLIES DUE TO COLOUR AVAILABILITY.
If the pushbutton is not broken, and the buckle functions properly, continue on to step 2. BE CERTAIN TO CHECK ALL BUCKLES.
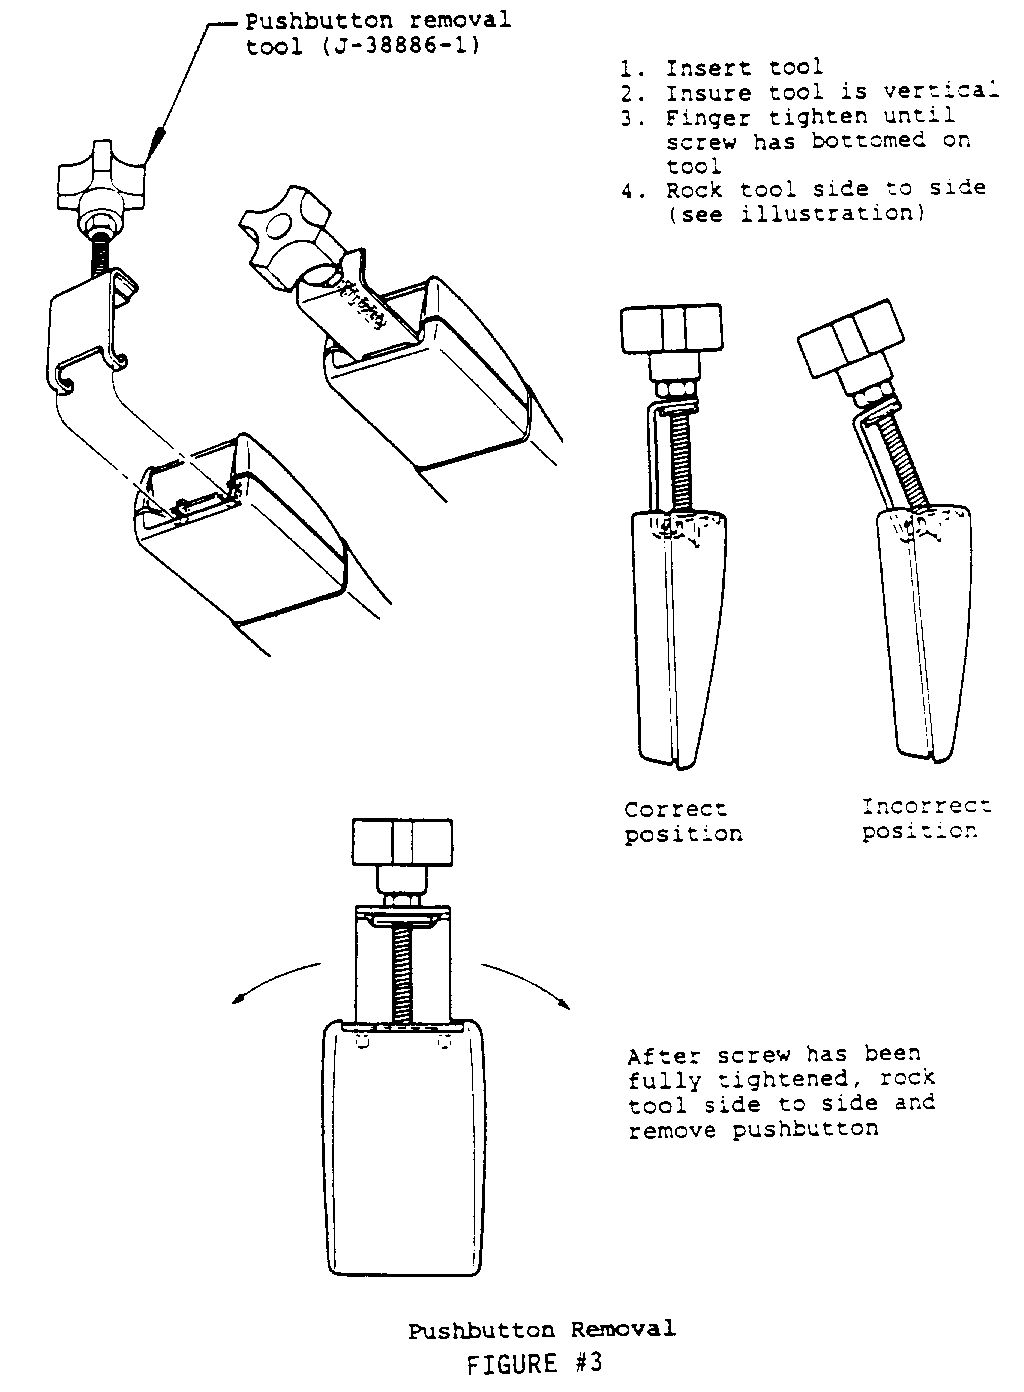
2. Remove pushbutton by inserting pushbutton removal tool (J-38886-1) under the edge of the pushbutton in a horizontal position and then rotate tool to a vertical position. See Figure #3.
NOTICE: Screw tip must be backed out towards top of tool to allow proper clearance for tool insertion.
Finger tighten screw until the screw head has bottomed out on the tool. Be certain to keep tool as vertical as possible.
NOTICE: Pushbutton may fracture at this time - this is acceptable.
Gently rock the tool in a side-to-side motion as shown in Figure #3 on the next page to dislodge the pushbutton cap. DO NOT PRY TOOL ON EDGE OF BUCKLE.
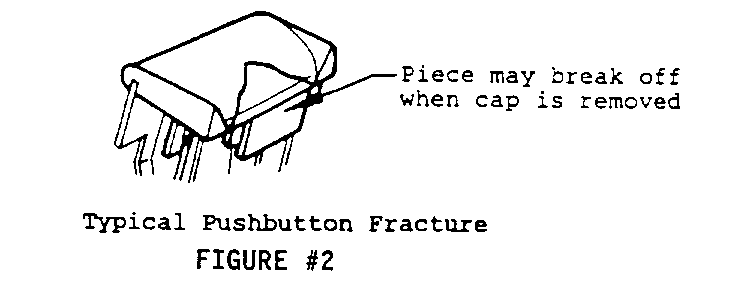
3. Inspect the just removed pushbutton for any fractures. Figure #2 below illustrates a typical pushbutton fracture.
* If pushbutton is not fractured, continue to step 4.
* If pushbutton is fractured, locate the fractured piece and insure that it is not in the buckle mechanism as it may interfere with buckle operation when reassembled. Continue on to step 4 when this is completed.
4. Discard removed pushbutton (and any fractured pieces).
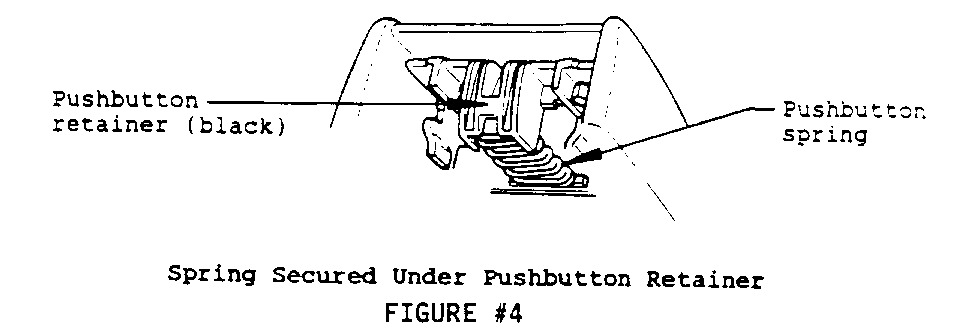
5. Inspect pushbutton spring inside buckle to determine if it is still secured under the pushbutton retainer (black). See Figure #4.
* If pushbutton spring is secure, continue to step 6.
***************************************************************************** REFER TO FIGURE #3: 1. Insert tool. 2. Insure tool is vertical. 3. Finger tighten until screw has bottomed on tool. 4. Rock tool side to side (See Illustration).
Pushbutton Removal (figure #3)
After screw has been fully tightened, rock tool side to side and remove pushbutton. *****************************************************************************
* If the spring is not secure, reposition the original spring (or install replacement spring if the original was lost or damaged in the removal of the pushbutton cap) using the spring installation tool (J-38886-2).
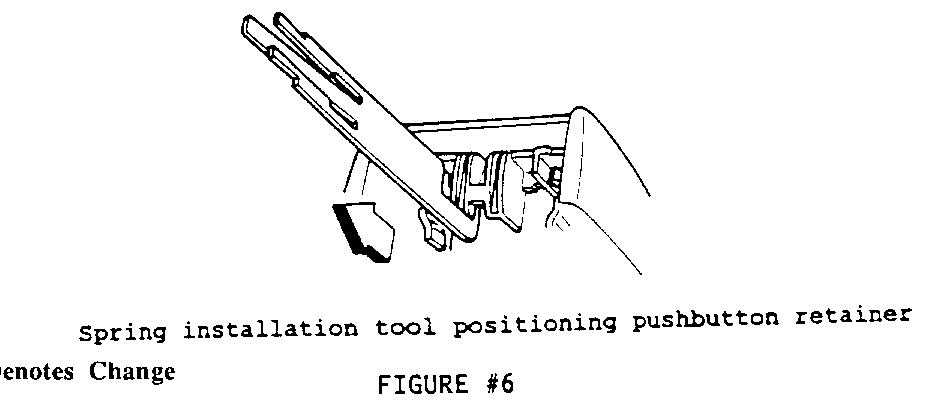
Install the pushbutton spring on the spring installation tool as illustrated below in Figure #5.
NOTICE: The opposite end of the spring installation tool may be used as a hook, if necessary, to aid in positioning the pushbutton retainer (black) - see Figure #6 below.
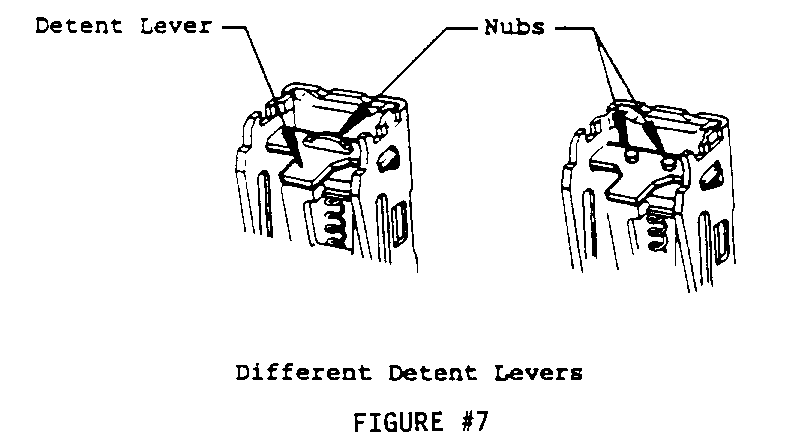
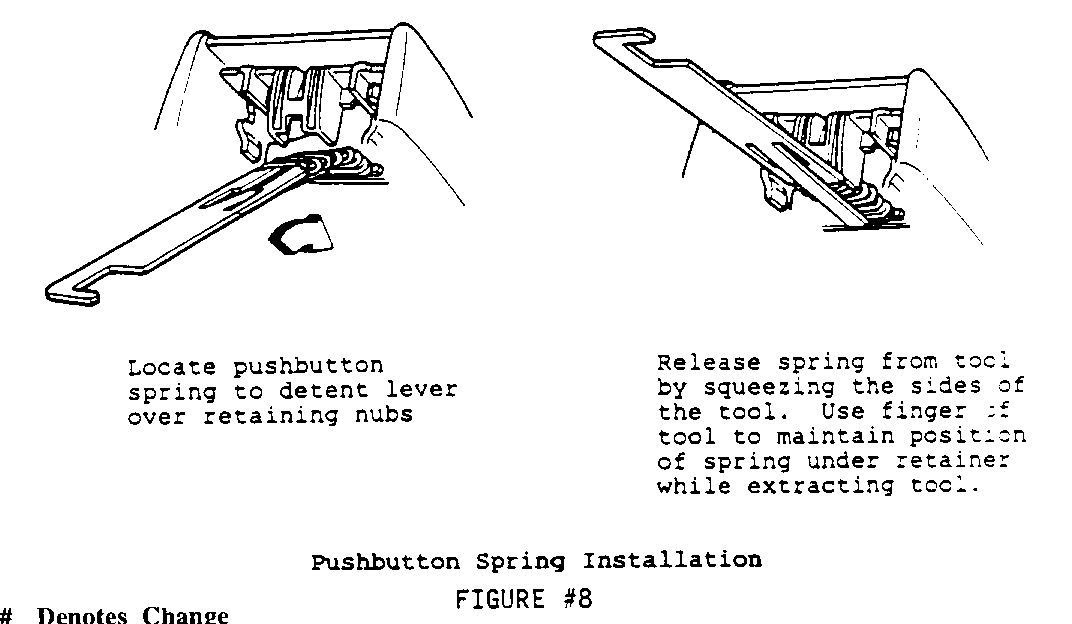
Install the pushbutton spring on the detent lever. Note that there are two different detent lever designs using either one or two retaining nubs - Figure #7. The pushbutton spring must be positioned over the retaining nub(s) on the detent lever and secured under the pushbutton - Figure #8.
***************************************************************************** FIGURE #7 Different Detent Levers --------- Position spring under pushbutton retainer
FIGURE #8 Pushbutton Spring Installation ---------- - Locate pushbutton spring to detent lever over retaining nubs
- Release spring from tool by squeezing the sides of the tool. Use finger of tool to maintain position of spring under retainer while extracting tool. *****************************************************************************
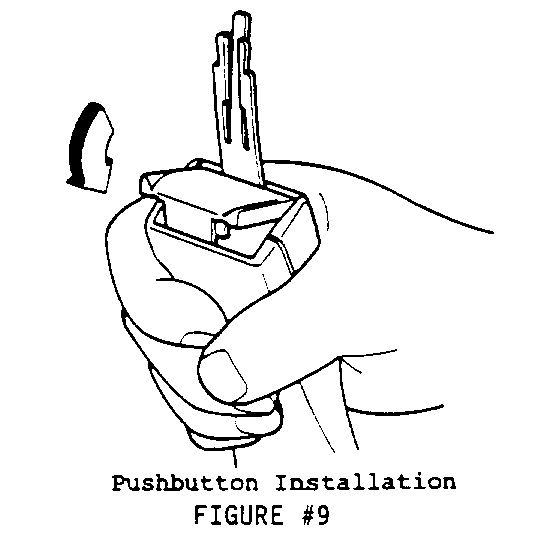
6. Install a new pushbutton from the service kit by inserting spring installation tool between buckle cover and pushbutton retainer to move the button away from the cover - see Figure #9. Locate new red pushbutton to the pushbutton retainer and push into position until an audible 'CLICK' is heard. Remove the tool from the buckle assembly.
NOTICE: Pushbutton should now move up and down freely. If it does not, repeat steps 2-6 to remove and reinstall pushbutton.
7. Buckle protector installation.
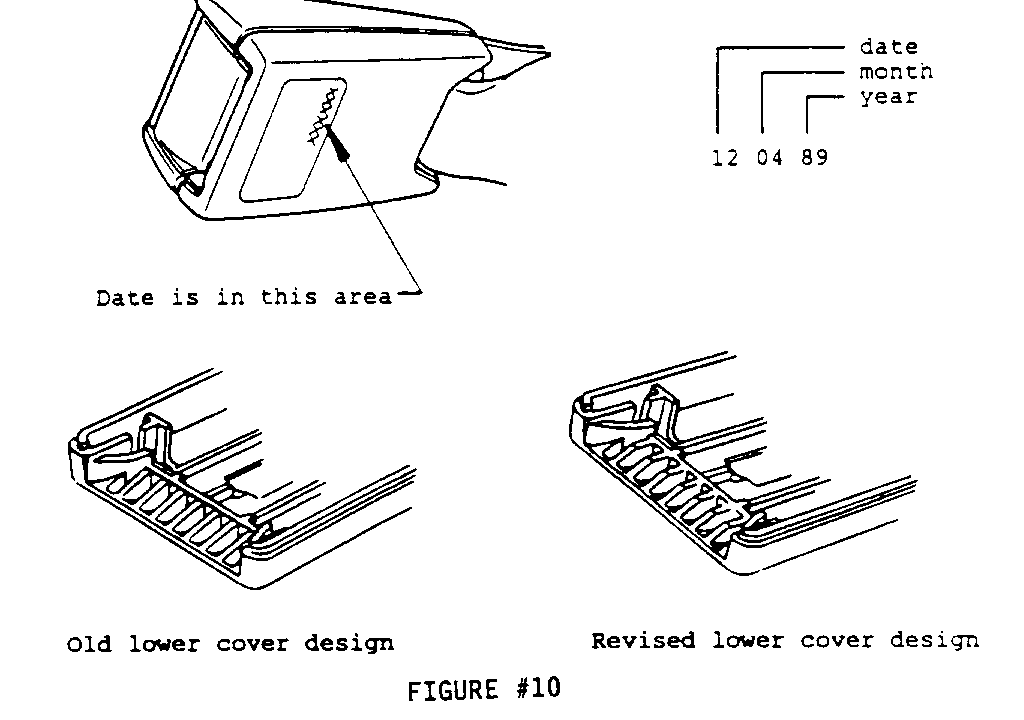
NOTICE: Buckles in some 1989 vehicles and buckles in all 1990 model year vehicles will not require the installation of buckle protectors. To determine if protectors are needed on 1989 vehicle buckles, note the assembly date stamp on the lower cover - Figure #10 on next page. If the stamp on the buckle is after 120489 (April 12, 1989), it will not require a protector. These buckles have revised lower cover ramps and do not need an additional protector.
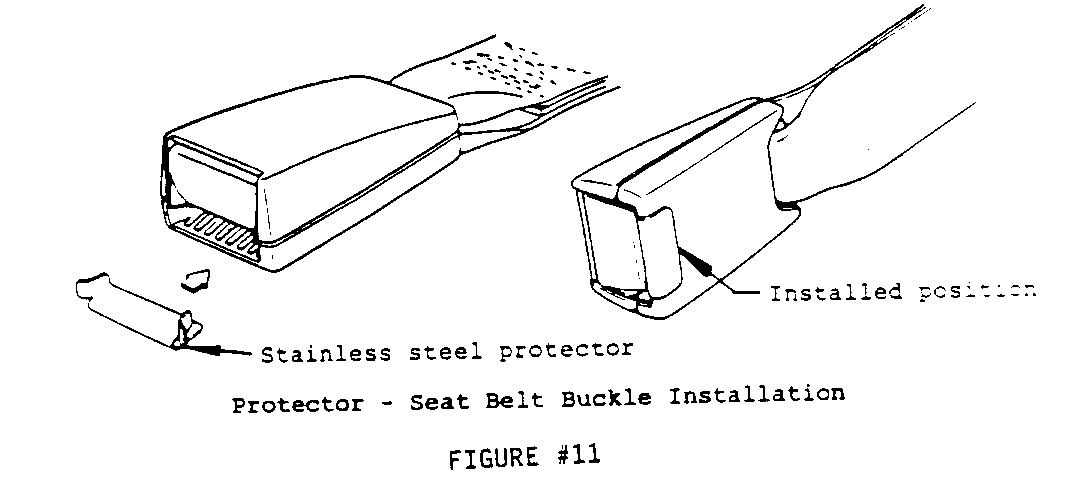
After determining if a vehicle requires protectors, position stainless steel protector onto buckle lower cover - Figure #11. Push steel protector onto cover until it snaps securely.
8. Perform final inspection of safety belt by inserting the latchplate into the buckle and pulling on the safety belt webbing to insure proper latching. Unlatch and repeat this step five times to assure proper operation.
9. Install Campaign Identification Label.
INSTALLATION OF CAMPAIGN IDENTIFICATION LABEL
Clean surface of radiator upper mounting panel and apply a Campaign Identification Label. Make sure the correct campaign number is inserted on the label. This will indicate that the campaign has been completed.
Dear General Motors Customer:
As we informed you in our previous letter, General Motors of Canada has determined that a defect which relates to motor vehicle safety exists in certain 1984-90 Chevrolet Camaro and Pontiac Firebird model vehicles. Some seat belt buckle assemblies in these vehicles may not latch, or may not release, due to fracture of the red pushbutton which can occur during seat belt connection or disconnection. These buckle malfunctions would prevent a person from using his seat belt system, and the risk of injury to an unbelted person in an accident would be increased.
In our previous letter, we made replacement of all vehicle seat belt buckle assemblies available to those owners who were currently experiencing any of the above conditions. However, since our last contact, General Motors has developed a preventative repair for those vehicles which have not experienced a pushbutton fracture or have not had all seat belt buckles replaced. If you had your seat belt buckle replaced following receipt of our previous letter this current letter does not apply to you.
To prevent the possibility of a pushbutton fracture condition occurring, your GM dealer will replace all pushbutton assemblies and install protector shields to the buckle assemblies (except for certain 1989 and all 1990 vehicles which do not need protectors). Also, any buckle assemblies which are found to have fractured buttons will be replaced.
This service will be performed for you at no charge.
Please contact your GM dealer as soon as possible to arrange a service date so that the dealer may order the proper parts to perform this repair. You may also make arrangements to have the vehicle towed to the dealer if the driver-side buckle is inoperative.
This letter identifies your vehicle. Presentation of this letter to your dealer will assist their Service personnel in completing the necessary correction to your vehicle in the shortest possible time.
Further assistance, if required, may be obtained from our Customer Assistance Centre, toll free, by calling 1-800-263-3777, or if you live in Quebec, 1-800-263-7854.
We are sorry to cause you this inconvenience; however, we have taken this action in the interest of your continued satisfaction with our products.

General Motors bulletins are intended for use by professional technicians, not a "do-it-yourselfer". They are written to inform those technicians of conditions that may occur on some vehicles, or to provide information that could assist in the proper service of a vehicle. Properly trained technicians have the equipment, tools, safety instructions and know-how to do a job properly and safely. If a condition is described, do not assume that the bulletin applies to your vehicle, or that your vehicle will have that condition. See a General Motors dealer servicing your brand of General Motors vehicle for information on whether your vehicle may benefit from the information.
